Recommendations from the pros!
Accessories for a bath Do-it-yourself gazebo Concrete fence Do-it-yourself potbelly stove Do-it-yourself veranda Screw foundation Do-it-yourself country toilet Decorative brick Stone fence Pouring a foundation How to make a fence Wicket from corrugated sheets Do-it-yourself fireplace Brick fence Do-it-yourself flower beds Forged gates Do-it-yourself porch Pool for a bathhouse Chicken coop do it yourself DIY staircase Metal gates Installation of lining Installation of polycarbonate Pump for a summer house Arrangement of a garage Fences for flower beds Do-it-yourself blind area Steam room in a bathhouse Railings for stairs Do-it-yourself cellar Painting walls Press with your own hands Grilles on windows Rolling gates Do-it-yourself barn Alarm system for a summer residence Benches for a summer residence Fence posts Floor screed Solid fuel boilers DIY greenhouse Fence installation House insulation Attic insulation Foundation insulation
Preparing to start work
Before making a gable roof, you will need to select materials. Installation begins with the selection of wood. To build a reliable structure with your own hands that is resistant to external factors, you will need to follow the following recommendations:
For construction, it is better to choose first or second grade coniferous species
- It would be right to choose softwood materials (spruce, pine, larch are more resistant to rotting);
- the structure is assembled from wood of the first or second grade, the use of the third for critical elements is unacceptable;
- it is better to choose those lumber that are produced in the northern regions; the more complex the growing conditions of the tree, the denser its structure;
- they try to choose the material that was cut down at the end of the cold period of the year (February-March).
Next, you should select the section of the rafter leg. It depends on the following points:
- load from snow cover (snow region);
- weight of the roof covering;
- rafter pitch;
- span (distance between reference points);
- insulation thickness.
Table of average values of rafter legs
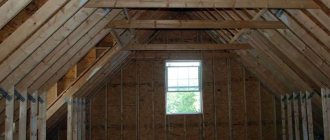
A thermal insulation layer is required when designing a living space - an attic - in the under-roof space of a house. Most often, do-it-yourself installation of mineral wool material is done to improve the thermal insulation characteristics
In this case, it is important to provide a ventilation gap between the heat insulator and the roofing. The height of the rafter leg should not be less than the thickness of the insulation
To increase the clearance, a system element such as a counter-lattice is introduced - a block that is nailed parallel to the rafter and increases its height.
This allows you to correctly install mineral wool slabs without trimming or additional elements. For such a step, the following recommendations for the cross-section depending on the span can be given:
- span 3 m – rafter size 40x150 mm;
- 4 m – 50x150 mm;
- 5 m – 50x175 mm;
- 6 m – 50x200 mm.
It is important to know the following: load-bearing capacity and bending resistance are more affected by height than width. If necessary, increase the load-bearing capacity by increasing the height more efficiently
Another element whose cross-section will need to be selected is the sheathing. The most optimal value would be a thickness of 32 mm. With increased load, the value is increased to 40 mm.
The remaining components of the house's rafter system are assigned structurally, based on what lumber is available. But it is still worth taking into account the strength requirements.
Immediately after purchasing the material, before assembling the system begins, you will need to treat all the elements with special compounds yourself.
A gable roof, like any other roof of a house, needs the following types of protection:
- antiseptic, carried out without fail, helps prevent the processes of decay and the occurrence of mold and mildew (even if installation is not planned some time after purchasing the wood, the treatment is carried out immediately);
- fire retardant, optional, but very important, it increases the wood’s ability to resist fire, thereby increasing the safety of the structure.
Design
There are three options for developing drawings:
- Free projects on the Internet. Lack of versatility. The roof section in the drawing is made without taking into account the features of a particular structure.
- Professional development.
- Independent drawing development. You can use Internet programs that can be used to plan the roof.
Independent work begins with drawing up a sketch. The design is chosen depending on the outline of the building. It is necessary to determine the shape and geometry of the roof. They stop separately on the roof slope. Choose the color and quality of roofing materials. Based on the decisions made, a sketch is drawn up. At this stage you can look and evaluate the general appearance of the house.
When drawing up a drawing, take into account the following points:
- Climate features in the construction area;
- Wind load;
- Quality, specific gravity of the selected roofing material;
- Tilt angle.
For country houses, drawings of pitched roofs with wooden rafters and sheathing are often chosen. The choice of inclination angle depends on the location of the construction area.
The minimum slope is determined by the roofing material:
- 14 - for steel;
- 27 - for tiles;
- 18 - for corrugated asbestos-cement sheets or slate.
With high snow cover, the slope in the drawing should be at least 30 degrees.
Select a drainage system. It comes in 2 types:
- Organized;
- Disorganized.
With organized drainage, the cross-sectional area of pipelines for water drainage is calculated taking into account 1-1.5 square meters. cm per 1 sq. m of surface. The distance between drainpipes is 15-20 m.
The size of the protruding length of the cornice must be at least 0.3 m with an organized drainage system. The removal of the cornice with unorganized drainage is from 0.5 m.
The roof truss system of a house is selected depending on the size of the building and the presence of internal load-bearing walls. If they are present, they stop on the inclined rafters. The rafter legs rest on the outer walls with one end, and on the ridge girder with the other.
In their absence, the choice is made in favor of hanging rafters. They rest on the wall on one side, and on the rafters of the opposite side on the other.
After calculating the expected load on the roof, the cross-section of lumber is selected. To prevent the appearance of condensation, the drawings provide for through ventilation through dormer windows.
The lathing is calculated taking into account what material will be used for the roof and its angle of inclination. For a soft roof, a continuous roof is used; for a sheet roof, a regular one with intervals is sufficient.
After the calculations, they begin to draw up a drawing of the roof. Particular attention is paid to the development of all structural parts, elements, and their connection with each other.
You will be interested in: How to make a drawing of a hipped hip roof yourself and make all the calculations when designing
Based on the drawings, an estimate is drawn up, which includes all the materials necessary for the construction of the roof. Determine the total cost of the work.
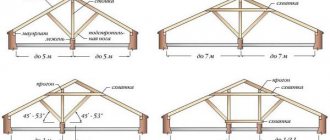
How to choose the type of rafter system for a 4-pitched roof?
In the absence of a central roof support, the choice is made in favor of a hanging rafter system. If you can find upper and lower supports for each rafter, then you should choose a layered structure. This option is simpler and more accessible for non-professional craftsmen. You just need to remember two main conditions: when rigidly fastening the bottom and top of the stops, a reinforced Mauerlat is needed, since the thrust is transferred to it; with a hinged fastening or a semi-rigid connection (for example, the top is hinged and the bottom is rigid or vice versa), the Mauerlat does not need to be reinforced:
The choice of one type of hip roof should be determined by the shape of the house itself. For square houses, hip rafters are erected, for rectangular ones - hip rafters. Also, you can find complex multi-pitched roofs of a combined type, which contain both hip and hip elements.
Both hip and hipped structures retain the basic functions of a gable roof (for example, the possibility of arranging an attic) and look very aesthetically pleasing:
Knots of the rafter system of a gable roof
We have already discussed the main types of connections in the nodes of the load-bearing roof structure above. But it makes sense to dwell in more detail on the auxiliary materials that make the rafter system more reliable and durable.
You can strengthen the fastening of parts when installing the rafter system using metal plates and corners of various shapes
Such products are made from galvanized steel up to 1.5 mm thick. They have different configurations and can be installed on any type of connection.
Photo gallery: types of connections in the nodes of the rafter system of a gable roof
All connecting nodes of the rafter system serve the function of strengthening the rafters by redistributing loads and strengthening the load-bearing elements. So, in the lower part, the rafter is supported on the mauerlat at a right angle, for which appropriate inserts are made.
To strengthen the rafter system, they try to use connections with maximum load-bearing capacity, for example, inserting rafters into the mauerlat at a right angle
In addition, metal mounting plates are used at the docking points for additional reinforcement. The same principle is used when installing struts to the rafters. In any case, the mating parts must work “steadily” and not move during operation.
Any parts must be loaded along their axis
There are three main types of nodes in the rafter system:
- Ridge connections. This is the joining of two rafter legs at a given angle along the line of intersection of the slopes. They can be hinged or blind. The former are used when constructing a rafter system on timber or log houses, which tend to sag and rise depending on the season during almost the entire period of operation. Blind connections are used in rafter systems of houses made of building stone. In such buildings, a reinforced belt is installed on top of the wall, which takes on lateral loads.
- Fastening the lower ends of the rafter legs to the Mauerlat. Since they are located at an angle to the support beam, a sliding vector is created, directed towards the outside of the building. To compensate for this, a cut-in is made in the mauerlat, and a heel is made on the rafters. The rafter is inserted into the groove with emphasis on it and fastened with a nail through the rib of the beam into the mauerlat. Additional supporting parts made of bars are also used. In cases where the rafter beam must move (on wooden log houses), sliding fasteners are used. They make it possible to compensate for seasonal changes in wall height.
- Other nodes. All other parts of rafter systems are essentially thrust elements that work in compression, rarely in tension. They are installed by cutting into the mating parts to prevent them from moving under load. Such parts include crossbars, struts, racks, stops and other similar parts.
For a more durable connection, the additional elements mentioned above are used.
How to make a gable roof: step-by-step instructions with photos
The work includes several stages:
- preparation;
- installation of a rafter system;
- laying hydro-, heat- and vapor barriers;
- installation of roofing material.
Lumber must be well dried. They are stored in stacks under a canopy or covered with film or tarpaulin in bad weather.
Preparation
If the walls are made of piece materials - blocks, bricks - it is recommended to install a reinforced concrete belt around the perimeter of the building. This will allow you to assemble the structure together and level the surface for laying the Mauerlat.
At the same stage, studs with a cross section of 10 mm made of galvanized steel are embedded in the fresh solution. You need to start from the corners, the laying step is 60 cm. Subsequently, the Mauerlat will be placed on them and secured with nuts.
To prevent contact between wood and concrete, waterproofing is installed - the surface of the reinforced belt is coated with hot bitumen and covered with 2 layers of roofing material.
Laying the Mauerlat
Holes are drilled in the timber in those places where the studs protrude from the walls. The Mauerlat is laid on the surface of the wall closer to its inner side to avoid demolition during strong winds.
The bars need to be aligned horizontally. You can insert spacers or trim off protruding parts.
It is allowed to lay the Mauerlat not entirely on the wall, but in separate segments directly under the rafters. For brick or concrete walls, fastening with metal plates, wooden plugs and brackets, and curved reinforcement is additionally used.
The length of the beam is joined with an oblique or straight lock. Corner joints are sawed into place and secured to the wall with anchors (studs).
Installation of ridge beams
At the highest points of the roof, a purlin is laid, which is attached to the posts and beams with metal corners and plates. The pitch of the racks is 3-5 m.
You can change the sequence and start by installing rafters at the ends of the building, but then you will have to secure each pair of beams with braces or boards. In the case where there is a ready-made run, the assembly proceeds faster and with better quality.
Installation of ridge beams
Installation of rafters
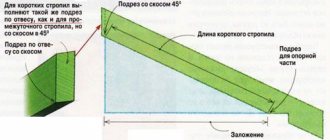
It is better to prepare rafters using a template. A groove is cut in the lower part to rest on the Mauerlat. The depth of the cut is no more than 1/3 of the width of the board.
2 types of fastening rafters to the Mauerlat
If lumber has to be spliced for rafters, an overlapping or overlay joint is used. It is recommended to make the joint at a distance of at least 1 m from the support points, preferably at about 1/3 of the rafter length. It is impossible to connect the boards in the center, since the maximum bending moment acts in the middle, and the beam can bend at the weakest point.
The assembly of the rafters begins from the gables. First, the first and last fragments are set, then the cord is pulled and markings are made. The studs should not fall into the support areas, so as not to create problems with cutting. Read in detail about attaching rafters to the mauerlat in a separate article.
The rafters are secured to adjacent elements using stops, struts and ties. It is important to firmly fix the system in space.
Fastening the sheathing
The base for laying the roofing covering is made of boards, slats, OSB boards or moisture-resistant plywood. The choice of material depends on the type of coating:
- for metal tiles - boards with a pitch of 35-45 cm, equal to the length of the transverse wave;
- flexible tiles, ondulin, roll roofing - continuous flooring;
- asbestos-cement slate - lathing in increments of 450-750 depending on the angle of inclination.
Boards or slats are laid perpendicular to the rafters. At each fastening point they are screwed with two self-tapping screws. The lathing additionally gives the rafter system rigidity and stability.
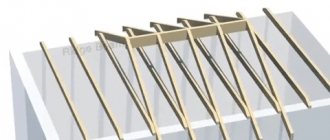
Construction of a four-slope rafter system
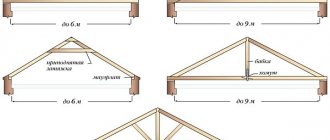
The four-slope rafter structure consists of the following elements: mauerlat, ridge beam, central and hip rafters, slanted legs, as well as beds, racks, crossbars, struts and other reinforcing parts. Let's look at the most basic elements.
I. Mauerlat
The Mauerlat is the most important part of the structure, since the entire rafter system rests on it. It is a powerful wooden beam 100x200, 100x250, 100x100, 150x250, 200x200 cm. The mauerlat is made from solid high-quality wood, mainly coniferous. The rafter system of a hip roof, like any multi-pitched roof, requires thorough fastening of the base beam. The procedure for installing the Mauerlat in this case: the formation of a monolithic foundation at the end of the load-bearing walls with the installation of spiers; laying waterproofing; processing and installation of Mauerlat around the perimeter of the entire house; reinforced with anchors and other fastenings for maximum reliability of the base.
We advise you to study - How to choose the right toilet? price, models, varieties and our tips for choosing a toilet
The Mauerlat can be laid on the edge of the wall, or in the pocket provided when laying bricks on the inside of the load-bearing walls.
II. Sloping legs
Sloping legs are the four corner rafters that rest on the edges of the ridge and the corners of the mauerlat. They are the longest among all the rafter legs of the system, therefore they must have a cross-section of at least 100x150 mm for maximum rigidity.
III. Ridge beam
Ridge purlin is a horizontal beam that connects all the rafters, the top of the rafter system. The beam must be strengthened with racks and struts. The ridge must be positioned strictly parallel to the plane of the attic floor and perpendicular to the racks.
IV. Rafters
Rafters for a hipped roof are divided into: central (attached to the mauerlat and ridge); main hip ones (attached to the ridge axis and Mauerlat); intermediate and shortened (installed on sloping legs and Mauerlat, connecting the corners of the slopes).
V. Strengthening elements
Additional reinforcing elements include ridge beam posts, crossbars or floor beams, rafter struts, wind beams, etc.
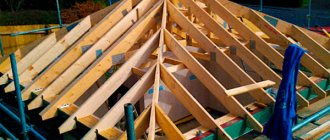
How to assemble a rafter system?
Finally, the rafters are ready, and you can start installing them.
So, in reality, everything is quite simple and somewhat similar to a children's construction set. The easiest and most convenient way is to make trusses directly on the ground, and only then raise them. It is a little more difficult to assemble the rafters directly on the roof, but it is easier to lift them there. This is where you start: if you have the opportunity (a crane, for example) to drag 200 kg of one truss onto the roof - drag it, if not - lift each individual rafter 50 kg using improvised means and do the assembly on the spot.
So, first of all, for convenience, make a template according to which you will assemble the roof trusses, and another template for mounting cuts on the rafters (use plywood). All you have to do is cut out mounting cuts on the rafters, attaching a template, and connect them together at a certain angle. This triangle is called a roof truss.
If the thickness or length of the board is not enough to make a normal rafter leg, extend the rafters. And there are several ways:
- Connect the boards together by folding them with their wide sides and stitching them with nails.
- Lay the boards half the length, resulting in a particularly strong rafter leg that can withstand considerable loads.
- Make an oblique cut at the ends to create a vertical anti-slip stop, and connect with a bolt.
- Lay two overlapping boards a meter long, connecting the rafters with pins or nails.
Also keep in mind when calculating that the roof ridge accounts for about 50% of the load of the entire rafter system. Therefore, always make a ridge beam so that its safety margin is at least 25% greater than originally calculated.
And the most vulnerable parts of the rafter structures are the lower ones, those that rest on the Mauerlat.
You need to secure the rafters using:
- External straight bracket.
- Metal corner plate.
- Internal metal rod.
You can also connect such rafters with studs - this will even be stronger. To do this, instead of making a cut, we now make a cut into half the tree and connect the rafters with a ledge. Next, drill a hole for a 12-14 mm stud and secure it with nuts and wide washers.
Let's start with a review of proven old-fashioned methods:
If you decide to make roof trusses using a more reliable new technology, you will need the following tool:
Here's how they work:
In details:
When assembling a hanging type truss, you need to connect the upper ends of the rafter legs. To do this, cut the end of each at exactly the same angle at which you are making the roof, connect the beams with cut planes and secure with two nails. Cover the joint with a wooden cover or metal plate.
Another useful master class:
Already on the roof, first of all you need to start by installing those rafters that form the two outer trusses of the gable roof (they are also called gable). To further secure them, install temporary struts. Next, stretch a strong cord between the outermost peaks of the trusses, which will become a level for the intermediate rafters.
Now we lift and place all the remaining trusses at a distance of at least 0.6 meters from each other. Again, if some of your structures turn out to be quite cumbersome, support them with the same temporary supports.
The rest is a matter of technique:
Calculation of the load on the rafter system of a gable roof
The rafter system experiences certain loads, which can be divided into two types.
- Constant loads that act independently of any other factors. Their size is determined by the design of the roofing pie and consists of the weight of waterproofing and vapor barrier films, insulation, additional elements, fasteners and any other elements of the roofing covering, including the finishing one. In practice, the average weight of all components of the roof of a house is about 40–45 kg/m2. More accurately, this value can be calculated by summing up the specific load values of each material used, which can be taken from reference tables. When calculating the weight of the roof, it is recommended to provide a safety margin of 10%.
- Variable loads. These include the effects of wind and snow, depending on their intensity. In essence, the roof of a house is a sail that absorbs the load from the wind. The force of direct impact on the roof along the normal depends on the angle of inclination of the slope - the smaller it is, the lower the load. At the same time, turbulence occurs on the leeward slope, and a load appears on the roof with a reverse vector of influence. In hurricane winds, the lifting force can reach 630 kg/m2. Variable loads also include snow impacts. It should be noted that they also have clearly defined regional indicators.
Obviously, careful calculation of loads from snow and wind, taking into account local climatic conditions, is vital when choosing roofing structures and materials. These loads can be determined from a map drawn up on the basis of SNiP 2.01.07–85.
Using the map, you can determine the magnitude of wind and snow loads in the construction region
The snow and wind load values marked on the maps for each area are called standard. In order to obtain the calculated snow load, the standard value must be multiplied by a special coefficient that takes into account the angle of inclination of the roof. This coefficient is equal to:
- 1 with a slope of less than 25o;
- 0.7 at an angle of inclination from 25 to 60o;
- 0 for steeper slopes.
The design wind load is determined by multiplying the standard value by a coefficient that takes into account the height of the building and the type of area in which construction is being carried out.
| Building height, m | |||
| Zone | 5 | 5–10 | 10–20 |
| A (coasts of water bodies and other open areas, areas without forests (steppes, tundra, etc.) | 0,75 | 1 | 1,25 |
| B (areas with forests, city houses and other obstacles to the wind (including relief folds) with a height of 10 m or more) | 0,5 | 0,65 | 0,85 |
| C (densely built-up urban area in which the average building height is 25 m) | 0,4 | 0,4 | 0,55 |
The specific load of the most popular roofing materials can be taken from the following table.
Table: weight indicators of some roofing materials
| Name of roofing material | Weight 1 m2, kg |
| Prolymer-bitumen soft tiles | 7–8 |
| Roll-bitumen polymer roofs | 4–8 |
| Metal tiles | 4–6 |
| Ondulin | 3–4 |
| Profiled sheet, seam roofing | 4–6 |
| Cement-sand tiles | 40–50 |
| Ceramic tiles | 35–40 |
| Slate | 10–14 |
| Shale materials | 40–50 |
| Copper sheet materials | 8 |
It is possible to take into account the specific effects of different types of loads only in aggregate, so calculations of this nature should be entrusted to an experienced specialist.
Designing the roof of a large house
If you plan to build a large private house, then it is not recommended to use a pitched roof. If you still want to make it, you should consider having several pitched roofs. They will need to be combined and placed at an angle in different directions. If you do not want to build high walls, then the roof should not have a large slope.
From an aesthetic point of view, the best solution is to use a hip sloping roof. It must be provided with dormer and dormer windows so that the roof can be ventilated.
If you plan to make a hip sloping roof, you should take care of installing dormer windows
In such a design, you can make an attic floor, which will add usable space to the building. When placing a dormer window, care must be taken to:
- the roof angle was more than 35°;
- the dimensions of the valves ranged from 80x60 to 120x80 cm;
- the superstructure above the roof opening was removed from the outer walls a short distance.
To equip roof dormers, you can use the following facing materials:
- tiles;
- copper sheets;
- sheets of steel.
In the process of drawing up a roof project, you will need to make a separate drawing of the dormer windows. When creating a project, you need to consider the following nuances:
- the width of the opening for such a window should be more than half the width of the attic room;
- the supports must be the same thickness as the roof rafters;
- Frame elements should be secured with steel fasteners.
Video: roof dormer window project
https://youtube.com/watch?v=cKu8YMuY81I
Recommendations for self-installation of the rafter system
Installation work can begin only after carefully carried out calculations and drawing up a detailed drawing. If you do not have the proper experience for calculations, it is better to resort to special online programs. In general, working with your own hands requires a lot of responsibility.
Mounting the Mauerlat
The installation site for the timber is the entire length of the walls, which serve as support for the rafters. The function of the mauerlat in log cabins is performed by the upper crown. In houses where porous material (aerated concrete, foam concrete) was used as a construction material, it is necessary to decorate all load-bearing walls with Mauerlat (the same applies to brick buildings). Other cases allow its installation only in the spaces between the rafters.
We advise you to study - Brick wall in the interior: what to make it from and what to combine it with
Since the length of standard lumber is not enough for the entire length of installation, they are spliced. To do this, you need to cut the timber at a right angle of 90°, using bolts to fasten the two parts.
The place where the Mauerlat is laid is usually the center of the wall. Some displacement of the beam to the side is also allowed, the main thing is that its cut should not be closer than 50 mm from the edge. To protect the timber from moisture, it is recommended to lay a waterproofing layer of ordinary roofing material underneath it. The Mauerlat must be secured as securely as possible, since the roof slopes are subject to serious wind loads.
The method of fastening is affected by the material of the walls:
- monolithic houses. The best option is fixation with anchor bolts;
- wooden or log cabins - fastening with wooden dowels or brackets;
- aerated concrete, foam concrete. Typically studs or reinforcement are used;
- If the house shrinks, it is recommended to use sliding fasteners.
As an additional measure, the attachment point can be reinforced with annealed wire.
Truss assembly
There are two options for implementing this procedure. In the first option, the beam is mounted directly at the installation site. Suitable for small buildings, when working at height to take measurements and trims does not cause difficulties due to the dimensions of the rafter legs.
The second option is assembly at the bottom. In this case, the layout and fastening of the constituent elements of the rafter system take place on the ground, and then the finished structures are raised upward. As a result, work at height is reduced to a minimum and completed much faster. To feed and align rafter pairs, special mechanisms are usually required due to the significant weight of the structures.
For ease of assembly of similar elements, it is practiced to use templates made from boards. This makes it possible to obtain absolutely identical farms at the output.
Attaching to the Mauerlat
The finished pairs must be lifted to the roof surface and attached to the Mauerlat. To facilitate the procedure, the legs are equipped with special cuts at the bottom while still on the ground. The end structures are installed first: they are placed opposite each other on the pediment side. To correctly position the first two pairs, temporary ties are used. A string is stretched between the installed trusses, which serves as a guide for intermediate pairs, indicating the level of the ridge along the way. At the end of this stage, a special ridge support is installed. If necessary, the length of the rafter legs can be increased locally.
Ridge installation
To create it, it is necessary to correctly fasten all the rafter legs. There are several methods of splicing - both with and without the use of a support beam. A more modern solution is the use of special intermediate clamps made of steel with the possibility of adjustment.
Arrangement of sheathing
The purpose of the sheathing is to facilitate movement on the roof and provide a reliable base for the finishing coating. It is the characteristics of the roofing material that have a decisive influence on the parameters of the frame. Continuous sheathing is used in the case of arranging a soft roof. The frame pitch for metal tiles is approximately 35 cm, and for corrugated sheets or slate – 44 cm.
To install the gable roof rafter system, it is best to choose a fine autumn or spring day, having previously enlisted the help of 2-3 assistants.
The final success of the work largely depends on a correctly drawn up drawing.
Tools for constructing a rafter system
To install a gable roof rafter system, you will need the following set of tools:
- tape measures of different lengths 5, 10, 20 meters;
- markers, pencils;
- cord for tensioning;
- hammers, for various purposes, nail puller;
- scissors, for cutting;
- roofing knife;
- putty knife;
- scotch;
- hacksaws, electric saw, electric drill with various drills and attachments;
- screwdriver with attachments;
- markings, horizontal and vertical levels;
- slats, rulers;
- polyurethane foam;
- safety belt and rope - for safe work.
Keep all tools on the roof in a tool bag for safety reasons.
Gable roof for a house with gables
There are a huge number of different solutions for constructing roofs with two slopes. They are erected over square and rectangular boxes of different heights, arranged with attics and without attics.
Gable technology is applicable in the arrangement of houses with attics, if the traditional broken method does not suit the owners for aesthetic, architectural or purely technical reasons. Most often this is done if the buildings are made of brick or concrete blocks, less often if the buildings are made of timber or logs.
When constructing a roof at an “angle” over a building with a half-attic, the walls of the box replace the lower tier of rafter legs. The rafters in such situations do not rest on the purlin structures characteristic of the attic method, but directly on the walls through the mauerlat.
In such cases, it is customary to erect the gables before the construction of the roof and lay them out entirely from one material. Partial cladding of the upper part of the gable wall looks unsightly and is rarely used even for the purpose of saving.
Rafters of gable roofs for houses with gables perform their usual work:
- They serve as the roof frame necessary for the formation of slopes.
- Distribute the components of the roofing pie.
- They hold the inner lining of the ceiling and the upper part of the attic walls.
Despite the fact of participation in the arrangement of the attic, the rafter systems of boxes with pediments do not belong to the category of broken ones. They do not form an attic as such, which is why they are not included in the attic category. Consequently, they are arranged in the simplest ways without ceiling beams.
The presence of gables makes it possible to reduce a considerable part of the elements that provide structural rigidity. They prevent displacement of structural components and guarantee static stability. In addition, the gables themselves often serve as components of the rafter system.
In another article, we have already found out that in the arrangement of buildings with solid gables, standard technologies for constructing gable roofs are used, i.e. hanging and layered diagrams of rafter systems.
The choice of scheme is directly related to the architectural design of the main part of the house:
- If it is possible to install a ridge purlin to support the upper edge of the rafters, they are constructed according to the layered method.
- If it is impossible to install a ridge girder, the rafter legs are constructed using a hanging method.
Installing a purlin allows you to significantly relieve the load on the rafter system, which is why the layered scheme is preferred in the construction of low-rise buildings. In traditional rafter frames, the purlin is supported by a structure designed for it, which is installed on the internal load-bearing wall of the house or on a series of support posts.
However, purlins and pillars located inside the building significantly interfere with the arrangement of usable space: they reduce the area of the premises both under the roof and within the main part of the building. This is where the advantages of boxes with gables come into play - they are quite suitable as reliable supports for purlins, replacing bulky support structures.
The purlin is essentially a powerful beam laid from one top of a gable roof to the other. The beam can be sewn from a board, made of laminated veneer lumber or a log beveled into two or four edges. Finding material for runs of more than 6 m is quite problematic. Yes, and it is unreasonable to install all-wood long purlins, because... they will sag significantly under the weight. In such cases, a relieving truss truss is installed under the purlin, and the beam is divided into two sections.
In addition to the inconvenience of constructing long runs, layered technology makes you think about transporting a heavy beam to the place of installation and fastening. For those who are thinking about how to make a gable roof inexpensively, moving a solid beam or log onto the roof without heavy construction equipment will be a serious problem. If there is no solution to the problem, the optimal choice is hanging technology with installation of roof trusses directly on site.
The hanging method is not associated with the need to install a ridge girder, but also does not completely reject its use as an element of connecting individual components into a single system. Rafter structures of the hanging category are constructed mainly when covering small spans. In some cases, this is the only choice due to the impossibility of installing additional support for a long run.
Main varieties
Design begins with determining which roof shape is most suitable for the house. In suburban construction, preference is given to the following types:
- Single slope;
- Gable;
- Four-slope or hip;
- Flat.
Single-pitch
Shed roof designs are the simplest. They allow the use of large sheets of roofing materials. Suitable for large buildings and small garages. Often several buildings are assembled under such a roof.
With a lean-to structure, the load on the water drainage system increases. The slope of the slope is performed at a slight angle to avoid the need to build high walls. It is convenient to use a sloping roof for installing solar collectors.
Gable
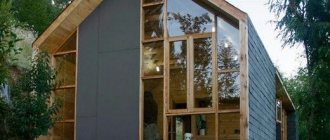
The most popular type of roof is the one with two slopes. Allows you to install any roofing materials. A triangular-shaped superstructure is formed above the house. For ventilation and lighting, windows are installed in the end parts. When building an attic, preference is given to a gable structure.
To rationally use the internal part, a broken slope is used, consisting of two parts of different angles of inclination. The upper segment has a greater slope. The design allows you to increase the height of the attic and rationally use the attic space.
Four-slope
Its peculiarity is the absence of pediments. They have been replaced with shortened slopes. A roof with four slopes is difficult to manufacture, but it is resistant to wind and precipitation. Most often used to cover large buildings. The hip roof not only covers the building, but also decorates it.
The hipped roof is common in southern areas. Used to create an attic. Ventilation and natural lighting are provided through attic and dormer windows.
Flat
A flat roof often covers houses with an attic, so if necessary, the roof is insulated. Often the outdoor space is developed and used for recreation.
You may be interested in: Nuances when designing a pitched roof: what is important to know when creating a drawing
The design will require additional measures to prevent the accumulation of snow and ice. Drawings of such roofs are difficult to produce, so the roofs are not popular.
Load on the rafters according to the diagram
There are three types of load:
- Constant. This is a value that will not change throughout the entire life of the roof. This category includes a lot of roofing material, insulation, hydro- and vapor barrier, sheathing, additional roofing parts, as well as interior decoration of the attic. That is, the summed value of the mass of the elements will be the expected load. Its average value is 40-45 kg/m2, but not more than 50 kg/m2. It is advisable to provide a safety margin equal to 10% of the total mass.
- Variable. This refers to the intensity of precipitation, load from snow and wind, which can vary significantly depending on the time of year or weather conditions.
- Special. This group includes extreme natural phenomena - earthquakes, tornadoes, strong winds. In these cases, the safety margin is made significantly larger than usual.
We advise you to study - Porcelain tiles. types and applications. characteristics and features
Possible roof options
The design of roofs is preceded by the selection of a suitable structure that will perform best in specific conditions. It is best to consider all possible options, weigh the pros and cons and settle on the best. First of all, you need to choose a roof in accordance with the weather conditions in the region, which will help you choose the right building materials and roofing covering.
For regions that experience strong wind gusts, high roofs are not suitable because excessive wind loads can lead to damage.
Roof options of various shapes and designs
If the area is dominated by heavy snowfall, then the roof structure should be high and steep, which will help quickly remove snow and prevent roof leaks.
As practice shows, flat roofs perform their functions much worse than structures of single-pitched, double-pitched or hipped roofs, therefore they are used much less frequently to protect residential buildings. Pitched roofs have proven themselves in operation, removing precipitation in the form of snow and rain without any problems.
These features allow pitched roofs to prevent the formation of debris and precipitation on the house, which has a positive effect on the durability of the roof.
The roof layout may have individual features that can be introduced by the designers developing the house project, however, this should not affect the ability of the roof to perform its main duties:
- Providing reliable protection for your home;
- Reliable removal of precipitation.
Various roof design drawings
Mounting the Mauerlat
A do-it-yourself rafter frame can be attached to the floor beams, but in this case all the loads on the building structures will be concentrated on the places where the floor beams are attached. This option is suitable for small, lightweight buildings.
To ensure uniform distribution of the load on the upper surface of the walls parallel to the ridge of the future roof, a Mauerlat is mounted, which will serve as the basis of the frame. To make the Mauerlat, a wooden beam with a cross-section of 150×150, 100×150 or 100×100 is used. It is attached to the wall in one of the following ways:
:
- Using metal studs embedded in a concrete beam poured along the length of the wall. The spacing of the fasteners is no more than 120 cm, the arrangement is staggered, the thread of the studs is no less than M12. The height of the part of the stud protruding above the concrete should be 30 mm higher than the height of the Mauerlat beam together with the waterproofing layer of roofing material. A wooden beam, in which corresponding holes are drilled, is attracted to the beam with nuts and washers;
- When installing a roof with two slopes with a total area of less than 250 m2 with your own hands, the studs for attaching the Mauerlat are placed in the walls during its construction. To ensure the necessary strength of the future wooden frame, the studs should be buried to a greater depth than in a concrete beam;
- Using wire rod mounted into the brickwork at least three rows before the top of the wall. This method is suitable for installing a roofing system of a small area.
Features of different options for metal rafter systems
- Often a combined type of rafter system is installed, in which, along with metal, wooden parts are also used. This method has some features. It is important to avoid contact between wood and metal, since a sharp change in temperature on a metal surface leads to the formation of condensation, which causes rotting of adjacent wooden parts.
- The second option is metal rafter systems without wooden parts. In this case, you don’t have to worry about the possibility of rotting. This type of roofing structure is considered advantageous because it has a long service life and allows the use of solid rafters of considerable length (7-30 m).
To avoid this, wood-based elements are treated with special antiseptics and moisture-resistant compounds. Another preventative measure is to isolate the wood from the metal through the use of roofing felt.
Special attention should be paid to the insulation of the attic space. When choosing a metal system, the insulating material is not laid between the rafter beams, as is done in the case of a wooden structure, but above or below them.
Another feature is the need to maintain a gap between the metal part and the roofing insulation to prevent condensation from penetrating into the insulating material and its subsequent wetting.
When laying insulation under the rafters, all other layers of the roofing pie (inner sheathing, vapor barrier material, roof covering, ventilation gap) are above the insulating layer, thereby avoiding large heat losses and the formation of cold bridges.
Metal rafters, or trusses, can be made independently or purchased ready-made. During the manufacturing process, paired corners, classic profiles, etc. are used.
The main parts of the truss are two inclined arms, which together form a triangle. They are optimally suited for the construction of roofs for industrial buildings and hangars, as they make it possible to cover large areas.
The use of metal roof trusses is also relevant when constructing residential buildings with a metal frame. In this case, they are custom-made for a specific frame, after which they are delivered to the construction site and installed together with the base.
Roof components
Roof structure diagram
A standard roof of this type consists of the following elements:
- Mauerlat;
- rafter legs;
- vertical racks;
- struts;
- puffs;
- skate;
- bed;
- battens.
Mauerlat mounting diagram
Mauerlat is a timber laid on top of the walls along the perimeter of the building. It is secured using threaded steel rods embedded in the wall or anchor bolts. The timber must be made of coniferous wood and have a square section of 100x100 mm or 150x150 mm. The Mauerlat takes on the load from the rafters and transfers it to the external walls.
Scheme of fastening rafter legs and Mauerlat
Rafter legs are long boards with a section of 50x150 mm or 100x150 mm. They are attached to each other at an angle and give the roof a triangular shape. The structure of their two rafter legs is called a truss. The number of trusses depends on the length of the house and the type of roofing. The minimum distance between them is 60 cm, the maximum is 120 cm. When calculating the pitch of the rafter legs, you should take into account not only the weight of the covering, but also the wind load, as well as the amount of snow in winter.
Horse
The ridge is located at the highest point of the roof and most often is a longitudinal beam connecting both slopes. The beam is supported from below by vertical posts, and the ends of the rafters are attached to the sides. Sometimes the ridge consists of two boards that are nailed to the top of the rafters on both sides and connected at a certain angle.
Gable roof
Racks are vertical beams with a cross section of 100x100 mm, located inside each truss and used to transfer the load from the ridge run to the load-bearing walls inside the house.
The struts are made from scraps of timber and installed at an angle between the posts and rafters. The side edges of the truss are strengthened with struts and the load-bearing capacity of the structure is increased.
Tie - a beam connecting the lower parts of the rafters, the base of the truss triangle. Together with the struts, such a beam serves to strengthen the truss and increase its resistance to loads.
A log is a long beam with a cross-section of 100x100 mm, laid along the central load-bearing wall, on which vertical posts rest. Lezhen is used when installing layered rafters when the run between the outer walls is more than 10 m.
The sheathing consists of boards or timber placed on the rafters. The sheathing can be continuous or with gaps, depending on the type of roof. It is always attached perpendicular to the direction of the rafters, most often horizontally.
Gable roof rafter system diagram
Due to the fact that a gable roof must have not only good strength, but also low weight, one of the most important points in its arrangement is the gable roof rafter system. This is due to the fact that the roof must be resistant to various loads, and at the same time not put a lot of pressure on the building.
With the help of a rafter system, in a gable roof, the total load on the roof is distributed equally to each wall of the building. The support of the lower ends of the rafters falls on top of the supporting structure of beams (mauerlat), and they are fixed using fasteners - strips or metal brackets. Using the angle of inclination of the “legs” of the rafters, the angle of inclination of the roof slope is determined.
Differences in rafter structures
As part of the rafter structure itself, rafters of both hanging and inclined types can be used. Rafters of the first type are so called because they are attached to the supports of the edges of the “legs” of the rafters - the walls and roof ridges.
Rafters of the second type are so called due to their installation method - they are installed in buildings in which there is a middle load-bearing wall (or intermediate support), the inclined rafters rest with their ends on the surface of the external load-bearing walls, and the central part rests on the support.
For this reason, hanging rafters work by bending and stretching, and the expansion force generated by the pressure of the rafter “legs” is reduced by the tie connecting the rafters. And inclined rafters perform “work” exclusively on bending, which is accompanied by lower costs compared to the roof of any other device.
But the best option is to arrange a rafter system where hanging and inclined rafters alternate. This is explained by the fact that it happens that the arrangement of hanging rafters is impossible. With the help of such a “combination” in the rafter system, it becomes possible to reduce material costs, and, in addition, strengthen the roof structure itself.
Probably the most difficult stage in roof construction is the delivery of material to the site of direct installation. However, with the help of modern technologies, it is possible to assemble the truss structure on the ground almost entirely, and only after that carry it out to the top of the building.
The use of this approach is associated with certain advantages and certain disadvantages: during the installation of the “legs” of the rafters at the top, the assembly will be as accurate as possible, but if you lift a completely finished structure to the building, problems may arise with the accuracy of the installation.
Why choose metal?
Based on what types of loads they want and what fire standards are, the frame is made from a variety of materials. And now let’s dwell as long as possible on the distinctive features of the materials used for raftering the frame. Let's consider the main advantages of wooden rafters. For most, building a frame seems like working with a wooden board that needs to be sawed in the required place. Dried wood is mainly used as wood. However, working with wood is actually no easier than working with metal, although most people think so. Thus, in the production of wooden rafters, only high-grade wood is indispensable. In addition, they carefully ensure that such types of boards and beams do not contain large knots, wane, cracks, or the necessary slope of the fiber. What's the point? Each important flaw can lead to the fact that the rafter leg will simply crack under load. If it is not possible to purchase high-quality dry lumber, then it is dried directly onto the lenses in a special ventilated stack. For this reason, it is worth buying ready-made boards for the production of rafter systems, moreover, with a margin of width. And that is not all.
Basically, lumber looks very smooth only to the eye, and for rafter systems geometry is a fairly important characteristic. And just having a margin of width, craftsmen have the opportunity to straighten the rafters themselves using planing equipment. Only in this way are the slopes actually level, and completely different roofing coverings can be comfortably installed on them.
Now let’s look at the features of choosing steel beams. Today, the rafter system is quite often selected from galvanized steel beams. You have most likely seen their names: I-beams, channels or brands. Such parts are very expensive than wooden or ordinary metal ones, but they are worth it. Yes, they are very difficult for installation work, but they are preferred for one important advantage - increased reliability against bending load. With the help of this, in the construction of the frame it is possible to do without any vertical supports and other parts. However, beams are not often used in residential building construction today, although a similar practice exists, and today we will explain why. For example, the complexity of rafter systems and the presence of internal parts immediately affects the planning decisions of the attic. Because the more varied the lintels are among builders, the less the attic ceiling will turn out. In addition, all this is important not only for installing another living room under the frame. The fact is that today the so-called attic frames are in demand, under which there are ordinary rooms of the house. And various additional parts will not fit there at all. However, there is a fly in the ointment: metal beams will continue to act as cold bridges, and because of this, a roofing pie will certainly be installed for them. The main filling here is oriented strand board. This is an excellent alternative to ordinary different rafters.
Projects and drawings
In the process of planning a gable roof, a drawing is prepared. This is a diagram of the future structure, where there are slopes, a pediment, and a ridge. Essentially, the plan is a drawing with detailed elements in different projections, showing how to tie the rafters. Drawing up a drawing of a gable roof is carried out taking into account all stages of work.
Its construction scheme includes:
- beams for sheathing;
- beams and rafters;
- scheme for laying thermal and waterproofing;
- roofing layout layout;
- installation diagram of additional fasteners;
- installation drawing of a ventilation system and chimney.
A well-designed roofing plan will reduce the cost of purchasing building materials. To create a project of any type, one or another type of material is used, based on calculations and taking into account the reliability of the coating. The size of the roof covering is also taken into account. When drawing, a part of the rafter system must be indicated, which allows you to understand how maximum the load on the roof can be.
The plan also includes:
- storm drain plan (storm sewer of a certain length);
- slope connection elements;
- construction area;
- diagram of roof junction points (pressure profile).