Basic requirements and conditions
Before starting construction, it is important to familiarize yourself with the key conditions and requirements:
- Chickens are birds. This means they can fly at least a little. In this regard, it is important to provide a minimum fence (about 2 meters), and best of all, to equip a roof.
- They hunt chickens. Stray dogs, foxes, ferrets, martens and even rats are potential chicken killers. The structure of the building should protect the birds from any intruders.
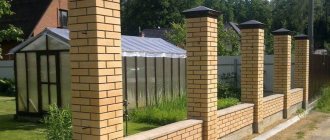
One ferret can destroy a family of 20 chickens in one night. Therefore, barrier devices must not only be of high quality, but also be as practical as possible. A reliable solid wooden fence or a fence made of corrugated board will serve as good protection. Additionally, you can get a mesh fence, along which you need to plant a dense hedge of tall shrubs. Such an obstacle will protect birds not only from animals, but also from people.
- Shrubs. The presence of tall bushes along the homemade chicken coop will protect the birds from sunlight and wind. Chickens love shade in hot weather and don't mind eating the leaves and insects that breed among last year's leaves under the plants. Thanks to the presence of insects and worms, the chickens' diet will expand, which is an additional plus.
- Purity. Where there are chickens, there is droppings. The chicken coop should be designed in such a way that it is easy to clean (hinged walls/doors, retractable coop bottom, etc.). To prevent people from suffocating from these odors, it is recommended to build a chicken coop as far away from residential buildings as possible.
- Ventilation should also be mentioned: if there is no flow of fresh air, the chickens will die in a matter of days. But ventilation protection must also be at its best - predators are able to get anywhere for prey.
- Winter season. If chickens will be kept indoors year-round, then even at the time of designing the chicken coop, serious waterproofing should be provided. Winter is ice, and ice is water, which means there will be increased dampness, which chickens fear on an instinctive level. Consequently, their productivity and egg production will decrease significantly. Additionally, insulate the chicken coop and take care to exclude drafts (in winter, gusts of wind occur more often).
- Required area and planting density. The design of a chicken coop should be based on 1 square meter. m for 4 adults (15 chickens). However, if chickens are kept not for the purpose of breeding, but for the sake of eggs, then per 1 sq. m there should be no more than 2 individuals.
If you are creating a small chicken coop, its minimum area should be at least 3 square meters. m.
For a homemade chicken coop for 20 chickens (19 laying hens, 1 rooster), the appropriate dimensions are 2.5 x 6 m, that is, a total area of 15 square meters. m. If you need a chicken coop for 10 chickens, then the dimensions can be significantly reduced: 2.5 meters in width and 3 meters in length is the best option.
For a large number of chickens, you can slightly reduce the total area of the chicken coop. The fact is that chickens will fight for a “place in the sun”, huddling in small groups. This allows you to reduce the area, but only slightly, otherwise the chickens will begin to conflict, pecking at the weaker ones.
Next to the chicken coop there must be an enclosure for walking, with dimensions of at least 3 x 3 m. It is best for the walking yard to have 2 square meters. m of free space per 1 adult.
To make the chicken coop as comfortable as possible for the birds, it is necessary to provide shade, safety from predators and protection from the sun/wind. These are ideal conditions for keeping chickens in a homemade chicken coop.
Why do you need a chicken coop?
In order for chickens to feel as comfortable as possible in the constructed housing, you need to clearly understand what goals and needs it should satisfy.
The main purpose of such a structure is that it is a place where birds spend the night and where they can safely lay eggs. As a result, the construction of a chicken coop should be carried out in such a way that it serves as a means of protection against:
- unfavorable weather;
- small rodents;
- predatory animals.
Preliminary preparation
Before the actual process of building a chicken coop, you should carefully consider every aspect of the actions and requirements. To begin, design the future structure and decide on the materials, location, shape and type of chicken coop.
Chicken coop design
Determining the required area of a structure is key when drawing up a construction plan. Not only the chicken coop itself is taken into account, but also the area for walking the chickens.
When developing a project, pay attention to the following points:
1Location of the structure
Under no circumstances should the place be in a low area. There are many reasons for this:
- after rains, water will accumulate there;
- the place itself will always be damp and dry out slowly (atmospheric moisture is concentrated there);
- in the lowlands the morning fog lasts the longest, etc.
It makes the most sense to place the structure on a small hill.
2 Chicken coop area
Dimensions are calculated individually. For every 5 laying hens, a minimum of 3 square meters must be allocated. m. Only in such conditions will normal coexistence and development of individuals be ensured. That is, the total size of a chicken coop for 5 chickens with such requirements will be 1.5 x 2 m (excluding the exercise yard).
If the chicken coop is being built for only 2-3 chickens, then the area may be even smaller. Premises of 1 sq. m will be more than enough.
The area for walking chickens should also be created taking into account the number of individuals. For the already mentioned 5 chickens, about 6-7 square meters are allocated. m of walking space. The more active the chickens’ lifestyle, the higher their egg production rate will be.
3Protecting the walking area
Wind protection should be provided for the walking area. An canopy installed over the enclosure, which will also protect the chickens from sunlight, rain and predators, will ideally cope with this task.
4Location features
It is strictly recommended to install the chicken coop on a hill. It can be created using an embankment made of layers of sand and crushed stone of the middle fraction. In addition to the stated benefits of this arrangement, it will also act as an obstacle for predators. Additional protection will be laying a layer of clay mixed with broken glass on top of the embankment.
5Ceiling and windows
Windows or doors provide natural light during the day. A reasonable solution would be a glazed door, but all this needs to be installed on the south-eastern side of the chicken coop - on this side the sun will illuminate the building the longest.
If the window is separate from the door, it should be installed at a height of 1.1-1.2 m from the floor, and the size should not be less than 50 x 50 cm. The ceiling rises to a height of 2-2.2 m so that there is a large volume of air space for chickens.
6Remote sockets
It is wiser to install nest extensions outside the coop so that they extend beyond its boundaries and have a size of 40 x 40 cm (minimum). The lid should lift easily so you don't have to go inside the coop to pick up the eggs.
Choosing a chicken coop
To build a good structure, you need to be responsible when choosing a chicken coop. This process depends on the following factors:
1Breed of chickens
All chickens are divided into 2 large groups: laying hens and meat chickens. For laying hens, space, lighting, fresh air and the opportunity to walk are important. In such conditions they will lay many eggs almost all year round.
But meat breeds should be kept as close together as possible so that they cannot walk around the chicken coop one more time and lose weight. Such breeds are kept only during the warm season, which means there is no need to heat the chicken coop.
2Type of walking
The walking area can also be of two types: open and closed. What was mentioned earlier are closed areas. They are good if the chicken coop itself is located in close proximity to a forest or fields. That is, where there is a danger of attack by predators.
With open range chickens leave the coop and walk around a large area, pecking at fresh grass. This will have a positive effect on their comfort, but there is also a risk of contracting a disease or being harmed by weasels, rodents and other predatory animals.
The choice of chicken coop also depends on this, since the absence of an enclosed run frees your hands when creating a building. And its necessity, on the contrary, forces us to design the future structure more compactly.
3 Number of chickens
The more chickens, the larger the coop you will need. Experts in breeding and keeping chickens advise allocating 3 square meters for 5 chickens. m of space. Accordingly, as the number of individuals increases, the size of the structure should also increase. This is worth paying special attention to, because it is possible to redo the roof or walls, but expanding the total area will be extremely problematic.
Every poultry farmer should remember that you should never completely copy a finished chicken coop design, even if it is executed flawlessly. If you forget about at least one individual, but important factor, the negative consequences will be significant.
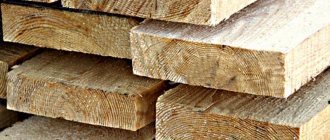
Materials and tools
The materials for a homemade chicken coop will be needed:
- foam blocks;
- wood;
- old window frames;
- cement;
- crushed stone;
- bars;
- plywood;
- brick;
- cinder blocks or shell rocks.
Foam blocks are the best choice for construction due to ease of installation. They also retain heat well, but their cost is significantly higher than other materials.
The most economical option would be to build a chicken coop out of wood. Moreover, the appearance of a wooden structure will fit perfectly into the countryside. Wooden chicken coops are extremely environmentally friendly.
Perches should be sanded using sanding devices. Also, all wooden parts are treated with impregnations against fire, insects, mold and rot. For this purpose, only environmentally friendly liquids are used.
To build the walls of the chicken coop, you can use brick or cinder block. These materials will cost several times less than foam blocks, and their strength and durability are quite satisfactory. The only negative is that brick chicken coops need to be provided with additional insulation.
As for the roof, it can be made from:
- slate;
- corrugated sheets;
- metal tiles.
Both for the chicken coop itself and for the chickens, the material from which the roof is made is absolutely unimportant. Therefore, you should select the most economical option that will provide warmth and not allow moisture to pass through. And to insulate the roof you will need rolled insulation or expanded clay.
When building a chicken coop you will need the most standard set of tools:
- hammers;
- nails/screws;
- screwdriver;
- saw;
- shovel;
- roulette;
- axe;
- Master OK;
- plane.
All of the above are basic tools that will definitely come in handy. However, it is impossible to say with certainty whether all this will be enough, since each structure is built according to individual requests, drawings and requirements.
Additional materials that may be useful:
- sand;
- construction rods;
- beams or boards for perches;
- lime for wall treatment;
- polystyrene foam and sawdust as insulation;
- roofing felt for foundation and roof;
- ventilation box;
- nest boxes;
- dowels (wooden nails).
Location
The requirements and conditions for the location of the chicken coop were described in detail earlier:
- on a hill;
- in a quiet and peaceful place;
- far from the road (literally as far as possible from the roadway);
- at a distance of more than 3 meters from residential buildings.
Silence is very important for any chicken coop. Can a hen hatch eggs productively with constant noise? Of course no. And no amount of soundproofing will help, so during preliminary preparation, choose a quiet place.
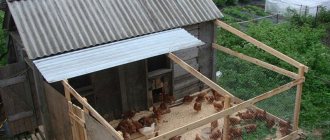
Summer chicken coop design
A summer chicken coop is characterized by ease of execution, low cost, a minimum of materials used, and the absence of a foundation.
Basic construction skills are sufficient for its construction. Such poultry houses are built as an additional measure to protect chickens from small predators.
In addition to the chicken coop itself, a special enclosure must be made, which is equipped with a canopy.
A canopy is a necessary attribute; it is needed to avoid overheating of birds during their walks, for example, on a hot summer afternoon.
Step-by-step instructions for building a chicken coop
The first step is to draw up a drawing of the future chicken coop. This is what a structure for 10 heads looks like:
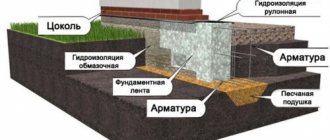
Foundation
Creating a foundation for a chicken coop should be taken as responsibly as possible:
1Marking
On the site selected for construction, the area for the foundation is marked. At the corners of the marking, steel rods are driven into the ground, connected to each other with a rope. Measurements are taken of the length of the sides and the diagonal between the corners, which will help ensure that the markings are correct.
Each of the corners should be straight, and the opposite sides and diagonals should be perfectly straight. If everything matches, you should drive in the pegs that act as the centers of the future pillars. The distance between the pegs is 1 meter.
2 Digging a hole
A hole 50 cm deep is dug along a given perimeter. Sand is compacted onto the bottom with a cushion. The larger it is, the better. Dry sand cannot be used, only wet sand.
3Concrete solution
To prepare the solution, you need to divide it into 7 parts and add materials in certain proportions:
- crushed stone - 3 parts;
- sand – 2 parts;
- cement – 1 part;
- All this is mixed with water - 1 part.
The mixture is poured into the hole at ground level, leveled and left to dry for a couple of days (about 3 days).
4Lifting
After the concrete has dried, you need to build up the pillars using cement and bricks (20-30 cm high). The width of the pillars is determined individually, but for a distance of 50 cm, 2 bricks for each row will be enough. Evenness should be controlled by the level (spirit level).
5Bookmark a layer
After the foundation is finally laid, it will need to be covered with waterproofing material (for example, roofing felt), on which the first row of timber is placed. For a stronger connection, cuts are made in the corners. At this point the foundation can be considered ready.
Chicken coop walls
Once the foundation is ready, you should choose the material to create the walls. It would be reasonable to use, as noted, wood. But you can give preference to any other material that will also perform its functions well and meet key conditions.
First, 4 load-bearing beams are installed. They are attached to the beams in the foundation using separate ground beams with a cross-section of 10 cm, the angle of which should be 45 degrees relative to the walls and floor.
The frame beams should be connected with beams and strengthened in the manner mentioned.
The outer and inner parts of the chicken coop are lined with chipboard, fiberboard, plywood and boards, taking into account the space allocated for lighting and ventilation. Some kind of insulation, for example, mineral wool, should be laid between the layers. When upholstering, it is critical to eliminate any gaps or uneven areas to ensure the coop is as airtight as possible.
After all actions, the boards are treated with a special solution. In stores in the relevant field there is a fairly extensive selection of these products (for example, MDS mineral sealing solution).
Roof, ceiling and floor
Creating a roof begins with laying the ceiling beams on the supporting beams. Their distance from each other should be no more than 1 m. For this purpose, a beam with a section of 15 x 10 cm is used, laid on the edge. Immediately after this, they need to be covered with transverse boards and insulation.
It is recommended to create a gable roof for the structure. This will provide guaranteed protection against precipitation, even very heavy ones.
When creating a gable roof you should:
- Take care of another vertical type beams right in the center of the short side of the structure.
- Attach rafter holders to them. The angle should be 50 degrees and 35 degrees to create a slope for precipitation to escape.
- The rafters are placed on holders on each side.
- For roofing, you can use slate or similar material.
Laying the floor is completely identical to the ceiling. The only difference is that it is allowed to use a square beam with a cross-section of 15 cm.
Next, it is recommended to lay a rubber coating on the floor (for tightness), which will prevent the formation of mold and other infections.
Next, floorboards are laid, attached to the beams with self-tapping screws or nails (20-35 mm long). All cracks in the floor and near the walls are coated with an airtight solution that is completely safe for chickens.
It may also be necessary to lay a thermal insulation layer in the floor so that during the winter season the heat of the chicken coop does not go into the ground. The cold significantly increases the likelihood of chickens getting arthritis in their legs and other colds.
Ventilation
Good ventilation will help control the temperature and humidity of the air, however, to do it correctly, you need to decide on the type of hood.
If the chicken coop is not designed for keeping chickens on an industrial scale, natural supply and exhaust ventilation works well:
- 2 pipes with a diameter of 19-22 cm and a length of 190-210 cm are required.
- 2 holes are made in the roof. The air exhaust pipe should be placed above the perches. And the inlet, through which street air will flow, is as far as possible from the chickens.
- The exhaust pipe is installed significantly higher than the roof, about 1.5 m. Only a small part of it should remain inside the chicken coop - no more than 30 cm.
- The supply pipe is installed completely the other way around: most of it will be located indoors, no more than 30 cm from the floor.
The principle of operation of such ventilation is comparable to “communicating vessels”, which are known from school physics lessons. Only instead of water there is air, and as a result - high-quality and natural ventilation of the premises.
More serious ventilation methods are used only on large farms and are not practical when setting up a homemade chicken coop. The reason is the need to purchase expensive fans with high power consumption.
Features of construction
Since we are talking about a structure whose purpose is to keep poultry, the main condition that must be met during design is the creation of comfort. This concept includes taking into account the climatic conditions of the region, elaboration of issues of temperature and ventilation, availability of walking areas, and electrification.
Despite the simplicity of raising the bird itself, preparing to move the livestock into a new habitat is a responsible step. Regardless of the materials used in construction and other characteristics of the future building, it is necessary to take care of fire safety, as well as antifungal and antiviral treatments.
Each owner of country real estate has his own idea about the external and internal arrangement of the chicken coop. Having studied the folk experience in the construction of this type of outbuildings, the summer resident can easily cope with the implementation of his project.
Types of chicken coops
There is a classification that divides poultry houses into several main types, which are strikingly different from each other. The choice of one type of design or another depends on the goals pursued by the summer resident when implementing the idea of poultry farming.
| Type | Description | Positive aspects |
| Stationary | The building is of a capital nature, providing for year-round keeping of poultry. It has two or three compartments aimed at resting the bird, an egg-laying area, a place for feeding and walking |
|
| Multi-tiered | Capital building equipped with cages that significantly increase the number of birds in a room with limited space |
|
| Mobile | A mobile structure designed for a small number of birds (up to 10 pcs.). Applicable for use in warm seasons |
|
Summer mobile chicken coop
Interior decoration
When raising meat breeds (broilers), the internal arrangement is not as important as for laying hens. Providing daylight, insulation and well-made perches are the key goals of the chicken coop for the latter.
Lighting
Agronomists recommend maintaining normal lighting in the chicken coop for at least 8-10 hours a day. If daylight hours for chickens are provided for 11-12 hours, the number of eggs laid can be increased up to 25-30%.
It is most important to use additional lighting from November to March.
To save on electricity in winter, you need to provide normal windows with shutters that can be closed from the outside.
To illuminate the chicken coop, it is permissible to use various good lamps:
- fluorescent (40 W);
- electric incandescent lamps (40-60 W);
- energy saving (15 W);
- LED (various powers, depending on needs).
One 60 W incandescent lamp can illuminate 6 square meters. m chicken coop (when placed at a height of 2 m from the floor). Thus, a good level of illumination (20 lux) is achieved.
Keep warm
The temperature inside the chicken coop should never be below +15 degrees. If this requirement is not met, the chickens will begin to consume twice as much feed, and the ability to lay eggs will drop sharply.
The stated condition applies to all common breeds of chickens. However, some can exist relatively comfortably at lower temperatures (for example, Cochin or Brahma due to their thick, lush plumage).
To maintain adequate temperature in the chicken coop, the following conditions must be met:
- main walls with a thickness of at least 15-20 cm (for winter chicken coops);
- external wall insulation;
- roof insulation;
- insulation of floors (concrete) or the use of wooden floors;
- take care of the absence of holes, cracks and rat passages;
- seal the chicken coop with absolute protection from drafts (for ventilation during the day, you should take care of the opening windows);
- have equipment for heating the room during frosts.
To ensure additional insulation, you can follow these recommendations:
- Place small ovens in the chicken coop with the chimney vented outside. Far from the safest, but still an effective option.
- Heat the room with fan heaters or electric radiators. The latter should be turned on during severe frosts or at night. The rest of the time they should be turned off (saving energy and increasing the service life of devices).
- You can also heat it with a stove with a water boiler and a heating element (tubular electric heater). During frosts, the stove is heated with wood. The heated water from the stove is supplied to heating radiators, which are located along the walls of the structure. Additionally, water can be heated by the mentioned heating element (up to 1.5 kW). Thus, during the day the stove runs on wood, and at night the heating element is turned on.
- You can also heat the chicken coop using infrared lamps. They emit a soft and not too bright light, which will be comfortable for chickens.
An important condition is to install the lamps so that they are out of reach of birds. A fire in a small and wooden structure is dangerous not only for chickens, but also for people.
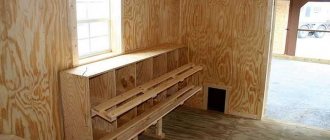
Arrangement of perches
The perches are the most important place in the entire chicken coop. The chicken will spend the most time on them. Chickens sleep and rest on roosts, so the quality of these places must be impeccable:
- for 1 individual, 25 cm is provided from the entire beam (if there are more than 20 individuals, then the total length of the perches should not be less than 5 m);
- perches are installed with a ladder or completely horizontally (but in no case on top of each other: the upper ones will dirty the lower ones);
- you should decide on a place in the chicken coop - where it will be easiest to clean up, there should be perches, because the bulk of the droppings will accumulate under them;
- the width of the beam should be 3-5 cm;
- All edges are processed with a plane to make the chickens comfortable and safe.
Arrangement of nests
The chicken coop must have nests where the chickens will hatch their eggs. Nests can be inexpensive: from an old basin covered with straw. But if you create a chicken coop with your own hands from scratch, then it is important to take care of the nests as responsibly as the entire structure as a whole:
- for 4 laying hens, 1 nest is required (at least), that is, for 20 individuals, 5 nests or more are made;
- a high threshold is set at the exit from the nest: hens are not the most graceful animals and can easily roll the egg out of the nest;
- nests can be installed above perches so that laying hens can get there through them (flying up is not required);
- when installing nests separately from perches (at least 40-50 cm from the floor), it is worth taking care of the poles that provide the chickens with a comfortable approach;
- lamps must be turned away from the nests - chickens like to lay eggs in a dark and quiet place;
- Separate feeders and water should be installed for laying hens hatching eggs near the nests.
If the area of the chicken coop allows, you can install a small ash bath next to the nests. Chickens will use it to clean their feathers and get rid of parasites, which, in turn, will increase their comfort and egg production.
Power supplies
It is better to organize the arrangement of feeders and drinkers around the perimeter of the chicken coop so that there is more space for walking. Using regular bowls is also not advisable.
It would be wiser to make wooden feeders or install a regular pipe with holes through which the chickens will peck food. Drinking bowls can be made from plastic bottles, drainpipes (using the same principle as with feeders), plastic buckets, etc.
If you can come up with many options with feeders, then with drinkers it is more difficult. This video shows a way to make a semi-automatic waterer for chickens from a regular pipe:
Winter chicken coop
The idea of building a winter chicken coop with your own hands is quite realistic. This type of building for 10 birds must have a foundation. To better retain heat inside in winter, it is advisable to attach a small vestibule to the main entrance to the poultry house.
The interior space must be sufficiently illuminated, insulated and ventilated. Plus, there must be a designated area where the bird will walk. There should be no more than 3 chickens per 1 m². Therefore, if you plan to increase the bird population in the future, then it is better to immediately build a large poultry house.
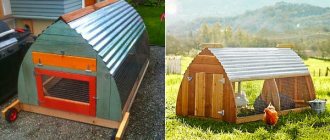
DIY mobile chicken coop
If you wish, you can make a homemade chicken coop “on wheels”. It has many advantages over the stationary one and only a few disadvantages. The most important of them is the small number of chickens that can be housed there.
The structure created is almost identical to a regular chicken coop, but much smaller in size and without the use of heavy materials:
- First, a drawing of a mobile chicken coop is drawn up. If you start creating it right away, you can miss key details, and the structure will collapse at the first load.
- Formation of the chicken coop:
- 2 triangular frames are created from timber with a section of 2 x 4 cm;
- connected using hewn boards (with handles for moving the structure);
- the side walls are made of slats with a section of 1.3 x 3 cm;
- a mesh is stretched between the walls;
- the overlap between the tiers can be arranged with plywood (a hole is created in it for the chickens, where the stairs will be connected);
- one of the side walls must be removable (entrance to the chicken coop);
- the second wall is created from clapboard.
- The lower tier is divided. A third of the entire area is equipped for perches, and the rest is space for birds to rest.
- Making the roof. It is made from plywood sheets so that at high temperatures the lid can be lifted for ventilation.
A small part of the roof must be completely removable. This will allow you to easily clean the chicken coop if necessary.
- Final processing. The outer part of the structure is treated with varnish. Thanks to its use, it will be possible to protect the wood from insects and excess moisture.
- Interior decoration. In a mobile chicken coop, the most important thing, in addition to perches and nests, is to organize lighting and ventilation. Access to sunlight can be provided through windows or using lamps, and for ventilation a regular window will do.
All other parts and devices are created completely identical to the previously mentioned scheme.
- Base. Due to the constant movement of the structure, there is no need to worry about the foundation; a simple but strong wooden floor will be enough.
Under it, however, you can arrange metal beams and attach wheels. This will eliminate the need to move the structure by hand.
If you take the creation of a chicken coop extremely responsibly and use high-quality materials, then the chickens will feel comfortable, the main thing is to choose the best option. And this will be reflected in good egg production and other advantages.
0
0
Copy link
Lighting
To maintain the level of egg production, chickens require 12-15 hours of daylight. In artificial conditions, the winter chicken coop begins to be illuminated from the end of October.
Too bright lighting provokes aggressive behavior and stress in any poultry. Therefore, for a room of 10-15 square meters. m an LED lamp of 8 watts or an incandescent lamp of 40-60 watts is sufficient.
The location of the artificial lighting source complies with fire safety standards, and the mounting height prevents contact with birds. Feeders and drinkers are illuminated as brightly as possible; the sleeping and egg-laying areas are in a darkened state.
The timing of turning on/off the chicken coop lighting cannot be violated - everything happens at the same time. You can equip the room with a timer, which allows you to automate the lighting process.
Creating a comfortable microclimate in the poultry house
The health of pets directly depends on the temperature of their home, air humidity and the availability of proper lighting. The first thing to do is to protect the house from excessive moisture and drafts. After the frame is assembled and the walls are sheathed, it is necessary to carry out thermal and waterproofing of the walls, floor and ceiling. The following are ideal tools: a sheet of foam plastic, mineral wool, film lined with sheets and other inexpensive and useful materials.
- If you plan to keep chickens in the summer, the design will eliminate drafts from the room and protect your pets from overheating on the hottest days.
- If you want to keep chickens in winter, think about a heating system. The temperature inside the chicken coop must strictly be positive.
A comfortable temperature for keeping chickens in summer should not exceed 20 degrees above zero, and in winter, not lower than 10 degrees.
Comfortable microclimate in the poultry house
Lighting in the poultry house
The duration of daylight hours for birds is from 12 to 15 hours, so in winter it is necessary to equip the bird house with good light. To do this, you can use low power lamps. The ideal ratio is 5 watts per 1 square meter. If you equip the chicken coop with infrared lamps, they must be placed at a distance of at least 50 centimeters from the objects to which the heating is directed.
Many farmers prefer infrared light sources, which are not only the main lighting device for brooders (special cages for newborn chicks), but are also used to warm up the room during the cold period. Experts say that such lamps improve your pet’s health and promote faster digestion of food. The following advantages of infrared lamps are also highlighted:
- keep bedding dry and maintain comfortable humidity;
- calming effect on chickens;
- they are easy to install and replace;
- They heat only those places that fall under the rays (direct the light to drinking bowls, food dishes and perches).
Infrared lighting in the chicken coop
Towards evening, turn off the lamps - chickens need to rest in the dark. But this method of lighting also has disadvantages. Bulbs consume more energy and also don't last long. If water gets on the lamps, they begin to crack. To avoid this, place them far from drinking bowls and equip the lamps with protective nets.
Chickens see very poorly at night. As sunset approaches, the birds begin to become disoriented and do not always have time to climb onto the roost.
Prices for infrared lamps
Infrared lamp
Ventilation
Ventilation helps the poultry house remove unpleasant odors from the room, and also regulates temperature and humidity, which reach their maximum values during the life of the chickens. If the room is small, you can limit yourself to a simple supply ventilation system. For large chicken coops, ventilation should be forced and cover all corners of the living space.
| Ventilation name | Description |
| Natural | Ventilate the room by opening doors and windows. Fresh air goes through the door, and exhaust air comes through the window. |
| Exhaust system | The diameter of the ventilation pipes is 20 centimeters, the length is 2 meters. The pipes go into a special hole in the roof. |
| Mechanical | The air circulates using a conventional fan, which can be mounted in the window. |
Ventilation system in the chicken coop