The classic hipped roof, even today, remains unusual for Russian latitudes and is reminiscent of the overseas way of life. That is why it is most often built in order to give the architecture of a residential building a special effect in terms of style and perception, it is advantageous to distinguish it from monotonous, familiar buildings.
In addition, a hipped roof - built with your own hands according to all the rules - in practice has a large number of advantages, especially for the harsh Russian latitudes. Let's take a closer look?
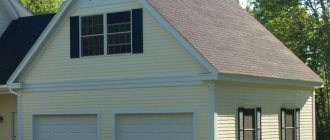
One-story houses
Hip-type hip roofs are a traditional type of roof in European countries, especially in northern regions, which are characterized by harsh climatic conditions with heavy rainfall and strong winds.
Hip and half-hip hipped roofs made of slate and ceramic tiles are often adjacent to combined facades of brick, half-timbering and stone, as in the photo of a one-story house with a bay window and an attic in the Victorian style.
Dutch private estates are particularly colorful - one-story brick houses with half-hipped roofs made of straw or reeds.
The photo shows a private cottage in a modern style, but with echoes of the traditional approach to roof construction. Here the hipped 4-pitched roof over the house was combined with a gable roof over the garage extension.
In the ultra-modern architecture of private houses, strict hip roofs are often found - hipped structures with a bitumen roofing.
An interesting concept for a modern country cottage is an asymmetrical hipped reed roof in tandem with a corrugated wooden facade.
A rational solution for a private house is a half-hipped roof with an attic, which significantly expands the living space due to the usable attic.
See also: Beautiful roofs of private houses: photos, design options, views
Types (tent, hip, half-hip)
Main types of hipped roofs:
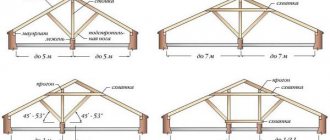
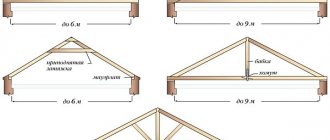
- Tent type . The roof has 4 triangular slopes, the tops of which converge at one point. Usually its base has the shape of a square, and all slopes are equal in area. This design is suitable for a house in which the lengths of all walls are equal. Typically these are small buildings. The roof is particularly attractive.
- The classic option is the Dutch hip roof . A rectangle is formed at its base. The roof resembles a gable structure, because the slopes, supported by long walls, converge at the top along a line, forming a ridge run. However, in a hip roof, it is not the pediment that is erected above the short walls, but slopes in the shape of a triangle. As a result, the roof is made up of 2 trapezoids and 2 triangles, on opposite sides of the house. This roof has versatility. It is suitable for any structures, especially when erected in regions where significant winds can blow from all directions.
- Half hip type . Instead of triangular slopes, more complex structures are provided in it, which accordingly changes the side edges of the trapezoidal slopes. There are 2 main varieties - Dutch and Danish half-hip roof. In the first case, the triangular slope is located at the top, but does not descend to the entire height of the roof. The lower part ends with a vertical wall in the shape of a trapezoid. This design allows you to equip a convenient entrance to the attic or attic window. In the second option, the vertical element has the shape of a triangle and is located in the upper part. The bottom is made in the form of a trapezoidal slope. The upper gable provides the possibility of installing an attic window.
All types of hipped roofs have an attractive appearance and have long been popular abroad. Recently, they are finding more and more admirers in Russia.
Two-story houses
The originality of the project of the two-story house in the photo lies in the fact that the hipped hip roof was used not only to build the roof, but also to construct the balcony railing.
In European regions characterized by heavy snowfalls, private houses are built with half-hip roofs, the slopes of which have a significant slope. Such a roof allows you to build a two-story attic, as in the photo. And to prevent avalanche snow, the slopes of such roofs are provided with a slight break along the edge.
Hip-type hip roofs are often combined with hipped and conical structures, equipping bay windows and extensions to the house with such roofs.
A two-story house with a sloping attic roof is a design solution that allows optimal use of the roof space and placement of living rooms there: bedrooms, children’s rooms and offices.
Hip-slope roofs are increasingly used in individual construction and go well with laconic architecture in the style of modern and high-tech.
Types of hipped roof
There are several types of this design. The standard structure consists of isosceles triangles that connect at a central point.
Beginning builders often confuse a hip roof with a regular hip roof. It consists of triangles that, when viewed from above, form a regular square.
If the plan shows a rectangle, then we are dealing with a hip structure. It received this name as a result of the use of special slopes that look like hips.
The hip roof is divided into the following types:
- Dutch;
- half-hip Dutch;
- half-hip Danish;
- tent.
The Dutch roof is distinguished by its resistance to climatic disasters. Here two trapezoidal slopes are used. The upper parts have long regular triangles, and the side parts are presented in the form of shortened corners.
In this case, a rafter system is used, in which four inclined beams with the required slope angle are used. The calculation of a hipped roof is based on the area of the building.
Thanks to this, it is possible to correctly position the inclined beams and the distance between them.
The half-hip Dutch roof can be made as a gable or hip-rafter roof. To construct such a structure, it is recommended to carefully select building materials.
Load-bearing supports must be made of dense wood. This variety is distinguished by its durability and endurance in relation to natural disasters.
Broken roof
The design of the private cottage in the photo is based on a combination of asymmetrically located gables with hip roofs: above the main building and above the open veranda. All these architectural elements come together into one thanks to a colorful chimney lined with wild stone.
A broken 4-slope roof is not necessarily a symmetrical design - the slopes can have different lengths, as in the photo of a wooden country cottage. Moreover, it is rational to use a longer slope on the windward side of the house.
Often one of the slopes of a sloping roof turns into a canopy over a terrace, veranda or porch.
The country house in the photo is an example of non-trivial wooden architecture, when the facades are painted in a catchy red shade, and the roof is covered with neutral-colored flooring.
Design of hip roofs
When developing a hip roof, all types of loads that will affect it are taken into account. To do this, you must first resolve several important issues:
- purpose of the attic space;
- roofing material;
- degree of atmospheric influence in the construction region.
Based on these factors, the degree of slope of the slopes and the roof area are determined, the loads are calculated and a decision is made on the design and parameters of the rafter system.
Geometric parameters of slopes
The angle of inclination of the slopes depends on the snow and wind load, therefore it varies within a very wide range - from 5 to 60 degrees. In areas with rainy weather and high snow cover, roofs with a slope of 45 to 60 degrees are erected. If the region is characterized by strong winds and minimal precipitation, then the slope can be reduced to the very minimum.
When determining the angular parameters of the roof, it is necessary to take into account what material it will be covered with:
- slate sheets, ondulin, roofing metal and rolled materials are laid on slopes with a slope of 14 to 60 degrees;
- the tiles are mounted on a surface with a degree of slope from 30 to 60 degrees;
- Roll coating is used on sloping slopes - from 5 to 18 degrees.
Having decided on the angle of the roof, it is not at all difficult to calculate at what height the ridge will be. To do this, use simple trigonometric formulas for a right triangle.
Roof area
Even the most complex hip roof consists of individual slopes that follow the contours of the simplest geometric shapes, so most often for calculations it is enough to know the linear dimensions of the base and the angles of inclination of the hips.
To determine the square footage of the roof, it is necessary to add up the areas of the slopes of which it consists
The total roof area is calculated by summing the square footage of the individual hips. Slopes of complex configuration are divided into several simple surfaces, after which separate calculations are carried out for each of them.
The principles for calculating the geometric parameters of hip roofs are based on calculations for simple surfaces
Load calculation
Loads acting on a hipped roof are divided into two types:
- permanent,
- periodic.
The first includes the weight of roofing materials, rafters, sheathing and other frame parts. The second is the forces exerted by precipitation and wind force. In addition, when calculating, one should take into account the payload in the form of various engineering systems and communications attached to the elements of the rafter system.
Based on SNiP, when designing a roof it is necessary to assume a snow load of 180 kg/sq.m. m. If there is a danger of snow accumulation on the roof, this parameter increases to 400–450 kg/sq. m. If the roof has a slope angle of more than 60 degrees, then the snow load can be ignored - precipitation does not linger on surfaces with such steep slopes.
The force of wind loads is much less - up to 35 kg/sq. m. If the roof slope is from 5 to 30 degrees, then the effect of the wind can be neglected.
The above parameters of atmospheric influences are average values accepted for the middle zone. When performing calculations, correction factors should be used depending on the region of construction.
Calculation of the rafter system
When calculating the rafter system, the pitch of the rafters and the maximum load they can carry are determined. Based on these data, a decision is made to install braces, which help redistribute the load, and tie-downs, which protect the frame from loosening.
The main load of the hip roof falls on the diagonal rafters
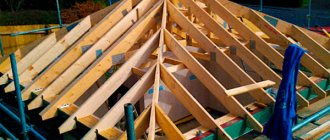
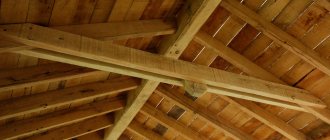
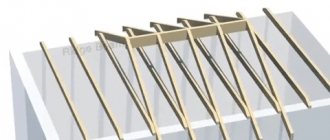
The presence of hips on hipped roofs, in addition to the usual rafters, also requires the installation of diagonal rafters (in other words, slanted ones) - those that are attached to the ridge and directed to the corners of the building. Their length is greater than the transverse node elements of the roof. In addition, shortened elements—springs—are attached to the diagonal ribs. Compared to conventional rafters, slanted legs experience a load increased by 1.5–2 times, so their cross-section is doubled, and to ensure multi-span they are supported by one or two racks.
Often, hip roofs have a complicated rafter system, which, in contrast to a simple hipped structure, places additional load where vertical supports are installed. This feature must be taken into account when calculating the strength of a wooden roof frame.
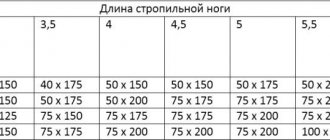
The distance for laying the rafters is called the pitch and is determined based on the length of the rafter leg and the cross-section of the lumber used. It is most convenient to determine this parameter using special tables, one of which is given below.
Table: dependence of the cross-section and pitch of rafters on their length
| Rafter leg length, m | Rafter section, m | Distance between rafters (step), m |
| Until 3 | 8x10 9x10 9x16 | 110–135 140–170 175–215 |
| Up to 4 | 8x16 8x18 9x18 | 110–135 140–170 175–215 |
| Up to 5 | 8x20 10x20 | 110–135 140–175 |
| Until 6 | 10x20 | 110–140 |
| Up to 6.5 | 12x22 | 110–140 |
Manual calculations are quite labor-intensive. To reduce design time, you can use one of the online calculators to determine the parameters of hip roofs. With its help, you can determine not only geometric parameters, but also a lot of other equally important factors:
- amount of moisture and heat insulation, taking into account overlaps;
- amount of roofing material, including waste generated during cutting;
- the volume of lumber required for arranging the rafter system;
- length of overhangs, etc.
Video: using a construction calculator to calculate a roof
https://youtube.com/watch?v=-6j7L6Kxxf4
What materials will be needed to assemble the rafter system?
For the construction of a hip roof, timber and boards made of larch, pine and other coniferous wood are best suited. When choosing material for construction, it is necessary to carefully reject defective boards. Fungal damage, knots and cracks reduce the strength of the boards and affect the durability of the roof. When the wood moisture content is more than 22%, the lumber is stacked in the open air and dried. It should be understood that under-dried boards can warp, and this, in turn, will lead to a violation of the geometry of the roof with possible damage to the finishing coating.
To assemble a wooden frame, a rectangular beam with a cross-section from 80x80 mm to 150x150 mm is used - the exact parameters are determined by calculation or using the table above. As an alternative, you can use a board with a section of 50x100 mm or 50x200 mm. If there is a need to strengthen the rafter leg, then paired boards are used.
For reliable fastening, as well as increasing the rigidity of the wooden frame, steel brackets and other metal elements are used. Often, steel supports, rather than wooden ones, are installed under particularly loaded ridge girders. Combined frames have increased strength and reliability.
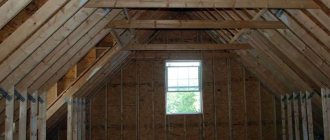
Roof with attic
If your plot of land is located on rough terrain, it is rational to build a house that consists of multi-level living spaces connected to each other. The building layout may also include various extensions, such as a garage with an attic or an enclosed terrace.
Dormer windows are a striking accent on the facade of a house with an attic; they are often highlighted in a color that contrasts with the shade of the roof and walls.
Dormer windows in the attic can have either a rectangular or arched shape, and shutters can be used as a beautiful addition to them.
In Art Nouveau style cottages, dormer windows are most often placed in the plane of the roofing.
See also: Beautiful mansard roofs of private houses: photos, design examples
Advantages and disadvantages
What are the advantages and disadvantages of a hipped roof? Experienced specialists highlight the following positive qualities of such a structure. These include:
- lack of pediments. Thanks to this, it is possible to improve the aerodynamic performance of the roof;
- minimum angle of inclination of roof slopes. In this case, the hipped roof system allows you to adjust the length of the hanging logs. These elements help make an additional canopy for the veranda;
- aesthetic appearance of a residential building. The house acquires smooth and streamlined lines.
The disadvantages include the following reasons:
- complex installation. You can make such a roof yourself if you have special skills;
- high consumption of building materials. To create a hip roof, it is necessary to make four slopes, which require additional marking and deformation of the roofing;
- construction of attic space is required. If this requirement is neglected, the risk of partial collapse of the erected structure increases.
Roofs from Ondulin
The hipped roof made of red Ondulin goes well with facades of light shades: beige, peach, vanilla, pink.
A roof made of red Ondulin is a spectacular roofing option for the hipped roof of a country-style house.
Dark brown Ondulin perfectly accents the architectural design of a house with white facades.
Brown 4-pitch roofs from Ondulin successfully harmonize with brick facades and dark joinery: window frames, door panels, wooden fences and gates.
The hipped roof of its original shape became a striking element of the architecture of the 3-story private house in the photo. Ondulin is used here as a roofing covering for both the house and the garage.
See also: Ondulin: Beautiful photos of house roofs, types of roofs
What is a hip roof
Roofs of four slopes, two of which, located opposite each other, have the shape of a trapezoid, and the other two are triangles, are called hip roofs. The hip is a triangular slope .
A hip roof consists of four or more slopes in the shape of a regular or truncated triangle
Roofs of this design have become quite widespread in modern suburban construction. In addition to convenience and functionality, they are simply beautiful. By using this architectural solution, even in the simplest version, you can make your home elegant.
Pros and cons of a hip roof
Like any building structure, hip roofs have their positive and negative qualities.
The positive aspects of hip roofs include:
- Ability to withstand significant wind loads due to the increased angle between the slopes.
- High strength to withstand significant snow loads.
- Possibility to install wide eaves overhangs on all sides of the building. They effectively protect the walls and foundation of the building from precipitation.
- Beauty and grace. Hip roofs visually conceal the height of the building with an attic space.
There are also negative aspects when using hip roofs:
- High complexity of the rafter system design. This complicates calculations and leads to higher costs for their production.
- Reducing the size of the under-roof space due to the large angle between the slopes. Because of this, the attic space in such houses turns out to be small.
- Possibility of moisture penetration through roof windows. This can be avoided by covering them with film during bad weather, but this technique is extremely inconvenient.
The main negative factor of a hip roof is considered to be the high complexity of the rafter system, accessible only to experienced craftsmen. This also explains the high cost of manufacturing hipped roofs.
Design Features
The supports for the hip roof rafters are the Mauerlat and the ridge beam. The roofing skeleton consists of the following parts:
- Support base (mauerlat). It is made from timber 100x150 or 150x150 mm, depending on the design of the building. The Mauerlat frame is strengthened in the horizontal plane by installing four jibs, which give the structure the necessary rigidity.
The Mauerlat is most often made of powerful timber and attached to the upper ends of the walls using studs or dowels - Racks. They are installed on the central axis of the floor along its long side and reinforced with temporary supports. Then a ridge beam is attached to them. The height of the racks depends on the selected angle of inclination of the slopes. The smaller the angle between the rafter legs, the higher the racks.
- Ridge beam. This is the top horizontal crossbar that lies on the posts and serves as a support for all the rafters.
The ridge beam is attached to the posts and is a support for all the main rafters - Main rafters. They rest on the mauerlat and ridge beam and are fixed to these parts using special galvanized steel plates.
- Diagonal or slanted rafters. They go from the ends of the ridge beam to the corners of the building. After installing all the diagonal rafters, you can dismantle the temporary fastenings of the racks.
After securing all diagonal rafters, the temporary supports of the racks are removed - Narozhniki. They are fixed with the lower end to the mauerlat, and the upper end to the sloped rafters. They are used to continue the plane of the main slopes. The distance between them is the same as between the rafters.
- Sprengels. They go from the Mauerlat jibs to the diagonal rafters and provide increased load-bearing capacity of the roof.
- Struts. They are needed to increase the roof’s resistance to wind loads. According to theory, it is recommended to install them on the side of the building where the “wind rose” is located. But in practice, struts are placed on all sides.
- Lathing. It is carried out along the inner surface of the rafter legs and forms the base for the roofing pie.
The design of the rafter system includes several important elements, each of which performs a strictly defined function.
The described structure of the rafter system is used with a rectangular building frame. If the house is square, the rafter system is built in the same way, but the ridge girder is not installed, since all the slopes converge at one point. This type of roof is called a hip roof.
Photo gallery: types of hip roofs
A small polycarbonate greenhouse is embedded in the structure of the house frame and roof
The roof of the original Danish-style house has two glass slopes
Hip roofs can have broken slopes of complex shape. A small protrusion on the attic floor with its own rafter system is called a “cuckoo”
Corrugated roofs
The brick facades are beautifully set off by a roof of a deep tone, for example, made of corrugated sheets painted in a dark emerald shade.
The design of a house with a sloping mansard roof made of dark corrugated sheet metal, contrasting with beige facades and white architectural details, is interesting in its own way.
The design of a one-story house with a hip roof made of galvanized corrugated sheets looks very expressive thanks to the contrasting end strip, which emphasizes the shape of the gables.
Hip roof with non-residential attic - features
If you do not plan to inhabit the attic space of the house, this will simplify the roof structure. Since the hip roof has a gentle slope, short rafters can be used for a structure with a smaller cross-section, which will significantly save the construction budget .
A residential attic will require a revision of the design, including changing the shape of the roof or significantly raising the beam floor. A similar solution can be used for the construction of large cottage houses, where the dimensions of the structure allow the attic to be equipped as a room.
Hip roof with attic
Metal roofs
A 4-slope roof made of metal tiles perfectly imitates a ceramic analogue and favorably emphasizes the severity of architecture in a classical style.
The most successful solution for private houses in the spirit of the classics is a red metal tile roof with a hipped attic.
For houses designed in the neoclassical style, metal tiles are most often selected in rich shades that contrast with the color of the facade finishing.
A hipped roof made of metal tiles harmonizes perfectly not only with classical architecture, but also with the design of houses in an ultra-modern style, when continuous facade glazing is used. In this case, the color of the roofing is selected in a neutral tone: black, anthracite, gray.
See also: Cottage interior design: 60 photos in a modern style
Step-by-step instructions for building a hipped roof
As an example, let’s look at the simplest of the listed types of hip roofs – the classic one. But even such a simple hip roof design is much more complex than any gable roof.
Standard hip roof design with support in the ridge area
Options for the rafter system of a hip roof. In the diagram on the left, the corner rafter (slant) rests on a truss; a similar solution can be used for all types of hip roofs
Important. You can start building a hip roof only after the professionals have made all the calculations. The best option is to order a house project from the relevant organizations. This will cost much less than restoring the structure after its destruction.
Hip or hip roof area calculator
Go to calculations
The construction of a hipped roof consists of several stages, you need to consider each of them in detail.
Floor beams and mauerlat
Prices for various types of timber
timber
Before starting construction of the rafter system, check the geometry of the house box; all walls must be parallel. According to the requirements of building codes, deviations at the corners of the building are allowed no more than two centimeters. If this parameter is exceeded, then adjustments will have to be made by changing the length of various elements of the rafter system.
First you need to check the geometry of the box at home
Quite often, the foundation plan does not provide for a load-bearing wall in the center of the house; architects plan two load-bearing partitions at an equal distance from the facade walls. This layout of the building makes adjustments to the plan of the rafter system; it is necessary to provide a special vertical structure (“stool”) to absorb vertical loads on the rafter legs, including the longest corner legs. One end of the rafter will rest on the mauerlat, the middle near the ridge on the purlin, and the second end in the ridge. Of course, these additional loads must be taken into account during the design, and the elements of the rafter system must withstand all forces with a safety factor. For residential buildings it is at least 1.4, that is, the rafter system must withstand actual forces that are 40% greater than the maximum calculated ones.
Step 1: Install the ceiling joists. They lie on a beam installed on the wall in a special niche slightly below the reinforced belt for the Mauerlat. It is imperative to put a waterproofing layer between the timber and the wall; it is better and cheaper to use ordinary roofing felt.
Ruberoid is fastened with a construction stapler
Laying timber
If such a niche is not provided for in the project, then the floor beams are installed directly on the mauerlat. But this method reduces the already small height of the attic space. It is better to fill the reinforcing belt yourself and provide a niche.
The beam is not fixed to the wall by anything; only vertical loads act on it. Roofing felt can be cut into strips with a grinder, this is much more convenient and faster; it is recommended to use two layers of waterproofing. The waterproofing strips are fixed to the timber with a stapler.
Ceiling beams installed
Important. On those walls where it is planned to install the vertical legs of the “stool”, you need to lay wide boards. Due to this, the additional load of the rafter system is evenly distributed over the entire surface of the masonry. The armored belt must be poured at the same level as the jumpers.
The distance between the ceiling beams should take into account the dimensions of the insulation. As a rule, this is the width of the material minus 1–2 centimeters; for floor beams, a 50x150 mm board is used. Immediately prepare the jumpers for the beams and use them as a template for adjusting all distances. The lintels are nailed down and make the floor structure rigid. The length of the nails is at least 120 mm; they need to be driven in slightly obliquely. If this is not done, then there is a high probability of cracking of the lumber. If the boards for the floor beams have a significant variation in width, then the work will become a little more complicated; you will have to spend more time measuring the lintels and sawing them separately.
Jumpers are nailed
Uses 120mm nails
Step 2. Install the Mauerlat. Level the surface of the reinforcing belt as much as possible; the difference in height should not exceed five millimeters per linear meter. In what order should the structure be installed?
- Drill holes in the corners of the facade walls; they should be located exactly in the center. The depth of the holes is not less than the height of two rows of masonry, this way the bandaging is done and the stability of the metal mortgages (anchors) is increased. The distance between the holes along the length and width of the house should be perfectly equal, check the corners. This should be done by measuring diagonals, as when laying out the foundation on the ground.
- Stretch the threads and drill holes along them along the length of the wall in increments of approximately 1.5–2.0 m.
Installed anchors
- Install the anchor into the holes. They can be made from building reinforcement of a periodic profile, wire rod or hexagon of appropriate diameters, but there must be a thread in the upper part. For the Mauerlat, anchors with a diameter of 8 mm are sufficient.
- Measure the distance from each stud to the edge of the wall and record this parameter on the horizontal surface of the reinforcing layer. This will greatly speed up the further process of installing the Mauerlat.
The distance is recorded on the surface of the reinforcing layer
Cut the timber for the Mauerlat to size, prepare the joints in quarters.
Preparing timber
Prices for popular models of circular saws
Circular saws
Quarter joints are created
Lift the pieces one by one to the top of the wall, place them next to the studs and mark the locations for drilling holes. This is done using a square. Place its leg to one side of the beam, and bring the other to the pin and draw a line. Do the same operation on the other side of the stud; there should be two parallel lines on the surface of the beam. Now transfer the distance recorded on the reinforcing belt to the beam and mark the center of the hole.
The blanks are laid next to the studs
Mark the locations for drilling holes
Drill a hole and put the Mauerlat in place. Do not forget to constantly waterproof. Tighten the nuts with great effort and press the Mauerlat to the reinforcing belt. Using the same algorithm, lay the remaining elements around the perimeter of the house. Everything is ready - you can start building the rafter system.
Holes are drilled
Waterproofing is targeted with a stapler
Nuts are tightened
Manufacturing of supporting horizontal purlins
Professionals among themselves call this design a “stool.” This is a very important element of the rafter system; there are no two identical options for all occasions. The master must make a specific decision on the spot, taking into account the characteristics of the house and the rafter system. But as we have already noted, the ideal option is to build a four-slope rafter system according to the project. It is required for all residential buildings; without a design, a house cannot be put into operation. This means that utilities will not be connected to it, residents will not be registered in it, and it cannot be sold or bequeathed by inheritance. Legally, the building does not exist, has no value, and is unsuitable for habitation. So be sure to order the production of project documentation.
Finished floor and mauerlat
All sides of the “stool” must be located at the same distance from the mauerlat, otherwise there will be a problem with attaching the rafter legs.
Stool collection diagram
Step 1: Lay the boards flat on the load-bearing walls inside the house. Above the boards, pull the thread over the Mauerlat and check the gap between it and the surface of the boards. This parameter must be checked. The fact is that the Mauerlat may not be perfectly horizontal, the boards on the load-bearing walls may have different thicknesses, etc. But we need to achieve the most horizontal position of the purlins, it has an important impact on the stability of the rafter system. The length of the vertical supports is measured separately for each element and must take into account the difference in height.
The boards are laid flat
Step 2. Temporarily secure the supports with diagonal spacers and install them in a vertical position. You can use an ordinary level, but the most accurate result is a plumb line. By the way, professional builders, when making a rafter system for measurements, prefer a plumb line and a hydraulic level in the form of a small diameter hose filled with water. These measuring instruments have the highest accuracy and do not depend on correct settings or the integrity of the manufacturer.
Installation of supports
Installation process, drawing
Step 3. Install the purlin beams on vertical supports and connect all the elements into a single rigid structure.
Photo of the assembled structure
Practical advice. There are times when, due to too large a distance between the internal partitions of the house, it is not possible to place emphasis in the right place. Then it is necessary to provide additional side struts on the “stool” and attach the purlin to them. The struts are installed after the spatial position of the “stool” has been leveled along all axes. Keep in mind that the strength and stability of the rafter system of a hipped roof largely depends on the accuracy of the alignment of the Mauerlat and horizontal girders. In addition, having all the dimensions, you can make a working drawing of the elements of the rafter system (ordinary and slanted rafters, braces, extensions, stops), this will greatly facilitate and speed up construction work. There will be no need to waste time measuring each element in the attic, and then going down to the ground to make it. In practice, it has been proven that the time lost on preparing a drawing certainly pays off many times over during the production of rafter legs.
Manufacturing and installation of rafters
The drawing shows the angle of inclination of the slopes and the height of the run; these initial data make it possible to easily calculate the length of the rafters, the distance between the cuts and their depth. The dimensions must be transferred to the board.
Important. Check the condition of the rafter boards; they should be smooth, without bends, damage from wood diseases or cracks. The load on these elements is maximum; it is recommended to use lumber of at least first grade for the rafter system.
Step 1. Cut one rafter leg to size, take the time to climb up the house and check it. And not only in one place, but along the entire perimeter of the building. If you find any errors, please correct them. The first rafter is used as a template; all the remaining ones are made from it. The quantity depends on the size of the house, the angle of the roof, wind and snow loads. Taking these efforts into account, the dimensions of the boards are calculated; it is difficult to do this on your own.
Preparing the rafter leg
The first rafter is used as a template
It is easier to mark cut angles with a Svenson square; this is a very convenient, accurate and useful tool for carpenters. It is not clear why in America they have been working with it since 1925, but it came to us quite recently and is considered a modern measuring instrument. By the way, the majority of hand-held power tools were invented by foreign engineers, something that domestic engineers worked hard on for decades - a big state secret.
Svenson square metric
Step 2. Raise the house and install four row rafters in place, check their position. If everything is normal, put the ridge in place and nail the rafters to it. First you need to nail the two outermost elements, after checking the position, a thread is pulled between them and all the remaining ones are fixed along it. This is a very important point; the rafter legs must be positioned strictly in the same plane.
Four row rafters installed
The rafters are nailed to the ridge beam with three nails: two on the sides obliquely, and one on top. This is quite enough, the tensile loads are insignificant.
Step 3. Make a drawing of the corner (sloping) rafters, cut out the elements according to the data obtained. In most cases, for such long rafters it is necessary to extend the boards. This is not difficult to do; there is detailed information on the Internet about various extension methods. Choose the most suitable one for yourself, try to ensure that the connection point is as close as possible to the supports or braces. In any case, it does not have the strength of a whole board; precautions must be taken to reduce bending forces.
Prepared rafters
Step 4. Place the truss under the sloped rafters. It consists of the following elements:
- support beam rests on the mauerlat;
- side braces, nailed to the rafters and support beam;
- vertical stop, strengthens the rafters.
Sprengel elements
The sprengel performs two tasks: it relieves the bending stress of the rafters and withstands lateral wind loads on the roof of the house. Such elements are made for each inclined rafter. It is desirable that the place where the rafters are built is located above the truss.
Sprengel has several functions at once
To align the rafter, pull the thread and use a sprengel to level its position. To prevent the vertical support from slipping, secure its position with a stop block nailed to the rafter. To further increase the stability of inclined rafters, support them with struts, the lower end should rest against the vertical support of the “stool”. Place the brace at a 90° angle to the rafter, this will prevent the element from slipping.
The rafter is supported by a brace
If the rafter system is hanging, then metal angles must be used to fix the legs; in all other cases, ordinary nails are sufficient. If the rafter boards are very short, then fillets need to be nailed to them.
Ready rafter system
Prices for various types of fasteners for rafters
Rafter fasteners
Step 5. Pull the thread along the edge of the eaves overhang and mark all the rafters. It is better to mark the cuts using a square or a simple template. The second option is faster and more accurate. Trim the rafters according to the markings, nail the wind board and the first bar of the counter-lattice.
A thread is stretched along the edge of the eaves overhang
A simple template is used for marking
Wind board
There is no need to use film on a cold roof. It is needed only to minimize leaks in the event of a leak in the main coating and a slight reduction in condensation; make the decision yourself.
Step 6. Install the sheathing under the covering, the step depends on the type of roofing material.
Practical advice. To increase the load-bearing characteristics and stability of the roof, you can additionally secure the rafter legs with ties installed above the horizontal upper purlins.
The rafter legs are additionally secured with ties
Installation of roofing coverings
After the film is laid, make a counter-lattice under the metal tiles. Soft roofs do not need counter-lattice or film. For metal tiles, the pitch of the first two sheathing boards is 30 cm, for all others 35 cm. At the ridge, the boards should be placed in such a way that a metal ridge element can be fixed to them.
Counter-lattice for metal tiles
Important. If film was used, then air vents should be left in the ridge for natural ventilation of wooden structures.
Metal roof
Make sure that the rafters are placed correctly and exactly in the same plane, this will eliminate the need to level the sheathing. Roof coverings are carried out using well-known technologies and taking into account the recommendations of manufacturers. If there are installed ventilation holes or chimneys on the roof, then it is better to use special additional elements for sealing; they are sold complete with roofing coverings. The drainage chute is fixed after filing; do not forget to make a slope to drain the water.
Video - Pitched roof. Thermophysics.
Soft roof
Flexible gray slate tiles emphasize the nobility of hipped roofs in the Tudor style and allow you to beautifully lay out the rounded slopes.
The architecture of the private house in the photo is a slightly unusual interpretation of half-timbered wood, when the black wood of the frame is combined with brickwork, and in addition to this “brutal” tandem, a half-hipped hipped roof made of gray slate-like slate tiles was chosen.
A flexible red roof is an effective solution for the design of a summer kitchen with a barbecue area built of brick and wood.
A hipped hip roof made of bitumen tiles is a good option for arranging a patio area by the pool in a modern style.
Design of a hipped roof and installation of a rafter system
Now that the project is ready and you have the drawings of the hipped roof in your hands, you can begin installing the rafters of the roof system. Installation can be carried out in several ways - hanging and inclined.
The inclined method is more economical and not so difficult to construct. When constructing a rafter system, it is necessary to take into account the elements that are necessarily present in each structure:
- slanted or diagonal rafters. In the finished structure they are installed so that they have a stop. Usually they rest against the mauerlat and the next pair of rafter legs;
- the Mauerlat is the lower support for the rafters;
- the girder-beam, which is used as additional support, is usually placed parallel to the mauerlat;
- shortened rafter legs are also used to support the mauerlat and rafter legs;
- racks and struts are used to construct a multi-span structure; in this case, it is also necessary to install several supports on the slanted leg;
- crossbars. They will help if there are gaps. This usually happens if the rafter system of the hipped roof was installed incorrectly during installation;
- the bench is used as a support for struts and racks;
- the sprengel will be used as an additional element of the rafter support.
Stages of work
First of all, to evenly distribute the load from the rafter system, roofing and precipitation during the winter, a support for racks and a Mauerlat are laid on the load-bearing walls . The support for the racks is installed on load-bearing partitions. Support posts will then be installed on these supports. Here you cannot do without a water level, with the help of which the support posts are leveled and secured with supports made of boards. The racks are secured using metal corners. Depending on which roof is being installed, the required placement of racks is also taken into account.
When installing a rafter system for a hip roof, the racks are placed in one row, and the distance between them should be no more than two meters. If a tent structure is being installed, then the racks are placed diagonally with the same distance from the corner. Then the purlins are laid on the racks and secured with an angle on the screws. Next, install diagonal rafters in increments of 0.5 to 1.5 meters. Professional carpenters advise making rafters from two boards combined in thickness, since it is these structural elements that experience the load. They are rested with the upper side on the rack, and the lower side on the corner of the Mauerlat.
Next you need to fill the distance between the rafters. Shortened rafter legs are perfect for this. The lower quarter of the diagonal rafters receives the greatest load, so it is recommended to install additional rafter support elements under them . They are placed, like ridge racks, on reinforced beams. A sheathing is made onto the finished structure of the rafter system of a hipped roof, followed by laying roofing material on it.
Advantages and disadvantages of a hipped design
If you compare a four-slope structure with a classic gable one, you can immediately identify a number of advantages and disadvantages. Benefits include:
- thanks to attic roofs, you can convert the attic space into a living space, which will significantly increase the living space of the house;
- the hipped roof, due to the peculiarity of its design, is not subject to temporary deformations;
- By insulating the roofing material during installation, you thereby improve the thermal insulation of the entire house, which saves on heating costs;
- due to the low angles of inclination of the structure, such roofs better withstand various weather changes;
- Thanks to its unusual design, the structure looks very beautiful and will add zest to any room.
The disadvantages, perhaps, include the following points:
- Considering that the design of a hipped roof is more complex than a gable roof, it will cost you more during installation. But again, thanks to it you don’t have to do brickwork;
- slopes located on four sides take away part of the living space from the short ends;
- Another disadvantage is that the roof windows that are installed can cause puddles to appear on the floor when it rains. But again, only if you forgot to close them. If desired, even ordinary vertical windows can be installed in the attic roof.
If you still decide to build a hipped roof with your own hands, it will not be easy. But, having hand and power tools, as well as all the necessary measuring devices, you will succeed, the main thing is to follow the general principles. It is important to remember that when installing the Mauerlat, it needs to be firmly secured in the corners , you should always start installation from the ridge, and the racks need good foundations. When you do the work yourself, you want the result to last as long as possible, so it is best to fix the structural elements of the rafter system with modern metal fasteners for wood.
Reed, straw and reed roofs
The village of Giethoorn in Holland is known as the “Venice of the North” - there are practically no roads here, only canals lined with colorful houses under thatched roofs.
The architecture characteristic of Giethoorn includes rectangular houses under half-hipped roofs made of reeds, which over time change color from golden to noble smoky.
The technology of cutting straw sheaves allows you to create semicircular surfaces on the roof, for example, at the junction of slopes or when decorating attic dormers.
Despite its centuries-old history, reed hipped roofs are organically combined with contemporary architecture.
Warm, sandy-beige shades of the reed roof give the exterior of the house a hospitable ambiance, even if a contrasting black and white color scheme is used in the decoration of the facades, as in the photo.
A two-level hip roof made of reeds will become a spectacular element of the architecture of a modern country-style house.
See also: Beautiful interiors of cottages: 60 photos inside country houses
Construction of a roof truss system with four slopes
Here is the simplest example of building a standard hip roof for a small country house:
Stage I. Planning and design
Before making a hipped roof, be sure to think through all its details, down to the smallest detail. Be sure to build even the simplest hip roof structure according to a ready-made drawing. The fact is that the finished gable roof has almost noticeable defects and distortions, but if you make a mistake somewhere in the construction of the same hip or hip roof, then the diagonal rafters simply will not meet at the ridge and it will be extremely difficult to correct this.
Therefore, if you know special programs, create a 3D model of the future roof directly in them, and if not, then just prepare a detailed drawing and it’s good if a professional helps you with this. All the details of such a roof must be calculated - down to the smallest detail!
By the way, today it is quite fashionable to make not only the roof hipped, but also its individual functional elements:
Stage II. Preparation of structural elements
So, if you have taken a ready-made roof drawing or sketched it yourself and are confident in the future quality, it’s time to prepare the necessary elements of the rafter system. And to do this, first let’s figure out how they are called correctly.
So, the first thing you have to take care of before building a hip roof is the Mauerlat . This is a square or rectangular beam that you will lay on the top of the walls around the entire perimeter of the house. It will become a support for the rafters, which will transfer the load to it, and it is this board that will evenly distribute the weight of the entire roof onto the walls of the house and the foundation. The ideal option is to use a beam with a section of 15 by 10 cm as a mauerlat.
Next, you will build the rafter legs - this is the main element that will create the slope of the roof. Standard rafters are made from boards 50 by 150 mm, and diagonal ones - 100 by 150 mm.
You will also need ties, the main task of which is to prevent the rafter legs from moving to the sides. You will fix the puffs themselves and connect them with the lower ends, and for this, stock up on boards measuring 50 by 150 meters.
But from above, both the diagonal rafter legs and the standard rafters will converge and be secured to each other in the ridge . To do this, take a beam 150 by 100 mm.
Next, in the center of the two opposite sides there should be a transverse beam - a bench , which serves as a support for the racks, and they, in turn, support the ridge girder. A timber with a cross section of 100 by 100 mm or 100 by 150 mm is suitable for this purpose.
The slopes will become a support for the rafters, which prevents them from moving. You should install them at an angle to the stand; to do this, take the same material as for the bench.
Next, an important detail will be the rack - the vertical element of the roof frame. It will serve as a support for the skate. Make it from the same material as the Mauerlat.
Don't forget also about the wind board - this is a horizontal element that connects all the lower ends of the rafters together. You will need to nail it to the rafters along the inner perimeter of the roof and in this way emphasize the line of the slope. A 100 by 50 mm board is suitable for this purpose.
But for the outside you will need another board - filly , made of the same material. This board received such a strange name from the times when it was carved in the form of horse faces.
But the most unusual and complex element of a hipped roof is the truss , which gives rigidity to the entire structure. Its main task is to connect all horizontal and vertical elements. It is also mounted at an angle, and is made of 100 by 100 mm timber:
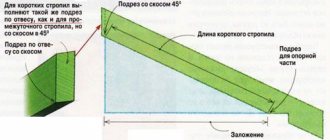
And finally, if we are talking specifically about a hip roof, then the only element that is present exclusively in hip roofs is spigots . They are shortened rafters that rest on a diagonal rafter leg. You can make them from a 50 by 150 mm board.
In life, all these elements look like this:
Also think about insulation, waterproofing film and additional roofing elements:
Stage III. Installation of attic floor
Often the headstocks of hanging rafters or hangers, which work in tension in a hip roof, must be made of steel. To do this, special wooden purlins are suspended perpendicularly to the clamps of the wooden rafters.
And wooden beams are suspended perpendicular to the purlins, after which beamless lightweight fillings are laid between them. Therefore, if you want to reduce the roof load on the hanging rafters or roof truss, you need to choose suspended floor structures.
For steel trusses, the suspended ceiling must be made fireproof, using steel beams. Prefabricated reinforced concrete slabs should be laid between such beams, and light insulation should be placed on them. To increase the fire resistance and durability of such load-bearing structures, they must be made of reinforced concrete. Moreover, it is better to make the most reinforced concrete load-bearing structures from large-sized prefabricated panels, so as not to take risks.
Stage IV. Installation of ridge girder
When calculating the ridge run, take into account the following nuances:
- If the building has permanent longitudinal walls, or at least two rows of internal pillars, then two purlins are made. At the same time, many rafter structures can be composite along their length, and crossbars are used to increase rigidity.
- If the building does not have internal supports, then it will not be possible to make inclined rafters here. Therefore, special construction trusses are used, to which the attic floor is simply suspended. In this case, the rods, which are located along the upper contour of the trusses, form the upper chord of the construction truss, and along the lower contour - the lower chord. The truss lattice itself now forms vertical rods and braces - inclined rods that are located between the upper and lower chords. Moreover, such trusses are not necessarily made only of wood; on the contrary, steel reinforced concrete ones are quite popular today. During the construction process, the trusses are installed at a distance of 4-6 meters from each other. The simplest version of such trusses are truss trusses, which consist of rafter legs, a vertical suspension, headstock and tie rods.
- If the width of the building is large enough, construction trusses or truss supports are used during installation. But then the attic floor cannot be covered with beams that will rest on the walls alone. Such a structure must be suspended on steel clamps to the lower chord of the truss, or to a tie, in order to thus form suspended ceilings.
This photo illustration clearly shows exactly how the rafters need to be attached to the ridge and ridges: