For a roof, the rafter system is something like a skeleton. It also has basic elements that hold the entire frame, and additional ones that provide strength and the presence of internal space under the roof. Without knowing the names of all these elements, it is quite difficult to understand the roof construction process. But you need to figure it out! The minimum is to control the quality of the work taking place when you hire a team, and delve into the intricacies of design. And self-confident craftsmen even take on the installation of the roof on their own, being well-versed in theory.
We invite you to consider the basic concepts: what a rafter system is and what elements it consists of. Now there will be no unclear terms left for you!
Shapes and types of roof: complexity of the device
First of all, let's understand the basic concepts. The greater the load on the roof, the more complex its shape, the more likely such a rafter system will contain many internal elements. For example, the simplest design of a rafter system is for a roof with one slope, and the most complex is for a multi-slope or unusual roof.
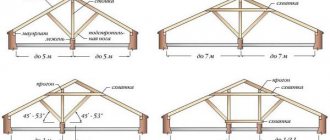
Depending on the number of available slopes, the roof truss system is called single-pitch, gable, hipped or multi-pitch. So, a pitched roof has only a plane - in the form of a rectangle. And with a gable roof, both planes rest on two outer walls. In this case, two triangles are formed on the end sides of the house, which are called gables (therefore, a gable roof is also called a gable roof).
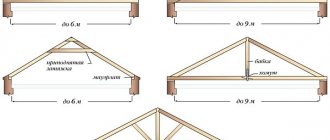
Typically, such a roof is equipped with a slope of 14 to 60 degrees. It consists of a row of two rafter legs resting on a horizontal beam. In the simplest version, these two rafter legs are connected by a bar, which is called a tie, but it is rich in additional elements. These are beds, racks, purlins, struts and much more.
And here is a more complex hipped roof. This rafter system does not have gable walls; they are replaced by additional slopes. To some extent, this saves building materials, but it is already more difficult to design and build such a roof. To do this, you will need layered rafters or integral trusses:
In addition, the hipped roof also has subtypes. So, if all the slopes are identical triangles, such a roof is called a hip roof. In this case, the vertices of the triangles always converge at one point. If two roof slopes are trapezoids, and the other two are cut triangles, then these are half-hip roofs: Danish or Dutch.
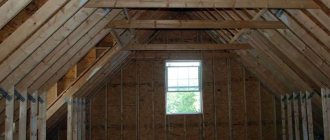
Another type of roof is sloping or mansard. Usually such slopes are steep, up to 60 degrees, and near the ridge they are flatter. Thanks to this structure of the rafter system, the attic area allows you to arrange quite comfortable rooms there. This roof is especially good for houses with a width of less than 10 meters.
Often today you can also find a multi-pitched roof with a complex architecture, which is becoming more and more fashionable every day. But its rafter system is also intuitive, because anything complex can be visually divided into several simple segments. Therefore, looking at the unusual roof, you will see that it effectively combined several of the most typical structures at once.
Types of rafter system
The construction of the roof during the construction of a building is of significant importance. And in order for the roof to be strong enough, special attention is paid to load-bearing systems, which are divided into:
- combined;
- hanging;
- layered.
A roof is a rather complex structure consisting of various parts. The main requirement for a roof is the ability to protect the building from all kinds of weather conditions and withstand different loads.
The main loads of the roof fall on the rafter system, so it is very important to select the right materials, calculate everything correctly and carry out installation in accordance with the technology.
Installation of hanging rafters
Hanging rafters are intended for buildings in which there are no permanent partitions inside, and the distance between the common load-bearing and side walls is no more than 10 meters. The roof structure in this option rests on the main walls of the building, but because of this it is subject to high loads. To make the tension a little weaker, additional parts (tightenings or crossbars) are used that fasten the truss in a horizontal position.
Depending on the span length, various reinforcing elements are used in the construction of hanging rafters
The lower ties are connected at the base of the rafters and can be used as beams for the attic floor, but they must be laid on the mauerlat. To make hanging rafters, a board with a cross-section of 50x200 mm is usually taken, but each individual building needs its own specific calculations.
Sequence of actions for installing hanging rafters:
- First, a Mauerlat is installed on the load-bearing side walls.
It is convenient to fasten the Mauerlat to the side load-bearing walls using screw studs pre-embedded in the building frame - At the bottom of the roof, hanging rafters cut into the mauerlat. Initially, the first pair of rafters is made on the ground and used as a template. The remaining pairs of hanging rafters are made along it. Next, all trusses are lifted to the very top of the building and installed one at a time. In order for them to stand stably, they need to be secured with temporary struts.
The rafter legs are attached to the mauerlat with steel plates on both sides - Next, the ridge girder is installed, maintaining the correct distance between all rafters.
The ridge girder connects the trusses at the top and fixes them in a vertical position - Each pair of rafters is strengthened with tension boards. After this, the final tightening of the places where the rafters are attached to the Mauerlat is carried out. In this case, bolted connections can be used.
- If the span between the walls exceeds 10 meters, the system is additionally strengthened with slopes and racks.
Installation of layered rafters
Layered rafters are mainly installed in those buildings where there are load-bearing partitions. They are much easier to install than a hanging system, since strong load-bearing walls located inside the house provide reliable support for the rafters. In addition, this system requires a minimum amount of building materials.
The ridge board in this case serves as a reference point. This roofing system is installed in one of three options:
- The upper side of the roofing layered system is attached to the ridge support, and the lower side is cut into the Mauerlat. It is attached to the wall with staples or wire.
- The upper part of the rafters is cut at the desired angle and then connected with iron plates. The lower part of the rafters is mounted to the Mauerlat using special movable fasteners.
- The rafters are secured with boards or bars on top. The bars are positioned horizontally and parallel to each other. The rafters are mounted on both sides at a certain angle, and a ridge girder is installed between them.
The configuration of additional stiffeners in layered rafters also depends on the length of the building span
To secure the rafters at the bottom of the roof, it is necessary to use sliding fasteners, which relieve the load-bearing partitions from additional stress. In this case, the rafters are not fixed very tightly, so that when the building shrinks, they can move without overloading the roof structure.
But in some cases, you can use a spacer system that is tightly attached to the Mauerlat below. Struts and ties are installed in the structure to reduce the load on the walls. This method is called complex because it combines elements of two systems.
This roofing system is used mainly for the construction of private buildings, so it is worth mentioning the installation work, which is carried out in the following sequence:
- Waterproofing material, for example, roofing felt, is placed on the constructed main walls of the building.
- The Mauerlat is attached to the frame through the waterproofing using metal anchors.
- The rafters are installed on the Mauerlat and secured with rigid or movable sliding fasteners. You can fix the rafters with twisted wire inside the wall. To do this, you need to drive a crutch at a distance of 30 centimeters from the Mauerlat and screw the wire onto it. Then fix the crutch on the rafters. Such fasteners preserve the roof even during gusty winds.
Layered rafters are attached to the Mauerlat with metal corners or special moving elements - An overhang up to 60 cm wide is formed as follows - the rafter legs are extended beyond the boundaries of the load-bearing walls. This design will reliably protect the walls from precipitation. If the rafter legs only reach the mauerlat in length, they are lengthened using parts called fillies.
To lengthen the rafters, boards of a certain length are stuffed onto them - fillies - The rafter system is secured with purlins, racks, and struts.
At the last stage, the trusses are connected with ridge purlins and additional struts, and gable overhangs are also installed
Installation work to install the layered system should begin with laying the boards on the floor beams. This device will help you carry out work comfortably and safely.
Combined roofing system
Combined rafters have elements from layered and hanging systems in their design. They are used in the manufacture of attic roofs. The walls of the rooms on the second floor are made up of vertical posts, which act as a fulcrum for the rafter beams.
The horizontal beams that were installed on top of the racks perform two functions: for the upper slopes they are a mauerlat, and for the side slopes they are a ridge beam. Some part of the rafter system, which is connected at the top of the ends of the racks, simultaneously becomes a tightening for the upper elements and a crossbar for the slopes located on the sides.
The combined roof uses fragments of layered and hanging rafter systems
To increase the strength of the structure, it is necessary to install struts that secure the rafters and vertical roof posts. Making combined rafters is a little more difficult than other systems, but the labor intensity of the work is offset by an increase in the load-bearing characteristics of the roof and the presence of a full-fledged room under the roof.
Photo gallery: options for rafter systems
The hip roof design uses layered rafters
For the envelope roof, a rafter system similar to the attic is erected
In the structures of sloping roofs, at the joints there are special rafters that support the valleys
Multi-gable roofs consist of several different rafter systems combined into one whole
In the rafter system of an attic roof, the same element can be both a mauerlat and a ridge
Roof skeleton: rafters, ridge and additional elements
Now let's move on to examining the individual elements. So, when you look at a well-designed and tastefully executed roof, you probably suspect (or know for sure) that it has some backbone inside. And this is true: like a living organism, the roof has a real skeleton, and the skeleton has a spine (ridge), ribs (rafters) and everything else:
Let's start with the most important concepts: what are rafters or rafter legs? These are metal or wooden bars or beams on which the entire structure rests. Basically, the rafters are connected to each other by hinges, i.e. movable or static, and take on all dynamic and static loads.
The rafter leg is the main functional element of the rafter system. It determines the angle of inclination of the slope, the general structure of the roof and serves as something like “ribs” that are attached to the “spine” - the ridge of the roof:
But if you lay the roofing directly on the rafters, between which there is a sufficiently wide step, then it will sag or even fall down. Therefore, the sheathing is placed directly on the rafters, perpendicular to them - boards, bars or metal strips. A separate element of the sheathing is called sheathing . The minimum section of the beam is 30 by 50 mm, and the rest of its parameters depend on the chosen roof.
Let's immediately define such a term as counter-lattice . It is made with a cross-section of 30x50 mm and installed along the rafter legs. They are necessary to secure the waterproofing film and create a ventilation gap under the roofing. Moreover, the counter-lattice is installed earlier than the sheathing itself.
Let's move on. A building with walls made of concrete, foam concrete or brick also has an additional element of the rafter system called a mauerlat . This is a wooden beam that takes on the entire load from the roof and carefully distributes it along the entire length of the walls. This element is necessarily separated from the wall by a dense layer of rolled waterproofing:
To prevent the rafter legs from moving apart, they are fastened at the bottom with a tie , and struts and racks give the rafters additional stability.
The overhang of the roof is the extension of the rafters beyond the wall to divert the rain flow away from the house. If the length of the rafter legs is not enough, fillies .
There is also such an important element as a beam , which is prepared from wooden beams or rolled products. This is an important part of the structure, which is designed for bending.
But a rarer element of the rafter system is the headstock . Essentially, this is a wooden beam that supports the rafter legs. It is installed perpendicular to the tie to connect the rafters.
Here's what all these elements look like:
And finally, in that place. where two slopes intersect in an internal bend, an internal angle is formed, which is called a valley . Where the slopes intersect on the outside, ridges (or ribs) are formed, but they should not be confused with stiffeners - these are special structural elements in the form of grooves and plates, which are sometimes used in roof construction. The sloping surface of the roof itself is called slope .
And the rafter system is the totality of all the listed elements that are included in it.
Installation of roof truss system
The rafter system is made of coniferous wood. You can use boards or timber that are treated with antiseptic substances before installation. Fasteners can be as follows:
- wooden scarves;
- metal plates;
- various cuts;
- nails.
When starting to install the rafters, the level of the floors and load-bearing walls is raised, after which waterproofing is laid. The rafter structure is necessary to prevent deformation of the rafters. The supporting elements that give the rafter system stability can be:
- sunbeds;
- struts;
- runs;
- racks.
Insulation of the roof is necessary, but for this you should choose a material for hydro-, heat- and vapor barrier. Installation is carried out layer by layer and only in the sequence in which it is necessary: initially steam-, then heat- and finally moisture-proofing material.
Before laying the roof covering, the necessary protective materials are installed in compliance with the established ventilation gaps
To ensure long-term operation of the rafter system, the necessary air circulation is arranged by installing ventilation holes. To prevent leaks, “collars” are made near the holes to prevent water from penetrating under the roof.
Video: DIY rafter system installation
How is the Mauerlat attached?
The Mauerlat is the foundation of the roof, so you should treat it responsibly. Otherwise, roof repairs will be inevitable in the future. Sequence of work:
- Waterproofing material is installed along the entire perimeter of the building.
- The beam is laid out on the upper end of the walls. If necessary, parts of the timber are spliced together.
A beam of the required cross-section is laid out along the entire perimeter of the building onto a layer of waterproofing - The correctness of the geometric shape is checked - the equality of the lengths of the diagonals. You can use fishing line or rope to check. The equality of the diagonals means that the angles formed by adjacent parts of the mauerlat are right. If necessary, the position of the beam is adjusted.
- The corners of the Mauerlat are fastened together.
The Mauerlat is fastened in the corners in half a tree - The Mauerlat is tightly secured with pins or wire. If you use studs, then holes are drilled in the Mauerlat. Tightening is done in several stages.
The mauerlat is attached to stone, block or concrete walls using studs fixed in them when installing the upper grillage
Methods of fastening roofing Mauerlat and splicing rafters
The Mauerlat is attached to the walls of the building along the entire perimeter, and the fastenings must be located in close proximity to the inside of the wall. Outside the house, the wooden part is protected by a slight projection of the wall. The mounting location is also initially determined.
How to fix the Mauerlat to the wall
The Mauerlat can be attached to the wall in the following ways:
- Using a wire that is laid between two bricks. Its length is selected so that in the end the entire beam can be tied with wire. The amount of wire must correspond to the number of rafter legs.
The wire is wrapped around the Mauerlat and tightened into a strong knot - Screw studs. Height reinforcement is introduced into the masonry at least 3 rows before the start of the roof. The reinforcement size is 10 mm. Studs bent into an L-shape are connected to the reinforcement frame. The length of the stud is selected so that the part remaining above the surface of the wall frame is several centimeters larger than the thickness of the Mauerlat. The structure is then filled with concrete. Matching holes are drilled in the Mauerlat timber and put on the studs. Next, the Mauerlat is fixed with nuts.
The pin is connected to the reinforcement frame and, after pouring concrete, becomes part of it - Wooden plugs. They are placed in the building the size of one brick and treated with antiseptics. You can put plugs under the Mauerlat and secure them with iron staples.
How to fasten rafters to the Mauerlat
All options for attaching the roof rafter system to the Mauerlat can be divided into the following types:
- Sliding mount. It is produced by sawing and installing the legs of the rafter system on the mauerlat. Installation is carried out using a special combination of metal plates, which, when engaged with each other, are able to move within specified limits. Due to this, it is possible to slightly shift the rafters during shrinkage and seasonal deformations of the building.
The sliding fastening leaves the rafter leg a slight freedom of movement when the building deforms - Rigid mount. This option is used for installing layered rafters. In the rafter system, a cut is made according to a special template, and then each leg rests against the Mauerlat and is fixed with nails.
Rigid fastening of rafter legs is used in the layered rafter system
How the rafters are attached at the ridge level
The most common option for attaching rafters to the ridge is a butt connection:
- Each rafter must be cut at a certain angle located at the top edge. This angle must be exactly equal to the angle of inclination of the slopes;
- the rafter legs at the cut points must be fastened with several nails 150 mm long;
- nails must be driven in at an angle so that they penetrate into the other rafter to a sufficient depth;
You can use different options for attaching rafter legs under the ridge - overlays made of wood and metal help strengthen the rafter system. They are secured with bolts or nails.
Metal overlays are used to strengthen the structure of the rafters in the ridge area
Rafter splicing options
In the construction industry, various options for rafter splicing are used everywhere, and when choosing a specific technology, you need to pay attention to the design characteristics of the rafter system, which are influenced by:
- purchased materials;
- technical data of the construction site;
- rafter installation step.
Rafters can be spliced as follows:
- Butt jointing is the fastest and most reliable option to lengthen rafters. To do this, the spliced parts are cut at an angle of 90 degrees. To ensure that there is no deflection at the junction, high precision will be required. The rafters are secured with metal or wood overlays, fastened with nails in a checkerboard pattern.
The butt joint is reinforced with metal or wooden plates - The oblique cut is the joints of the rafter parts, which are cut at an angle of 45°. The fastening element is a 12 or 14 mm bolt, mounted in the middle of the joint.
- Overlapping is an easy option because it doesn't require much precision. The overlap can be from 80 to 100 cm. Next, the rafters are fixed with nails along the entire length of the boards being joined. Nails are driven in only in a checkerboard pattern so that the beams do not open under the heavy weight of the roofing material. You can also use studs or bolts, but you must first make holes for them. This method is distinguished by the high reliability of spliced rafters, but it is more labor-intensive.
Rafter boards can be spliced in any of the three described ways
Each type of rafter system has its own characteristic features and is suitable only for a certain type of roof structure. Not only the reliability, but also the strength of the roof depends on the correct installation of the rafters, so this stage of work must be approached with maximum responsibility.
Rafter material: which one is better?
Depending on what loads are planned and what the fire requirements are, the roof frame is made from a variety of materials. Here's what a classic wood and metal roof system looks like, for example:
We propose to dwell briefly on the features of the materials used for roof rafters.
Wooden rafters: advantages and disadvantages
For many, erecting a roof seems like working with wooden boards, which are sawed and fastened in the right place. This is partly true, of course:
The wood used is usually dried coniferous or glued if the rafter elements must withstand increased load. But working with wood is actually no easier than working with metal, although many people think so.
Thus, when making wooden rafters, only high quality wood is suitable. These are dry boards and beams with a moisture content not exceeding 25%. They also carefully ensure that such boards and beams do not have large knots, wane, cracks or unnecessary bending of the fibers.
What's the point? Any serious defect can lead to the rafter leg simply cracking under load. If it is not possible to buy good quality dry lumber, then it is dried directly onto the lens in a special ventilated stack. But this takes more than one month, and even after drying, about 30% of the boards have to be rejected.
Therefore, it is more rational to purchase ready-made boards for the manufacture of a rafter system, with a margin of width. And that is not all. Typically, lumber looks perfectly smooth only by eye, and for a rafter system, geometry is an extremely important parameter. And just having a margin in width, the master gets the opportunity to straighten the rafters independently using planing equipment. This is the only way the slopes turn out to be truly even, and absolutely any roofing covering can be successfully placed on them.
Steel beams: for special loads
Today, the rafter system is often assembled from galvanized steel beams. You've probably come across their name: I-beams, channels or tees. Such elements turn out to be much more expensive than wooden or ordinary metal ones, but it’s worth it.
Yes, they are much more difficult to install, but they are valued for one important advantage - their high resistance to bending loads. Thanks to this, in the construction of the roof it is possible to do without any vertical supports and other elements. But in residential building construction, beams are not often used today, although such practice exists, and now we will explain why.
For example, the complexity of the rafter system and the presence of internal elements directly affects the planning solution of the attic. After all, the more different jumpers and crossbars between the construction legs, the lower the attic ceiling will be.
Moreover, all this is important not only for arranging another living space under the roof. The fact is that today the so-called attic roofs are popular, under which the most ordinary rooms of the house are located. And any additional elements simply won’t fit there.
But there is a fly in the ointment: metal beams often serve as cold bridges, and therefore a roofing pie must be installed for them. Basically, the filling here is oriented strand boards and extruded polystyrene foam as insulation. This is a great alternative to traditional hanging rafters!
LVL beams and combined I-beams have shown themselves to be the best in this regard in practice. I-beams are relatively inexpensive, but have not yet been tested by time, but LVL timber is three times more expensive than conventional lumber. Whether or not you should give preference to such a rafter system is up to you to decide.
We make drawings and preliminary calculations of hip roof rafters
You can’t start doing such a complex installation without preliminary sketches and calculations. If you have no experience, an architect or other specialist will help you calculate the rafter system for a hip roof.
This will not only allow you to most accurately plan the costs of wood and roofing materials, but also avoid other annoying mistakes.
Attention: Installation of a classic tetrahedral roof begins with a sketch and drawings! They must accurately indicate the angles of inclination of each slope, marking all the nuances, including the step between the beams.
When making your own drawing, if you have to do this for the first time, you can even build a small copy of the future hip roof out of cardboard in order to visually evaluate its advantages and disadvantages.
At this stage, it is not too late to change the angle of inclination of the main and side slopes, increase or decrease its height, and also optimize upcoming costs. Next, all adjustments are made to the preliminary drawing of the rafter system, and a “finishing draft” is made that is used during installation.
Tip: Remember that the greater the slope, the higher the roof and the greater the consumption of roofing materials. But too sloping edges will retain a lot of precipitation.
Attention: For high-quality installation of a hip roof, use only well-dried timber and logs, which are important to be pre-impregnated with a special antiseptic.
Calculation of the total loads on the rafters
Now we move on to the most difficult issue - designing the rafter system. Let's be clear right away: dynamic loads include falling snow from time to time, the lifting force of the wind, and people working on the roof. Static loads mean the pressure exerted by the weight of the roof covering, a satellite dish installed on the roof and other similar equipment, as well as a snow cap that lies motionless all winter.
The main task of the rafter system is to correctly transfer all this load to the walls and foundation of the house. And also to protect everything that is below on the ground from avalanche-like snow, a continuous wall of rain and other manifestations of bad weather.
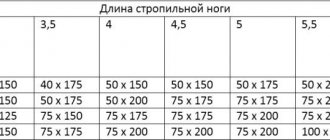
The cross-section and pitch of the rafters are never chosen by eye: for this there are strict building codes and regulations, briefly referred to as SNiPs. For these reasons, the calculation of the rafter system is quite complex and, according to the rules, it is trusted only to professionals.
By the way, today many organizations are engaged in designing rafter systems for any type of house. Of course, it makes sense to turn to specialists, because the roof is officially recognized as an object of first importance in ensuring the safety of a home.
To independently make an accurate calculation of such a rafter system, you need to have the necessary skills and even education. Here are some features of this calculation:
So, it is necessary to take into account not only the desired slope of the slope, but also snow and wind loads, the weight of the selected roofing and other possible moments of pressure such as people working on the roof. That is why the roof truss system is always built with a certain margin of safety.
For example, the pitch and cross-section of beams are always no less than 25% larger than calculated. At the same time, the costs themselves increase slightly, but the roof will last much longer.
Design features of a classic hip roof
When choosing a roof configuration, you should proceed not only from aesthetic preferences, but also take into account climatic conditions and the functionality of the structure. As you know, a roof that is too high and steep with different compartments and roof windows is a rather expensive undertaking, although a beautiful one. But it also encounters great resistance from air masses on the leeward side.
A flat roof is more economical, but it retains a lot of precipitation, and the heavy cap of snow lying for many months creates additional pressure with its mass on the entire structure.
The best option is a hip roof. These are 2 trapezoidal slopes on the wide sides of the perimeter of the house and 2 triangular ones on the end sides. At the top, these trapezoids under the ridge are closed by their upper edges, covering the structure on opposite sides with triangular edges - examples:
A tetrahedral hip roof on a rafter system with a slope sufficient to drain precipitation is the best option for any climatic zone. There is no doubt about the aesthetics of buildings with a tetrahedral finish, especially when modernly designed with new generation roofing materials.
It is based on a classic rafter frame that securely holds such a structure. Its durability and functionality depend on the correct arrangement of the base and supporting structure - hip roof rafter system: photo.
Hip roof is suitable for:
- typical development of cottages; individual construction; detached country house “on the seven winds”.
The trapezoidal shape of the hip roof gets its name from the German word for “tent,” although the hip roof is a separate variety, but similar in shape.
This design has proven its reliability in areas where there is frequent heavy snowfall and rain, and where ice forms on the roof. It is also applicable in zones of seismic activity, as well as where, in addition to heavy rainfall, strong gusts of wind and tornado turbulence are frequent. In such regions, high gable roofs are torn off under pressure or folded like a house of cards.
The main advantages of this design:
- minimum roof surface with an optimal slope for precipitation drainage; uniform distribution of the structure load over the entire perimeter of the walls; excellent resistance to wind force and abnormal weather conditions; increased roof stability; optimal water drainage during heavy rainfall and sliding of the snow cap when precipitation exceeds the norm; providing protection against temperature changes.
Types of rafters according to load distribution
We’ve sorted out the concepts, now let’s look at how the rafter system is structured from the inside.
Rafters of layered and hanging type
The roof structure, depending on its internal structure, can be spacer or non-spacer. Depending on this, the rafters themselves are divided into two main types: layered and hanging.
Layered ones are easier to make, but hanging ones will require some tinkering. They are quite difficult to design, repair or change, but this is the design that will have to be resorted to if the entire rafter system will rely only on the outer fence:
The main advantage of hanging rafters is that they work well in compression and bending. But such a rafter system creates considerable horizontal bursting forces that act on the walls.
In order to reduce this physical phenomenon, an intermediate metal or wooden tie is installed that will connect the rafter legs. Most often this is a crossbar - a special element that is used in the construction of attic roofs. And the higher it is located, the higher the ceiling in the attic will be, and the larger the cross-section of such an element should be.
Layered rafter systems are more economical and simpler in design, but they are used only when the building already has two or even several rows of vertical supports, between which the span does not exceed 8 m.
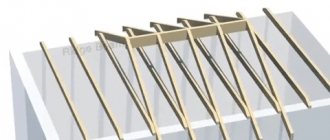
Roof on purlins: for log buildings
The choice between layered and hanging rafters matters when we are talking about an ordinary roof of a residential building, but a bathhouse or a cottage made of rounded logs is built differently, according to its own laws. For example, the basis of such a roof is often slabs, or purlins.
These are special long boards that are parallel to the ridge and rest on log gables. This makes sense!
The fact is that logs tend to shrink, and a conventional rafter system simply warps on them. It will be almost impossible to correct this, and in the above method, with the shrinkage of the gables, the angle of inclination of the rafters will change. That is why movable fasteners are used for everything on the rafters, and the roofing covering is only allowed to be laid after one and a half to two years.
Of course, installing such a roof will require both time and expense, but the technology itself is quite reliable and time-tested:
Although, it is worth noting that quite often roofers use a different technology for such buildings. They take dry logs in advance and tighten them with spring-loaded capercaillie (the so-called special elements). In this case, classic purlins are abandoned, and trusses are installed with vertical supports or struts.
As a result, any shrinkage of the gables no longer affects the geometry of the roof, and those gaps that appear over time are closed with decorative strips. This is how beautiful Russian baths and country houses in the appropriate style are obtained.
General information
Types of rafters and application
Selecting a rafter system is an extremely important step that requires knowledge of the design of each type of roof. Rafters can be of different types:
- Layered types of rafters that rest on the ridge girder and mauerlat. They are used in the construction of a single-pitched roof, a regular gable roof, and also as one of the elements of sloping and hip attic roofs.
- Sliding rafters are one of the types of layered rafters that are used for wooden buildings that shrink significantly. Their main difference is the fastening of the sliding type of rafters to the Mauerlat, which makes it possible to compensate for wall shrinkage without roof deformation.
- Hanging types of rafters are rafter-type systems that are tied together with crossbars or even tie-rods, and are usually used in the construction of a standard gable roof, and also as the top rafters of an attic roof. In a hanging rafter system, the ridge purlin is completely absent, and in the upper part the symmetrical rafter purlins rest directly on each other.
- Sloping types of rafters, or otherwise called corner/diagonal. They are used to make a hipped or three-pitched roof, and also for roofs with complex geometry.
Let's consider what elements of the system are.
Elements of a rafter type system
Any type of rafters is designed to distribute and transfer roofing loads to house walls. The main elements on which the rafters will rest are:
Mauerlat is a beam that is fixed to the upper wall plane along the general perimeter of the house.- Floors are beams for support that are laid on internal load-bearing types of partitions or columns.
- Floor beams on the top floor.
- Supports and racks.
- Purlins are supporting horizontal elements that are laid along the roofing axis on racks.
The roof truss is made of the following elements:
- Rabs are boards that are attached to the lower end of the rafters and create roof overhangs.
- Struts are supports that are placed at an angle and support the legs of the rafters.
- Crossbars or tie rods are horizontal types of elements that pull paired legs (rafters) together.
- Rafters are timber or boards that form the contour of the roof, and they are laid at a certain pitch.
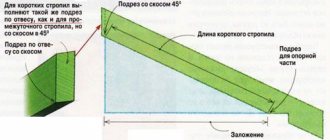
Rafts are short rafters that rest on diagonal rafters in a hip roof. All such elements in private construction are usually made of wood - coniferous boards or timber, dried naturally.
The wood is impregnated with an antiseptic, which makes it possible to increase its service life. The cross-section and thickness of the elements must be determined by calculation.
Integral roof trusses: for extra strength
The rafter system, like an ordinary construction set, can be assembled right on site during the construction of a house, or it can be ordered in the form of ready-made rafters at the factory, and only then installed on the roof. In a word, solid elements rise to the top, which only need to be secured. This is more convenient in terms of rafter work, because at height many manipulations with tools are not convenient.
Today, many companies are engaged in similar production. They adapt the client’s project to the required technology, accurately calculate what the structure of the rafter system should be, and calculate down to the millimeter all the cross-sections of the elements for the chosen type of roof, slope and covering. Time is also devoted to calculating the planned loads on the roof, of which there are many. But with certain knowledge and skills, it’s possible to do all this on your own.
Let's take a closer look at the design of such rafter frames. They represent a triangle, which is quite rigid in its structure and does not deform under pressure or thrust force:
Thanks to such trusses, the roof is provided with the necessary stability, and for many modern projects this is the main reliability criterion.
How to calculate the angle of a hip roof?
In modern practice of constructing hip roofs, the slope angle of the edges varies greatly, depending on:
- climatic conditions of the area; functionality of the attic (attic) space; general design or architectural project; personal preferences.
Each locality has its own fashion for the shape of the roof. In the Carpathians, for example, they always made high, sharp roofs that shed caps of snow, but in the Alps I make them flatter, in Denmark they make additional broken sections, etc.
But, whatever the choice, it is important to remember the proportionality of the house and the overall load of the structure. If the house is old and low, then a disproportionately large roof can visually press it into the ground and add mass to the foundation.
The choice of optimal slope is influenced by:
- weather factors of the area; choice of roofing materials; design solution; consumption of building materials.
In regions with strong winds, a large roof creates a “windage”, so the slope of the hip rafter system will be minimal.
Here it may be necessary to strengthen the supporting structure and the choice of roofing materials may be limited. Heavy snowfalls and long winters “raise” the slope so that the snow cap slides along the roof without undue load on the house. In areas where it is warm and sunny most of the year, you can limit yourself to a rather sloping or symmetrical roof with minimal heating of the materials.
Tip: It makes sense to install solar panels there for a backup energy source, but this is additional weight, which must be taken into account in the roof design.
Selection of slope angle depending on roofing materials:
- piece materials (tiles, slate, slate) - slope of at least 22° degrees; rolled materials on the sloping side of the roof - 5°, and on gable and hip roofs - from 15°; corrugated sheets and metal tiles - from 15°; ondulin and soft roofing - from 11°; membrane coatings from 2 to 5°.
Optimal slope limits range from 10 – 60°, sometimes up to 75°.
Today it is believed that the installation of a hip rafter system is the most labor-intensive compared to other types of roofs. But it is more reliable and more aesthetically pleasing than a simple gable roof.
Tip: On a large sloping hip roof, install an emergency drain for excessive storm water loads.
Materials
The rafter system is an essential element of pitched roofs of any shape and configuration, consisting of vertical supports, horizontal ties and rafter legs that provide support and reliable fastening to the roofing material. The material used to make the frame must be light in weight, high strength, load-bearing capacity, and also resistant to moisture. The most suitable options are:
- Wood. Wood is a natural, environmentally friendly material that is lightweight and durable. For the manufacture of the frame, square bars of 100x100 mm or 150x150 mm, and hardwood boards with a section of 50x150 mm are used. A significant disadvantage of wooden frame elements is that they bend under their own weight when they are long, and also have poor resistance to moisture.
- Metal. Metal rafter systems are more expensive than wooden ones; they are used mainly when there is a large area of slopes and a large weight of the roofing material. The high load-bearing capacity of a metal profile or corner allows you to increase the pitch between frame elements without losing the strength of the structure. To reduce the likelihood of rust spreading, corrosion-resistant types of metal are used.
Note! Wood is considered the most suitable material for the manufacture of rafter frames for the roofs of residential buildings, as it has 3 important qualities: light weight, strength, and breathability. To increase the resistance of wood to moisture, it is necessary to treat the elements of the rafter system with a deeply penetrating antiseptic.