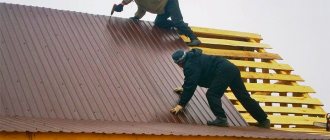
If you want to maximize the usable space of your home without spending exorbitant amounts of money, you should definitely consider attic projects. The experience of developers suggests that this is the optimal way to plan economy-class housing, because one square meter of living space in it costs several times less than in two-story buildings. There is a misconception that the attic is only suitable for seasonal use in the warm season.
However, it is erroneous, since a high-quality insulated sloping attic roof perfectly retains heat in winter, its temperature regime is no less comfortable than in the heated rooms of the first floor.
Even without additional thermal insulation, the attic is a kind of “air cushion” that maintains the optimal temperature inside the house.
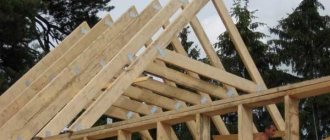
Rafter system for an attic sloping roof
Sloping roof rafter system
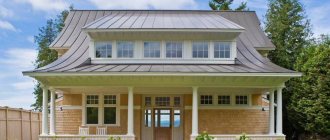
Project of a house with a sloping roof
A broken mansard roof is considered a technically complex structure, and it is advisable to entrust its construction to a professional team. However, a person who is familiar with roofing work using the example of a traditional gable roof is quite capable of mastering its construction with his own hands, with the help of two auxiliary workers and assistants. The main thing is to understand that this is a process that requires a serious approach, which it would be reckless to start without preliminary calculations.
Project development
When choosing a project for a future attic, first of all, you should take into account the mutual dependence of its dimensions on the slope of the roof.
The mentioned residential part of the house should reach a height of at least 2.2 m, although with straight roof slopes one should not be surprised at the reduction in the width of the room, which we just mentioned. To maximize the living area, with the desired ceiling height in all places, you should consider the option of a gable sloping roof, when the lower rafters are placed at a 60-degree angle, and the angle of inclination of the upper ones is selected according to individual preferences and the climatic characteristics of a particular area.
Do not forget about taking into account the distance between the floor and the ridge, the value of which should be about 2.5-2.7 m. With smaller numbers, it is impossible to call this space an attic.
To accurately calculate the parameters of each structural element and its correct drawing, it is necessary to proceed from rectangular figures - the cross-section of the future attic. Considering the width and height of the planned room, it is almost impossible to make a mistake in the angles above the roof slopes, the dimensions of the ridge, rafters and other important structural elements.
If it is difficult for you to navigate all the necessary values, then you can start measuring from the middle of the width of the front part of the wall. It is from here that you can calculate the height of the ridge, the placement of wall posts, and calculate the size of the eaves overhang and the height of the ceiling in the room.
Also, when performing all calculations, it is necessary to take into account the weight of the roof, the expected load from snow, the weight of the sheathing (together with the counter-lattice), insulation, steam and waterproofing materials, slope angles, the total length of the span, the pitch of the sheathing and rafters.
Important! Each individual structure has its own individual number of different connecting points of very different structures. In order to better understand the peculiarities of the connection of all elements converging at a specific point, it is advisable to draw each such connection separately. Even if you are completely confident in the correctness of the developed project and the accuracy of all measurements, before undertaking the work, it is advisable to show your drawings to a specialist, who will be able to notice even the smallest inaccuracies that can reduce the quality of the final result
Even if you are completely confident in the correctness of the developed project and the accuracy of all measurements, before taking on the work, it is advisable to show your drawings to a specialist who will be able to notice even the smallest inaccuracies that could reduce the quality of the final result.
Technical requirements for a sloping roof
The following requirements apply to sloping roofs:
- the height of the attic walls must exceed 2.2 m;
- good ventilation must be ensured so that moisture does not condense under the roof;
- the roofing material should have a small mass;
- the design must provide measures against the impact of additional load on the rafter system - that is, the roof elements must withstand not only their own weight, but also, for example, snow;
- the attic loses heat faster than the lower floors, so special attention should be paid to thermal insulation;
- To ensure fire safety, all wooden beams and sheathing elements should be treated with fire retardants.
Tips and tricks
- Self-tapping screws for roof construction must have the manufacturer’s mark and EPDM gaskets ≥ 2 mm thick, otherwise roof leakage cannot be avoided;
- Poor-quality protective coating of fittings will quickly deteriorate under the influence of weather conditions, which will lead to leakage at fastening points and an unsightly appearance in the form of rusty or dirty spots;
- The absence of a snow retention system means the possibility of unexpected snow falling off the slopes, which can lead to failure of the roofing and drainage systems;
- Poor ventilation leads to the formation of condensation in the under-roof space.
Pediment and cornice
The pediment is sewn up after the construction of the rafter structure is completed. Modern materials are increasingly replacing traditional wood when sheathing gables, and now they use lining, siding, corrugated board, and other durable decorative finishing materials. Any cladding material is attached to a frame, which is mounted in advance. Regardless of whether or not there is a room or attic in the attic, it is necessary to leave a window opening in the gable - for ventilation and minimal natural lighting of the space.
Arrangement of the pediment
The cornice must be installed around the entire perimeter of the house - it is necessary for moisture and wind protection of the truss structure, the walls of the house and the foundation. Since every self-respecting owner must install drainage systems around the perimeter of the house, they are also attached to the eaves, and drain pipes to the walls. The plastic drainage system is mounted on plastic clamps. The bottom of the cornice boards or cornice frame is painted, sheathed with siding, clapboard or corrugated sheeting - in unison with the finishing of the pediment.
Gable roof cornice
The roof is mounted on the sheathing, and, based on the type of roofing materials, the sheathing is first done with vapor barrier, hydro- and heat-insulating materials. For roofing, you can use ondulin, metal tiles, ceramic materials, soft tiles, etc.
Installation of rafters
The rafters of a gable roof are several identical wooden beams of the same length and cross-section. After installing the floor beams, a ridge beam is attached, for which beams with a cross section of 100 x 50 mm are secured along the central longitudinal axis of the house with spacers. The height of the racks in a typical gable roof scheme is equal to the distance from the floor to the upper surface of the Mauerlat. Instead of timber for the ridge, you can use boards 50 mm thick.
1ca71fb49bf71bba2b2c392a632f3ffe.jpe
Before installing the rafter system, it is recommended to make a scale template. To do this, the board from the rafter structure must be attached with one end to the beam, the other to the ridge, and mark its length. This will be the standard length of the rafters. Fastening the rafters
The rafter system is also installed according to the template, observing the sequence of processes. After installation and fastening from the lower end of one rafter beam, you must immediately fasten the opposite rafter and connect the beams with their upper ends to each other through the ridge. The rafters are nailed to the ridge beam, and to the floor beam - with steel brackets or angles, self-tapping screws or anchors. For a roof of any shape with two symmetrical or asymmetrical slopes, boards are fastened lengthwise and crosswise under the rafters to give rigidity to the system.
https://youtube.com/watch?v=fOlIW8FXVP8
Features of structural elements
A gable roof does not require the creation of particularly complex base systems and other elements. To build a reliable and durable roof, it is enough to take into account the features of the main components of the rafter and mauerlat system. The first component of the roof includes a set of elements that ensure the strength of the structure. The Mauerlat is the base of the roof, to which the rafters are attached, resting on the walls.
The project includes drawings that show the connection features of important elements
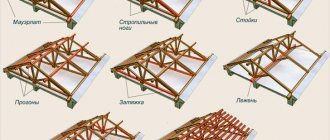
Rafter system options
Rafter systems can be suspended or layered. The main difference between these types is the method of attaching the rafters to the Mauerlat, as well as other features. The hanging rafters of the roof with two slopes rest on the side walls, creating a bursting force. As a result of this, the supporting walls are subjected to increased load, and to eliminate the negative impact, the rafter legs are connected with a special tightening. This reduces the load on load-bearing walls.
The diagram shows the main elements of hanging rafters, which must be constructed during roof construction
An additional tie on top helps ensure the strength of the hanging system. In this case, a distance of 50 cm from the edge or ridge of the gable roof is maintained. Hanging systems are optimal when the distance between external load-bearing walls is no more than 10 m. In this case, there should be no internal load-bearing wall. Thus, hanging structures will be reliable and provide protection to the house.
The design of hanging rafters is simple, but calculation of the load on the walls is necessary
The layered version of the rafters is created when there is another load-bearing wall between the outer walls. In this case, there is a support beam that transfers the weight of the roof to the supporting structures. Instead of an internal wall, there may be columns. In this case, different types of rafters are alternated, that is, layered elements are supported on the columns, and hanging elements are mounted between the load-bearing elements.
The drawing allows you to determine the features of rafters for different buildings
The layered rafters are supported by a ridge beam and a mauerlat. In this case, the load is distributed not only on these elements, but also on the internal supporting structures.
The procedure for calculating the roofing pie
As an example of how to calculate a roofing pie, we took the installation of a sloping roof using metal tiles.
The following materials are required:
- waterproofing;
- thermal insulation;
- vapor barrier;
- roofing;
- fasteners;
- additional elements;
- drainage products.
For vapor barrier it is planned to use Izospan B; its standard roll has a width of 160 centimeters. According to the manufacturer's instructions, the overlap size should be at least 10 centimeters, hence the working width is 150 centimeters. Taking into account the standard roll sizes, 70 “squares” of material are obtained. After this, the area of the roofing surface is divided by the area of the roll and their required quantity is determined.
The material for waterproofing when building a gable or single-pitch sloping roof is calculated in a similar way.
A single- or double-slope sloping roof can be insulated in one of two ways: the material is laid either on its entire surface or only on the walls and ceiling of the attic room. The second method is cheaper, but since the insulation is placed between the rafters, the rupture of the material layer contributes to the formation of cold bridges. When choosing a tiled “Ecover Light 35”, which has a thickness of 5 centimeters, a width of 60 centimeters and a length of 1 meter, you need to divide the surface area of the roof by the area of one sheet and multiply the result by 3, since the thickness of the insulation layer must be at least 15 centimeters.
To calculate the required amount of metal tiles when creating a single-, double- or four-slope sloping roof, you need to know the parameters of the sheet of roofing material. If you are planning a gable roof, you need the length of the lower and upper slopes, the length of the side purlins and the ridge. Then, to extend beyond the rafter leg, 7 centimeters are added to the length of each of the slopes (read the article: “Constructing the roof of a private house - preparation”).
Rafter system of a sloping roof, look at the video:
https://youtube.com/watch?v=NZ8MmnfT94g
The length of the side purlin, as well as the ridge, is divided by the working width of the metal tile sheets (it is determined by subtracting the size of the side overlaps). The result is the number of paintings that need to be laid along the width of each of the slopes.
To calculate sheets according to length, take into account that the length of the painting (maximum) is 6.1 meters, the standard length of the sheet is 2.95 and 2.25 meters, the overlap at the end is 15 centimeters, and 7 centimeters must be added to the overhang. Taking into account the fact that the height of the side girder usually corresponds to the height of the room of 2.5 meters, it is advisable to use sheets having a length of 2.95 meters.
4c77931956161f38285df0d25b162c66.jpe
08b1311ca83e9e64a4ef6879c7f6547e.jpe 597f53f284c334c49b7f3ee732a8415b.jpe
Ways to increase the size of the attic space
The design of the sloping roof truss system described here is, one might say, classic. However, if desired, it can be modified somewhat.
Installation of floor beams with extension beyond the walls
The essence of the solution: the attic floor is made up of beams that are longer than the width of the building. The beams are laid on the mauerlat and attached to it.
With this design, the side rafters are no longer installed on the mauerlat, but on the ends of the floor beams. Accordingly, the attic becomes more spacious.
By removing the floor beams and rafters, you can not only increase the size of the attic space, but also create a reliable canopy over the entrance
Refusal of racks
In this version of the rafter system, the racks remain, but they are moved closer to the outer walls, turning into supports for the side rafters. In this case, the junction of the side and ridge rafters, which now has no support, must be fastened so firmly that the pair of rafters turns into a solid broken-shaped beam.
For this purpose, steel plates with a thickness of at least 4 mm and several studs are used. The linings must be cut so that their shape corresponds to the node at which the rafters are joined.
If the junctions of the side and ridge rafters are fastened with powerful plates and threaded rods, you can dispense with the racks and significantly increase the size of the attic space
With this design of rafters, the attic space also receives additional volume.
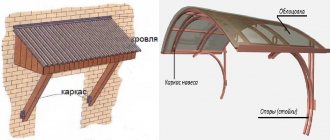
Transparent roof
If the attic is not considered as a place for permanent residence, it can be covered with a transparent roof and used as a summer veranda. The roofing material in this case is monolithic polycarbonate. Compared to glass, it wins in several ways:
- costs less;
- is plastic;
- has low weight.
To attach polycarbonate, a simple frame without insulation is mounted
Polycarbonate sheets are fixed in a frame, which is assembled from special profiles. It should be taken into account that plastic has a high temperature coefficient of expansion, so it must be fixed in compliance with the following rules:
- the gap between the self-tapping screw and the edges of the mounting hole should be 1–1.5 mm (the difference in diameters, respectively, is 2–3 mm);
- You need to tighten the screws without much effort, just to grab the sheet and not press it tightly.
In this case, the attic roof is built according to the rules of a cold attic: it is not the roof that is insulated, but the attic floor. The dimensions of the attic in this case remain the same, but increase purely visually, due to the greater amount of light penetrating into the room.
Video: an interesting attic option
Varieties
All mansard roofs can be classified into 4 categories, each with different designs. Moreover, such attics can be single-level or two-level. It is easier to build a one-level attic. As a rule, this design involves the construction of a conventional gable or sloping roof.
Two-level attics are more difficult to construct. This design involves the construction of 2 rooms at different levels. In this case, the method of combining supports is used.
In the photo of the attic roof you can clearly see the design options for such structures. Additionally, a balcony can be provided. It is constructed by analogy with a window opening.
But this possibility depends on the load-bearing capacity of the walls. If it is not enough, a balcony can be built using additional supports.
DIY construction of a sloping roof
Roof trusses can be assembled on the ground. But then, to deliver them to the roof, you will need lifting equipment, which an individual developer does not always have at his disposal. Therefore, in private construction, the rafter system is mainly erected directly on site:
- The top edge of the outer walls is covered with roofing felt, after which the mauerlat is laid on them. If it consists of several short beams, they must be connected by an oblique cut and fastened with bolts. The Mauerlat can be fastened to the wall with anchor bolts with a diameter of 12 mm, but it is better to embed studs of the same diameter into the wall in advance. In any case, the fasteners must be embedded into the masonry by 150–170 mm. Also sometimes annealed wire with a diameter of 3–4 mm is embedded, with which the timber is tied.
- Next, the floor beams are laid. Their ends rest on the outer walls and are fastened to the Mauerlat with brackets or corners. If the beams also rest on internal walls, they should also be covered with roofing felt.
- Having stepped back to the left and right from the middle of the beam a distance equal to half the width of the attic room, install the racks. They must be positioned strictly vertically, so they must first be “grabbed” with nails and only after alignment with a plumb line or level are they finally secured. Wooden plates and special corners are used as fasteners.
- Having installed both racks, they complete the creation of the U-shaped element by installing the upper crossbar (it plays the same role as a tightening in a conventional rafter system). The crossbar is fastened to the racks using shaped corners.
- Side rafters are installed on both sides of the U-shaped element. To install them on the Mauerlat, they must have a groove cut out at the bottom end, which will ensure a reliable connection. Each rafter beam is attached to the Mauerlat with brackets.
- If the length of the side rafters exceeds the maximum permissible for the selected combination of beam section, load and inter-rafter pitch, struts should be installed under them. In addition, contractions and additional racks can be used to strengthen the truss structure.
- Having finished work on the lower tier, they move on to the upper one: ridge rafters are installed on the U-shaped element. The place where they rest against each other must be fastened with bolts (steel plates are often used instead of washers) or steel plates.
- Next, the junction of the ridge rafters (ridge unit) and the middle of the crossbar of the U-shaped element are connected by a vertical beam - the headstock.
- Having completed the construction of one truss, they move on to the next. The trusses are erected in this order: first the outer ones, between which the threads are stretched, then the intermediate ones along these threads.
- Finally, the trusses are connected by horizontal girders.
Subsequent manipulations with a sloping roof - installation of roofing and insulation - are no different from those performed on a regular roof:
- The rafters are covered with a waterproofing film, which is fixed with a counter-lattice (boards placed on top of the rafters parallel to them).
- Lathing is placed on the counter-batten across the rafters.
- The roof covering is being installed.
- Insulation boards are installed in the space between the rafters, after which the racks are sheathed with boards or plasterboard.
The counter-grid provides a ventilated gap under the roofing material, which prevents steam from condensing on it (moisture will be removed through a draft). If a vapor-proof film is used as waterproofing, then there must also be a gap between it and the insulation.
The gaps must be ventilated: holes must be left in the eaves and under the ridge to ensure air circulation.
If the cross-section of the holes is not enough (during the design, a separate calculation is made for roof ventilation), devices are installed on the roof to improve circulation - aerators.
Construction of a sloping mansard roof
The design of a sloping mansard roof is based on several key elements that form its basis and form an integral roofing system.
The structure of an attic roof with a broken structure looks like this:
- Roof covering that provides reliable protection of the entire structure from atmospheric and weather conditions.
- A sheathing that serves as a supporting element of the entire roofing system. It is often presented in the form of a lattice of wooden boards fastened together.
- Ridge run. This is the top part of the system. In the case of a sloping roof, there may be several purlins if the attic is designed in such a way that the roof forms several peaks.
- A rafter system presented in the form of supporting ribs, the task of which is to create the necessary rigidity of the structure.
- Mauerlat, which is actually beam elements that act as the basis for fastening all components of the rafter system. It is located along the entire perimeter of the building, fastened to each wall with strong fasteners.
- Diagonal piles. Their purpose is to give the entire system a high level of reliability. To do this, diagonal bevels are installed between the longitudinal and vertical beams, which help ensure maximum strength of the connection.
- Internal supports located at the bottom of the rafter system. They are responsible for giving the structure a stable position.
- Insulating materials that act as a connecting link between all components of the roofing system. Their main task is to create a reliable seal and establish a normal microclimate inside the attic space.
Important! When arranging a sloping roof, special attention must be paid to insulation. It must be multi-layered to ensure the most comfortable level of life support in the attic.
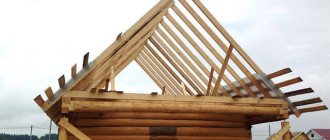
Installation of attic rafter system
Installation of a rafter system with a residential roof space requires careful preparation. It is necessary to install convenient scaffolding, decking and ladders, as well as provide workplaces with safety ropes. Workers must be provided with protective clothing, protective equipment and working equipment. It is necessary to select a flat place on the ground for pre-assembling the trusses, marking the corners and making templates. All wooden elements must be treated with antiseptic and fire-retardant compounds.
After this, you can begin work, which takes place in the following sequence:
- On walls with walled studs, a mauerlat is mounted around the perimeter. If there is a load-bearing wall inside the building, we lay a beam or purlin on it that is the same height as the mauerlat.
- Cable ties with cornice extensions are attached to the Mauerlat parallel to the short wall.
- Vertical posts are placed on the tie rods, delimiting the attic space.
- The racks are connected to a tie that serves as the ceiling of the attic space. The trusses installed in this way are connected to each other by horizontal girders.
- The lower and then the upper rafters are installed, which are attached to the ridge part.
- To strengthen the lower and upper rafters, struts, headstocks and ribs are used.
- The sheathing and front board are installed on the eaves overhang.
We looked at the assembly of the rafter system using the example of a broken mansard roof. The construction of other structures consists of similar operations and mainly consists of performing work according to the design installation diagram, which reflects the methods of connecting the elements of the rafter system. With carefully calculated drawings, a team of four people is able to install a roof with a rafter system of any complexity.
573e595ec0a7d72db7699ccf739e9e54.jpe
c6783e423adb0558f5ec6d7124b56296.jpe
Video: installation of an attic roof
We examined the rafter group of the attic roof, its design, calculations, as well as a diagram and description of the main components. They offered an option for step-by-step installation of load-bearing structures of the attic, attached illustrations and videos that explain the procedure for assembling the structural elements of the attic roof. Now its successful construction depends only on the careful fulfillment of the requirements of instructions and technologies and the availability of certain skills for the performers to carry out construction work. We wish you success.
Construction stages
Creating a Project
When drawing up a project for a sloping mansard roof for construction with your own hands, it is better to draw up drawings with different projections, which will comprehensively show the location of its elements. Based on the length and width of the house, you need to determine the size of the attic space, as well as the roof. First of all, the geometry of the slopes is built:
- An important task is calculating the height of the ridge connection , since the height of future ceilings depends on it. Keep in mind that there should be about 1.5 m from the ridge to the ceiling.
- The next stage is determining the ceiling height . For comfortable use, it is better to lay it at a level of 2-2.2 meters.
In order for the project calculations to be correct, it is important to accurately take primary measurements, as well as maintain scale. Computer programs can make design easier; you just need to enter the dimensions of the building and the desired type of roof; they do the rest of the work automatically. If you do not have access to such software, it is better to use ready-made projects.
Calculation of the rafter system
Rafters are the main supporting elements of a sloping attic roof, a kind of its backbone. They are subjected to enormous loads, so special requirements are placed on them.
The choice of the cross-section of the rafter legs does not occur randomly, but in accordance with the installation pitch, the distance between the supports, and the values of the wind and snow load. If the first three indicators can be easily determined from the drawing, then the last two require special explanation.
- The territory of Russia is divided into 8 zones with different snow loads. For each specific roof, this value is adjusted by the angle of inclination of its slopes. Since the slope of the slopes is different, two indicators are calculated, respectively, the upper and lower rafters may have different sections.
- There is also zoning based on wind load, which also includes 8 zones. Using a coefficient that takes into account the height of the building, amendments are made to the table value of this indicator.
- The values of these two indicators are summed to determine the total load. Numbers should be rounded up to provide a small margin of safety. Based on them, the required cross-section of the boards is determined using reference tables.
Mauerlat installation
The beginning of work on equipping a sloping mansard roof is the installation of a Mauerlat, a strong beam measuring 100x100 mm or 150x150 mm. It is fixed to the end of the side external walls.
Its main task is to distribute the weight of the roof structure, transfer it to the foundation, and also protect the slopes from tipping over. The Mauerlat is laid along the top of the wall over pre-laid waterproofing, which is used as roofing material folded in half or several layers of a special film.
Fastening is carried out using metal pins; they must be placed in a concrete screed. If we are talking about do-it-yourself roof reconstruction, it is mounted with anchor bolts to the wall to a depth of 15-17 cm.
For timber and log houses, wooden dowels are used. Please note that installation is flush.
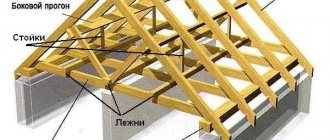
Assembling the rafter system
The assembly of the rafter system of a sloping attic roof occurs in the following order:
- Laying floor beams on top of the Mauerlat . In some cases, it is practiced to move beams outside the building. This measure makes it possible to expand the attic area and form good overhangs. In this case, the beams are attached to the Mauerlat from above. When laying without removal, they are laid on waterproofed walls, secured with corners to the inner edge of the mauerlat.
- Exactly in the middle of the floor beam, mark the point above which the ridge connection will be located . Having retreated an equal distance from it in one direction or another, the racks are set up. They need to be placed vertically, so they are temporarily supported by struts.
- The racks are connected with ties . These are straight, strong bars that are attached to reliable metal corners. As a result of these actions, you should get a structure in the shape of the letter “p”.
Compliance with the above points forms one truss truss. The rest are installed in the same way in increments of 60-120 cm.
Waterproofing and roofing works
When the work on installing the rafter system of a sloping mansard roof with your own hands is completed, you need to organize its waterproofing. To do this, you need a waterproofing film or membrane, which is usually produced in the form of a roll.
- The first strip of film is laid on the lower part of the rafters and secured with counter lathing. The overlap between the strips should be at least 10-15 cm.
Fasteners are selected depending on the type of material. For tiles, galvanized self-tapping screws with rubber heads are used, which, during the tightening process, are deformed in such a way that they waterproof the hole.
In order to speed up the process, you can use a screwdriver. Shinglas or ondulin are fixed with nails 100 mm long. After completion of the roofing work, the gables and overhangs of the attic sloping roof are designed.
To summarize, we can say that a broken mansard roof will help you expand the area of your house with your own hands. You can build it with your own hands, however, this will require special skills and costs, which will undoubtedly pay for themselves.
Calculation of the rafter system
The initial data for the calculation are taken from a previously developed project. For example, let’s look at a roofing diagram with an attic.
The design drawing indicates the dimensions, installation locations and material of all elements of the roofing system
The main indicator, calculated first of all, is the pitch of the rafters, depending on the planned finishing coating. So, to install ceramic tiles, the pitch of the rafters should be no more than 60 centimeters, and if you plan to install a plastic covering or soft roof, this figure can be increased to 120–150 centimeters. Again, you need to take into account the nature of the loads - a combination of the effects of wind and snow - and set the optimal angle between the roof slopes.
The procedure for calculating the number of rafters
For example, consider the installation of roofs for a house 10 meters long. As a first approximation, we take the distance between the rafter legs to be 80 centimeters. Then you will need them: 1000: 80 + 1 = 13.5. Since the number of rafters must be an integer, we round the result to 13. In this case, the exact distance between them will be 1000: 13 = 769 (millimeters). This is the exact value of the gap between the axes of the rafter legs.
When calculating the need for materials, you need to take into account their cutting ability. In the case of wood materials, their length can be 4 or 6 meters. During the design process, it is necessary to select the dimensions of parts taking into account the formation of the smallest amount of trim. Coniferous wood trimmings are unsuitable even for firewood for stoves.
Materials for truss structure
Composite profiled wood materials are becoming increasingly common. These include:
- Wooden I-beams. These products are interesting because they are made mainly from wood waste. The supporting surfaces are made of multi-layer waterproof plywood and the wall is made of OSB. Such structural materials have a load-bearing capacity no less than solid timber. The requirements for antibacterial fire protection treatment are much softer; the material has already undergone all protective treatments during the production process. At the same time, it does not undergo cracking, and its mechanical properties are the same in all directions.
- Wooden channels. They are produced in the same way as I-beams. The main application is load-bearing elements of wooden structures. The strength characteristics of this profile are higher than those of natural wood and wooden I-beams. Often such products are made from solid coniferous wood. This significantly reduces the weight of the structures and the load on the foundation.
- Glued beam. This material is rarely used for the installation of rafter frames. Its main application is the laying of log houses. They use timber with a core made of ordinary pine needles and outer plates made of expensive wood species: oak, larch and other valuable materials. For rafters, beams made of homogeneous plates of increased length are used in highly stressed areas of the system.
- Metal profiles. They are not used so often for assembling rafter frames. The most convenient material for installation is profile pipe. The disadvantage of metal profiles is the need for periodic measures to protect against corrosion. Elements of the rafter system, as a rule, are tightly closed by the roofing pie and the interior decoration of the attic, which greatly complicates access for maintenance.
Types of roofing materials and their installation
The market offers a large selection of roofing materials to suit every taste. Each of them has its own advantages and disadvantages. Any builder first of all looks at the cost of the roof, then at its quality and service life.
Here's a range of roofing materials for you to choose from::
- Metal tiles;
- Profiled sheeting;
- Slate;
- Soft roof;
- Roof tiles.
This list can be continued, the choice will be yours in any case.
To install any of these roofs, your own rafter design is required . Primarily because of the weight. For example, slate or cement tiles are very heavy, and therefore require additional strengthening of the base.
Metal tiles are a lightweight material, but are susceptible to corrosion over time , so in areas where there is frequent precipitation it is not the best choice.
Roofing material
Projects of houses with different types of sloping roofs
Due to their design features, sloping roofs differ in appearance:
- with the support of the lower rafters on the mauerlat;
- with the lower part of the layered rafters moved outside the wall;
- using only layered rafters.
Depending on the characteristics of the rafter system, sloping roofs have different appearances.
In the first option, the floor beams are installed so that they slightly do not reach the walls of the lower floor. The lower part of the slopes consists of layered rafters and is attached to the walls of the building using a Mauerlat. The frame of the attic space is made from vertical elements (racks). The resulting components of the roof are in the form of triangles along the walls, connected to each other by contractions. And the upper parts of the slopes from the hanging rafters resting on the tie are attached to them.
In the second option, the lower edges of the rafters are brought outside the house, which makes it possible to increase the size of the attic. And the larger the offset, as mentioned above, the wider the room under the roof can be made. The support for the rafters in this case is not the Mauerlat, but the floor beams, which are held by the Mauerlat. The rafters are supported by struts. The racks are recessed into the ceilings, but not more than 1/3 of the thickness.
c733049680b5cefa025a74eaa52b3599.jpe e36da2ac7e7e9747dd4169cd4d71300e.jpe
e4feae2da0cc419d0c5146d1e9a4ffbe.jpe 5bb2038ec1684492cf9d2bd65b203bf1.jpe
e2a97de5c2429602dfb6505aeb0cb7ce.jpe
In the third option there are no hanging rafters. The upper slopes also consist of layers, the support for which is puffs.
Roof structure without vertical elements
There are also other versions of sloping roofs, one of which is quite interesting - in this configuration there are no vertical posts, and the rafters are all the same length. Externally, the roof resembles an octagon. The ceiling of the under-roof room will be in the form of a tetrahedral vault.
The key feature of such a device is to enhance the load-bearing capacity of the rafters, for which 2 metal plates (metal thickness 3 mm) are fixed on each of them at the fracture site on both sides. In addition, crossbars are installed in the upper part of the structure, which additionally removes the load from the flatter part of the broken roof. This solution makes it possible to strengthen the rafters, redistribute the load of load-bearing elements, remove racks and thereby significantly expand the room.
Broken roof with attic
There are a great many houses with an attic, because they are:
- attractive silhouette of the roof, and with it the entire house;
- increasing usable space through rational use of existing space;
- fast construction and low costs.
The design with a sloping hip-type mansard roof allows for the most efficient use of the internal space of the attic.
Attic houses with a sloping roof, where one slope is broken and the other is straight, look especially unusual. This architectural technique is used when the project has asymmetry in the pediment and it is necessary to move the attic room to one or the other wall. From the outside, this house looks stylish. It is easy to install solar panels, climate or heating systems and other technological equipment on an asymmetric roof.
The sloping roof combines wonderfully with various futuristic shapes, including asymmetry
Calculation of a sloping roof
The calculation is carried out taking into account the type of main roof covering, as well as the angles of inclination of the rafters. Calculating the required volume of covering material for a sloping roof is simple:
- measure the length and width of the slopes, multiply to obtain the area of each slope;
- sum up the calculated areas and divide the resulting result by the area of the roofing (metal tile sheets, ondulin, etc.) + 10–15% for overlap and margin.
Insulating materials are calculated similarly.
Before calculating the rafter system, you need to draw up a house plan and look at maps of snow loads and wind loads by region. Anyone who is familiar with ArchiCad or SolidWorks and knows the basics of construction can create a project for the roof of their house in these programs, where all elements have weight and size. Based on this, you can immediately draw up an estimate and find out what the costs will be for arranging the selected roof.
Video: roof truss system, design in ArchiCad and SolidWorks
We draw a sketch of the house on a checkered piece of paper, where we display the features of the sloping roof rafter system - shape, width of the wall, slope angles, etc. Let's take a sketch from a photograph as an example.
When drawing up a house diagram, it is necessary to maintain proportions
Starting data: the width of the wall on which the roof end is formed (Vd) is 6.4 m, built, for example, in Tyumen, the height of the box according to the sketch is 2.3 m, the distance from the ceiling to the roof ridge is 3.5 m, the angles of the slopes are angle a 60° between the ceiling and the slope and angle b at the break point of the slopes is 30°, the desired height of the room (Nm) is 2.5 m, there is no extension of the floor beams beyond the wall (Вв), the pitch of the rafters will be taken equal to 0.6 m.
We find the location of the construction on the map and find out the amount of snow loads for the given area. Moreover, if construction is carried out on the border of regions, then a larger value is preferred. In our example, the snow load (Tyumen) is 180 kg/m².
The amount of snow loads is determined depending on the terrain
We determine the value of the wind power from the wind load map and multiply it by the correction factor (k) from the table below, since the type of terrain and the height of the future building matter here. In our example, the wind load for Tyumen is 24 kg/m², k 0.65 (column “B”). In total we get 24 x 0.65 = 15.6 kg/m².
Using the wind load map, wind power is determined for all regions
Table: coefficient (k) for terrain types
| Building height, m | And the open coasts of lakes, seas, reservoirs, steppes, deserts, forest-steppes, tundra | B forested areas, urban areas and other areas evenly covered with obstacles more than 10 m high | In urban areas with dense buildings with a height of more than 25 m |
| no more than 5 | 0,75 | 0,5 | 0,4 |
| 5–10 | 1,0 | 0,65 | 0,4 |
| 10–20 | 1,25 | 0,85 | 0,55 |
If the house is being built within the city limits, but near the sea, then take the value of column “A”.
In our example, the value of column “B” is taken - the height of the house is over 5 m and it is being built within the city limits (Tyumen) in a cottage village where there are no high-rise buildings.
Video: sloping roof with attic, part 1 - design diagram, loads, DCS
We carry out calculations.
- We calculate the dependence of the width of the attic on the steepness of the attic slope (angle a) according to the laws of geometry - Vm = Vd - {2 x (Nm : tq a)} = 6.4 - {2 x (2.5 : tq 60°)}= 3 .51 m. The calculation was made without removing the beams, when the rafters rest on the mauerlat. With the removal of the floor beams outwards, say, by 0.5 m, the width of the attic room will increase to 4.01 m. Hence the conclusion - the greater the removal of the floor beams, the wider the attic room can be made.
- We calculate the total height of the roof: Nm + Hk (height of the ridge triangle), where Hk = 0.5 x Bm x tq b = 2.5 m + (0.5 x 3.51 x tq 30°) = 2.5 m + 1.01 m = 3.51 m.
- We calculate the length of the rafter legs: to calculate the lower rafter legs Nm: sin angle a = 2.5: sin 60° = 2.89 m length of the rafter leg; to calculate the ridge rafter Hk: sin angle b = 1.01: sin 30° = 2.02 m. If the structure is formed with the removal of the floor beams, i.e. the roof overhang is formed due to the extension, then the calculations of the rafter legs are completed. If there is no extension of the beams, then the rafters will need to be extended, which means that additional calculations need to be made.
- We calculate the elongation of the rafters - the working length of the filly - for the planned amount of the eaves overhang according to the formula - the desired length of the eaves overhang (k): cos angle a = 0.5 m, for example: cos 60° = 1 m.
- We find out the slope of the slopes and the amount of load on the rafters, guided by the table “Recommended slopes of pitched roofs” located below.
- We calculate the load on the rafters. To do this, we will use the initial and calculated data. Load due to the slope of the slope (for example, a metal-tiled roof) + snow load, according to the snow load map + wind load (determined from the map adjusted by coefficient). Total: 5 kg/m² + 180 kg/m² + 15.6 kg/m² = 200.6 kg/m² x specified rafter installation pitch (we have 0.6 m) ≈ 110 kg/linear meter.
Table: recommended slopes of pitched roofs
| Roof covering material | Roof slope | Weight per 1 m², kg |
| Metal tiles | from 1:5 and more | 5 |
| Cement tiles | from 1:5 to 1:0.5 | 45–70 |
| Ceramic tiles | from 1:5 to 1:0.5 | 50–60 |
| Galvanized sheet with single seams | from 1:4 and more | 3–6,5 |
| Double folded | from 1:5 and more | 3–6,5 |
| Soft (flexible) tiles | from 1 : 10 and more | 9–15 |
| Corrugated sheets of cellulose-bitumen | from 1 : 10 and more | 6 |
| Corrugated sheets a/c medium profile | from 1:10 to 1:2 | 11 |
| Reinforced profile | from 1:5 to 1:1 | 13 |
Knowing the magnitude of the load, you can correctly select the cross-section of rafter lumber.
Table: relationship between load and beam thickness for the rafter system
| Load on rafter leg, kg/linear meter | Thickness of the board (timber), mm |
| 75 | 40 |
| 100 | 50 |
| 125 | 60 |
| 150 | 80 |
| 175 | 100 |
Note: when choosing a load, round up.
Video: sloping roof with attic, part 2 - calculation in Scad, selection of sections of roofing elements
When purchasing lumber, you need to take into account the insulation, as well as the ventilation gap and the vapor-proof layer of the roofing “pie” (which is 20–30 mm).
The calculation of a sloping roof is voluminous, but simple. You can do it yourself manually or using the Scad calculation program. You can also use the online calculator for calculating the rafter system on construction sites, where you need to enter the requested data and receive a ready-made calculation.
Video: sloping roof with attic, part 3 - design and layout
Skate attachment
A ridge is a rib located at the very top of the roof, formed as a result of the contact of the roof slopes. The components of this element also include various parts attached to the rib. It is at this point that the roof roof is ventilated.
Did you know? People first learned about corrugated sheets back in 1820, for which today we must thank Henry Palmer, a British engineer and architect who was the first to start corrugating.
The process of installing the ridge is also the process of arranging its run, connecting the slopes of the rafter systems.
The method of installing this element directly depends on the type of roof, which means it’s worth thinking about when choosing a specific covering material. For example, when purchasing asbestos-cement sheets. Shaped elements resembling a gutter are ideal for them.
They are fixed to boards or ridge beams using nails for fastening slate sheets, with a rubber gasket on them. It is also mandatory to waterproof all covering elements, and the ridge beams are covered with roofing felt tape.
To fix all the ridge elements, first install a special beam with a cross-section of at least 70 x 90 mm. Then two sheathing bars are attached to it on both sides, and to simplify the task of installing the parts, special brackets can be attached to the central wooden block to hang the walking bridges from them.
Important! When choosing a ridge board, keep in mind that it should be 10-15 cm thicker than the sheathing boards.
The ridge beam is attached to the central one, and for the convenience of performing this task, its upper edge should be rounded. This form guarantees a more durable attachment of all parts of the ridge, and to prevent rotting and the development of mold of the wooden parts, it is better to cover them with ordinary roofing felt along the entire length, applying enamel or paint on top.
The ridge ceiling is obtained by combining two ridges placed on adjacent slopes, after which the main ridge, extended by 10 mm, is fixed.
67edd9c3d932775c99921889e6f99a73.jpe
Consider the option of installing a ridge on a metal flooring:
- It is necessary to make holes on two skates, exactly the same as on the flat block side.
- Then two holes are drilled and on the longitudinal axis of the line of the timber hump. Just make sure that on the lapels they intersect the crests of the waves of the coating.
- The ridge is installed on top of the end strips, and its edge should extend outward by at least 2-3 cm.
- When installing a flat element, you need to ensure that all parts are joined together with an overlap of about 10 cm or even more.
- In the process of joining the elements of a semicircular ridge, the connection is made along stamping lines.
- Be sure to consider the possibility of combining the ridge strip with the angle of inclination of the covering material. If necessary, you need to adjust the angle of the plank to the angle of the slope (if necessary, it can be easily bent and unbent).
- It is quite possible that additional installation of a ridge board will be required, which is placed slightly higher than the top sheathing board, but maintaining an 80-mm gap between the slopes themselves and their ridge boards for good ventilation of the free space under the roof.
Video: installation of corrugated sheets and installation of a ridge
The final installation of the ridge strip is carried out by tightening it with self-tapping screws to the highest parts of the metal tile sheets. The pitch of the screws is usually within 0.8 m.
At this point, the independent organization of the attic roof is considered completely completed, and the final result will depend on the accuracy of all the above actions.
Of course, doing the work yourself seems to be a more profitable option than paying workers, but in some cases the opinion of specialists is really important, which should never be forgotten
Design advantages
A gable sloping roof, unlike a traditional triangular roof, resembles not a triangle, but a pentagon. The figure formed by the roof slopes and cornice has a pentagonal shape. This design is usually called broken because the line of the slopes is not straight, but with a bend that forms an edge. Conventionally, two parts can be distinguished in the structure: the first, the upper one with flatter slopes of 20-300, having the shape of a triangle, and the second - the lower one, reminiscent of a trapezoid, the sides of which are located at an angle of 50-600. Thus, the broken structure allows snow to slide freely and prevents rainwater from penetrating into the attic.
Most often, a gable sloping roof is used if there is a need to use the attic as a living space. After all, the geometry of the slopes allows you to use the available space as efficiently as possible, equip yourself with a high horizontal ceiling, a ventilated attic, and side compartments for seasonal storage of things.
Experienced builders do not miss the opportunity to install skylights directly into the roof slopes. After all, if you correctly calculate the location, the sloping attic roof will be naturally illuminated throughout the daylight hours, and this will significantly reduce energy costs. In addition, a sloping roof looks great with a spacious balcony, which is important for houses with a small area.