The coming season of heavy rains may be a long-awaited boon for the vegetation on the site, but it also becomes a serious threat to the house, foundation, basement and surrounding area as a whole. To protect the base of the building from the destructive influence of moisture, many owners additionally construct a storm drain along its perimeter. In most cases, an integral part of the system is a special reservoir - a rainwater inlet. It does the same job as larger structures used in municipal stormwater systems. However, owners of private houses may be interested in what criteria are used to choose such tanks, and how a rainwater inlet is installed in the blind area.
Uncompacted base
If the soil under the blind area is not compacted well enough, it may sag, causing part of the concrete structure to acquire a reverse slope or crack.
article to the mistakes that are often made when compacting soil (8 mistakes when compacting soil) on the website.
To achieve high-quality compaction, you need to use tamping equipment (vibrating plate, vibrating leg). Not all the soil should be compacted, but the surface should be treated in layers of 15–30 cm, depending on the capabilities of the compacting equipment.
Concrete gutters
» Drainage » Concrete gutters
| Standard series concrete channels |
| These trays are widely used both in urban and private construction due to the optimal combination of price, quality and dimensions. They are suitable for installation in places with a load on the canvas of up to 25 tons and an average amount of moisture removed. They can be equipped with reinforcing steel plates. There are options for trays with a vertical drain. |
| Concrete channels Big series |
| Trays with increased depth of the "Big" series are used in areas with increased volumes of wastewater. The large selection of products of different sizes that we offer makes it possible to select trays that are suitable for specific conditions. |
| Super series concrete channels |
| Trays of this series are designed for areas with maximum load, up to class F (90 tons), have reinforced steel nozzles and are equipped with grates made of high-strength cast iron. Many options for trays with different widths and heights of the hydraulic section allow you to organize a drainage system with optimal characteristics. These channels have a hydraulic cross-section from 100 to 500 and can have an internal slope of 0.50. |
Storm drainage is used to improve the territories of cottages. As an element of storm drainage, concrete gutters are the most reliable, practice-tested drainage system. If you install concrete gutters around the perimeter of the blind area of the house, you can provide not only high-quality drainage, but also protection of the foundation.
Gutters (concrete trays) are reliable and durable when used for constructing storm drainage systems. Functionally, concrete gutters are designed for drainage and drainage systems. Excellent quality characteristics at low prices create active consumer demand for concrete gutters. Installing concrete drainage gutters is much more profitable than structures made from other components.
Buy gutters and pipes 495/589-49-79
Manufacturing companies produce concrete gutters in a wide range of products. Manufactured using the vibrocompression method, which eliminates the formation of voids, concrete gutters are endowed with particularly durable characteristics. Only high-quality concrete products are able to drain powerful surface flows. In this regard, concrete gutters are widely used to drain rain and melt water in linear drainage systems.
Installation of gutters of the drainage system
Today, concrete trays are used according to the load class, which determines the installation at specific sites. These can be individual buildings or urban areas, highways. General purpose concrete gutters of the Standard 100 series can withstand load class C up to 25t. This type of concrete gutters is the most common, used in parking lots, urban areas and highways. For concrete gutters with a higher load class, the M800 grade of heavy concrete is used.
Grids for gutters
Surface gratings are additionally installed on concrete gutters for efficient operation of gutters and protection from pollution. Surface gratings installed on a concrete gutter must be at least 3-5 mm from the level of the road surface. Additionally, it can be equipped with reinforced steel nozzles. Concrete gutters protected in this way are a good solution for organizing drainage from the internal paths of a country house. The installation of such concrete gutters at the entrance to a country house will protect the access roads from destruction.
Gutter sizes
Gutters may have a vertical overflow covered with special gratings with permissible loads according to the class. This allows you to organize high-quality drainage in almost any area.
Concrete gutters have the following advantages:
- Resistance to aggressive environments;
- Resistance to temperature changes;
- Smooth inner surface;
- Exact fit to size;
- The presence of stiffening ribs that can withstand loads of up to 90 tons;
- Long service life.
Taking into account consumer demand, concrete gutters are presented in various modifications corresponding to the load class and have quality certificates. Concrete gutters are a universal solution for organizing uninterrupted drainage in drainage systems.
| Name | Load class | Length, mm | Width, mm | Height, mm | Weight, kg |
| Gutters of the Standart 100 with galvanized grating | B (up to 12.5t.) | 500 | 175 | 95 | 11,5 |
| Gutters of the Standart 100 with stainless grating | B (up to 12.5t.) | 500 | 175 | 95 | 11,5 |
| Gutters Standard 100/60 | C (up to 25t.) | 500 | 140 | 60 | 5,4 |
| Gutters of the Standart 100/80 with vertical ebb | C (up to 25t.) | 1000 | 160 | 80 | — |
| Gutters Standard 100/125 | C (up to 25t.) | 1000 | 136 | 125 | 19 |
| Big series gutters | C (up to 25t.) | 1000 | 163 | 165 | 37 |
| Big series gutters | C (up to 25t.) | 1000 | 163 | 190 | 41 |
| Big series gutters | C (up to 25t.) | 1000 | 163 | 215 | 45 |
| Gutters series Big tilt angle 0.50 | C (up to 25t.) | 1000 | 163 | 165 | 37,5 |
| Gutters series Big tilt angle 0.50 | C (up to 25t.) | 1000 | 163 | 170 | 38,3 |
| Gutters series Big tilt angle 0.50 | C (up to 25t.) | 1000 | 163 | 175 | 39 |
| Gutters series Big tilt angle 0.50 | C (up to 25t.) | 1000 | 163 | 180 | 39,8 |
| Gutters series Big tilt angle 0.50 | C (up to 25t.) | 1000 | 163 | 185 | 40,6 |
| Gutters series Big tilt angle 0.50 | C (up to 25t.) | 1000 | 163 | 190 | 41,4 |
| Gutters series Big tilt angle 0.50 | C (up to 25t.) | 1000 | 163 | 195 | 42,2 |
| Gutters series Big tilt angle 0.50 | C (up to 25t.) | 1000 | 163 | 200 | 43 |
| Gutters series Big tilt angle 0.50 | C (up to 25t.) | 1000 | 163 | 205 | 43,8 |
| Gutters series Big tilt angle 0.50 | C (up to 25t.) | 1000 | 163 | 210 | 44,6 |
| Gutters of the Super with a cross-section of 100 | E (up to 60 t.) | 1000 | 165 | 110 | 26,8 |
| Super series gutters with section 110 | E (up to 60 t.) | 1000 | 190 | 230 | 70 |
| Gutters of the Super with a cross-section of 150 | E (up to 60 t.) | 1000 | 255 | 155 | 52 |
| Gutters of the Super with a cross-section of 160 | E (up to 60 t.) | 1000 | 250 | 100 | 47,4 |
| Gutters of the Super with a cross-section of 200 | E (up to 60 t.) | 1000 | 335 | 205 | 105 |
| Gutters of the Super with a cross-section of 220 | E (up to 60 t.) | 750 | 316 | 220 | 66 |
| Gutters of the Super with a cross-section of 300 | E (up to 60 t.) | 1000 | 380 | 410 | 190,6 |
| Gutters of the Super with a cross-section of 500 | F (up to 90 t.) | 1000 | 650 | 310 | 168,6 |
Source: https://gis-msk.ru/betonnye-geloba
Moisturizing the area under the blind area
You can often encounter a situation where the owner has made a blind area, but the soil underneath still remains wet. This occurs due to the wrong choice of soil for backfilling.
After digging a pit and pouring the foundation, so-called foundation cavities remain between the foundation wall and the slope. When the foundation hardens, you need to backfill. We wrote more about the choice of soil for backfilling in a separate article (Backfilling a foundation with sand or clay).
The density of the soil under the blind area should correspond to the soil on the rest of the site. Otherwise, it will have a higher filtration rate (water will pass through it more easily), meaning that liquid from the entire area will follow the path of least resistance and end up under the house.
If all the soil on the site consists of loam, and the backfill is made with sand, then drainage must be made underneath it, since otherwise the blind area will not protect the foundation from moisture.
Making a blind area with a drain
The blind area and drainage can be installed simultaneously. This water drainage option allows you to combine two processes, which will significantly reduce the time for work.
Marking and excavation work
First of all, it is necessary to make markings that will take into account the placement of all elements. At the initial stage, it is necessary to decide on the width of the trench. It is important that it is wider than the roof overhang so that the flowing precipitation does not cause damage to the structure.
Excavation
To adhere to the selected parameters along the perimeter, you should drive in pegs and stretch a fishing line between them, to which the orientation will be carried out.
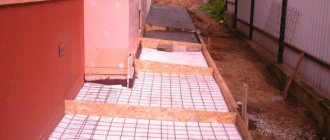
Pouring the blind area
After waterproofing the foundation with roofing felt or mastic, you can begin pouring the blind area of the house with concrete mortar. Before the procedure begins, formwork is constructed and reinforcement is carried out. It is important to consider the angle of the slope so that water flows away from the house.
Pouring the blind area
After pouring, while the blind area is still damp, gutters are formed for drainage or pipes are embedded in the mixture. Further work can begin only after the concrete solution has completely dried.
Gutter installation
The final stage will be the organization of drainage. The direction and slope will depend on the location of the reservoir where the water will be drained. To do this, a trench is dug along the edge of the entire blind area, the width of which will be similar to the pipe used.
Gutter installation
You can use both the sewer option and asbestos-cement or polymer pipes cut in half. The base for the pipe can be compacted with sand and gravel, and the trench is also filled with concrete, which gives additional strength.
Blind areas and drainage make it possible to create high-quality protection for the foundation from the influence of atmospheric moisture and groundwater, so their arrangement is mandatory.
Correct placement of elements and adherence to installation technology make it possible to obtain the maximum effect, even when constructing drainage on your own.
Reverse slope to the blind area on the site
Water flowing down the blind area should not accumulate around the house. In an ideal situation, water rolls down the blind area, falls into the tray and goes into the sewer or another container for collecting liquid. The problem here is that the abundance of precipitation cannot be calculated and depends on the vagaries of the weather, so in a rainy summer, water will inevitably flow down the blind area and flow further along the site. It is important here that the soil around the house does not create a counterslope, pouring all the liquid back under the house. The slope on the site may not be so intense: 2 cm per 1 m at a distance of two meters from the blind area is enough.
Drainage installation around the house
Drainage around the house and blind area are the main elements that ensure the safety of the foundation from moisture. But when arranging them, it is important to take into account a lot of additional factors, for example, the features of the sewerage system on the site, as well as the water supply system. But regardless of the type of drainage chosen, there are certain general rules that must be followed.
Design principles
In order for the drainage of the blind area around the house to be as effective as possible, it is important to adhere to the following key principles.
- Correct depth. We install the drainage deeper than the ground freezes. This is extremely important, because during the spring thaw, when enhanced drainage is necessary, the frozen system will not be able to cope with its function.
- Slope of drainage pipes. Here it is important to determine the degree of inclination as correctly as possible, since an excessive or insufficient angle of inclination leads to ineffective drainage. The correct slope should guarantee the unimpeded movement of water at a speed of approximately 1 m/s.
- Place of drainage. The place where moisture will be removed should be selected in advance. It could be a lake, river, ravine. To prevent the reverse movement of moisture through the pipes, they must be located above the water level in the reservoir.
- Additional features. Even the most efficient system can fail, especially with large amounts of water. In this case, it is necessary to consider an additional pumping system, for example using a pump.
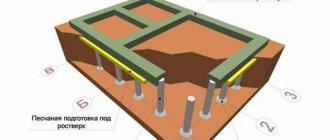
Device diagram
Adhering to the principles described above, you can independently organize a high-quality water drainage system from the house.
Components
The main components of modern drainage systems are:
- Pipes. If a more economical option is required, then an asbestos cement pipe is suitable. But a more modern option is polymer or composite materials. They are easy to install and are characterized by good reliability and durability.
- Drainage well. If there is no natural drainage basin, then you will need to organize a special container where the water flow will be organized.
- Pumps. Even in the most reliable system, moisture will settle; in order to remove it, you will need to use pumping units.
Components
Additional components are also possible. It all depends on the type of drainage system chosen.
Wide blind area
People who want to secure the foundation on problematic soils often make a wide blind area of more than 1.5 m. From a construction point of view, this makes no sense; it simply leads to increased costs for concrete. From an aesthetic point of view, this reduces the space for green spaces and adds additional cubic meters of concrete to our site.
On problematic soils, it is more rational to use a combination of traditional and hidden blind areas. In this case, you can make a concrete platform 1 m wide, and then lay a hidden blind area.
Purpose and characteristics of blind area and drainage
The blind area around the house is not always only functional. If its width reaches a meter, then it may well be a sidewalk path along the house. If it is expanded in some places, then garden furniture and plants can easily be placed on the blind area. In other words, it can become an interesting design solution and brighten up a boring country landscape. But if the blind area around the building will also act as a decorative element, then it is better to choose solid materials for its base. Materials intended for paving streets (gravel, pebbles, wooden flooring) are suitable for this purpose.
Scheme of the blind area.
The dimensions of the blind area depend on the soil and the width of the roof canopies. For normal soil, the width of the blind area should be 20 cm larger than the protruding canopy. If the soil is subsiding, then the blind area should extend 30 cm beyond the markings of the foundation pit. In this case, the blind area should not be narrower than one meter.
The angle of inclination for cobblestone or brick blind areas is 10 cm (with a blind area one m wide).
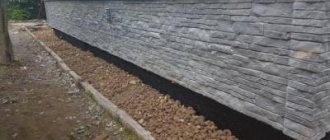
And in order for the house to be one hundred percent protected from external factors, a high-quality drainage system is required, for which a trench is dug along the entire perimeter of the house. Gravel, dust, and sawdust are placed in the trench. During the rainy season, water will flow through the blind area into this trench and be diverted away from the house.
Spot installation of plastic drainage pipes and trays
Installation of drainage and drainage devices and their integration into a drainage system may include coverage not only of the border of the house and the ground, but also of the adjacent territory. As already mentioned, the drainage device for the blind area can be point or linear, possibly mixed.
Point drainage systems and plastic rainwater inlets are always used for local (local) collection of water from the surface, as well as from the roof in case of connecting a drainpipe.
With a point drainage system, installation is carried out at the time of construction of the blind area. After removing the layer of earth and installing the formwork, a mixture of sand and crushed stone is poured onto the bottom in a dense layer of about 5 cm. Pipes and storm water inlets are placed, preferably insulated, using roofing felt or roofing felt, laid on a layer of sand and crushed stone. The pipes are laid with a slight slope. You need to pour crushed stone on top of the pipe again, cover it with geotextiles and pour sand. Then you can pour concrete, with or without reinforcement. When using other materials, we lay it with paving slabs or whatever is used for construction. Construction materials may vary.
Drainage tray device
The drainage tray is a solid U-shaped channel, the upper surface of which is covered with a grate.
According to the European classification, there are four types of trays:
- Sewage
. This design has the shape of a straight gutter that receives water along its entire length. There are two types of drainage trays: option I, which does not require a foundation or lining, and option M, which is installed on a foundation. - Box-shaped
. These devices are classic U-shaped gutters, which are equipped with removable top grilles that protect the tray channel from large objects and items. - Slotted
. Such elements of the drainage system are square beams that have an internal through channel along their entire length. The upper part has a slot through which liquid is received into the drain. These cuts can be either continuous or intermittent. Slotted trays are often analogues of box trays. - Borders
. The design of the curb trays is very similar to the previous version, with one difference: the curb trays have an L-shaped protrusion on the top edge, which hides a gap in the body. These trays are perfect not only for installation under gutters, but also near curbs. The strongest structures are used to create drainage systems for airports, highways or heavy equipment parking areas.
How to install drainage trays. Stages of installation of concrete drainage systems
Every building owner wants his structure to be reliable, functional, and not subject to destruction not just for years, but for decades. This is a completely natural desire for every person, regardless of what is in his property - a modest country house with a small plot or several huge production buildings of a factory enterprise. In order to fulfill his desire and keep the building in order, its owner regularly checks its condition and carries out the necessary repairs. It is especially important to remember that the condition of a building depends not only on its parts, but also on the site on which it stands. Therefore, building owners know that to take care of their property, installing surface drainage is essential.
Our Company offers you its services for the installation of surface drainage.
Installation of plastic trays.
Installation diagram of plastic trays.
Scheme of joining trays with a sand trap and sewer pipes.
Plastic trays are installed in stages in the following order:
A trench is prepared in accordance with the diagram in the place where the tray will be installed;
-a concrete footing is made by laying concrete in even layers along the bottom of the trench; -plastic trays are located in the trench in the center; - the slopes are concreted to give the system stability.
Plastic drainage trays are connected to each other using the butt method. To do this, there is a tongue on one side of the tray and a groove on the other. To significantly increase the warranty period of plastic trays, the joints are sealed.
To attach the grid to the plastic tray, you must:
Install the main fastening system into the tray by unscrewing the bolt from it; - insert the bolt into the hole located on the grille; - firmly secure the bolt until it stops, checking the reliability of installation; - the stamped grille is attached very easily: the locks located at the edges of the grille are bent, the grille is fixed into the tray.
To make a side connection, you need to make a small hole in the side wall of the tray, connect the trays at right angles, seal and cap.
Advantages
Plastic trays have many more disadvantages.
The main advantages are: throughput. Smooth walls are not covered with growths, to which debris can cling and accumulate over time; durability, which is caused by resistance to loads, chemicals, temperature changes; light weight, which facilitates transportation and installation of such a system; several holes, which makes it possible to vary when connecting to a sewer pipe; installation is so primitive that one person can handle it without special education or specific or expensive equipment; Wide area of application - from intensive areas with a large number of pedestrians to small courtyard areas.
Disadvantages
plastic trays are: unreliable at temperatures below zero. Plastic may burst in severe frost or due to the weight of passing traffic; possible deformations over time due to different expansion coefficients of plastic and concrete. In addition, the plastic tray may fall out of the concrete trench over time; Due to the lightness of plastic, it must be pressed when connecting to concrete, which requires additional effort.
Scheme of installing a concrete tray in asphalt.
Scheme of installing a concrete tray in concrete.
Scheme of installing a concrete tray in a tile.
Concrete trays are installed in a ditch on a concrete base in asphalt, concrete or tiles.
The thickness of concrete depends on the load class. The base is usually made of B25 concrete. The sides are fastened in the form of slopes. The width of the slopes also depends on the load class.
The correct deepening of concrete trays is checked as follows: after installation is completed, the extreme point on the grid should be 4 mm below the point of the road. Concrete trays are connected to each other and sealed. If the drainage is connected at an angle, the concrete tray and grate are sawed.
When installing concrete trays, one must not forget about expansion joints. The connection of concrete trays is carried out through a sand trap using a 100-160mm pipe or using a vertical pipe installed at the bottom of the tray.
Advantages
Concrete trays are obvious - reliability and simplicity, special wear resistance. It should be noted that the scope of application of concrete trays is especially effective in Russia due to its special climatic conditions.
Concrete trays can withstand severe temperature overloads and retain their functionality. In addition, many concrete gutters and trays are resistant to various mechanical loads. Modern concrete trays are made using a special vibration pressing method; metal inserts are added to improve the class of the product and increase its wear resistance. Some products are made from fiber-reinforced concrete, concrete combined with fiberglass, the characteristics of which include increased impact resistance. An important factor in concrete trays is their correct installation and proper scope of application. Thus, there are general-purpose concrete trays, class C, with a cross-section of 100, and a load of up to twenty tons. For the movement of freight transport, more powerful drainage is required; super-class concrete trays are made for it for maximum load.
The only drawback
The average concrete tray is its low impact strength, especially this characteristic is of great importance during transportation. As mentioned above, for a special type of work, especially strong concrete is made, trays from which are used on runways and in industry. Thus, when installing a concrete tray, you need the help of a specialist who will help you understand the class of concrete required for a specific drainage and install it correctly.
Drainage, as its name implies, ensures the removal of excess precipitation from the territory. While drainage systems save them from excess groundwater that harms the foundations of buildings, surface drainage saves the area from the occurrence of puddles and dirt, which harm the condition of the territory, make it difficult to move around it, and can also become dangerous, turning into ice in cold weather. of the year. Installation of surface drainage
solves all these possible problems.
Trust such careful work as drainage installation,
Worth only for professionals. By contacting a professional company, you can be sure that all work will be carried out in compliance with all sanitary, hygienic, construction and safety standards. Professionals will tell you in detail about each stage of work, its role in the drainage system, help you select the appropriate equipment, provide and agree on an installation plan. Our company guarantees you exactly this approach to work.
Our employees have significant experience working with such equipment, so we ensure that our customers complete their orders in the shortest possible time. In addition, the opportunity to work with one company from the moment of selecting and purchasing equipment to installation of drainage systems
will allow you to save money, since we value our customers and offer them the best prices.
Drainage, installation
which were carried out by our company, are always of high quality and reliable, because we work exclusively with proven equipment from the best suppliers. You can be confident that you have received certified equipment that meets all modern technical standards.
We carry out installation work within Moscow and the Moscow region. However, we always strive to meet our clients halfway, so it is possible for specialists to travel to regions close to the Moscow region.
For the effective operation of the drainage system, it is important to comply with all stages of its installation, in particular - professional installation of drainage trays,
collecting and directionally draining excess fluid to a specific place.
Installation of drainage trays,
which are special geometric structures shaped like a rectangle, square or oval, requires care and skill.
Such work should only be trusted to experienced specialists. The preliminary selection of the trays themselves is also important. Do you need trays made of concrete, or are plastic ones suitable? Is it possible to install open trays on your site or is it important to have a special grid? What depth and shape of trays best suit your conditions? Professional consultants from our company will give you answers to all these questions. You will definitely select the optimal equipment, and we, in turn, guarantee you professional installation of drainage trays.
The combination of these two factors will allow you to get an excellent result, and
the installation of drainage trays
will be effective and efficient.
Drainage, installation
which were produced with high quality, will be effectively used for many years and will not create the slightest problems for the owners of the sites on which they are installed. Provide yourself with the best equipment - contact professionals who have proven their effectiveness for installation work, contact our Company!
Drainage trays - plastic, concrete or cast iron - are used in the construction of surface-type drainage systems. Moreover, in such systems the tray “works” as a drainage channel that collects wastewater. Therefore, it is mounted near the road curb, under the sewer pipe, and at the end of the annular blind area.
Cast iron
Since cast iron has good resistance to longitudinal and transverse loads, products made from it are used in places where they will be subject to great forces. Typically, cast iron trays are installed on runways, truck stops and other areas: the use of cast iron trays on private land is not justified from a financial point of view.