Materials
Plastics are represented by a whole collection of modern polymers.
These include PVC (polyvinyl chloride), uPVC (unplasticized polyvinyl chloride), PE (polyethylene) and PP (polypropylene). All of them, to varying degrees, have good resistance to mechanical damage, stretching, bending, and discoloration. They are resistant to corrosion and many acids, alkalis and salts that can be dissolved in rainwater. They do not require additional painting. The durability of many plastic systems is about 50 years.
Galvanized steel (galvanization) became very widespread at one time due to its availability and low cost. Tinsmiths manufactured and assembled drainage systems right on site, using a minimum of tools and a maximum of imagination. Such systems were cheap (though they did not last long). The craftsmen tried to compensate for the shortcomings with hand-chasing, intricate “ruffles” and ornaments. Special paints make it possible to give gutters an aesthetic appearance and increase their resistance to corrosion.
Galvanized steel with a polymer coating has better strength characteristics compared to plastics and greater durability than galvanizing due to its multi-layer protection and mass production on high-precision equipment. Modern systems are for the most part made from the same steel as metal tiles, the outer walls of insulating sandwich panels or flashings for roof windows. The raw material used is cold-rolled hot-dip galvanized steel with a double-sided polymer coating of plastisol, painted according to the RAL color palette. It is noteworthy that most manufacturers choose white and brown as the main colors for drainage systems, although any color can be made to order.
Copper. It is impossible not to appreciate the uniqueness and durability of copper: it is used as a first-class roofing material, gutter systems, roofing accessories and water pipes are made from it. It is known that copper roofs can last more than 400 years. You can work with copper at any time of the year, regardless of temperature conditions. However, all fastening material must be copper or stainless steel to avoid the formation of electrolytic vapors that lead to the destruction of copper. It is prohibited from contacting galvanized steel or titanium zinc.
Changing the color of copper is a natural process. At first it is bright, later dark brown. Within 1-5 years it becomes black in color, and later becomes greenish. By the age of 25-30, copper has a noble green color. Individual changes in copper color do not affect its durability in any way.
Aluminum is one of the lightest and most durable materials. It is used in environmentally difficult conditions and in places where the durability of roofing and drainage structures must exceed 50 years. You can work with natural aluminum without paint at temperatures down to -20°C, and with painted aluminum down to -10°C.
Zinc-titanium is a lightweight metal alloy with a shiny surface that develops a blue-blue patina under the influence of atmospheric conditions. It is advisable to use it in difficult atmospheric conditions. The durability of the zinc-titanium alloy drainage system exceeds 50 years. But, like copper, zinc-titanium requires professional handling. Working with it is prohibited if the metal temperature is below +10°C. Contact with PVC membranes, roofing films and roofing felt, as well as all materials based on petroleum, asphalt, lime, cement and gypsum is strictly prohibited. Contact is only possible with natural aluminum, lead and stainless steel.
Copper, aluminum and zinc-titanium are very expensive materials, so you need to work with them professionally and efficiently.
Having chosen the material, you need to calculate the cost of the drainage system. In most cases, it is advisable to seek help from a specialized roofing company and entrust the calculations to a professional consultant who will draw up a commercial proposal for the supply of a drainage system. The roofing company can also make calculations for several drainage systems - for example, one made of plastic and the other made of metal with a polymer coating, or two equivalent systems from different manufacturers.
The consultant may identify inaccuracies or unaccounted elements in the preliminary calculation. Having its commercial offer, the customer will be able to compare his desires with his capabilities. Specialized companies can provide a trained team of professional installers and issue a guarantee for the ordered goods and work.
Components
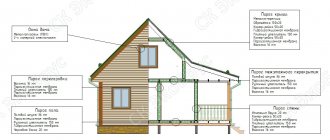
The design of all drainage systems includes gutters, hooks or brackets to support them, downspouts and pipes for draining water. Clamps are used to secure pipes to the wall of a building. In order to turn the pipe from the edge of the roof in the roof area and bring it closer to the wall, and in the lower part of the building to turn the flow away from the house, elbows are used. Additionally, systems may include pipe connectors and gutter connectors, gutter corner elements, various kinds of tees for connecting two or more pipes, as well as storm drains for underground sewerage and inspections for cleaning pipes. It would be worth mentioning the leaf catcher nets. They significantly contribute to protecting the drainage system from clogging and improve the conditions for its functioning.
Types of drains
Roof drainage systems are classified according to certain criteria:
- Organization of drainage
. According to this feature, the system can be internal or external. In the first case, it is built into the walls of a house or indoors; the second type involves fastening drainage elements to the facades of buildings. External drainage can be used for all roofs with slopes; internal drainage is not installed on a pitched roof; it is designed to organize the collection and drainage of water only on flat floors. - Material of manufacture
. The drainage system can be made of plastic or metal. - Method of connecting elements
. Since the system consists of several elements, to connect them it is necessary to use either a special adhesive composition or rubber seals. Only in this case can storm drainage systems from the roof be reliably sealed.
Brackets
The brackets are designed to attach the gutter of the drainage system to the roof structure and hold it during operation.
They come in different shapes and are made from different materials (plastics, steel, copper, zinc-titanium alloys). The color of the brackets most often matches the color of the entire drainage system.
Depending on the shape or the initially chosen fastening method, the brackets can be fastened in several ways.
The first method (the simplest) is to attach the bracket to the frontal roof board. This allows you to install a drainage system on an already finished or reconstructed roof. Most often, such brackets are found in PVC systems. They are made with highly developed vertical ribs to increase strength (reinforced PVC brackets are designed for a load of up to 75 kg each and ensure efficient operation of the drain under snow and wind loads).
In metal systems, short brackets (also called short hooks) are used to attach the gutter to the front board.
There are cases when the frontal plate is completely absent. Then, using special steel extensions, the plastic brackets are attached directly to the rafter leg. Such brackets are usually called combined, and they allow you to attach them to the rafter leg both from above and from the side. If there is no access to the rafters, metal spikes are driven into the wall, to which the gutter is attached using holders on studs that regulate its height.
The second mounting method (the most reliable) involves installing the bracket on the rafter leg. This happens before the installation of the roofing begins. This is why it is so important to think about the drainage system before roofing work begins. It should be noted that this method is justified in cases where a drainage system with increased capacity is provided on roofs with a large coverage area. Moreover, fairly heavy roofing materials are used, for example natural tiles, and the distance between the rafters does not exceed 60 cm. This allows you to securely fasten the gutter (preventing its sagging), form a reliable load-bearing roof frame and use thermal insulation materials with a minimum amount of waste.
The third method is suitable for roofs where the rafters are located at a distance of more than 60 cm from each other. Most often these are roofs covered with metal tiles, bitumen tiles or corrugated sheets of the Ondulin type.
Here it is necessary to attach long hooks or combination brackets to the first strip of sheathing or, in the case of asphalt shingles, to the bottom edge of the continuous deck. This is done before laying the roofing begins.
The basic rules and procedure for installing hooks and brackets must be strictly observed, because the correct direction of the flow of collected water, the strength and durability of the system as a whole depend on this.
Gutters should be installed with a recommended slope of 28 mm by 10 mm (1:350). The brackets must be installed so that their ends do not intersect the plane. This will ensure the snow slides without loading the gutter (in areas with heavy snowfall, it is recommended to additionally install snow barriers). A tightly stretched string between the drain and the bracket (in PVC systems) or between the outer hooks (in metal systems) will indicate the mounting height of the remaining brackets and gutter couplings.
Gutters
Gutters come in different shapes. In cross-section they can be semicircular, oval, rectangular or a more complex combined shape. Each manufacturer can present several interesting options for the customer to choose from. The main thing is that the hooks and gutters are from the same system and have a common curvature configuration. It is clear that it is unlikely that it will be possible to secure a rectangular gutter in a semicircular bracket.
Many gutters are designed as follows: in the front part there is a special semicircular groove that prevents the overflow of water received by the drain, and the rear edge has a rib to increase the transverse rigidity of the gutter. Often, such a rib can act as a stop when connecting the gutter to the bracket. It is worth noting that systems using symmetrically shaped gutters are equipped with universal elements without division into right and left (for example, a gutter plug). This greatly simplifies the calculation of the necessary elements and packaging for the customer, and logistics and warehousing for the manufacturer and its dealers.
Brackets and gutters are connected to each other in different ways too. Each manufacturer, trying to make installation of the system as easy as possible and make their product attractive on the market, has developed its own connection system. The most interesting among them, of course, can be considered systems in which the gutter is connected to the bracket according to the “insert and snap” principle. An example is the Surefit snap-in system (English Hunter drainage systems), which allows for quick and easy installation and assembly of elements using rotary latches. This system makes it easy to disassemble and dismantle the drainage system as a whole or part of it in order to eliminate any shortcomings.
When installing gutters, it is necessary to take into account temperature changes in their linear dimensions. This is especially true for PVC gutters. To compensate for such linear fluctuations in size, manufacturers have provided compensators (also called couplings), the inner side of which is marked with special notches. These notches explain in an accessible form to the master to what depth the installed gutters need to be inserted and how the length of the gutter will change depending on the ambient temperature.
It is worth remembering that PVC gutters cannot be connected point-to-point. This can put unwanted stress on the gutter and cause breakage and cracks. If the gutters are connected with glue, you must consult with a representative of the supplier about the number of expansion joints and their location on your roof.
Although the thermal expansion of a metal gutter is significantly less than that of PVC gutters, the coupling in metal systems also acts as an expansion joint and in most cases has a recommended installation line that should not be crossed (it is recommended to leave a gap of 4 to 10 mm between the gutters).
Gutters and downpipes should be protected from icing. The best protection is good roof insulation combined with snow barriers. Forced heating systems using electric heating cables are also becoming increasingly popular.
Installation of drainage from pitched roofs
A building that is not provided with high-quality drainage during construction will, in a very short time, acquire a rather unpresentable appearance under the influence of precipitation. And most importantly, the general condition of the structure will also be negatively affected, which is why mold and an unpleasant odor may appear in many places.
A drain is needed to prevent water from accumulating on the roof and falling on the walls and foundation
And if this problem is not approached with all seriousness, the following problems will arise that will require constant financial expenses:
- high humidity will cause weakening and gradual destruction of the foundation and base of the house;
- undiverted water will penetrate into the basement and constantly fill it;
- mold and high humidity will affect the health of residents;
- the noise from flowing water will interfere with a comfortable rest.
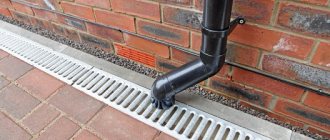
The drainage system is used everywhere to remove precipitation from the surface of roofs: flowing water from the roof enters a special gutter and then flows through drainpipes to the ground away from the building. The purpose of the gutter is precisely to collect water from the roof surface. The drainpipe provides water drainage to a specially designated place. But to install a drain, you will need not only a pipeline and a gutter, but also elbows, clamps, fasteners and other elements.
The drain consists of horizontal gutters and vertical pipes
Gutter system configurations: closed and open
The type of roof determines the design of the drainage system. For example, for a house in a suburban area that has an ordinary gable roof with a straight eaves, a simple system with two gutters and a small number of drainpipes is best suited.
But when the roof slopes have a complex configuration, the design of the drainage system becomes more complicated. In this case, to ensure the aesthetic appearance of the building, you have to resort to various tricks to ensure reliable drainage.
Closed drainage system
A closed drain is installed if the house has a hip roof. The gutters are of a single design located along the perimeter of the slopes and do not have any plugs. It is worth paying attention to the fact that water drainage from a hip roof occurs in all directions, so drainpipes are best placed in the corners of the house.
Calculation of drainpipes in a closed system is carried out taking into account the entire roof area with values rounded up.
The choice of gutter type depends on the shape and configuration of the roof
Open drainage system
An ordinary roof with two slopes will have its own gutter with drainpipes for each slope, which means the presence of two open systems.
Drainage pipes in open systems must be installed at the corners of the building and exactly in the center of the wall.
Drainage system for pitched roofs
The simplest drainage design has a pitched roof. Sediment will flow from it in one direction, so it will not be difficult to collect it.
A pitched roof gutter consists of a small line of gutters and a downspout
In houses with only one floor, a fairly common solution is to use a rain chain instead of pipes, which is less noticeable.
The chain as a drain has become very popular on the Japanese islands, as it is also an element of facade decoration. It is often made from copper. Alas, currently manufacturers of drainage system elements for the Russian market do not produce decorative elements for drainage chains.
But if you want to make such a system yourself, be sure to comply with the following requirements:
- The chain must be tensioned to prevent it from oscillating from side to side, for which purpose the lower end must be secured in any possible way.
- To avoid water getting on the finishing materials of the building, the chain must be installed at a distance of at least 0.5 meters from the wall.
The implementation of such an idea is quite simple, the main thing is to have the desire.
The drainage chain is an excellent decorative element of the building facade
Drainage system for gable roofs
A standard gable roof has gutters that are located at the corners of the house. This arrangement is most appropriate from both an aesthetic and a technical point of view.
The installation location of gutters is directly influenced by the roof structure.
The location of the drains must be selected based on the roof plan. The installation must ensure the aesthetics and reliability of the drain, but the priority is still reliability. The length of the drain pipes is determined taking into account the distance from the gutter to the drain point (plinth area or sewer well).
The installation location of the drain pipe is also determined by the length of the roof slopes. With a length of less than 12 meters, the pipe can be located at any point on the wall, except in cases where there is a window, balcony or bay window nearby. With a length of more than 12 meters - near the center of the cornice. The main thing is that there should be no more than 24 meters between the pipes.
On gable roofs with small slopes, drainpipes can be installed in any convenient places
Gutters on roofs of complex shapes
It is difficult to design drainage for a multi-slope roof, since each slope requires its own drainage system. It is these difficulties that will be discussed in detail.
The influence of the number of slopes on the design of the drainage system
In the case where the roof has a large number of slopes, and the drainage system is built at minimal cost, a large volume of water entering the gutter sharply reduces its flow rate due to the insufficient volume of the gutter itself. This causes a large load on the system design and leads to rapid freezing of water at subzero temperatures. Therefore, when designing a drainage system, it is imperative to take into account the increase in load associated with a large area of roof slopes.
Superstructures and hatches
The next difficulty is to ensure drainage on towers or balconies, since it is in these places that moisture is most likely to penetrate into the structure and freeze. That is why building minimalism is currently fashionable.
Ensuring drainage from the tower is a non-trivial task, since it is necessary to install a gutter in the form of a circle. It is almost impossible to make a metal gutter of the required diameter by bending a single piece of material. Such a gutter is made from small segments soldered together and painted in the color of the roof to hide the junctions of the segments.
And for a roof window and skylight, a gutter is not required. The main thing is to know the direction of water flow and the place of its accumulation. In the case of lucarnes, a gutter is installed only when it has a large area and multidirectional slopes.
It is not necessary to install a drain to drain water from the hatch
Video: DIY drainage system installation
Seals
All seals that are supplied with drainage systems are made of EPDM rubber. EPDM (ethylene propylene diene monomer) is the most modern and durable material, which is an analogue of a rubber mixture. It is used in places where it is necessary to achieve reliable and durable sealing of connections. Due to its elasticity, this material ensures high tightness of joints, and when the load is removed, it restores its original shape even after prolonged use. It is absolutely waterproof, not subject to destruction when exposed to climatic factors, its operating temperatures range from -50 to +100°C.
In most cases, manufacturers coat the seals with silicone grease at the factory, which provides additional protection for the rubber and also facilitates the sliding of the gutter during installation and thermal expansion.
Drainage funnels
These system elements are designed to collect water flowing through gutters and direct it into downspouts. In most PVC systems, the funnel is made as a separate part and is also attached to the roof fascia, and the passing gutter is cut at the location where the funnel is installed.
In plastic systems, funnels are most often right, left and through. The right and left sides have a wall on one side that acts as a gutter plug. Such funnels are placed at the end of the gutter, and walk-through funnels can be installed anywhere.
In metal systems, the funnel can be placed anywhere in the gutter. Moreover, it is not at all necessary to cut it for this - just cut a round hole in the gutter at the place where the funnel is installed.
Installation of a metal drainage system
We will not go through the entire algorithm step by step. It is the same as for plastic systems. Let's look at just a few features.
To cut a funnel in the gutter, use metal scissors. Sawing with a grinder can damage the protective layer - as a result, rust will appear and the service life of the gutters will be reduced.
For metal drainage systems we use only metal brackets. The slope of the gutters should be the same as for the plastic system - 4 mm per 1 linear meter. The distance between the brackets and the end edges of the gutters should also be about 15 cm. The installation step of the brackets is 60 cm. At all joints, the system must be reinforced with additional brackets.
Knees
Elbows are usually made in the form of a short pipe, bent to a certain angle. They are designed to connect the drainage funnels of gutters located near the eaves and drainpipes attached to the wall of the building, as well as to drain water from the facade at the bottom of the pipes. Most often, they are used in three pieces per drainpipe: two at the top and one at the bottom. If the distance from the funnel to the pipe exceeds the length of the elbows, a piece of pipe of the required length is inserted between the upper elbows.
Unusual creative solutions
Finally, some interesting photos of creative gutters.
Gutter-watering can
Unusual facade
Creative fantasy
Drain-cloud
Gutter-waterfall
Original gutters
Wisdom Quote: He who strives for good must be willing to endure evil.
Drainpipes
They can be round or rectangular in cross-section: it all depends on the design of the system that the manufacturer offers. Their lengths can be from one to four meters. The difference between plastic pipes and their metal counterparts is that their diameter is often constant along the entire length. That is, to connect two pipes you will definitely need a pipe connector with a variable diameter (coupling). This is a small but essential detail, which, by the way, also costs money.
Metal pipes are most often flared on one side and tightly inserted into each other. True, on plastic pipes made using molding technology, there is also an expansion on one side - for connection. But they also cost a little more than extruded ones.
Clamps
Designed for attaching drainpipes to the facade of a building. The shape of the clamps and the system for attaching them to the wall are as different as the materials from which they are made. Plastic clamps are available for two support points, as well as metal clamps for one long piece of hardware. There are clamps that snap into place around the pipe, and others with screw-in elements.
There are three factors to keep in mind when installing clamps. Firstly, the thickness of the thermal insulation layer of the facade. The length of the hardware should take into account three distances: the depth of fixation in the wall material (5-7 cm), the thickness of the thermal insulation layer and the desired distance of the pipe from the facade. Under no circumstances should a clamp be attached only to thermal insulation. This type of fastening is very short-lived. Secondly, the clamp should not cover the pipe very tightly, especially if it is made of PVC. This is due to a linear change in size under the influence of temperature changes. Thirdly, the clamps must be placed at a distance of 1.8-2.5 m from each other, depending on the pipe material and the number of floors of the building.
Features of installing gutters
The drainage system must be installed according to certain rules and taking into account certain features:
- When installing a drainage system yourself, it is important to maintain a distance of at least 5 cm between the wall and the drain pipe. Otherwise, the wall will be in constant contact with the wet pipe.
- The drainage system, especially gutters, must be installed with a certain slope towards the funnels. Thanks to this design, water will flow freely down the gutter without accumulating or overflowing over the edges of the gutter.
- Installing a hidden drain on a pitched roof involves installing the system behind the facing layer or hanging panels.
- The joints and fastenings must be sealed. For this purpose, special glue, cold welding and rubber seals are used.
When choosing one or another sealing option, you should study the advantages and disadvantages of each of them:
- Rubber elements are resistant to mechanical stress and seal the drainage system well. But it is worth considering their sensitivity to high and low temperatures, and for their normal functioning an average temperature is required.
- The connection with glue is also reliable and airtight, but dismantling such a system is impossible.
- Cold welding is the most reliable and hermetically sealed connection, but changing the linear dimensions of the system elements leads to cracking of the joints.
Consequently, the method of joining drainage elements is selected based on certain operating conditions.