The simplicity, reliability and cost-effectiveness of strip foundations have been confirmed by many decades of observation, research and refinement of technology.
The construction methodology for this type of foundation has been worked out to the smallest detail, which makes errors unlikely.
All possible problems arise only when the foundation is erected independently by people who do not have experience and appropriate training.
Most mistakes are made at the preparation stage, when creating the design elements of the tape.
Let's consider one of the important stages of construction - assembly and installation of formwork.
What is formwork for a strip foundation
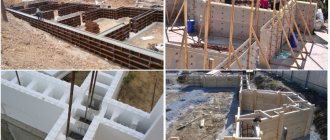
Formwork is a form for pouring concrete. It is a panel structure made of wooden, plywood or polymer materials, forming a container in the shape of a concrete strip . It is built directly at the casting site, according to the dimensions specified in the project or working drawing.
In most cases, the exhibition is made from edged boards, but there are also more specialized structures designed for reusable use. The main requirement for formwork is strength, the ability to withstand the loads that arise when concrete is poured and hardened.
In addition, the tightness of the form is important, preventing the leakage of concrete and eliminating wasteful loss of material..
Installation errors
When assembling the formwork of a strip foundation, novice builders often make mistakes. They can even lead to the fact that the mounted frame disintegrates during the pouring of concrete mortar.
Properly installed formwork
Typical shortcomings include the following:
- the use of materials that do not have the required strength and elasticity to create the structure, as a result of which deformation or breaking of the shields may occur;
- insufficient distance between the walls of the trench and the stakes that act as supports;
- lack of reliable fastening of stops and braces;
- design errors or incorrect placement of supporting elements.
To avoid deformation of the foundation when pouring concrete, when creating panels it is necessary to select a material of suitable strength. All structural elements must be well secured.
Recommendations for using different materials to create a frame for pouring are contained in the video below. Do-it-yourself installation of formwork under a strip foundation is shown in the following video.
For one-time construction, formwork made of wood, plywood or OSB, which you can make yourself, is suitable. If large volumes of work are planned, then metal shields can be used. You can also speed up the construction process by using permanent blocks. They will additionally protect the base from water and reduce heat loss through the foundation.
Kinds
There are different types of formwork.
They vary in type of design and installation.:
- Small and large shield . The most common type.
- Block. Used for filling wells, columns, etc.
- Volume-adjustable . Used for parallel casting of vertical and horizontal surfaces.
- Sliding . It moves as the concrete sets for further pouring.
- Horizontally movable . A type of sliding formwork for pouring horizontal structures.
- Lifting and adjustable . Used for tiered concreting of vertical structures.
- Fixed . Concrete or polystyrene foam blocks are used, from which the wall is assembled, and the internal cavity is filled with concrete. The technology is relatively new and not yet widely used.
Of the listed options, predominantly panel types are used, since the remaining structures are intended not so much for strip foundations, but for general construction work.
There are varieties according to the level of heat saving:
- Insulated.
- Warming.
- Special.
- Not insulated.
The choice of type and material for formwork is made at the design stage and is based on engineering calculations.
Most private house projects consider only wooden formwork due to the ability to assemble any size, but there are also other solutions.
What material is used
Formwork can be created from various materials:
- Wooden.
- Plywood.
- Made from polystyrene foam.
- Metal.
In addition, there are options made from synthetic fabrics or rubber. Wooden structures predominate because they are cheap, can be used repeatedly and in different sizes.
Reusable molds are designed to mass produce castings of the same size and configuration, so they are made from stronger and more durable materials.
The advantage of wooden structures is their low cost and versatility, but their assembly time is much longer than that of plywood or metal ready-made panels.
How to calculate the quantity?
The simplest way to calculate is to use an online calculator. You enter your own data into the appropriate boxes - the height of the tape, the total perimeter multiplied by 2, and the type of material.
The result is the amount of wood in cubic meters. This is convenient, since the usual calculation is made by area, which is then converted to cubic meters.
For those who do not trust the online calculator, the calculation method will be useful:
- The perimeter of the tape is calculated.
- Divided by the length of one board, we get the number of shields.
- The width of the shield is selected based on the height of the tape (usually a multiple of the width of the boards).
- The number of boards in each shield is calculated.
- Multiplied by the number of shields.
- The result obtained is multiplied by 2.
In addition, you need to calculate the number of strips needed to create crossbars and stops. It is determined by multiplying the total number of shields by the number of slats of one shield.
NOTE!
Any method of calculation is quite approximate, so it is recommended to purchase 10-15% more than what was calculated.
How to mark a site
To install the formwork correctly, you must first mark the area. To do this you will need a long cord and stakes.
In the places where the corners of the structure will be located, stakes are driven in and a cord is pulled between them. It is recommended to pay attention to the fact that when marking, it is necessary to leave a margin of at least 1.0 m from the length of each wall.
After the first cord is stretched, the direction of the location of the first wall will be indicated - this can be considered the beginning of the countdown. Next, you need to determine the location of the corner of the foundation by driving a stake into it and measuring the length of the proposed wall. Do the same with marking the remaining walls and corners.
Now you can start measuring the inner perimeter, which requires precision and accuracy. In this case, the width of the foundation should be taken into account.
Video on how to install formwork for a strip foundation:
Which board is best to use?
To assemble the formwork, the most common material is usually used - edged pine boards. It is recommended to plan the working surface of the boards, but this is not always possible, so most often the assembly of panels is made from unplaned boards.
An important issue is the degree of moisture content of the lumber. In this case, the use of a dry board is not necessary, and sometimes even undesirable. The formwork holds a mass of wet concrete for a long time, which is periodically watered with water all this time.
Dry lumber begins to actively absorb moisture, swells and increases in size, causing individual boards to be squeezed out of the plane by the board .
The thickness of the boards used to assemble the boards ranges from 25-40 mm. The higher and wider the tape, the thicker the boards must be to withstand the loads during pouring and the pressure of liquid concrete on the walls.
How to make removable formwork with your own hands
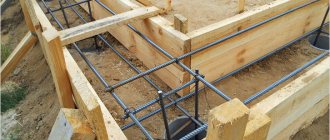
To install a durable structure of removable formwork for a strip foundation, you should follow a certain sequence of actions:
- Clear the construction site of debris.
- Mark the site according to the project.
- Dig a trench, the depth of which is about 55 cm.
- Level its base using a building level.
- Fill the bottom of the trench with a sand cushion.
- Fill the laid layer with water and compact it.
- Lay a layer of geotextile dense.
- Cover it with gravel or crushed stone. The thickness of the layer ranges from 10-16 cm.
- Level the layer using a building level.
- Make boards from boards 2 to 3 m long with beams located across them. The distance between the boards should not be more than 2 mm, otherwise the concrete solution will flow out through the cracks.
- Fix the boards and beams together using self-tapping screws or nails.
- Place the panels on a frame made of beams.
- The panels are secured to each other using braces, the distance between which should be from 0.5 to 1.0 m.
- The lower edge of the brace rests on the ground. To secure it, wooden stakes are used, which are driven into the soil. Its upper edge is fixed using an overhead board driven into the upper edge of the shield.
- Place a thrust block between the shield and the stake. This is necessary to fix the structure in a vertical position.
- The strength of the structure can be increased by connecting the side panels using planks.
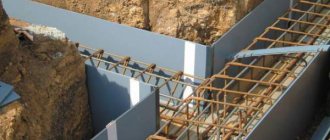
- Cover the bottom and walls of the structure with PVC film or polyethylene. This will serve as waterproofing.
- Fill the inside with concrete solution.
- After 15 days the shields can be removed.
OSB boards can be used. In this case, the sequence of actions will be as follows:
- Cut the beams into pieces, the length of which coincides with the width of the future foundation. There are 4 pieces of bars per 1 meter of base.
- Place OSB sheets parallel, inserting beams between them. Secure them with screws - this will help increase the strength of the structure.
- Connect the blocks using wooden planks, checking their level.
- Install supports on the outside of the structure to prevent the system from collapsing. This can be done using bars, the length of which should be 0.6, 0.9 and 1.2 m. Place 3 bars of different lengths on one side.
- The supports installed directly to the formwork should be driven into the ground 0.5 m.
- Fill the internal cavity of the structure with concrete solution, not reaching its upper edge.
- After the concrete has hardened, the formwork can be removed.
By following this sequence of actions, you can build a durable formwork that will serve as the basis for future construction.
When and how to remove formwork
Many people have a question about when to dismantle the formwork. Most experts recommend doing this after 25-28 days. It all depends on the curing time of the concrete. Therefore, it is not always advisable to wait 28 days. The hardening time of the solution is determined by weather conditions, the grade of concrete, and the components included in its composition. In order to speed up the hardening time, it is recommended to periodically moisten the formwork surface with water or cover it with plastic film.
To avoid cracking of the foundation walls, the formwork should be removed after the concrete strength reaches 50-70%.
In this case, you should adhere to the following recommendations:
- If the air temperature is within 30-35°, the structure can be dismantled after 3-4 days.
- Movements should be smooth and careful.
- You need to start from places where the load is minimal. These are corners and open edges.
- Movements should be performed from the top edge to the bottom.
- Lastly, the elements that tighten the opposite panels (studs and brackets) are removed. They are cut off or unscrewed.
Since the concrete has not yet reached maximum hardness during removal, all manipulations must be performed as carefully as possible.
Installation procedure
The creation of formwork is carried out in stages:
- Vertical transverse strips are cut . Their length is 40-50 cm greater than the estimated width of the shields, since they will have to be driven into the ground. To do this, one end is sharpened for better fit.
- Preparing the boards . They are cut to length (if necessary) and stored on a flat surface. Optimally - close to the trench, so that you don’t have to carry ready-made shields over long distances.
- The crossbars are laid out in increments of 0.8-1.2 m . The top cut is aligned along the line.
- The panels are being assembled . First attach the top board, then attach the rest as tightly as possible. Nails or screws are used.
- The shields are lowered into the trench and aligned along their axes and dimensions . The pointed ends of the vertical planks are driven into the ground until the horizontal planks come into contact with the bottom of the trench.
- The parallel installed panels are connected to each other by crossbars that determine the thickness of the tape. Their role is sometimes played by U-shaped clamps assembled from wooden blocks.
- Additional inclined struts are installed on the outside to prevent the panels from being squeezed out when pouring concrete.
IMPORTANT!
The inner surface of the formwork should be covered with plastic film to ensure tightness and prevent concrete leakage. No matter how neatly and tightly the formwork is assembled, the loads during pouring are very high and arise abruptly . The shields diverge slightly, which leads to the appearance of cracks. The film allows you to preserve material and prevent wasteful losses.
We mark the area for the strip foundation.
Before you start marking, you should remove vegetation from the entire perimeter of the area allocated for future construction. After this, we will mark the outer edges of one of the outer walls of the foundation with two U-shaped structures, consisting of two pegs driven vertically into the ground and one block nailed on top of the pegs. Stretch a rope between these structures.
Other external sides of the foundation are designated in a similar way.
The perimeter has been marked, it's time to tackle the internal partitions. The ropes should be pulled parallel to the threads marking the edge of the foundation. Observe the angles, they should all be 90 degrees. The distance between the threads should be equal to the width of the walls of the future foundation.
Now it’s time to take up the shovel - we will dig trenches along the lines marked with ropes. The width of the dug trenches must exceed the width of the walls of the future foundation; compliance with this condition will allow us to construct the strip foundation formwork according to the rules.
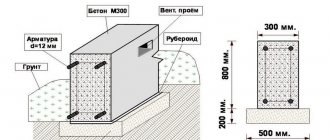
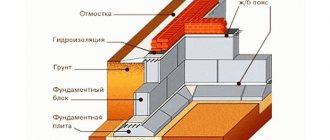
The trench should go deep to the amount made up of compacted layers of sand and crushed stone, 15 cm each, and the depth of the foundation.
Installation of removable plywood formwork
Plywood makes it possible to obtain sealed panels with a flat and smooth surface. For one-time pouring you can get by with the cheapest pine plywood , but for reusable formwork it is recommended to choose more durable birch plywood, impregnate it with drying oil or purchase laminated plywood (the best option).
The thickness of the sheets is chosen based on the height of the formwork, but not less than 10-12 mm. Usually 14-18 mm plywood is used.
Assembly order:
- Plywood panels are cut to size.
- The frame of the panels is made from wooden blocks (50 by 50 mm). It is a edging located on the outer (non-working) side of the shield. There is no need to connect the planks together, but they are firmly attached to the plywood sheet. Nails, self-tapping screws or metal pins (for large panels) are used for fastening.
- Pegs are driven into the trench to support the shields.
- The finished shields are placed in the trench and their position is leveled. The distance between the parallel panels is fixed with transverse struts, which are subsequently removed before pouring.
- Individual panels are connected to each other to form continuous formwork walls. The joints are sealed as tightly as possible; when cracks appear, they are sealed immediately.
- U-shaped clamps are installed on top of the shields at intervals of about 1 m, holding the shields from being squeezed out when pouring.
- It is recommended to cover the inside with polyethylene to seal the formwork and improve the curing behavior of the concrete. The plywood will remain clean and can be used again or for other purposes.
NOTE!
After purchasing the material, you need to inspect it and apply a layer of drying oil to the entire surface and end areas. This will make it easier to dismantle the formwork and preserve it for reuse.
Manufacturing and installation technology of formwork
Creating a structure for pouring concrete is a labor-intensive process. Do-it-yourself formwork for a strip foundation is made and installed in the following order:
- prepare working tools and materials;
- dig trenches under the foundation tape;
- cut plywood or boards to the required size;
- shields are knocked down;
- install formwork;
- check the strength of the created structure.
Technology for installing formwork for pouring a strip base
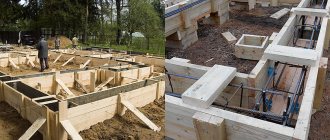
Using equipment for excavation work will speed up construction. The assembly and installation technology itself is simple. You can do all the work yourself. Do-it-yourself panels for strip foundations will cost much less than factory-made products.
Do-it-yourself assembly of panel structures
The formwork for the strip foundation is made of panels. Their dimensions vary: the height should slightly exceed the same parameter of the base, and the length of one often ranges from 1.2 m to 3. The latter, in the sum of the individual elements, should correspond to the perimeter of the base.
An important criterion is the strength of panel structures. They must withstand the load from the mass of poured concrete without deformation until it completely hardens.
Please note that working with shields that are too long is inconvenient. If the thickness of the boards is small, then they sag.
The production of panel structures from boards occurs as follows:
- the material is cut to the same length;
- then the boards are fastened: they are nailed to the bars with nails driven in from the side facing the foundation;
- Be sure to attach the bars at the beginning and end of the shield, 20 cm away from its edge, and additional ones are installed every meter;
- 2 or 3 of them are made 20 cm longer than the others and the ends are pointed so that during installation they can be driven into the soil.
According to this scheme, the required number of boards is made from boards.
Sheet materials structures
You can use self-tapping screws instead of nails. They promote closer contact between structural elements. At the same time, they do not need to be bent like nails on bars.
When working independently, the boards can be replaced with plywood or OSB. Parts cut to size are mounted on a frame made of timber. In such structures, the corners are the weakest point. Therefore, they are reinforced with metal corners.
To make panels, it is recommended to use edged boards of the same thickness. This will ensure that there are no gaps in the created structure and that the side surfaces of the base are even.
Installation of formwork
Installation of formwork for strip foundations is carried out on the leveled bottom of the trench. The difficulty lies in aligning the shields vertically. The process itself consists of the following stages:
- make markings using cords and pegs;
- stakes are driven in along the mark, which will simultaneously serve as guides and support for the structure being created from the inside;
- placing them close to them, they hammer the shields into the ground;
- it is necessary to drive in until the bottom board comes into complete contact with the soil, so that there are no gaps left and the poured solution does not leak out;
- with a level they check the correct installation vertically and horizontally: if there are deviations from the vertical, hit it with a hammer from the side or from above;
- the next panels are mounted according to the markings on the 1st level with the first, so that on each side of the base they lie in the same plane;
- Install the form for pouring along the entire foundation perimeter in the same way.
Installed formwork
When, during the manufacture of panels, elongated wedges for driving were not made on them, then timber is fixed at the bottom of the trench for their installation according to the markings. They are secured to it using spacers and bevels.
Strengthening the created structure
Further installation of the strip foundation formwork requires strengthening the entire structure both outside and inside. It must withstand the weight of poured concrete.
To strengthen the outside, supports are installed every meter. They are placed in the corners on both sides. When the height of the mounted structure exceeds 2 m, then the braces are placed in 2 rows.
To fix the distance between opposite panels, use:
- metal studs with a thickness of 8 to 12 mm and threaded on both ends;
- washers and nuts of the appropriate diameter.
The studs should be 10 cm longer than the width of the foundation strip. They are installed in 2 tiers: top and bottom. In this case, the distance from each edge is about 15 cm.
Threaded studs can be made independently or purchased ready-made. They are placed in the formwork in this way:
- drill holes using a long drill in 2 panels;
- insert a piece of plastic pipe equal in length to the width of the tape according to the design;
- a pin is installed into the holes through it;
- put a metal backing (washers, plates) on them and tighten the nuts until they stop.
Different Models of Pinch Screws
The inner diameter of the tubes should be selected so that the pin will pass through without problems. The work should be done by three people - it’s more convenient and faster. When dismantling the formwork, first remove the studs, and then remove the slopes and supports.
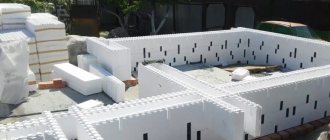
How to assemble from polystyrene foam
In this case, the formwork cannot be dismantled, being first a mold for casting, and subsequently a layer of insulation. Ready-made blocks of extruded polystyrene foam and additional elements for them are used - jumpers, parts for longitudinal connections, etc.
All of them are commercially available and purchased in advance in the required quantity, which greatly facilitates assembly and allows you to obtain a durable and airtight outer cocoon for the concrete strip. The technology was invented quite a long time ago, but for various reasons it was not used; it is only beginning to gain popularity at the present time.
Nevertheless, the results allow us to predict good prospects for the technique.
Assembly of the formwork is simple. The blocks are connected to each other according to the principle of the designer, fixation is carried out using jumpers. The assembly process, in addition to creating a mold for pouring, combines insulation and sound insulation, which reduces the overall work time and simplifies the work in general.
The fewer operations there are, the less possibility of errors or technology violations.
The main disadvantage of the method is the high cost of polystyrene foam blocks, which increases construction costs.
This is the main factor hindering the spread of technology.
How to strengthen the finished formwork?
Strengthening the formwork
After installing the structure, the next step is its strengthening. This stage is necessary to ensure that your formwork is of high quality and strong. To strengthen, you will need wooden pegs or reinforcing rods. They must be driven into the ground along the entire perimeter of the formwork in increments of 40 centimeters, depending on the height of the panels. You can also install additional supports.
Screeds must be installed along the top of the structure. which will keep the formwork panels from diverging under the weight of concrete. The boards are secured to stakes driven into the ground using nails or self-cuts.
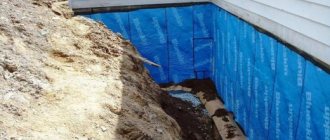
Installation of removable formwork with insulation
Do-it-yourself installation of this type of formwork is carried out using our own methods:
- The trench has a width equal to the thickness of the tape plus a double layer of insulation. Typically extruded polystyrene foam is used. The insulator sheets are installed vertically on the edge and fastened with nails 20 cm long directly to the walls of the trench.
- Before installing the heat insulator, façade dowels are installed on the reverse side over the entire area . Their ends pass through the material and protrude into the trench in order to ensure a high-quality connection between concrete and insulation after pouring.
- Wooden formwork is installed along the edge of the trench, forming an upward continuation of its walls. The heat insulator is attached to it in the same way as to the ground - with nails, only of shorter length. The technique for creating shields is common, the only difference is that it is installed not inside the trench, but along its edges.
- Pouring concrete ensures tight contact of the tape with the insulation, absence of gaps and tightness of the insulation layer. After the concrete has hardened, the wooden formwork is dismantled, and the heat insulator remains on the surface of the concrete. Taking into account the specifics of the material, it is necessary to install a protective layer of the plinth sheathing to prevent mechanical impacts on the insulator.
Wooden panels must be dismantled carefully so as not to destroy the polystyrene foam boards.
Types of structures
The construction of an auxiliary structure made of wood, metal or other materials involves the use of rigid structures interconnected and capable of supporting the mass of concrete, but some types also provide excellent thermal insulation characteristics of the house. Various types of materials are used to construct formworks; let’s stop and first look at the types of formworks for strip foundations:
- Removable (collapsible). These are wooden, less often plastic and metal panels, which are assembled in the form of a constructor, ensuring reliable connection of elements and tightness of seams. In most cases, the calculation of the amount of required materials is done on site when necessary. After use, you can remove and reapply. You can make it yourself from wood.
- Fixed. This is a disposable design, made from polystyrene foam, and serves as the main thermal insulation layer. Needed when the building area is limited. Thanks to reinforcement with special supports and spacers, the foam plastic can withstand heavy loads, does not deform, and do-it-yourself assembly is done like a construction set from factory elements. It cannot be removed; it is necessary to calculate the panels for each specific construction. Various materials can be used, but most often polymer products.
- Combined. Here, wood is simultaneously used as the outer layer of formwork, and polystyrene foam is used as insulation. After pouring the foundation, the outer part of the structure can be removed, while the insulation remains embedded in the concrete.
Several years ago, builders preferred to use removable formwork for strip foundations, since it is reusable and can be rented at an affordable price. Moreover, many companies and small firms produce such formwork with their own hands and then rent it out at an affordable price. It is worth noting that it is difficult to erect the formwork correctly, according to all standards, taking into account the technical characteristics of the materials used, as well as the possibility of expanding the base if necessary.
Installation of permanent formwork
In addition to polystyrene foam, concrete is used to make permanent formwork. Hollow blocks are produced from it, which are assembled like construction kit parts, forming a hollow wall of the required size.
After this, concrete is poured inside, filling the voids and forming a solid solid wall. This technology appeared earlier than polymer permanent formwork, but, for various reasons, it was not widely used.
Creating such an external frame allows you to solve a number of problems with rigidity, density of connection with concrete filling and finishing work . Insulation and waterproofing can be done without waiting for the final hardening of concrete.
There is a saving in building materials, since there is no need for conventional formwork.
The formwork assembly method is simple and does not raise any questions. Blocks are installed in the prepared trench on the waterproofing layer, a layer of waterproofing is applied to the side surfaces, after which the armored belt is installed and concrete is poured.
The procedure is simple and allows you to significantly speed up the creation of a solid foundation.
How can I further strengthen this device?
The weight of concrete is very large, and the loads on the formwork during pouring can destroy it or create cracks through which concrete will flow out. For strengthening, additional elements are used to strengthen the walls and take on the load from the weight of the concrete.
Usually, at a distance of about 50 cm from the outer surface, stakes are driven into the ground, to which inclined stops are attached . In addition, horizontal stops are placed below, tightly inserted between the stakes and the lower edge of the shields.
As a result, a number of additional fasteners are formed that increase the stability of the formwork and protect it from destruction.
Dismantling of formwork
It is necessary for at least a week to pass before dismantling the structure can begin. All work is done in the reverse order, first all fasteners, ties and clamps are removed, and at the final stage the shields are dismantled. If the boards have been processed or a film has been laid, the walls will easily and quickly separate from the foundation.
In other cases, you will need to lightly tap the boards until the walls come away from the concrete. Today you learned how to make formwork for a strip foundation, now you can get to work, good luck!
When to remove formwork from a strip foundation?
Formwork is traditionally dismantled 10 days after pouring. Various technological options allow earlier or later dismantling within 5-15 days , which is determined by the size and thickness of the tape - the larger it is, the longer the curing period in the formwork.
When dismantling at an earlier time, extreme care must be taken, as corners or edges of the tape can easily be knocked off.