Features of concrete floor
A concrete floor is the most reliable option for a garage, but, of course, it cannot be left in its original form.
A concrete floor is a traditional covering for a garage. In its pure form it is not very attractive and has some difficulties in operation. To eliminate them, several options for dust removal and concrete coating have been developed:
- ironing;
- porcelain stoneware finishing;
- installation of a self-leveling floor on a mineral, polymer or epoxy basis;
- coloring.
The strength characteristics of the coating largely depend on the grade of concrete and compliance with the technology for pouring it. It is equally important what the base is, the “pie” on top of which the screed is poured.
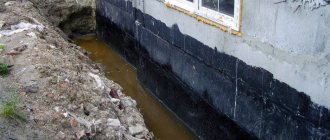
When installing a concrete floor in unheated garages, you need to be prepared for the fact that with the onset of spring, the frozen concrete will begin to thaw and the air humidity in the room will increase. As a result, moisture will condense on the cold metal. High-quality garage ventilation and the correct installation of the top moisture-proof layer of the screed will help eliminate this deficiency.
Advantages and disadvantages
Concrete is highly durable and fire resistant
The main advantages of concrete are strength and durability . These are undeniable advantages that have ensured the widespread use of this building material. In a garage, such a floor is convenient due to its resistance to various types of oils, solvents and flammable liquids. Other benefits include:
- fire safety;
- easy to clean surface;
- ability to withstand significant, including uneven, weight loads.
The disadvantages of concrete pavement include:
- damage from blows from sharp, heavy objects;
- long period of gaining brand strength (at least 28 days);
- difficulty of dismantling.
Device requirements
To get a smooth surface, you need to sand the floor
In order to get an idea of the relationship between the strength of concrete and the thickness of its layer, it is recommended to pay attention to the requirements for constructing a concrete floor in hangars for Euro trucks. The standard foundation “pie” in these rooms is as follows:
- sand – 10 cm;
- crushed stone – 10 cm;
- reinforced screed – 10 cm.
It should be noted that to obtain a smooth floor surface, it is not enough to level the concrete along the beacons during its pouring. A smooth surface is obtained by grinding using special machines or a self-leveling floor device. Also for this purpose, porcelain stoneware is laid on the screed.
Attention! Before pouring the floor, you need to make sure there is an inspection hole, if provided for by the garage design.
The requirements for the installation of a concrete screed are recorded in SP 29-13330-2011 “SNiP 2.03.13-88 Floors”:
- The minimum thickness of the concrete layer is 20 mm.
- If installation of sound or heat insulating materials is provided, the minimum thickness of the screed is 40 mm.
- When installing communications along the plane of the lower floor, the recommended thickness of the concrete layer is 10-15 mm greater than the cross-section of the pipes.
- The end surfaces must be covered with a moisture-proof coating (moisture-resistant primer or paint).
- After leveling the work joints along the beacons, they are filled with cement-sand mortar and smoothed.
- To install the screed, sifted sand, gravel or crushed stone with a fraction of 5-15 mm is used, cement M150 for industrial premises and M300-M400 for residential premises.
- To reinforce the screed, metal mesh with a mesh size of 100x100 mm or 150x15 mm is required.
- Reinforcement is carried out with a concrete layer thickness of 40 cm.
Which brand of concrete is better to choose?
Before choosing concrete, read the SNiP requirements
To install the floor in the garage, you can order factory-made concrete or prepare it yourself using a concrete mixer. When choosing a concrete grade, they are guided by the requirements of SNiP:
| Coverage type | Minimum thickness (mm) | Concrete grade | Hardening time (grade strength gain, days) |
| Screed with reinforcement | 50-70 | M200-M350 | 28 |
| With voluminous topping | Not less than 40 mm | M600-M700 | 7-8 |
| Reinforced concrete floors | Not less than 40 mm | M500-M550 | 7-8 |
| Reinforced sand concrete floors | Not less than 40 mm | M400-M500 | 7-8 |
| Fiber concrete | Not less than 40 mm | M200-M350 | 28 |
According to reviews from garage owners, for passenger cars it is enough to pour a reinforced concrete floor 70 mm thick (excluding the shock-absorbing “cushion”) . Then apply 2 layers of primer and renew the coating every six months. The optimal grade of concrete is M300.
How to make an earthen floor
First, all construction debris that may accumulate there during construction is removed from the garage. Next, the entire fertile layer is removed. Completely all the way down to “clean” soil without vegetation and roots. The thickness of the layer can be different - somewhere 10-15 cm, and somewhere 50-60 cm. Regardless of this, the entire fertile layer must be removed. It contains a lot of organic matter, microorganisms, and insects. Organic matter will rot, spreading corresponding odors, and microorganisms will contribute to the appearance of mold and fungi; insects are also not the best neighbors.
Remove all fertile layer
Having reached clean soil, it is leveled, the same clean soil is poured in layers of about 5 cm (you can dig a hole somewhere nearby or bring it in). Each layer is well compacted. It’s good if there is a vibrating platform, a roller or some other similar device. If you don’t have one, you can make a manual tamper yourself. There are two options:
- thick steel plate, with a T-shaped handle welded in the center:
- a piece of log of considerable diameter with a crossbar-handle nailed at the top.
Each layer is compacted with this tamper. So, tamping in layers, fill the pit to the ground level, maybe even a little higher. The upper layers are molded, creating a slight slope towards the door so that water that gets into the garage drains.
Dirt floor with crushed stone
To create a more serviceable floor, the top layers are replaced with clay, but it is very difficult to compact it, and high density must be achieved. Another option is to pour some gravel onto the compacted earthen floor and ram it into the ground with a tamper. Here, most likely, you will need a vibration platform. But you get a solid base in which even the wheels leave no traces. The advantages of this option also include the fact that there will be much less dirt in the garage.
This is what a vibro-form looks like. It can be rented
With this we can assume that the earthen floor in the garage was made with your own hands. Not the best option, but definitely the cheapest.
Calculations
You can calculate the floor using special calculators
To install a floor in a garage, it is necessary to perform a series of calculations of the required amount of concrete and the optimal thickness of its layer. To perform these tasks, special calculators have been developed that take into account:
- expected weight load;
- the need to concreting the inspection pit and platform before entering;
- brand of concrete;
- weight characteristics of the solution components;
- 10% supply of materials.
To independently prepare M300 concrete, mix a composition of the following components:
- cement M400 – 1 part;
- sifted sand - 1.9 parts;
- gravel or crushed stone - 3.7 parts.
Optimal screed parameters:
- for garages with one car, the floor thickness is 50-70 mm;
- for garages with two parking spaces - 80-100 mm;
- reinforcement is performed with road mesh BP1 with a wire cross-section of 8 mm and a cell size of 150-150 mm;
- sand layer thickness – 50-70 mm;
- the thickness of the gravel or crushed stone “pillow” is 120-150 mm.
Attention! Chain-link mesh is unsuitable for screed reinforcement, since it can only withstand tensile load in the horizontal direction.
Reinforcement
To prevent the concrete from sagging under the weight of the machine, the floor screed is always reinforced. Reinforcement allows:
- strengthen the base of the floor;
- increase the compressive strength of the screed;
- reduce the amount of mechanical loads on the floor;
- reduce the appearance of cracks.
Reinforcement is carried out using reinforcing mesh with a rod diameter of 9 mm, and the size of the mesh cells is 15 mm. The reinforcement is placed on special supports, since the mesh must be inside the concrete screed. The mesh is overlapped and connected to each other with a special wire.
Required materials and tools
The tools for pouring a concrete floor in a garage are very extensive.
In order to fill the floor in the garage, you will need to perform a large amount of excavation work and, if necessary, make your own mesh for reinforcement. To complete all tasks you will need the following tools:
- concrete mixer;
- stretcher or garden wheelbarrow with pneumatic wheels;
- bayonet and shovel shovels;
- roulette;
- laser level;
- bucket with a strong handle;
- rags;
- a brush with stiff bristles;
- lighthouses;
- rule (can be replaced with a flat board).
It is necessary to prepare materials:
- cement M400;
- sand;
- clay;
- crushed stone or fine gravel;
- plasticizer for cement (sold in cans);
- reinforcement with a cross section of 8 mm or ready-made mesh for screed reinforcement;
- waterproofing materials: bitumen-rubber mastic, roofing felt, special membranes.
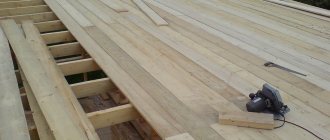
Installation of beacons
In order for the garage floor to be level, it must be leveled. It is more convenient to do this with the help of a special long bar, which is called the “rule” (emphasis on the letter “I” - from the word edit). This plank is supported on even planks set at the required level. They are called lighthouses.
Any flat and long objects can be used as beacons. These can be pipes, bars, special beacons, which are sold in construction stores. They must be placed at the same level as the concrete slab level mark on the walls.
Beacons are placed from the far wall, towards the one in which the doors are located (most often it turns out that along a long wall). The installation step is 25-30 cm narrower than the length of the rule. If the rule is 150 cm long, the distance between the beacons should be 120-125 cm. They retreat about 30 cm from the wall, place the first beacon, then others with a given distance.
This is how a concrete floor in a garage is poured along the beacons
They are usually installed on islands of a thickly mixed solution. They lay out the slide a little higher than necessary, and press the beacon into it so that it is at the desired level.
When installing beacons, you can make a slight slope of the concrete floor towards the doors (0.5-1 cm per meter). In this case, the water will flow by gravity from the floor to the street. Just note that in this case more concrete is required - you have to lift up the edge of the floor farthest from the entrance, but this is compensated by ease of use.
The next day after pouring, the beacons are removed, the voids are filled with mortar and leveled to the same level as the previously filled floor.
Preparatory work
If you cheat at the preparatory stage, further work may go down the drain
Every step of installing a concrete garage floor is important. There are no trifles in this matter. The quality of further work largely depends on how correctly the preparatory work is completed.
Step 1. Calculation of the pit depth. On average, to fill a floor with a thickness of 10 mm, you will need to go 20-30 cm deep into the ground.
Step 2. Marking the floor level. Using a level, find a point 10 cm above the level of the existing floor in the garage. Focusing on it, horizontal lines are drawn along the walls (or marks are made) with chalk or a marker.
Step 3. Preparing the pit. Includes a set of works for excavating soil to the calculated depth.
Step 4. Level the bottom using shovels.
Step 5. Compact the soil using a vibrating plate or heavy objects. If necessary, dig a pit for an inspection hole. Its parameters:
- width 75-80 cm + thickness of waterproofing layer 30 cm;
- depth - they are guided by the height of the person who will be repairing the car + 30-40 cm;
- length is equal to the length of the car + 120-150 cm.
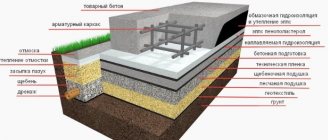
Preparing the base
The concrete floor in the garage is made on the ground. But more often than not, the soil itself is not a reliable and dense enough foundation, so a foundation is required - a cushion of crushed stone and sand. Preliminary and mandatory work - removal of the fertile layer, down to clean soil. The fertile layer removes organic matter and most of the microorganisms, while clean soil contains a minimal amount of them.
The first stage of installing a concrete floor in a garage is removing the fertile layer
Zero level mark
As a result, you get a pit of some depth. Crushed stone and sand will be poured into it, but in order to understand whether its depth is sufficient or excessive, you need to decide on the “zero” level of the floor. It is convenient if the floor is level with the gate threshold. Often they do it just below the threshold, but then they will have to somehow drain the water, and it will definitely be there, if not in spring-autumn, in winter, from melted snow, for sure.
Mark the zero floor level along the perimeter of the walls. The most convenient way to do this is with the help of a plane builder (electronic level or level). Turn on the device to display the horizontal plane, set it at the desired level and draw along the beam.
It's easier to work with a laser level
If you don't have a laser level, use a water level. It’s not so convenient: you have to move the mark many times across all four walls. These marks are connected by a straight line; instead of a ruler, you can use a bubble level, at the same time you can check whether all the marks have been placed correctly.
The water level will have to transfer marks to all walls
Calculation of the thickness of ASG layers
As a result of this work, we have a foundation pit and a zero floor level. Now you can calculate how thick the layers are needed to reach the desired height. You need to start from the following dimensions:
- the optimal thickness of the concrete floor in the garage (if there is a passenger car or lighter vehicle) is 10 cm;
- the thickness of the crushed stone layer is at least 10 cm;
- sand - at least 5 cm;
In total, it turns out that the pit should be no shallower than 25 cm deep. And this does not take into account the floor covering. If you simply treat the concrete floor with impregnation or paint, then no additional centimeters are required; for any other coating, add the required thickness.
Structure of a concrete floor in a garage
Having received a specific figure, you can plan the amount of sand and crushed stone. If the layers turn out to be very large, you can add soil to the bottom and compact it (but not the fertile layer). If the depth of the pit is not enough, we remove some more rock.
You can put marks on the walls of the garage, which will help you control the thickness of the layers. If the width of the garage is small - 2 meters or so - these marks are enough. If the garage is wider, you need to put a few more stakes in the middle and mark them too. It is clear that all marks must lie in the same plane. This is again convenient to do using a level. Another way is to take a flat plank or board and apply it to the marked marks. Place a level on top of the bar/board. If everything is set correctly, the bubble will be in the middle.
If you are planning to make a hole in the garage, now is the time to dig a pit for it. If the pit has brick walls, you can immediately pour a concrete floor in it. While you are pouring concrete under the garage, it will gain the required strength and you can lay out the walls. They can be driven out after filling the floor with a cushion of crushed stone and sand.
Materials for backfill
For a normal concrete floor in a garage, it is better to use crushed stone rather than gravel. Gravel, with its rounded edges, you will never compact to the required degree. And if the foundation under the concrete is unstable, even a thick reinforced slab will burst. That’s why we import crushed stone, medium and fine fraction. Average 60-70%, the rest - small.
The cushion consists of compacted crushed stone and sand
There are no special requirements for the quality of sand for pillows. It is important that it is free of clay inclusions, but it can (and should) be sifted before laying.
Making a pillow for a concrete floor
The first step is to level the bottom of the pit. We remove uneven surfaces, fill in depressions, and raise the level to the horizon. Do not think that the concrete floor in the garage can be damaged. It can be done, but then the slab will crack and you will have to redo it.
Now we take a vibrating platform (you can rent it) or a manual tamper and compact the soil. Along the way, once again leveling the plane. When the soil is compacted, crushed stone can be poured. They don’t fill the entire volume at once - it’s normal not to compact 10 cm. The maximum layer is 5 cm, but 3-4 is better. We fill in the required part, distribute it, level it (with a rake) until it reaches approximately the same thickness. We take a tamper or vibrating plate and tamp it.
It is better to compact with a vibrating plate
This compaction of crushed stone when installing a concrete floor in a garage is very important - a certain amount of crushed stone is driven into the ground. As a result, it becomes even more dense, the load-bearing capacity increases, and the possibility of subsidence is eliminated. Tamping is considered sufficient if you step on the surface and leave no traces. In the same way, all portions of crushed stone are compacted, bringing them to the required thickness.
Sand is poured onto the compacted crushed stone. It is also divided into parts of 2-3 cm. The peculiarity of compacting sand: it must be moistened, they also say - spilled. The wet sand is compacted, again focusing on the layers.
Now you can start forcing out the walls of the pit, if there is one. They are brought to the level with the finished floor or even slightly higher - so that you can wash the car right in the garage without fear of water getting into it.
Step-by-step instructions for pouring a concrete garage floor
After pouring the concrete floor, it will not be possible to walk on it for about a week.
Step 1. Place a layer of clay 3-4 cm thick at the bottom of the pit and compact it thoroughly. It will act as a waterproofing agent.
Step 2. Pour sand and level it to form a layer 8-10 cm thick. Water it with water from a hose, level it again and compact it.
Step 3. Pour a layer of crushed stone and repeat the leveling and compaction processes.
Step 4. Fill the sand-crushed stone “cushion” with lean concrete, which is prepared in the following proportion: for 1 bag of M400 cement (25 kg) – 344 kg of sand and 11 liters of water. The resulting layer is leveled and left to dry for 2-3 days.
Step 5. Waterproofing is done using the chosen method: sheets of roofing material or special membranes are laid with an overlap, and a layer of coating mastic is applied. The waterproofing should extend 10-15 cm onto the garage walls.
Step 6. Lay the reinforcing mesh.
Step 7. Install beacons. They are guided by the previously completed markings of the garage walls. The beacons are pre-lubricated with machine oil and installed on a cement-sand mortar. All planks must be in the same horizontal plane. The correct installation is checked with a level or the threads are pulled from one wall to another.
Step 8. Prepare M300 concrete or use a ready-made factory mixture.
Step 9. Concrete is poured in layers, compacting it with a reinforcement bar. This will allow air to escape from the solution and prevent voids from forming. Level the concrete along the beacons.
Step 9. After 24-36 hours, carefully remove the beacons.
Step 10. The resulting depressions are filled with cement-sand mortar and leveled.
Step 11. During the first three days, moisten the floor. To protect it from drying out, you can sprinkle it with wet sawdust or cover it with plastic wrap.
After 4 weeks the surface will be ready for use. But you can walk on it after 5-7 days.
Installation of concrete screed in the garage
Garage floor reinforcement
For reinforcement, a ready-made road mesh for reinforcement is used: a cell with a side of 15 cm, wire thickness 8 mm. This is enough for a garage where cars will be stored. If we are talking about cargo transport, then it should be reinforced with a mesh with a mesh size of 20 cm and a wire thickness of 12 mm. The mesh cannot be placed on waterproofing: it must be located in the thickness of the concrete. It is necessary to raise the mesh above the surface by 4-5 cm. For this, special stands are purchased or pieces of brick (halves) are used.
Beacons and slope
For a garage floor, a slope of 1.5 - 2% per linear meter is required. It should be directed towards the outlet or drain grate. You should think about the slope at the stage of installing beacons. These are long planks along which you can then level the poured concrete. They are sold in aluminum, but you can also use wooden slats, tubes, etc. The beacons are placed on posts made of thick mortar, along a long wall towards the doors. The step of their installation depends on the width of the rule - a wide mop with which the solution is leveled. With a rule width of 1.5 m, the distance between the beacons should be 1.2 - 1.0 m.
Methods of hardening and dust removal
A practical garage owner will take care not only of the durability of the floor, but also of its smoothness. One of the most important tasks is to create a smooth, non-hygroscopic surface. This effect is achieved in several ways.
Ironing
For the ironing process, you will need to equip yourself with a metal float or similar tool.
The easiest way to strengthen the top layer of screed is ironing . This is a time-tested technology that guarantees dust removal and compaction of concrete. The procedure is performed on the 3-4th day after pouring the floor. The essence of the process is to rub dry cement into the surface of the concrete, or use various additives:
- washed and sifted quartz sand with a fraction of no more than 0.2 m;
- steel fiber: metal filings with a cross-section of no more than 1 mm;
- slaked lime and cement mixed in a ratio of 1:10.
To complete the work, you will need a metal grater or any convenient metal object. Rubbing the prepared composition is carried out until the shine characteristic of a polished surface appears.
Important! Before use, the cement is sifted through a fine sieve.
Coloring
There are several ways to strengthen the concrete surface using enamels:
- When pouring the top layer of the floor, moisture-resistant and quick-drying paint is added to the cement-sand mortar. Take into account that the color of the surface will change, but will not reach the same brightness as when applying paint with a brush.
- Use paint intended for road markings. Cover the floor with 2 layers. On average, painting an area of 100 m2 will require 90-100 liters of paint. This is a quick-drying compound that hardens within 10 minutes.
- Painting with a paint brush with wear-resistant, quick-drying paints.
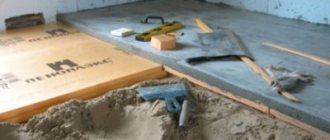
Padding
Floor priming is used to remove dust from concrete. Any composition that ensures moisture resistance of the treated surface is suitable for this purpose. The primer is poured onto the floor and spread with a brush or roller with a long handle. As a rule, one layer is not enough to achieve the desired result. Therefore, the concrete floor in the garage is primed twice, observing the break required by the instructions.
Bedding
Adding granite or marble chips significantly increases the strength of a concrete floor . You need to understand that it is not enough to add stones when pouring the top layer. Not all the crumbs will be tightly covered by the cement-sand mortar and will soon begin to peel off. The correct bedding technology is as follows:
- the floor is coated with a layer of two-component primer ENECLAD CFS (“Eneclad SFS”);
- pour a layer of granite or marble chips, level and compact it;
- After the primer has hardened, a new layer of ENECLAD CFS is poured over the crumbs.
Topping
Topping is the process of compacting concrete using special additives. Depending on the ingredients used, there are several types of topping:
- volumetric - with the addition of plasticizers;
- liquid - using polymerizing soluble mixtures on a polyurethane, epoxy, acrylic basis;
- dry – with the addition of the additives “Terrazzo”, “Maser Top 100”, “Master Top 450”.
Any of the listed technologies strengthens only the top layer of concrete screed. The coating needs to be updated every 3-5 years.
Washed (washed) concrete
Washed concrete combines strength and decorativeness
Washed concrete is a rocky surface, each element of which is securely held in place by a cement-sand mortar. The durability of this coating is high, so it is recommended for arranging warehouses, parking lots and garages. Due to its decorative effect, it is widely used in landscape design, when decorating entrance groups and steps.
To obtain washed concrete you will need the following materials:
- aggregate fraction 5-10 mm (granite or marble chips, crushed stone, dolomite, gravel);
- sifted quarry sand;
- Portland cement M400;
- hardening retarder gel for the finishing layer of concrete (can be replaced with sugar syrup or Progress detergent);
- plastic molds for paving slabs or self-prepared wooden boxes.
Tools:
- hydrodynamic washer of the Karcher type (instead, you can use a hand pump for whitewashing with a pressure of 0.5 MPa);
- concrete mixer;
- running water;
- brush with synthetic stiff bristles.
Stages of work:
- The concrete mixer is filled with 1 part cement, 3 parts sand and 4 parts aggregate. The solution is prepared within a few minutes.
- The resulting mass is placed in molds, the bottom of which is coated with a layer of gel in advance.
- Wait until the mixture hardens.
- The finished products are taken out.
- Rinse under the pressure of a stream of water, scrubbing the gel with a brush.
Important! Surface treatment with water is carried out immediately after formwork. Otherwise, the gel will be more difficult to wash off.
Laying porcelain tiles
Porcelain tiles are a reliable and aesthetic option for covering a concrete floor
To lay a concrete floor in a garage, you will need ceramic tiles with a wear resistance class of at least 5. When choosing, pay attention to the front surface of the porcelain tile: it is important that it is not smooth. The optimal solution is to buy tiles with a rough or textured surface. This coating is non-slip and at the same time easy to clean.
Porcelain tiles are laid on tile adhesive or cement-sand mortar. Concrete is pre-primed 1-2 times. Laying begins from one of the far corners; the correctness of the work is regularly checked using a bubble level. The seams are filled with moisture-resistant grout.
Concrete mix
Preparation of concrete mixture
| Concrete grade | Mass composition, C:P:SH, kg | Volumetric composition per 10 liters of cement P/Shch, l | Amount of concrete from 10 liters of cement, l |
| 100 | 1 : 4,6 : 7,0 | 41/61 | 78 |
| 150 | 1 : 3,5 : 5,7 | 32/50 | 64 |
| 200 | 1 : 2,8 : 4,8 | 25/42 | 54 |
| 250 | 1 : 2,1 : 3,9 | 19/34 | 43 |
| 300 | 1 : 1,9 : 3,7 | 17/32 | 41 |
| 400 | 1 : 1,2 : 2,7 | 11/24 | 31 |
| 450 | 1 : 1,1 : 2,5 | 10/22 | 29 |
| Concrete grade | Mass composition C:P:SH, kg | Volumetric composition per 10 liters of cement P/Shch, l | Amount of concrete from 10 liters of cement, l |
| 100 | 1 : 5,8 : 8,1 | 53/71 | 90 |
| 150 | 1 : 4,5 : 6,6 | 40/58 | 73 |
| 200 | 1 : 3,5 : 5,6 | 32/49 | 62 |
| 250 | 1 : 2,6 : 4,5 | 24/39 | 50 |
| 300 | 1 : 2,4 : 4,3 | 22/37 | 47 |
| 400 | 1 : 1,6 : 3,2 | 14/28 | 36 |
| 450 | 1 : 1,4 : 2,9 | 12/25 | 32 |
Preparing a concrete mixture is not a difficult task, but you need to make the correct calculations. If the concrete mixture is prepared on site, then only three components are involved: sand, water and cement. All ingredients are mixed taking into account certain proportions, depending on the brand of cement. There is no one approach here; each master, like a cook in the kitchen, based on his own experience, makes a solution “to his own taste.” The basis of the concrete mixture is cement. If, for example, cement grade M400 or M500 is used, then the ratio with sand will be 1:3. There are also options for the ratio to sand 1:4 and 1:5, using M300 cement. Due to the wide choice of special dry construction mixtures on the market, their use is now very popular. In this case, there is no need to make any calculations, just follow the instructions for use printed on the packaging, mix with water and that’s it - the solution is ready.
Experts tend to choose a high-quality dry mixture rather than mixing sand and cement. The choice of a dry ready-made mixture is determined by the already proven recipe, as well as the presence of fiber fibers and plasticizers in its composition. These additives increase the strength of the concrete surface and its smoothness.
In order for the concrete mixture to absorb additional polymers, you need to give the solution time to “come up.”
How to make concrete correctly
Temperature of water and concrete mixture
Video - Pouring concrete screed
Care and operation
The main condition for maintaining the load-bearing capacity of a concrete floor is the absence of moisture that destroys it . It is necessary to provide high-quality natural or forced ventilation in the garage to ensure good air exchange. If you plan to wash your car indoors, provide ditches for water drainage.
Another important condition for the safety of the coating is not to hit it with heavy objects. It is necessary to organize the garage space so that all large and heavy products are located on the lower shelves of the racks.
The range of concrete floor care procedures includes:
- timely removal of stains from oils, paints and solvents;
- traces of tire rubber are washed off with special detergents;
- Wet cleaning is carried out regularly.
Which fill is better
If you decide to build a garage structure, then do not forget to pay special attention to the floor.
You need to know the correct technology for pouring garage flooring so that it does not crumble, crack, or let you down.
For many owners, sometimes a garage means more than an apartment and they attach not only purely operational qualities to the floor, but prefer to transform the garage base with a decorative coating. For this purpose, special ceramic floor tiles, which are highly durable, are often used. With this coating, the garage will become more aesthetically pleasing, and the tiles will strengthen it. Most car enthusiasts generally prefer the simplest option for installing a floor - a high-quality and reliable concrete screed.
What qualities should a garage flooring have:
- Reliability, strength, it must withstand heavy mechanical loads;
- Fire safety, since there are always flammable substances in the garage;
- To the influence of chemical agents - resistance (stains from solvents, paint, technical fluids and oil cannot be avoided);
- Must withstand high or low humidity;
- It must be possible to carry out regular cleaning;
- Durability of the structure.
The floor must be able to withstand quite a lot of weight without deformation.
Possible problems
After some time of use, cracks may appear in the concrete floor.
During the operation of a concrete floor, surface defects such as cracks and cavities may form. They are eliminated by filling with cement-sand mortar. Pre-embroider, removing all loose particles, remove dust and apply 1-2 layers of primer.
One of the troubles when using concrete surfaces is the formation of specific fine dust. It can be removed by priming, ironing or finishing with facing materials.
The hygroscopicity of concrete is reduced using special means - water repellents. One of them is Penetron. The solution is prepared in accordance with the manufacturer's instructions and applied to the floor surface with a paint brush or roller. For these purposes, you can use other compositions:
- "AQUATRON";
- "HYDROHIT";
- "KALMATRON";
- "HYDROTEX";
- "WASCON"
They all work on the same principle: they fill the smallest pores of concrete, crystallize and form a moisture-proof layer.