SHARE ON SOCIAL NETWORKS
FacebookTwitterOkGoogle+PinterestVk
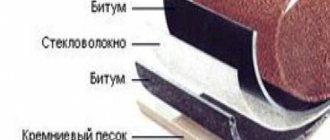
Metal tiles are a material that is used for roofing along with such popular materials as slate, bituminous shingles and galvanized sheet. Excellent technical characteristics make it an excellent option for any home. And although they usually prefer to invite professionals to carry out this kind of work, let’s look at how to install metal tiles yourself: step-by-step instructions and some recommendations from specialists.
The use of metal tiles is one of the most popular roof finishing options.
What are the advantages of installing a metal roof?
A tile roof, especially if it is made of metal, is one of the best options for decorating a home. Experts and users themselves note many positive aspects of using this material, including:
- light weight (4-6 kg/m²), which ensures very little load on the roof;
Metal roofing is distinguished by its affordable price, long service life and expressive appearance.
- simple installation procedure and ease of repair work;
- wide range of color solutions;
- the material is environmentally friendly and does not contain any harmful components;
- the coating is equipped with stiffening ribs, which makes it very durable. Provided that all installation recommendations are followed, the surface can withstand a load of 200 kg/m², even if 0.5 mm thick sheets were used;
- the material is extremely temperature resistant. It is not afraid of any changes, and the rate of thermal expansion is minimal.
There is practically no need to talk about the disadvantages of metal tiles, with the possible exception of increased noise levels on days when it rains. But this can also be dealt with if you first lay a layer of glass wool.
The use of metal tiles as a roof for the roof of a private house is convenient due to its simple installation technique and high speed of work
Preparatory work
Before you start covering the roof, you need to prepare for work , that is, select metal tiles, lay waterproofing, install sheathing and calculate the amount of material required for the roof.
It is recommended to choose metal tiles based on the following indicators:
- The thickness of the sheet, according to the standards, must be at least 0.5 mm.
- The index of galvanized coating must be at least 275 g per sq./m. It’s not bad at all if the tiles have an additional coating made of aluminum alloy.
- Pay attention to the type of polymer coating. For example, roofing tiles in the southern region are recommended with a polyvinyl chloride (PVC) coating, which is quite resistant to sunlight. For a sharply continental climate, it is better to choose sheets with a pural coating, which does not react to temperature changes. But plastisol and polyester can be called universal; tiles with these coatings can be used in any climatic zone .
What to prepare before laying metal tiles
- Scissors for cutting metal, manual and electric. It is not recommended to cut this roofing material with a grinder.
- For marking you will need a square, a marker and a tape measure.
- Roofing screws for metal tiles.
- Preferably a cordless screwdriver.
- A small wooden ladder that you will have to work on while laying the tiles.
- Strong rope for belaying and lifting sheets.
- Two long boards to accommodate the lifting of metal tiles.
- Soft shoes to avoid damaging the polymer coating.
During cutting with an abrasive wheel, a high temperature is generated, which burns not only the polymer, but also the galvanized coating. And this leads to corrosion of the metal middle of the sheet and to the slow destruction of the roof .
Determining the size and shape of the roof
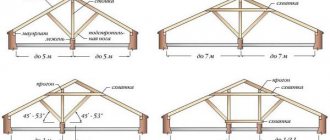
Before laying metal tiles correctly , you need to take the dimensions of the entire roof and determine its shape. This will not be difficult to do if it has only two slopes. In this case, you will only need to check the symmetry of each diagonal slope, which should be the same size, and if they coincide, this is very good. If the indicators are different, then you will have to equalize them using lathing.
But with a complex geometric shape of the roof, calculations will be more difficult. For example, for a hipped, sloping or hip roof, each slope will have to be calculated separately.
Material calculation
To calculate the number of sheets per roof slope , you need to measure its width, if it is a single- or gable roof, and divide the resulting value by the width of the sheet, calculating from it the value of the overlap on the adjacent sheet. And if it is a complex roof, the width is measured from the valley to the eaves.
The results obtained are rounded up. The standard sheet is produced in widths of 1.17 - 1.2 m, but their working width is always the same and equal to 1.1 m, and everything else overlaps. For example, the width of the slope is 9 m, the calculation will be made as follows: 9: 1.1 = 8.18. This means that for such a slope you will need to prepare 9 sheets.
Then the number of sheets in one row is calculated. To do this, the roof slope is measured from the ridge to the eaves. The maximum length of a sheet is 8 m/p, but transportation and especially laying of sheets of such length is quite difficult. Therefore, the sheets are trimmed. But if you take long sheets and cut them in place, this can make it quite difficult to install the tiles. To prevent this situation from happening, the length of the sheets must be chosen optimally.
For example, the length of the slope is 6 m, add another 0.5 m here, this is the length of the overhang. The total length is 6.5 m, which means that this length can be covered with two sheets of 4 m each, with one sheet being intact and the other being trimmed by 250 mm. This means that there are two sheets in each row, and the result is 9 × 2 = 18 sheets need to be prepared for one slope.
When calculating materials for a metal tile roof, you should not forget that you need to take measurements of each slope separately, since they can be of different lengths even on a gable roof .
Criteria for choosing a material for a metal roof: photo examples
Before you begin considering the installation process of this roofing material, you need to decide exactly how the material should be used.
Looking at photos of roofs on which metal tiles look attractive is far from the best method in this case, since in the selection process you need to pay attention to the list of additional elements, as well as the markings provided by the manufacturer. Let's look at what the buyer needs to know.
First of all, you need to pay attention to the presence in the price list of such additional elements as:
- different types of skates: simple, figured and with aerators;
- special passage units for installing pipes, hatches, ventilation, antennas, as well as lighting windows;
- elements designed to ensure the safety of surface maintenance - walking bridges, ladders, snow guards;
- internal and external valleys;
- other necessary elements are wall profiles, pediments, metal tile eaves, the installation of which is an obligatory part of the roofing arrangement.
Thanks to a wide selection of metal tile colors, you can choose the most aesthetic option for a private home
Important! The presence of all of the listed elements among the seller’s offers is an indicator of the level of the company that produces metal tiles, which may also indicate the quality of the products themselves.
In addition, it is worth paying attention to studying the markings, which must be present on each certified material. Typically, production indicates all the characteristics of the material itself, as well as the level of quality of the anti-corrosion coating that is applied on top of the sheet.
So, here is what information you can glean by reading the information provided on the back of the metal tile sheet:
- presence of polymers;
- how much zinc is per 1 m² of sheet;
- production date and warranty period for the use of the material;
- manufacturer's name;
- sheet thickness.
When purchasing metal tiles, it is important to pay attention to the manufacturer’s quality certificates
During the visual inspection, you need to pay attention to the integrity of the protective layer, both on the front and back sides of the sheet, as well as the presence of all required markings.
Important! If we are talking about material purchased from a large manufacturer, then the marking will also contain information about the grade of steel used.
Laying a layer of thermal insulation on the roof
At the next stage, before laying metal tiles on the roof, you need to take care of insulating the roof and attic space. First of all, a vapor barrier film or membrane is laid. An insulating material is placed on top of this layer.
Please note that insulation in rolls or in the form of slabs is laid in the cells between the rafters and purlins in such a way as to fill the entire space. In this case, the thickness of the insulation should be about 20-25 cm.
To protect the insulation from moisture, it is covered with a layer of waterproofing. It is important that the film is not stretched too tightly, but is placed with some slack. In addition, a small overlap of film should be made along the edges of the roof so that accumulated condensate flows freely into the gutters. Counter batten slats are attached to the waterproofing on top.
Installation of metal tiles: step-by-step instructions for independent work
Considering the fact that the price of installing metal tiles has never been low, many people prefer to try to do everything they need on their own. Although initially it is worth familiarizing yourself with how much professional installation of metal tiles costs. The price of work per m2 starts from 250 rubles and can increase depending on the complexity.
The process of installing a metal tile roof, the technology of which will be discussed below, consists of several stages, each of which has its own significance and must be carried out properly.
Metal tiles are an environmentally friendly material and do not contain harmful components.
Laying metal tiles: preparatory stage and calculations
The first thing that needs to be done if a decision has been made to independently carry out the procedure for laying metal tiles on the roof surface is to carry out preliminary calculations. This is necessary in order to determine how much of what materials will be required and, accordingly, avoid unnecessary costs.
Let's start by clarifying some basic concepts so that in the future the question of how exactly a metal tile roof is constructed does not arise. If you look at a roof that has already been covered with this material, you can see that it consists of rows that run across the slope and waves. The distance from one row to another is called a step.
There is such a thing as a “model”. This name refers to sheets of metal tiles, the pitch of which is 35 cm, and the number of waves is 6. Sheets of modules 1, 3, 6 and 10 can be found on sale.
Roofing pie installation diagram: 1. Rafter system, 2. Counter battens, 3. Waterproofing film, 4. Vertical sheathing bars, 5. Horizontal sheathing starter beam, 6. Horizontal sheathing bars, 7. Additional sheathing, 8. Wind board, 9. Bracket for gutter, 10. Eaves strip, 11. Metal tile, 12. Roof ridge. 13. Ridge seal, 14. Dormer window, 15. Thermal insulation material, 16. Vapor barrier material, 17. Attic lining.
Helpful advice! In addition to purchasing sheets of standard sizes, you can consider the option of individually manufacturing metal tiles to order. Of course, it will cost noticeably more, but this way you can get exactly the material that is right for you. The main thing to remember is that the length of one sheet should not be less than 45 cm or more than 7 m.
In the process of choosing the appropriate sheet size, you need to be guided by the fact that after installation the joints and waves converge in such a way as to form a single coating along the entire length of the slope. It is quite easy to calculate the amount of material, taking into account the length of the roof and sheets.
When purchasing metal tiles, it is important to pay attention to some additional elements that are included in the kit and allow for proper installation. This includes steel strips 2 m long, as well as steel sheets 200x125 cm, which must have the same color as the tiles.
In the process of purchasing metal tiles, you need to make sure that these auxiliary elements are available in sufficient quantity and meet all requirements. For example, the standard bar inclination level is 30 degrees. Although other options are possible at the request of buyers - from 11 to 70 degrees.
Before choosing metal tiles as a roof, you should pay attention to the angle of the roof.
Important! 11 degrees is the minimum slope at which metal tiles can be installed.
Materials and tools for laying metal tiles with your own hands
In order to install metal tiles with your own hands, you need to take care in advance of having some tools and materials that will allow you to carry out all the work as simply and efficiently as possible:
- screwdriver;
- electric drill;
- scissors for cutting metal;
- yardstick;
- hammer;
- marker;
- mounting tape.
It is also worth taking care of the presence of a stepladder and means intended for personal protection of the face and hands (goggles, gloves).
Fastening the metal tiles to the sheathing is carried out using self-tapping screws and a screwdriver
As for the consumables that will be required to prepare the base and fasten the metal tiles, this list includes: waterproofing material, roofing strips, tiles, as well as an aeroroller, strips for the ridge and ends, a guide board and 2.5x10 cm boards. itself, you will also need fastening elements - self-tapping screws and special sealing washers for them.
Helpful advice! To give the coating an attractive appearance, decorative overlays should be used.
Preparing for installation of metal tiles
The corrugated metal sheets of the currently popular coating are equipped with double protection against atmospheric attacks. Steel profiled blanks are first immersed in containers with hot zinc, due to which an anti-corrosion film is formed on the surface. Then the outer side of the material is covered with a colored polymer shell, which performs aesthetic and protective functions.
However, both degrees of protection will not be able to withstand the attacks of precipitation and household fumes if the roofing pie is constructed with violations and errors. Condensation will begin to accumulate in the space under the coating, which will slowly but surely reach the metal. The insulation will become moist and lose its insulating properties. The wooden elements will get wet and rot as a result.
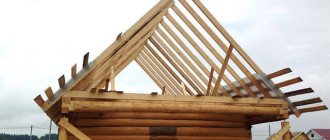
You shouldn’t completely rely on the light weight and impressive area of sheets of material either: the rafter system must be strong enough, and the sheathing needs to be such that each element is fixed at the required number of points. Therefore, you should properly prepare for the independent installation of metal tiles, i.e. become familiar with the nuances of constructing a rafter structure, sheathing and roofing pie.
Rafter system and sheathing
Metal tiles are used in the construction of cold and insulated roofs. The rafter system for the cold type can be constructed from steel or aluminum elements. But wood is still a priority, because it is easier to attach covering sheets to it. Insulated structures require stronger rafter trusses, because thermal insulation will be located between their legs. The use of metal in such situations is impractical, so warm roofs are installed on wooden rafters with sheathing.
Note that metal roofing is possible on pitched roofs with a minimum slope slope of 14º. The optimal roof slope is considered to be from 15º to 20º.
The construction of a rafter system for a warm roof with metal tiles has its own rules, these are:
- The step between the rafter legs should not exceed 90cm. The minimum distance between rafters is 60cm. If the pitch of the existing rafter system is greater than the specified upper limit, an additional sheathing is installed from a transversely installed board.
- The rafter system is made of 50mm thick boards. The recommended board height is 100 or 150mm depending on the thickness of the thermal insulation.
- The insulation laid in the spacer between the rafters should not come into contact with traditional waterproofing. If the thickness of the insulation is equal to the transverse height of the board used in the construction of the rafter structure, then an additional counter batten measuring 30×50 or 50×50 is placed on the rafters along their direction. It will create a gap of 3-5cm.
In order to ensure ventilation of wooden elements, it is advisable to drill holes Ø 2-2.5 cm in the side rafter legs. Forming holes is an optional procedure, but strongly recommended by metal tile manufacturers. If there are concerns about the weakening of the structure, it is recommended to place them closer to the ridge in two or three rows with a step of 30 cm.
Before constructing the lathing, which acts as a basis for fastening sheets, you should check the geometric parameters of the rafter system. The lengths of the diagonals of the rectangular slopes should be measured and verified. On mansard roofs, the lengths of the diagonals of each part of the slope are separate. You need to check the horizontality of the overhangs and ridge, as well as the location of the outer surface of the rafter legs in the same plane. Timely identification of deviations in geometry will eliminate further errors.
Having convinced yourself of the geometric perfection of the trusses, you can begin to construct the sheathing, the construction of which, by analogy, has clear rules:
- The first batten - the lowest batten on the overhang should be higher than the subsequent row battens. To construct it, you need to take a block thicker than for ordinary laths. For example, for the bottom rail it is 50x50, and for all subsequent ones it is 30x50.
- The initial batten of the sheathing should be clearly parallel to the eaves line.
- The step between the first and second bars is 28 or 30 cm. The step between subsequent slats is 30, 35 or 40 cm. the pitch is determined by the distance between the transverse waves of the metal tile.
- During the installation of sheathing, through penetrations through the roof are taken into account and fastening devices for pipes are installed.
- In the gutters, around roof windows, chimneys, fan pipes and other pipes, a continuous sheathing of boards is installed.
- At the top of the slopes, two boards are nailed to the rafters to ensure reliable fixation of the eaves strip. The boards are installed at a distance of 5 cm from each other.
Among other things, before installing the sheathing, all wooden components should be treated with an antiseptic and fire-retardant compound.
The lathing not only plays the role of a basis for fastening sheets, but at the same time performs another very important job. It forms ventilation channels through which air flows circulate from the overhang to the ridge, and provides a ventilation gap between the waterproofing layer and the coating.
Ventilation ducts must remain free so that air can flow under the metal sheets and exit without interference. On the side of the overhangs and on the side of the ridge, they are simply covered with perforated tape, which prevents dust and debris from getting into the roofing pie.
Structural roofing boards
Eaves boards are used to strengthen the slope and make it more rigid if the roof is planned to be equipped with an organized drainage system or the overhangs are hemmed with vinyl siding. In situations where the hemming is done simply with a board, there is no need to use board reinforcement.
The eaves boards are laid along the overhangs in the grooves pre-selected in the rafters. The dimensions of the grooves must correspond to the dimensions of the board so that the overhang plane remains unchanged and the height of the rafter system does not increase. If you plan to install long hooks used to fix the gutter, grooves are cut out in the eaves board for their fastening. Hooks with a short leg are screwed only to the front board. They are used when the installation of a drainage system was not planned in advance and when repairing old roofs. The installation step of all types of hooks is equal to the step of the rafter legs.
A front board is used if the roof does not have an organized drainage system. It is attached to the ends of the rafters with galvanized nails. Serves as an element for fastening various roofing parts and accessories, including for hemming overhangs. The end board serves as the basis for the end strip, the latter covers the waterproofing laid on top of the board. In addition to its decorative function, the strip nailed to the end board prevents rattling of the roof.
Time to hem the overhangs
Coating manufacturers strongly advise lining overhangs with valves specially produced for this purpose, for example KTV or Vilpe. Siding, corrugated sheets or vinyl soffits are recommended for filing cornices. The extensions are sold complete with connecting parts and instructions. You can economically hem it with a board attached with a gap for roof ventilation.
Specifics of the roofing pie
The composition and structure of the roofing pie for metal tiles depends on whether the structure will be insulated or not. In the simplest non-insulated scheme, only a waterproofing film is used. A vapor barrier is used if the attic space is to be hemmed.
The insulated roofing pie includes three standard layers, these are:
- Vapor barrier. It is located on the side of the future intake of household fumes, i.e. from inside the rafter system. Its job is to protect the insulation from steam. Strips of vapor barrier material are laid parallel to the overhangs with an overlap of 10-15 cm. They are attached to the rafters with a stapler, and connected into a single sheet with adhesive tape. A gap should be created between the interior lining of the attic and the vapor barrier by installing sheathing.
- Thermal insulation. Mineral wool boards are most often used as insulation, the thickness of which is determined in accordance with the requirements of SNiP II-3-79. The material is installed between the rafter legs. To ensure rigidity of installation, the slabs are cut 1.5-2 cm wider than the distance between the rafters.
- Waterproofing. It is needed as a barrier against precipitation. They lay it on the outside of the rafter system before installing the sheathing; they try to install it immediately after laying the insulation, so as not to get wet. The waterproofing material is laid like a vapor barrier, in strips with similar overlaps and fastening methods.
The waterproofing layer is laid so that its sheet overlaps the perimeter wall lines by at least 20 cm. In areas where slopes meet and in valleys, laying is done with overlaps of 20-30 cm. The waterproofing must have a gap along the ridge line so as not to interfere with air circulation.
Important condition: bitumen water-repellent materials cannot be used as waterproofing of the roofing pie when installing a metal tile roof. Waterproofing must allow steam and condensation accumulated in the insulation to pass through.
The method of installing a water-repellent layer depends on the material used:
- The classic version of waterproofing is reinforced or unreinforced polyethylene film, which must be provided with two ventilation gaps. The first of them is formed by the rafter system and is located between the insulation and the film, the second is formed by the lathing and is located between the film and the roofing. The size of each gap is 3-5cm.
- The superdiffusion membrane can work perfectly with one ventilation gap 3-5cm wide. It is created between the membrane and metal tiles. When using a polymer material, there is no point in breaking the contact between the waterproofing and the insulation. After all, the membrane is capable of allowing excess moisture to pass out, preventing it from getting inside.
- Anti-condensation materials with a fleecy surface designed to accumulate moisture. Their pile is quickly ventilated when washed with air, which should be provided with a path. Therefore, this option also requires dual-circuit ventilation, like the classic. It is used mainly in the construction of cold roofs.
All types of insulating materials, except polymer waterproofing, are laid with sagging. This is necessary so that the film does not tear when tensioned. Only the membrane does not need to be laid with sagging - it has the property of stretching.
Around through passages through the roof, waterproofing is applied to the walls of communication pipes by 5-7 cm. Ideally, it is recommended to install an additional waterproofing layer around pipes and other weakened areas of the roof.
Installation of parts before laying the covering
Before laying metal tiles, the following must be installed:
- Eaves strips that prevent dust and debris from penetrating into the under-roof space. They are mounted on top of the ventilation tape attached to the ends and the legs of the drain hooks. The planks are attached to the front and cornice boards with self-tapping screws in 30cm increments. To prevent rattling from gusts of wind, these metal parts are installed with interference.
- Cornice drips, which are located under the waterproofing film. They are needed to remove moisture from the waterproofing.
- A lower valley that enhances protection for concave roof corners. It is a metal corner that follows the shape of the groove. Mounted on top of a continuous plank sheathing. The lower edge of the corner is located above the cornice board. In almost flat valleys, the boardwalk is equipped with an additional strip of waterproofing. The lower valley is screwed with self-tapping screws every 30cm. A porous seal is laid over the lower valley.
- Protective edge around chimney pipes crossing the roof. It is carried out using metal contour strips, the upper edge of which is attached to a groove formed in the pipe walls and treated with sealant. Drilling into the seam is prohibited! The same rules apply when arranging junctions with walls.
- A lightning rod required for the safe operation of a metal roof.
The lightning rod system consists of three main parts. The first is an air terminal, which is a steel or aluminum rod Ø 12 mm with a length of 20 cm to 1.5 m. The second component of the down conductor is a single-core steel or aluminum wire Ø 6 mm welded to the lightning rod. The down conductor is laid along the sheathing and along the walls, leading to grounding. Grounding, the third part of the system, is an iron beam 1.5 m long buried at a depth of 1.5 m or a steel sheet with an area of 1 m × 1 m, for example.
How to attach metal tiles: stages of preparatory work
The low weight of metal tiles allows for a minimum amount of preparatory work to be carried out before proceeding to installation. Nevertheless, it is still necessary to prepare a suitable foundation. Since there is no need for a reinforced base, a regular wooden sheathing made from slats is quite suitable.
In order to cover the roof with metal tiles, you first need to install the sheathing
The procedure is extremely simple - based on the pitch of the selected metal tile, slats are placed on the surface. It is important to maintain a uniform distance so that during the process of attaching the roofing material you do not have to screw screws into the void. Another important factor to consider when installing the sheathing is the location of the windows. It is highly undesirable to place rafters directly above the windows.
Related article:
Dimensions of metal roofing sheets: price and selection parameters, installation of material
Features of material models, types of polymer coating. Subtleties of installing a metal roof.
Metal tiles - roofing with an “iron” character
Metal tiles belong to the class of rolled products. In essence, it is the old familiar sheet steel, profiled in two mutually perpendicular directions. The longitudinal and transverse waves formed as a result of profiling give the sheets a similarity to the ceramic roofing prototype. The outer side is equipped with a colored polymer film that performs protective and decorative functions.
Disadvantages of the material and ways to eliminate them
The ability to imitate roofing ceramics did not rid the material of the standard disadvantages of metal. Thin sheets quickly heat up under the sun's rays and quickly say goodbye to the heat at the slightest drop in ambient temperature. There is no insulation: heat and sound waves easily penetrate inside the steel roof and go outside unhindered. The list of disadvantages is significantly supplemented by the ability to collect condensate due to the difference in the thermal properties of the coating itself and the rafter frame elements in contact with it.
Low insulation performance and condensation are two “scourges” of a metal roof. You can get rid of them by arming yourself with information about the proper construction of a frame with a correctly laid roofing pie. If the installation of the rafter system for metal tiles is carried out in accordance with all technological requirements, complications with laying the material and operating the structure will not arise.
To ensure that the traditional behavior of a steel roof does not bother owners and does not cause premature wear, it is necessary to correctly distribute the layers of the roofing cake. Responsibility for distribution lies with the rafter system, the list of responsibilities of which includes:
- Retention of the components of the roofing pie, which are laid on top, below and between the rafters.
- Formation of air channels that eliminate condensation, and often the possibility of its occurrence.
- Preparation of a number of supports aligned in one plane for the installation of future slopes by laying profiled sheets.
If we figuratively compare the roofing system with a living organism, then let’s say this: the “patient” will live and function normally only with a healthy supporting apparatus. In our case with a rafter frame. The method of dealing with the shortcomings of a steel coating lies precisely in choosing and strictly following an impeccably suitable installation scheme for the rafter system for the subsequent installation of metal tiles.
Types of rafter systems for metal roofing
Roofs with metal tile covering are erected over permanent and temporary residences. Gazebos, verandas, and bathhouses covered with metal “scales” look interesting. Depending on the purpose of the structure and the conditions of its operation, roofs with metal tiles are installed with or without insulation. The presence of thermal insulation is closely related to the structure of the rafter frame:
- For insulated roofs, a system is constructed that includes three insulating layers and one or two ventilation circuits.
- For cold roofs, a system with one insulating layer and one ventilation circuit is installed.
Insulated roof structures are erected if you plan to actively use the attic all year round. The rafter frames of warm roofs are designed so that the insulation boards are located in the space between the rafters. Analogs without insulation are installed on small dachas and buildings intended for temporary residence.
A roof without thermal insulation is also constructed in the case of insulation of the attic floor. For example, above a bathhouse or a residential building with a low attic space that is clearly not intended for use, it is more reasonable to lay insulation between the ceiling beams or above them.
In the construction of rafter frames, rolled metal and lumber are used for laying profiled sheets. Metal products are closer in properties to coatings, but wood is more suitable for the tasks of private construction. It is easier to work with it for an independent owner who has decided to build and cover the roof with his own hands.
It’s easy to make all the frame elements yourself from lumber, assemble and connect them into a rafter system. Wood is warmer and more attractive in terms of environmental aspects.
Advantages of a gable design
The simplest option for constructing a rafter system for laying metal tiles is rightfully recognized as a design with two slopes. Its rectangular planes are ideal for laying sheets of similar shape. A hip or broken mansard roof will require much more effort and diligence. Many owners are depressed by the increased consumption of large-sheet material for roofing structures with full-length and shortened hips, and are not happy with the complexity of cutting.
Manufacturers claim that the optimal design for laying metal tiles will be a design with a slope angle of 12 to 15º. Structures of lesser steepness must be equipped with a reinforced waterproofing carpet. On steeper roofs, the number of fasteners increases and the installation step decreases. In both situations, the budget for the arrangement will be increased due to the purchase of additional insulating materials and hardware products.
Depending on the size of the metal tile and the dimensions of the structure being installed, the sheets are laid in one, two or more rows. Laying in one row is a priority, because transverse seams reduce insulation parameters and are potentially dangerous for leaks. Manufacturers consider 4-4.5 m to be the best sheet length for arranging the roofs of private houses. Among the offers of most suppliers of metal tiles there is a very popular service for cutting sheets to size, which is incredibly convenient for laying on slopes with individual sizes. The length of the sheet is equal to the sum of the length of the slope and the length of the overhang, which is 0.4-0.6 m, depending on the architectural solution.
The metal tiles are mounted on the sheathing, which in turn is attached to the rafter system. The lines of all structural parts of a gable roof are strictly vertical and horizontal, which significantly facilitates the process of laying profiled sheets with similar edges. If the rafter system is built without flaws, then there will be no problems with installing the sheathing and roofing.
Thermal insulation during installation of a metal roof
When it comes to installing a roof made of metal tiles, the thermal insulation material is designed to solve two problems at once - to reduce heat loss and also to reduce the noise level produced by raindrops hitting the surface. To do this, a vapor barrier material is first laid on the rafters, and then a layer of thermal insulation. It is important that the thickness of the layer does not exceed 25 cm. An antioxidant film is attached to the top, fixing it with wooden blocks directly to the rafters.
Important! In order to ensure that precipitation flows into the drain, the material must be fixed with a small allowance (about 2 cm). Due to such a small sagging, there will be no problems with water drainage.
This “pie” is the most effective roof thermal insulation system that metal tile installation technology allows. As for the choice of thermal insulation material, there are several options that depend on cost, quality and manufacturer.
Scheme of a roofing pie for metal tiles
Creating a roofing pie for a warm metal roof: installation instructions
Before covering the roof with metal tiles, for its warm version, you should arrange a roofing pie. The first stage is the installation of a vapor barrier. The protective film is installed from the attic side. It is attached to the rafters using staplers. The material is laid with an overlap of 10 cm. Butt joints must be taped.
Helpful advice! There are vapor barrier films with a ready-made adhesive strip protected by paper.
Vapor barrier material should be carefully installed at transition points, chimney joints and other utility networks. The heat supply parameters of the interior depend on the quality of the installed vapor barrier, since with increasing humidity the thermal conductivity of many insulation materials decreases.
Before covering the roof with metal tiles, for its warm version, you should arrange a roofing pie
Insulation is installed in the space between the rafters. Basalt wool is most often used. The optimal layer thickness is 10 cm. For buildings located in cold regions, the thickness of the insulation can be increased to 25 cm. The material should be laid with offset joints to eliminate the possibility of cold bridges.
Condensation often forms on the underside of metal tiles. To eliminate the possibility of leakage, waterproofing is laid on the insulation, thanks to which it is possible to delay the repair of a metal tile roof for several decades. The best option is a membrane, which is characterized by good vapor permeability. It is capable of letting through steam that has entered the mineral wool, but does not allow condensation to return to the insulation.
The material is also used to prevent heat loss. Since mineral wool is characterized by low density, air can blow through it and carry away heat.
The first step is to isolate the valley. It is necessary to lay the material along its entire length, starting from the top. Butt joints should be sealed with construction tape from the same manufacturer as the membrane. Next, the material is laid horizontally, overlapping by 10-15 cm and fixed with a construction stapler. The first section needs to be laid parallel to the cornice strip with an overlap of 5-10 cm on it. Subsequent strips are installed sequentially as they move towards the roof ridge with an overlap of 10-15 cm.
Insulation must be laid in the space between the rafters; basalt wool is most often used
Important! The waterproofing membrane must be well tensioned; its sagging in certain places is not allowed.
Installation of a metal tile roof: basic operating rules
Before you begin work directly related to laying metal tiles, you need to familiarize yourself with some rules and concepts that will allow you to avoid common mistakes and do everything necessary with the highest possible quality:
- There are two ways to lay sheets of metal tiles: from right to left and from left to right. In the first case, each subsequent sheet must be laid overlapping the previous one, and in the second, the previous sheet must be overlapped.
- There is no need to attach each sheet completely at once. Before screwing the metal tiles, it is best to lay four sheets and lightly grab them with fasteners so that they hold. Then you need to make sure that they are located as needed and, if necessary, trim them. For final fastening, use one self-tapping screw, which passes through all the sheets.
- The service life of the entire roof greatly depends on the quality of the fasteners used. Therefore, due attention should be paid to the choice of self-tapping screws. It is important that they are galvanized and must have special seals on the heads that can hermetically fill the holes when the self-tapping screw is completely screwed into the hole.
- In those places where several sheets were fastened with one fastener at once, one way or another, a seal will appear. In order to smooth it, it is necessary to cut off part of the corner, or you can straighten the capillary ditch, which is located under the stamping line.
Finishing work using metal tiles must be carried out in accordance with the rules for installing roofing tiles
Scheme of fastening metal tiles and other necessary elements
Certain rules also exist for the installation of other mandatory elements, without which no roof can do. Here are some recommendations regarding the installation scheme of metal tiles and other elements:
- the end strips must be fixed with an overlap, which should be about 2 cm. In this case, the size of the wave must be adjusted in accordance with the width of the slope. Otherwise, you may encounter the fact that the ridge will fit onto the pediment;
- for the cornice strip it is also necessary to have an overlap of 10 cm on the bottom bar of the sheathing, to which it is attached with nails;
- It is imperative to lay an additional layer of sealing material between the metal tile sheet and the roofing strip;
- for the arrangement of all elements located below the ridge (pipes and windows), sheets with one module are used. Typically, 2 pieces are required for each structural element;
- if the roof slope is sloping, then it is necessary to additionally install an aerial roller between the ridge strip and the material itself. This will prevent precipitation from penetrating under the ridge;
Scheme of fastening sheets of metal tiles
- The ridge must be fixed to the planks, which are located at the end of the entire structure. In this case, calculations must be carried out taking into account the required protrusion, which is 2-3 cm. Moreover, if you have to deal with a flat ridge, then the fastening is done with an overlap, and for semicircular elements according to the profile lines;
- It is necessary to study in advance the specifics of installing a drip line under metal tiles, and strictly follow all instructions.
Helpful advice! If you have to work with a roof whose inclination angle is more than 45 degrees, then it is worth carrying out calculations in advance that will allow you to determine whether it is possible to install a specific model of ridge strip in this case. This must be done, because otherwise, you may even need to completely replace the entire roofing covering.
It is also worth paying attention to the fact that, if necessary, the ridge strip can be slightly adjusted. That is, it can not be bent or straightened in order to ensure the most accurate repetition of the angle of the roof. You can learn more about such subtleties from the video instructions for installing metal tiles.
Scheme of fastening sheets of metal tiles and placement of screws
Stage 1. Carrying out calculations
First, let's clarify one important point. Visually, a roof covered with this material consists of rows and waves (the first run across the slope). The distance between the rows is called the pitch. If a sheet of tile has a pitch of 35 cm and six waves, then it is called a module. The modern building materials market offers sheets for 1, 3, 6 and 10 modules.
Calculation
Important! If you wish, you can order tiles in individual sizes, but this will cost much more. It should be remembered that the length of the sheet should not exceed 7 m and be less than 45 cm.
When calculating and laying out, the fact that joints and waves must form a solid coating along the entire length of the slope is taken into account. Having decided on the number of modules, the amount of material is calculated based on the roof area.
Additional elements
Roofing components
In addition to the metal tiles themselves, the kit also includes:
- steel strips 2 m long;
- steel sheets 200x125 cm, having the same color as the tiles.
Typically, the strips are intended for roofs made with a slope of 30ᵒ, although if desired, you can adjust them to 11-70ᵒ.
Important! The minimum slope at which the installation of tiles is allowed is 11ᵒ.
Installation of a valley when roofing with metal tiles
Another extremely important element, the installation rules of which cannot be neglected, is the valley. For each such element, an additional board must be attached. In this case, fastening must begin from the bottom, gradually moving upward and not forgetting about the need for overlap (in this case, 25-30 cm). Below the level of the cornice, be sure to cut off the bottom strip. Then follows the flanging, under which, as well as under the ridge, a seal is laid.
There remains a gap between the sheets and the axis, about 8-10 cm in size. Then, at a distance of approximately 1.5 cm from the stamping line, screws are screwed into the cut sheets. In this case, the fastening should be located 25 cm from the valley axis. If you follow this technology, then eventually the sheet, at the fastening point, will converge with the board on which the valley is located.
As for the installation of the valley below, it must begin before laying the roofing material. This is important to ensure that water flows directly into the additional element in the future.
Scheme for installing a valley when roofing with metal tiles
Important! All errors in the process of calculations and measurements can lead to the appearance of gaps on the surface, and when heavy precipitation begins, the roof will most likely leak.
In order to cover those places where the cut sheets are visible, special decorative overlays are used. When installing them, you also need to remember a few simple rules:
- installation must be done from the bottom up;
- a sealant between the lining and the tile is not needed;
- the overlays must be overlapped by at least 10 cm;
- fastening elements (in this case self-tapping screws) should not cause damage to the valley.
Very often you have to deal with situations where the beginning and end of the valleys are located directly on the roof slope. As an example, we can consider the case when a dormer window is installed. In such a situation, it is necessary to lay a separate board, and for the window itself, a hole is made in the metal tile sheet. The cornice cut is covered with a plank. And sealing material must be laid along the walls.
Scheme for calculating endowa when roofing with metal tiles
Step-by-step instruction
The construction of a metal tile roof includes several main stages. Phased construction begins after preparatory work and procurement of materials.
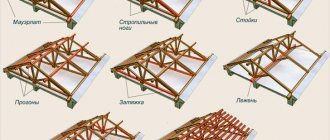
Rafter system installation technology
The first step is installation of the rafter system . Metal tiles can be used to cover single-, double- and multi-slope roofs. The design of the rafter system depends on the type of roof.
To reliably hold the roof in question, the rafters are made of 10x5 or 15x5 cm timber. The installation pitch of the rafter legs is selected within 0.6-0.9 m, depending on the roof area.
Wooden beams for rafters must have a residual moisture content of no more than 20%. Before installation, all wooden elements of the system must be impregnated with an anti-rot and fire-retardant composition.
With the help of the rafter system, the necessary slope of the slopes is formed . It depends on the snow and wind load. It is important to take into account that increasing the angle increases resistance to snowfall, but increases windage, and therefore reduces resistance to winds.
For metal tiles, the minimum tilt angle is 14 degrees. The optimal angle is 22-25 degrees. In regions with heavy snowfalls, the angle will have to be increased to 40-60 degrees, but if there is a risk of strong winds, it should not exceed 45 degrees.
Pie
The elements of the “roofing pie” are installed in the following order:
- A counter-lattice made of beams (2-2.5) x 5 cm is attached to the rafters from below. The pitch between the beams is selected approximately equal to the pitch of the rafters.
- A rolled vapor barrier is laid at the bottom of the counter-lattice. Moreover, the foil layer is directed towards the attic. Fastening to the beams is ensured with a construction stapler. The material is laid in strips across the rafters with an overlap of at least 10 cm. It is recommended to glue the joint with tape.
- Thermal insulation is laid between the rafters. Its thickness depends on the region and is 15-25 cm. The joints between the plates are sealed with polyurethane foam and sealed with tape.
- Waterproofing is installed on top of the rafters. Strips of film are laid across the rafters. Fastening is provided with a stapler. The joints have an overlap of at least 15 cm and are taped. The membrane requires the installation of a drip, because it is brought to its surface. Streams of water are directed directly at it, and from there they flow into the drainage system.
The protective part of the “roofing pie” is completed by the upper counter-lattice. It is made from timber 2.5x5 or 4x5 cm.
In addition to the fact that it strengthens the lower layers, a ventilation gap is formed, eliminating the accumulation of condensation. The beams are secured with self-tapping screws to the rafters.
Lathing
The wooden sheathing continues to form the roof, creating a load-bearing base for the roofing material. Essentially, it is a deck made of boards or beams, fixed to the rafter system on top of the counter-lattice .
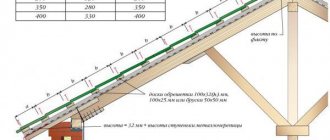
It is made from boards 2-2.5 cm thick and 10-20 cm wide. The pitch for metal tiles is 30-50 cm.
It is selected so that each sheet can be secured to the sheathing in 3 places (top, bottom and center). In places where additional elements are installed on the roof (valley, ridge, snow retainers), the sheathing is strengthened by installing additional boards (beams).
Cornice units
The eaves overhang must have increased strength . To do this, a groove is cut in the rafters in which the frontal board of the cornice is installed. It is secured with nails with galvanized heads.
An intermediate horizontal beam is fixed between the front board and the last board of the sheathing. If the overhang length is more than 50 cm, there can be 2 such beams. Between the indicated elements, bars are attached in the transverse direction, forming a lattice. You can attach the cornice hem to it.
Structural elements: ridge, valley, eaves strip, chimney apron
Before installing the roof covering, it is necessary to strengthen some structural elements of the roof:
- Horse. A ridge strip will be installed here, and to fasten it on top of the rafters, 2 additional boards are nailed on both sides of the ridge at a distance of 5 cm from each other.
- Endova. In it, around window openings and chimneys, a continuous sheathing is provided with a length of at least 50 cm. A passage element will be attached to such flooring.
- Cornice plank. It is attached to the frontal and cornice boards with self-tapping screws in increments of no more than 30 cm. The plank is designed to strengthen the edge of the overhang and covers the drainage hooks.
- Endova. At the side joints of the slopes, an internal corner is formed where snow can accumulate. This place needs to be further strengthened. For this, a continuous sheathing of 15x2.5 cm boards is provided. At least 2 such boards are laid on each side of the joint without a gap. A wooden gutter is formed, which must be protected from the inside with waterproofing. To seal, a self-expanding material is placed directly in the corner, which seals the joint of the metal tile sheets.
- Chimney pipe apron. A continuous sheathing is made around the pipe and abutment strips are secured. At the joints, the waterproofing rises up onto the pipe walls. In addition, additional thermal insulation is installed. A horizontal groove with a depth of at least 1.5 cm is cut into the pipe for mounting the junction strip.
All additional roof elements are installed with great care . It is important to remember that the reliability of the entire roof sometimes depends on them, because... The leak in them spreads along the entire slope and penetrates into the room.
Laying sheets
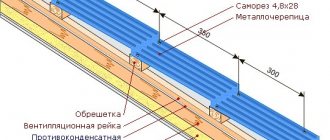
How to cover a roof with metal tiles with your own hands? The installation of metal tiles begins with cutting the sheets to length. Cutting can be done with a grinder, jigsaw or hacksaw. Laying is done in rows. It starts from the lower right corner of the roof slope. The sheets are secured to the sheathing using special roofing screws with a rubber washer. This washer acts as a sealing gasket.
Important! The fastener is screwed strictly at right angles to the plane of the board. It is not tightened by 1-1.5 mm to prevent damage to the protective coating.
Each sheet is secured at the top, bottom and center with 3-5 screws, depending on the width. The sheets are joined with an overlap of 1 wave of the profile. Additional screws are screwed into the overlap areas.
After laying every 3 sheets, parallelism is checked. Each subsequent row of metal tiles is shifted relative to the previous one to ensure that the joints do not overlap.
How to lay metal tiles on a roof with a triangular or trapezoidal slope
If there is a need to cover a triangular or trapezoidal roof with metal tiles, then the installation of two additional bars will be required. They are installed along the fold line of the roof on both sides of the “ridge”. After this, the cornice board is mounted and the assembly of the sheathing begins. The sheathing pitch for metal tiles in this case is calculated in the same way as with the standard scheme. Then the cornice system is installed. They begin to lay the metal tiles only after all these procedures have been carried out, orienting and aligning the first sheet along the eaves strip.
Important! The distance between the corner sheets that were trimmed and installed near the “ridge” should not exceed 10 cm.
In order to install the ridge assemblies, you need to align the ridge strips relative to the angle of the “ridge”. If you use a straight ridge, it must be cut according to the existing corners, and for a semicircular ridge special plugs are provided. Moreover, it is best to use plastic models.
Ridge installation diagram for roofs with a triangular or trapezoidal slope
The ridge strip must be located strictly along the axis of the “ridge”. This is not too difficult a task if the slope angles are the same. If they have different sizes, then the task becomes significantly more complicated. Bright polyurethane foam is used as an auxiliary material, which allows you to determine the quality of the connection to the slopes.
Technical aspects of laying tiles
Sheets of metal tiles should be laid in rows: from left to right, from bottom to top. The first row of sheets should protrude 50 mm beyond the cornice. The sheets are attached to the deflection of the wave under the step, in the places adjacent to the sheathing.
Pipe bypass installation
To form a pipe bypass, we install a “metal apron” from junction strips. The lower part will go under the tiles by 200 mm, and the upper part by 150-200 mm will rise along the pipe.
- The junction strip is mounted on top in a groove or overlay.
- A sealant should be installed in the upper part of the “apron”.
- The joints of the strip and the gaps between it and the pipe should be carefully sealed.
Gutter installation
- Long hooks are installed before installing the roofing material. The eaves board must be at least 200 mm wide to securely attach the hooks.
- If the drainage system is installed after the roof has been installed, we recommend using short hooks and mounting them directly on the roofing board.
- The cornice strip is mounted on the cornice board on top of the hooks with an overlap of at least 20 mm on each other
- To prevent damage to the gutter when snow falls off the roof, we recommend installing the first hook on the front board so that the outer edge of the hook is 20 mm below the imaginary continuation line of the eaves board (Diagram 2)
More information about installing a drainage system: Installation instructions for a drainage system
The rules for installing walk-through elements, roof windows, and roof safety elements are described in detail in the instructions attached to the orders.
Installation instructions for metal tiles "Monterrey"
A separate type of metal tile that is undoubtedly worthy of attention is Monterrey. This option is very popular due to some exceptional characteristics:
- extremely high level of material resistance to both ultraviolet radiation and other external factors, such as moisture and temperature;
- due to the layer of polymer applied to the surface of the tile, it does not lose its appearance throughout its entire service life;
- the material is extremely durable and hard, so it can withstand heavy loads;
- multilayer structure prevents corrosion;
- due to its low weight (one square meter of material weighs no more than 5 kg), the load on the rafter system is significantly reduced;
- using this option is a great savings, since there is no need to take a large step between fasteners. Initially, the installation instructions for Monterrey metal tiles provide for 35-centimeter steps.
Monterrey metal tiles are a fairly durable material due to the presence of stiffening ribs
This material has only two disadvantages - a large amount of residue after installation, as well as the need for high-quality sound insulation.
As for the features that you need to know about before laying Montrerey metal tiles, the following aspects play a role here:
- For different models of this material, it is necessary to prepare different lathing. So, for Standard or Super metal tiles, a step of 35 cm will be enough, but for Lux or Maxi, the step should be 40 cm;
- in the most difficult places of the roof (usually these are the internal corners, as well as the place where the chimney outlet is located), you need to make a continuous sheathing;
- on the junction strips, for the chimney exit, you need to install internal aprons;
- the installation instructions for Monterrey metal tiles do not provide for the use of material whose length is more than 4 m;
- Before installing the material, it is necessary to remove the protective coating, since this may be impossible to do in the future.
When installing Monterrey metal tiles, it is necessary to install high-quality sound insulation
It is strictly forbidden to cut the sheet in the transverse direction, as this may lead to the profile becoming wrinkled. Also, under no circumstances should you use a grinder or other tools with abrasive wheels for this purpose.
Interesting! Cascade metal tiles also look great, the installation instructions for which are not too different from all the others. But the appearance of such a roof is considered more aesthetic and original.
Installation instructions
Now it’s worth considering the issue of laying metal tiles step by step. The technology of this process is as follows:
- The first step is to secure the cornice and end strip. These additional elements play an important role; they protect the roof of the house. Before installing the cornice strip, nail the front board. Brackets for the drainage are attached to it. After this, the cornice strip is laid.
- If the roof has negative angles, then the next step will be to install the valley. This element must be placed on a continuous sheathing.
- Next, you can lay the metal tiles themselves. This needs to be done from the cornice. Which side of the roof, right or left, to start with is up to the master himself. This is not important. The first sheet should be placed flush with the eaves and the edge of the roof. The next one is placed on the right or left.
- The installation procedure is simple. First, the bottom row is installed. Next, the next one and so on until the ridge. The best option is if the length of the metal tile sheets matches the length of the slope. In this case, the installation will be carried out faster, and the roof itself will be more reliable (there will be few joints). But if the roof is broken or has a complex configuration, then this will not work.
- There is no need to immediately attach metal tile sheets to the sheathing. First, one row is laid out. Next, you should align all the sheets relative to each other and the edges of the roof. After this, the metal tiles are attached to the sheathing. In this case, there must be at least eight screws for each square meter.
- The fastening points must be strictly above the sheathing boards. The installation instructions indicate that the screws are screwed in one and a half centimeters below the stamping line of the metal tile. At the same time, you can’t be too zealous. The cap should tightly press the metal tile to the base without damaging it.
- The instructions for laying metal tiles indicate the next step - attaching the upper valley. Its installation is carried out on top of the roofing material. In this case, you need to use special products that improve the tightness of the joints. The valley is the most dangerous place on any roof. This is where leaks most often occur.
- Next, according to the instructions for installing metal tiles, the installation of additional products is carried out. This is the ridge, end strips and so on. It is best that they are from the same manufacturer. In this case, installation will take place without any particular difficulties. In addition, it will provide a more attractive appearance and significantly improve the protection of your home's roof.
- When laying additional materials, you should also be careful about waterproofing and other “add-ons”. This is especially true for the skate. Here, in addition to the seal to improve protection against leakage, other devices should be used that will ensure the presence of a ventilation gap. Without such a “gap,” condensation that forms under the metal tile when temperatures change can quickly damage the rafter system.
Video on the topic:
The layout of metal tiles is quite simple and anyone can do everything with their own hands. It is very important not to rush and do everything carefully and following the rules. In this case, the roof will be reliable, and the risk of injury will be reduced to zero. It is very important to take seriously the integrity of the polymer coating of metal tiles. If it is damaged during transportation or installation, the roof will soon “give” a leak.
How to properly care for a metal roof covering
After studying the step-by-step instructions for installing metal siding, you can carry out its high-quality installation. But in order for the material to last for many years, you need to know how to care for it.
When cleaning a metal tile roof, it is important not to damage the top layer, which consists of a polymer material
The top layer of metal tiles is a polymer material that is designed to protect against corrosive processes. But as a result of constant exposure to external factors: precipitation, ultraviolet rays, as well as dust and dirt, this layer may begin to deteriorate, which will lead to the need to replace the coating. In order to avoid this phenomenon and extend the service life of the roof, it is necessary to regularly carry out the following procedures:
- remove dirt, dust and dry leaves from the surface using a damp fluffy brush;
- If we are talking about eliminating more complex stains, then it is permissible to use cleaning agents, but only those intended for polymer surfaces. The use of aggressive chemicals is strictly prohibited, as they destroy the protective layer and render the material unusable;
- cleaning of gutters is carried out using a stream of water, which should be directed from the ridge to the eaves;
- It is possible and necessary to clear snow, but this should only be done using tools that are not capable of causing damage to the delicate coating.
Provided that these simple but extremely important rules are followed, metal roofing can serve as a roofing material for about 50 years.
If a metal tile roof is damaged, it is important to carry out repairs immediately to prevent destruction of the lower layers of the roofing pie
Installation of a drainage system for the roof of a metal tile house
When roofing a house with metal tiles, it is necessary to install a reliable drainage system, which includes a gutter, holders, plugs, an outlet funnel, connectors, a spider, a connecting pipe with an elbow, a drain with a holder and a tee, a funnel, and an overflow stop.
The spider is installed in the drainpipe funnel and protects the system from leaves and debris getting into it
Each drainpipe requires 10 m of gutter. In the places where they are attached, a V-shaped hole 10 cm wide is cut out, into which a funnel is inserted. It is fixed 10 cm from the edge of the gutter. The holders are installed before installing the roof eaves every 50 cm, ensuring a gutter slope of 5 mm. Plugs are fixed on both sides.
Brackets for supporting the gutter should not be attached to the first strip of the sheathing, since the metal strip will rest against the profile sheet of the roofing material, which will lead to its deformation. Over time, this can cause damage to thin sheet metal as a result of roof vibrations. Special recesses must be made for the brackets. Their upper sections should not protrude above the surface of the sheathing elements.
The front edges of the outlet funnels must be brought under the bent outer edge of the gutter and secured with a carved flange. When attaching the gutters, they are overlapped by 3 cm and secured with locking connectors and rubber gaskets. The spider is installed in the funnel of the drainpipe and protects the system from leaves and debris getting into it.
Helpful advice! It is recommended to clean the spider twice a year.
The holders are installed before installing the roof eaves every 50 cm.
Two elbows and a connecting pipe are used to transition the funnel to the drainpipe. Pipe holders are installed every meter on the wall. An elbow is attached to its lower part to drain the water, moving it 30 cm to the side. A tee is used when using one drain for two funnels. A limiter to prevent overflow is installed in the place where water constantly flows. It is placed on the gutter or in its corner.
Common mistakes when installing a metal tile roof with your own hands
Inexperienced craftsmen often make mistakes, which can lead to the fact that the work will have to be partially, and sometimes completely, redone. Such carelessness can lead to additional expenses for the purchase of materials and consumables, so it is better to familiarize yourself with common mistakes in advance in order to prevent them:
- installation of metal tiles should be carried out exclusively in shoes with soft soles that cannot damage or scratch the coating;
- It is strictly forbidden to step on the crest of a wave, as this may cause deformation;
- Moreover, it is generally not recommended to step on the sheets with a full foot;
- when moving along the surface of the material, the leg should be placed parallel, and not perpendicular to the slope;
- You can only handle the material while wearing gloves.
Taking these simple rules into account, as well as acting in accordance with the technology for laying metal tiles, you can make a beautiful and reliable roof yourself.
Due to its light weight, metal tiles provide very little load on the roof and foundation of the building
Transportation and storage conditions
When transporting metal tiles to the construction site, all conditions must be created so that the material does not deform. Wooden guides are used for loading and unloading the covering. It is advisable that the vehicle be large. Then the metal tiles can be laid along their entire length. Please note that no weight should be placed on top of the material.
When transferring sheets of metal tiles from place to place, they must be held vertically, making sure that they do not sag. Dragging metal tiles along the ground is strictly prohibited.
If it is necessary to store sheets of metal tiles for some time, then there should be a minimum level of humidity in the room. Wooden blocks are placed below the material, laying them so that there is a gap of 20 cm to the ground.
Installation of snow guards on metal tiles: instructions and their varieties
A high level of safety is one of the main requirements for roofing made of any material, including metal tiles. For this purpose, special structures are used, which are called snow retainers. And the main goal is to ensure safe snow removal from the roof and prevent possible dangerous situations. In addition, they help maintain the original shape of the structure and prevent it from deforming under the weight of icy snow. And considering that its weight in some cases can exceed the weight of the roof itself, this problem is quite relevant.
Important! The issue of distributing the load that snow exerts on the roof surface should be thought out at the stage of laying the foundation. This factor must be taken into account in the calculations.
It is almost impossible to predict exactly how snow will be distributed on the roof surface. This depends on many factors, including the angle of the roof, wind direction, etc. Therefore, in order to make calculations, a special formula is used:
Q = G×s
In this case, Q is the load exerted by the snow, G is the mass of snow on the flat surface of the roof, which can be found from a special table, and S is the correction factor, which depends on the angle of the roof: > 25° - 1, if 25- 60° - 0.7. If the degree of inclination is more than 60, then this is not taken into account, since in this case precipitation will definitely not linger on the surface.
An important step when finishing a roof using metal tiles is the installation of all additional elements that not only protect the coating, but also allow you to hide unsightly joints and edges
In order to determine the G index, you need to refer to a special table that provides information regarding snow cover for each region of the country.
Installation of tubular snow guards on metal tiles: installation rules
As a rule, a pipe is used as a basis for snow retention, which is laid along the roof. In the case of using metal tiles as a roofing material, fixation is made in the places where the roof and load-bearing wall connect.
It is strictly forbidden to fix these elements on the eaves strip for metal tiles, as this may lead to the destruction of the entire system. Moreover, if you have to deal with a slope whose length is quite large, then the installation of snow retainers on metal tiles must be done in several rows at once to ensure a more reliable fixation.
The process of installing tubular snow guards on metal tiles
The tubes themselves are mounted on the roof either end-to-end or in a checkerboard pattern. Special attention should be paid to installing such a system if the house has an attic. In this case, the installation must be carried out in such a way that a snow guard is located above each window opening. As for the distance from the edge of the roof to the elements, 40-50 cm is quite enough.
Lattice snow guards for metal roofing: how to attach correctly
Lattice snow retainers are considered the most effective, so those users who are interested in the quality of the installed systems preferentially choose this option. There are two types of such structures - ordinary and “royal”, although it is worth recognizing that there is not much difference between them, with the exception of the supports and the complexity of the lattice.
The high level of efficiency and safety of this type of snow retainer is due to their considerable height, due to which they may not be useful not only in winter when it comes to retaining snow, but also in summer. After all, it is during the warm season that all kinds of repair work are most often carried out.
Lattice snow retainers are considered one of the best options for metal roofing
Corner snow retainers for metal tiles
Corner snow guards are thin steel sheets that are coated with a polymer coating that protects them from corrosion. This is one of the most budget-friendly options, which at the same time allows you to effectively prevent snow from rolling off the roof. It is very easy to choose a model that will suit your existing metal tiles, since the range of color options is extremely large.
To fix the corner snow guards on the roof of a metal roof, screws and ordinary metal corners are used. Fastening is carried out on the upper wave of the sheet.
These are not all design options that can be used to prevent snow from rolling off the roof. Metal tiles are perfectly combined with many models and varieties of these elements, so there will definitely not be any problems with selection and fixation.
An example of the location of corner snow guards on a roof covered with metal tiles
Laying metal tiles
Installation of metal tile sheets begins from the edge of the roof slope. When using long material that immediately covers the entire length of the slope, horizontal joints are not required. The eaves overhang must be at least 45 mm.
Lifting sheets onto the roof can cause difficulties. Lifting to greater heights is carried out using belts. If the distance from the roof to the ground is small, then the tiles are lifted along logs or logs. Lifting sheets should be carried out by two people.
Lifting metal tiles along guides.
- The metal tiles are attached to the wooden sheathing with self-tapping screws. The self-tapping screw must have a rubber gasket to prevent water from flowing down the thread onto the sheathing. The screw head is painted to match the color of the coating.
- Fastening is carried out in the deflection of the wave, while the hardware is twisted through one or two waves in a checkerboard pattern.
- Installation of sheets begins from the left or right slope. When laying from the left edge, the adjacent sheet is placed with its edge under the previous one. If installation is done on the right, then each subsequent sheet is laid overlapping the previous one.
- If the length of the sheet is less than the slope, then first three sheets of the bottom row are laid, then three sheets of the top row.
Move along the roof carefully. For work, it is better to use shoes with soft soles.
- To install elements of hoods and ventilation holes, corresponding holes are cut out in the roofing according to a template. The cut is made with metal scissors or electric scissors. A waterproofing gasket is installed in the hole, it is lubricated with a layer of sealant and secured with self-tapping screws to the sheathing.
- After completing the installation of all sheets of metal tiles and ventilation holes, snow retention elements can be secured to the roof surface. They are attached to the sheathing with bolt screws, for which holes are pre-drilled. There should be a rubber seal between the bracket and the tile.
Installation of a roof window in metal tiles
It is believed that installing roof windows is not a task for beginners, and it is best to contact specialists who have adequate experience in this field. But this does not mean that it is impossible to do it yourself, especially if you use step-by-step instructions for dummies. The installation of metal tiles and the installation of the window itself in this case may well proceed without any problems.
First of all, it is worth paying attention to the fact that the maximum possible width of such a window should be 80-120 mm less than the opening between the rafters. In cases where the rafter pitch is very small, two small windows are installed in adjacent niches.
The installation of the window is carried out after the roofing “pie” is completely made, then you need to install the mounting beam, for which I use the same boards as for the rafter system. Then the frame is installed and the sashes are installed. It is very important to take care of high-quality waterproofing so that in the future the window does not become a source of precipitation entering the house.
Installation of a roof window is carried out after laying all layers of the roofing pie
Of course, you have to make some changes to the process of installing the sheathing under the metal tiles, and pay special attention to the issue of installing the ridge of the metal tiles if a roof window is planned. But all these difficulties are more than justified by the excellent result that awaits the owners as a result.
Other, no less important elements of the roof
When installing a metal tile roof, you should not neglect such important parts of the roof as valleys, end strips, and ridges. These elements serve their special role in the overall roof structure .
The main task of all these listed elements is to protect the ventilation space under the metal tiles from snow, rainwater, falling leaves from trees and other things getting inside.
Modern manufacturers of roofing materials have developed many different solutions for effectively insulating internal spaces under the roof. Proper installation of all these elements is a very important part of the roof construction process.
Properly arranging the valley
The picture shows a very important element of the roof - the valley.
We begin to lay the base of the valley. The base boards should be laid flush with the sheathing boards throughout the entire roof surface.
During the installation of the valley base, it is necessary to leave gaps of 20 millimeters between the planks for subsequent ventilation of the under-roof space. The cornice strip is measured along the length and adjusted to the length of the cornice .
It is mounted directly on the corner of the valley. Then we proceed to laying the valley itself, do not forget to clearly mark the guide lines, we will need them in the future when we lay the roofing sheets.
The minimum permissible distance between guide lines cannot exceed 200 millimeters. Next, the sealing material is adjusted to create a distance from the guide lines of 30 millimeters, and the distance between the sealing lines is 260 millimeters.
From the very beginning, it is advisable to lay sheets of full size, because at this stage of roof construction you should not use sheets that require cutting and fitting. Next, we measure the area that will then be occupied by the metal tile sheet next to the valley.
We measure the distances from the guide line to the direct overlap.
First of all, draw a guideline that will be needed when laying subsequent sheets of metal tiles on the mounted sheathing. It is better to take several measurements at once. After marking the cut location on the sheet of metal tile, cut it using scissors specially designed for this purpose.
If you notice any damage, scratches or cracks on the paint layer, then use paint that is the same color as the material to paint over visible defects.
Immediately after completing the previous step, install the metal tiles over the valley, placing the cut sheet of material along the previously marked guide lines.
Then continue installing the measured and cut sheets of metal tiles along the guide lines.
We install the ridge and end strip
The end strip must be fastened by analogy with metal tile sheets - in the direction from the eaves to the ridge, trimming the end strip occurs at the ridge.
To secure the end strip to the end board on top of the metal tile sheets, resort to using self-tapping screws measuring 4.8 by 70 and maintaining a pitch of 500 - 800 millimeters, not forgetting about the overlap.
We attach the ridge directly to the roofing sheets, using self-tapping screws to make an indentation every two waves of the tile. The ridge strips should have an overlap of 100 millimeters.
This is what a horse looks like
Attention!
How to lay metal tiles so as not to break the tightness of the sealing material? Screw in the screws so that they cannot reach it.
Thus, sufficient tightness of the joints is maintained, which prevents water from penetrating into the under-roof space.
Tips for arranging elements
Let's consider installation on some roof elements; the technologies are universal.
Cornice strip
It is used to perform two tasks:
- protection of the under-roof space from slanting rain. Protects the rafter system and sheathing from getting wet;
- improves the appearance of the roof, hides the wooden structural elements.
Cornice strip on the diagram
Important. The thickness of the first batten of the sheathing should exceed the thickness of the others, the difference corresponds to the height of the metal tile step. The fact is that it is in this place that the first row of screws will be screwed in, and it is higher than the other fixation points. The sheet must have a stop; for this, the height of the first rail is increased.
Another nuance - the distance between the first and second lathing strips should be 28 cm, between the rest 35 cm. This is due to the characteristics of the profiles and their linear dimensions. The strip for the cornice is attached to the first rail with self-tapping screws.
Prices for curtain rods
Cornice strip
Lower (drainage) and upper valley
Quite complex elements of the roof, this is where leaks most often appear. What is the difference between lower and upper valleys? The first ensures water drainage and guarantees the tightness of the roof. The second plays only a decorative role, covering uneven cuts and additional fixation elements.
- Lower valley . The sheathing should be a continuous width of ≈ 20 cm on each side of the junction. To increase the tightness, before installing the metal valley element, flexible bituminous materials can be used for additional waterproofing. Water is drained onto the eaves strip, from which it flows directly into the gutter. The valley is fixed with flat-head screws or special metal strips.
- Upper valley. A decorative element that covers uneven sections of tiles. Screwed with self-tapping screws to the wave crests. The color of the metal element must exactly match the color of the roof covering.
Upper and lower valley
You need to work on valleys very carefully; the appearance of leaks in these places has extremely negative consequences. They are difficult to notice - the unit has a complex structure; water can remain invisible on the visible side of the roof for a long time, and during this time the wooden structures become wet and are affected by rot.
Chimney lines
In the classic design, they must have two water protections: a lower one made of flexible materials that drain water onto a long galvanized metal plate connected to a gutter, and an upper one. The second, at the same time as protection, also performs a decorative function. Metal strips are installed in chimneys in grooves; water from the strip falls onto the metal tiles.
Pipe passages
Junction strips
They are installed at the junction of the roof with vertical brick structures and in areas where slopes bend. They look like metal strips bent at an obtuse or acute angle; the material used is the same as metal tiles. The planks are fixed to the ridges of the sheets; in some cases, a rubber or foam seal can be used to seal large gaps between the slopes.
Roof abutment strip
The junction of the metal tiles to the wall, in the photo there is a junction strip
Horse
It has various geometric shapes, from a simple bent metal sheet to a convex round one. Screwed on with long self-tapping screws; the dimensions of the hardware should be 2–3 cm greater than the height of the coating wave. There are options for special universal fixation elements with a ridge bar for ventilation.
Semicircular ridge for metal tiles
Skate bar
Prices for different types of roofing ridges
Roofing ridge
Snow guards
They can be tubular, lattice and lamellar. They are used to prevent avalanche-like snow falling from the roof, during which there is a high probability of damaging the gutter or injuring people.
The strongest tubular and lattice ones are fixed to the sheathing of the rafter system.
Tubular snow guards
Plate ones are screwed to the ridges of metal tiles and cannot withstand heavy loads.
Plate snow guards
The decision to install snow guards is made taking into account the angle of inclination of the roof slopes and the climatic zone of the building's location.
Prices for snow guards
Snow guard
Materials and tools
To install metal tile sheets, you will need a set of traditional tools for finishing work:
- electric screwdriver;
- jigsaw or circular saw;
- marker;
- construction stapler with staples;
- metal scissors;
- scotch;
- laser plane builder or building level;
- roulette.
Important! To cut sheets of metal tiles, you cannot use grinders with abrasive discs operating at high speeds. Their use will lead to overheating of the steel base, melting and destruction of the polymer protective coating. Such damage greatly reduces the service life of the roof.
Of the materials, in addition to the metal tile itself and its accessories, you will need the following:
- bars 50 x 50 mm;
- boards 100 wide and 25–35 mm thick;
- sheet waterproofing material;
- wooden slats;
- galvanized screws, nails.
You will also need personal protective equipment and auxiliary equipment: a ladder, scaffolding, a brush for sweeping away debris, etc.
Find out more about laying corrugated sheets on a gable roof:
Construction of houses
129 votes
+
Vote for!
—
Vote against!
Each of us has seen metal tiles more than once. Every year, more than one hundred square meters of this roofing material is installed on various roofs. In view of the widespread use of metal tiles, I would like to say a few words about the correct choice of material, its proper storage, as well as how to cover the roof with metal tiles and install all the additional elements that come with it.
Advantages of metal tiles
This roofing material first appeared on sale in Finland in the second half of the last century and since then has been successfully leading among all coatings of this kind. Today, metal tiles are made from aluminum-zinc steel, which has a protective polymer coating that protects the metal from corrosion and is painted in different colors.
In the manufacture of this material, several coatings are used, which differ in their properties, cost and thickness. Galvanized profiled sheets have a more complex internal structure than it initially seems: usually a cold-rolled hot-dip galvanized sheet is used for the base, which has a thickness of 0.4-0.5 millimeters.
Metal tiles have a list of key qualities that determine their popularity: light weight, ease of installation, long useful life, increased wear resistance and reasonable price. The material does not burn, does not deform or melt. Sometimes consumers suffer from increased noise during strong winds or rain, but this occurs when the roofing, sound insulation and drainage are not installed correctly.
This roofing material has a stylish appearance, often imitating traditional ceramic tiles, but is far superior to its clay counterpart in ergonomic qualities. Metal tiles are used for reconstruction of buildings or new construction. In any case, it can last 50 years, or even more, without losing its original appearance throughout the entire period of operation.
The process of laying metal tile sheets is one of those jobs that requires strict adherence to the requirements specified by the manufacturer in the instructions. Deviation from these recommendations can lead to a significant reduction in the service life of the material, and manufacturers in such cases decline responsibility due to breach of warranty.
Calculation of metal tile sheets
To buy the required number of sheets of metal tiles, first pay attention to any residential building that has a similar roof. “Waves” are placed across the roof slope, and “rows” are located along them. The pitch of metal tiles is the distance between the rows. A sheet that consists of 6 “waves” and has a pitch of 350 millimeters is called a “module”. One-, three-, six- and ten-module warehouse sheets are available for sale.
But you can also order sheets according to your own measured sizes. Of course, prices for special orders will be higher. However, when covering a complex roof with sheets of standard sizes, a lot of waste is generated, which also affects the price of covering the roof with metal tiles. But the possibility of individual cutting of roofing material for each customer allows us to reduce this waste significantly. Therefore, you need to choose warehouse sheets or their cutting based on a specific option.
The metal tile sheet has 2 widths: general and useful. As for the length of the sheets produced, the minimum length is 450 millimeters, and the maximum reaches 7 meters. The lower 50 millimeters of the sheet from the cut line to the wave crest is called the “bottom cut,” the size of which is the same for cut and stock sheets. The “top cut” from the crest of the wave to the edge at the top is 50 millimeters for standard metal tile sheets and up to 300 millimeters for special-order sheets.
To calculate the number of rows of sheets horizontally, you need to divide the maximum length of the slope along the ridge or cornice by the usable width of the sheet. Round the resulting number up. You can calculate the length of sheets in a stacked row by summing up several values.
The first of them is the length of the slope, measured from the eaves to the ridge, that is, from the bottom to the top point of the slope. The second is the length of the eaves overhang of 0.05 meters, which is calculated to prevent moisture from getting under the roofing sheets. The third is the length of the vertical overlap of the sheets of 0.15 meters. If there are two or more sheets in a row, then each subsequent sheet will overlap the bottom one, interlocking with each other at the “lock” and forming a strong, tight and even connection.
When choosing sheets of metal tiles, remember that it is not recommended to take sheets that are longer than 4-4.5 meters, because this is expensive and quite labor-intensive; inconveniences arise when loading, unloading and lifting the material onto the roof, because a long sheet can be scratched and bent and become deformed. When using very long sheets of metal tiles, it is better to cut them into pieces, which must be laid with an overlap of 150 millimeters.
Metal tiles, according to building codes, must be stored in an unheated room, where protection from weather factors - rain and direct sunlight - is maintained. Profiles that are factory-packed must be laid on a flat surface using beams 20 centimeters thick as a support, in increments of 50 centimeters. If you plan to store the material for longer than 1 month, unpack the metal tiles and stack them in stacks up to 70 centimeters high.
Construction of the rafter system
Calculation of the elements of the rafter system must be done at the roof design stage. The peculiarities of the roof shape, wind and snow loads for the region should be taken into account. If there are errors in the calculation of the pitch and cross-section of the rafters, the roof may sag over time, and cracks may also appear. The pitch of the rafters for metal tiles should be 600-900 millimeters. If this indicator is increased, it is recommended to use large cross-section boards (lathing). As a rule, it is customary to use rafters with a section of 100 or 150 by 50 millimeters.
If you plan to insulate the roof, it is advisable to install additional horizontal ventilation between the rafters. Namely, in the side of the rafters, drill holes near the top of the roof that have a diameter of 2-2.5 centimeters, in increments of 30 centimeters. After this, it is necessary to treat the wood materials with fire-fighting and antiseptic impregnations.
Before covering the roof with metal tiles with your own hands, it is recommended to check the diagonal length of all slopes, since the roof must have the correct rectangular shape. Then check the cornice, ridge, plane and slope fractures for horizontalness. If there are errors, the surface must be leveled.
When choosing metal tiles as a roofing covering, the minimum angle of inclination of the roof should reach 14 degrees, which ensures acceptable water flow, and the roof itself will not accumulate moisture and leak in the future. Be sure to install the cornice board into the grooves cut into the rafter legs to add more rigidity to the structure for installing hooks for gutters.
Many instructions for installing metal tile sheets recommend installing a fascia strip as well. The front board is attached to the end of the rafters for additional protection. The filing of eaves overhangs is carried out using corrugated sheets, siding or soffits, having previously made a special sheathing. If soffits without perforation are used as lining, it is necessary to leave ventilation gaps to ensure free flow of air into the space under the roof.
Hooks for gutters are installed immediately before fastening the metal tiles. It is best to use long hooks, which provide greater structural strength. Install the gutter holders on the cornice strip, cutting out grooves for the “leg” of the hook. Secure the hooks with self-tapping screws. The installation pitch of the gutter holders usually coincides with the pitch of the rafters. For installed metal roofing, it is customary to use short hooks.
Arrangement of waterproofing and ventilation
Moisture and its minimal penetration into the under-roof space are contraindicated for any roofing pie, as it leads to rotting and cracking of the rafter system and corrosion of metal tile sheets. You can avoid such negative factors if you choose insulation for the roof of sufficient thickness, protect it from condensation with a waterproofing film and from moisture with a vapor barrier, and also arrange natural ventilation of the space.
To organize proper ventilation of a metal tile roof, you need to calculate the area of ventilation gaps, according to the ratio of the total space of ventilation gaps to the total roof area of 1 to 100. Remember that ventilation gaps must be placed between the waterproofing and the roof, heat and waterproofing for through air flow, ridge and in the cornice lining for air flow.
For waterproofing metal roofing, it is customary to use waterproofing and anti-condensation films, as well as superdiffusion membranes. You should absolutely not install bitumen waterproofing under a metal tile roof! The waterproofing material is laid in such a way that air flows pass from the eaves without obstacles under the ridge of the roof and exit through the ventilation holes that are installed in the highest place.
Lay the waterproofing layer horizontally between the ridge and the eaves with an overlap of 15 centimeters, on top of the rafter system. You should start from the cornices. Lay the material with a slight sag between the rafter legs of 20-25 millimeters to avoid tearing the film in cold weather. Fastening of this material can be done using wooden slats installed along the trusses. Lay the vapor barrier film overlapping under the insulation, connecting its pieces with adhesive tape.
Construction of sheathing for metal tiles
Metal tiles require the creation of sheathing. For this, bars are used that have a cross-section of 5 by 5 centimeters, and boards measuring 3.2 by 10 centimeters. First of all, nail the falling bars from the ridge to the eaves to the rafters along the waterproofing film. Sheathing boards are attached to them horizontally. The first of them from the cornice should be 1-1.5 centimeters thicker than the others - 5 by 10 centimeters.
The boards must be fastened with the following distances: from the beginning of the first board to the middle of the next one there should be 28 centimeters, between the middles of the remaining boards - 35 centimeters. It is recommended to check the sheathing pitch every 5 rows from the first board. Laying metal tiles yourself is not an easy task. And if you make a mistake with the horizontality of the cornice board, you will have to re-cut the entire sheathing again.
Near the attic windows, chimney ducts and in the valleys, you need to make a continuous sheathing, nailing two additional abutment strips measuring 150 by 25 millimeters over a distance of 300 millimeters to the sides of the ridge strip. If the valley angle is almost flat, it is worth laying an additional layer of waterproofing material. The endow is attached using self-tapping screws to the sheathing in increments of 300 millimeters. The lower edge of the valley should be laid on top of the cornice strip. The overlap should be at least 100 millimeters at the horizontal junction of the valleys.
It is necessary to make a groove in the chimney pipe (it is strictly forbidden to cut into masonry seams) with a depth of at least 15 millimeters and waterproof the pipe by 50 millimeters, securing the cut with adhesive tape. The external junction strips will be placed on the pipe, with the upper part inserted into the groove. This area must be sealed with a high-quality heat-resistant sealant. Also at this stage it is necessary to provide places for the arrangement of passage elements of the roof - ventilation and antenna exits.
Fastening sheets of metal tiles
So we come to the main question of how to properly cover a roof with metal tiles. Regardless of the fact that metal tiles are a durable material, you should follow some rules when working with them. The process of laying metal tiles begins on the ground; you need to unpack and arrange the sheets in piles intended for each slope. Do not handle sheets with bare hands; wear protective gloves.
The technology for arranging a roof made of metal tiles allows for cutting sheets for complex areas on site. However, you cannot cut sheets with a grinder, as the protective polymer layer may be damaged. Use electric nibblers or tin snips for cutting. Before you start cutting, practice on a separate piece, since cutting metal tiles is more difficult than ordinary steel sheet.
When lifting metal tiles onto the roof, it is important not to scratch them. Take the sheet of material as you move it beyond the edge of the stamping line and lift it onto the roof using the guides from the boards. It is not recommended to lift long sheets by the edges, because the sheet may bend. Also, do not load multiple sheets at the same time. Remember that when moving through the sheets, you need to choose shoes with soft soles. Do not step on the crest of the wave, but only on your toes. Place your foot parallel to the slope.
The direction of laying sheets is not tied to anything, so it can be done from left to right or from right to left. When choosing to install metal tiles from left to right, you will have to lift the edge of the sheet, and place the edge of the next one under it. As a result, the outermost sheet will rest on the previous one, or rather, on its transverse wave, which prevents the sheets from sliding. On gable roofs, the installation of sheets begins from the end, and on hip roofs - they are laid from the hip. Align the sheets relative to the cornices. If you start laying the covering with long sheets, it will be much easier to level them.
When laying the material in one row, the first sheet is placed on the sheathing, temporarily attached with one self-tapping screw. Then lay the next sheet, aligned with the first, and fasten the sheets together. Make sure that all sheets fit together tightly and correctly from a geometric position. Install the metal tiles, moving from the eaves to the ridge. After this, attach all the sheets to the sheathing, and the last sheet in the row is attached to the sheathing only after leveling the next block.
When laying sheets of metal tiles from right to left in several rows, lay the first sheet, aligning it along the end and the cornice, then place a second sheet on top of the first, temporarily secure it with one screw in the center of the sheet at the ridge, align the sheets and fasten them together with screws. Then you need to lay the third sheet on the left side of the first, fasten the sheets together and lay the fourth sheet over the third. Align the entire block along the end and cornice, and then finally attach the metal tile sheets to the sheathing.
When laying material on a triangular slope, before starting installation, it is necessary to mark the center of the slope and draw an axis through this center. Then the same axis needs to be marked on the sheet and the features of the axes drawn on the sheet and the slope should be combined. Secure the sheet to the ridge with one self-tapping screw. On both sides of it, continue installation according to the principles that were described in the previous versions.
Sheets of metal tiles are attached to each other, to the eaves, to the ends and to the sheathing. First, three or four sheets are fastened together at the joints, then they are secured in place with one screw, aligned strictly along the eaves, and only then the sheets are finally attached to the sheathing. Sheets of roofing material are attached to the sheathing with two self-tapping screws - near the ridge and at the eaves. Continue installing the coating according to the same scheme. Brush away any drilling shavings with a soft brush after finishing installing the metal tiles and touch up the surface if necessary.
End and ridge strip
To protect the metal tile from the lifting force of the wind and the process of loosening its fastening, an end strip is required. It also acts as a protective element for the structure from moisture. The end strip is installed towards the ridge from the cornice, without cutting off the excess at the ridge. Attach this strip to the end board with self-tapping screws every 500-600 millimeters
Due to the difference in heights, the end strip is pressed tightly against the sheets of metal tiles, this eliminates rattling and noise during gusts of wind. The overlap of the end strips should be up to 100 millimeters. The waterproofing layer must be laid on top of the end strip, which will cover the edge of the waterproofing material. Also, such a strip should cover the upper crest of the wave to protect the metal tiles from water ingress.
To ensure proper ventilation of the space under the roof, air must freely pass to the ridge from the eaves and exit through the holes in the ridge seal to the outside. Lay waterproofing on the continuous sheathing so that it overlaps the bottom layer of waterproofing material along the edges by at least 150 millimeters.
The ridge is attached to the sheathing using ridge screws into the upper crest of the metal tile wave on both sides. The seal is attached to the ridge before the latter is installed on the roof, having first removed the protective film from it.
Upper valley and abutment strips
The upper valley strip is needed to remove moisture from the inner corner of the roof, located at the junction of two slopes. The valley is secured with self-tapping screws so that they do not go through and damage the waterproofing. Remember that a self-expanding sealant must be laid between the sheets of tiles and the upper valley.
It is also necessary to leave ventilation gaps of about 20 millimeters between the valley planks, and make an overlap of 200 millimeters at the joints when laying the planks. The corner sheet of the valley must overlap the roofing sheet by at least 250 millimeters.
Special strips must be installed on breaks in the roof and when the roofing is adjacent to the wall. Roof fractures can be reverse or straight. In areas of fractures, it is recommended to maintain continuous waterproofing. In case of a direct break in the slope, the sheathing boards should be as close to each other as possible. The sheet of metal tile covering the breaks in the slopes should protrude slightly above the break in the roof and thereby cover it.
In the case of a reverse fracture of the roof slope, you can use the junction with the wall as a mating element, placing it on the lower slope with the rolled side. The connection of the roof to the wall is arranged according to a similar principle as the procedure for connecting to a pipe. The waterproofing is removed and raised onto the wall, at least 50 millimeters before the groove. Depending on the connection - to the end or side of the wall, use a universal or profile seal.
Fastening gutters and snow guards
Long hooks are installed on the eaves board or rafters before covering the old roof with metal tiles. For better water drainage, the gutter angle should be at least 5 millimeters per linear meter. It is customary to install hooks with a vertical offset. To insert the gutter into the hook, you need to insert its spout into the gutter in such a way that the spout is inside the curl.
Then you should fix the other edge of the gutter using a snap-on plate clamp. The outer edge of the gutter should be 6 millimeters lower than the inner edge in order to prevent water from entering the façade during heavy rainfall. The continuation of the edge of the metal tile should hang 50 millimeters above the gutter. The gutter is connected to the corner of another gutter or to the next gutter end-to-end using a special connector.
The gutter connector is equipped with a special rubber gasket that ensures a tight connection between the two gutters and also compensates for thermal expansion. The drainpipe should be of such length that the drain elbow is located at a distance of about 200 millimeters from the ground or moisture-resistant base, since if the height is too high, water splashes. To organize the removal of water, it is necessary to equip a storm drain.
It is imperative to install snow holders on a metal tile roof, because thanks to these products the snow will not fall on your head and will not scratch the roofing material as it falls off. Snow holders are attached under the second transverse step of the metal tile parallel to the cornice. They are installed under the crest of the wave in bars that were previously attached. The lower edge of the snow guard is attached from above on every second wave. For long slopes, it is recommended to install snow guards in several rows.
Lightning rod and roof grounding
To install the lightning rod and weather vane, prepare a metal bracket, a compass, metal screws, and a wrench. Weather vanes can be mounted on a ridge, roof end or spire. For safety reasons, metal roofing must be grounded. This is done in order to protect the roofing material from damage when lightning strikes the roof and protect the residents of the house. Such a system consists of a down conductor, a grounding conductor and an lightning rod.
The lightning rod is installed at the highest point of the roof using wooden supports. The down conductor is attached to the lightning rod and lowered along the sheathing under the sheets of tiles. It is welded to the lightning rod, and where it comes into contact with the sheets of metal tiles, the protective coating or layer of varnish is removed. For greater contact between points, it is worth branching such a wire into several sheets so that lightning quickly finds the path of minimal resistance.
Then they run the down conductor along the wall of the residential building and connect it to the ground electrode. It is recommended to install the down conductor along the wall opposite the entrance. To equip the grounding of the roof, you need to dig a hole 1.5 meters deep, fill it with a 10-centimeter layer of sand, fill it with water, lower the ground electrode there, fill the hole with soil and water it.
Now you have learned how much it costs to cover a roof with metal tiles, and how to do it correctly. But that is not all! Additional elements are included with each ventilation or antenna output. First, you should place a template of a passage element or ventilation outlet on the metal roof and trace it along the contour. Then you need to cut a hole along the resulting line. Outlets and passage elements are fixed to the metal profile with special self-tapping screws.
Advantages of metal tiles
The widespread use of metal tiles is due to the combination of the following advantages in this type of roofing material:
- Economic expediency. Compared to most other roofing coverings, metal tiles have a relatively low cost. What makes purchasing such a roof even more profitable is the ability to avoid hiring builders to install it, as well as its long service life.
- Light weight. With an average weight of 1 sq. m of material is about 6 kg, the total mass of the roof is relatively small. This allows you to do without the use of a powerful and expensive rafter system. In addition, a lightweight roof does not require the installation of continuous sheathing, which simplifies the calculation of the roof and reduces the cost of work.
- Resistance against external factors. Protection is provided by the use of several security words in the design of the roofing sheet. Therefore, the metal base of the canvas is not afraid of prolonged exposure to moisture, direct sunlight, or damage during installation or hail.
- Aesthetics. The production technology of metal tiles allows you to create absolutely any texture. Accordingly, on the market you can easily choose an option suitable for the overall exterior of the building. The range is further expanded by the possibility of painting sheets in all shades of the palette.
- Fire safety. The basis of the metal tile is a sheet of galvanized steel. This material is completely non-flammable, making it absolutely fireproof.
The indicated advantages of metal roofing make it the most practical, affordable and attractive roofing option.
Attention! Metal tiles are recommended for use on roofs that have a slope angle of at least 14 degrees.