Types of self-leveling floors
Self-leveling floors are classified according to the materials on which they are made, according to their tasks and according to their ability to independently accept the horizon.
According to the type of binder, self-leveling floors are:
- Plaster
- Cement
- Epoxy
- Polyurethane
When doing DIY repairs, the first two types are usually used; To work with the rest you need a professional.
Based on their intended purpose, self-leveling floors are divided into mixtures for basic and final leveling.
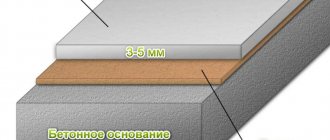
Basic floors are used to smooth out large differences and are applied in a layer of up to 10 cm. Finish self-leveling floors are used for thin-layer application under decorative coatings. Their feature is fine grinding, which makes the finished surface even, dense and smooth.
A major achievement in the production of dry building mixtures was the emergence of self-leveling self-leveling floors. If the cement-sand mixture had to be compacted (and this is labor-intensive), then many modern compositions have increased fluidity, compact under their own weight and independently accept the horizon.
High-strength floors
To create a smooth surface with a strength of at least 25 MPa, a combination of cement, fractional additives and polymer fillers is used. The mixture is poured with water, mixed and applied to the prepared base within 40 minutes in a layer of 40 to 100 mm. The solution takes a long time to dry, so you can walk on it only 24 hours after pouring.
The composition is intended for basic and final leveling of concrete surfaces, mainly for further laying of finishing coatings. Used in rooms with intensive operating loads - warehouses, basements, garages. Also suitable for underfloor heating systems and the formation of screeds on the separating layer.
Selecting self-leveling floors for the task
The first question to answer is “cement or plaster”?
What are the benefits of cement-based self-leveling floors?
- 100% waterproof , meaning they can be used in areas with high humidity, including bathrooms, areas near swimming pools, canteens, workshops and industrial premises.
- Economical price
- Due to the plasticizers in the composition, the solution is more mobile and plastic than a conventional cement-sand mixture , so it is easier to work with.
But there are also a lot of disadvantages: when drying, the cement floor shrinks, strength gains take up to 28 days, the finished surface turns out to be porous and dusty. Porosity leads to increased consumption of primer materials for subsequent gluing of coatings.
In some European countries, including Germany, in the last decade there has been a complete abandonment of cement-based self-leveling floors - today they use only gypsum-based compositions of various grades of strength. Why?
The main advantage of floors with gypsum binder:
- Non-shrinkage, and therefore crack resistance.
- They have high adhesion to the base and form a uniform, durable layer.
- The solution is fluid, mobile, comfortable to work with and does not require the installation of beacons, and the strength gain is several times shorter than that of cement.
Thus, for self-leveling self-leveling floors of the FORMAN brand, the technological passage time is 4 hours; a day after pouring, you can move weights on the surface and place scaffolding, and the development of brand strength is only 7 days.
Many people are concerned about the water resistance of gypsum . Technologies have long solved this problem. Today, gypsum self-leveling floors that can withstand short-term exposure to water are widely used.
For example, FORMAN 33 can be in contact with water for up to several days : it does not lose strength, and after the moisture dries, the surface properties are completely restored. In addition, due to its very smooth and dense texture, the surface allows water to pass through much more slowly than a loose and porous floor made from a cement-sand mixture. That is, if a pipe breaks through a layer of FORMAN 33, water will leak to the neighbors in a much smaller volume than through a cement screed, and not over the entire surface of the floor, but mainly at the joints with the walls. This will give you time to collect the water and result in less damage.
There are two types of gypsum self-leveling floors - based on building gypsum (G-5) and based on high-strength gypsum (GVVS). How are they different, what are the benefits and what are the advantages of each?
1. RELIABILITY
The compressive strength of floors on building gypsum is on average about 10-15 MPa , this is enough for an apartment under lining. But homogeneous coatings require solid foundations, otherwise there is a high probability that defects will occur; so in such cases it is more reasonable to use floors made of high-strength gypsum, their compressive strength is more than 20 MPa.
2. TIME SAVING
The water requirement of building gypsum is 1.5 times higher than that of high-strength gypsum. The more water in the composition, the longer it takes for it to evaporate. That is, the creation of self-leveling floors based on building gypsum will take longer than when using floors that contain hot water.
3. RELATED SAVINGS
When using thick-layer types of self-leveling floors based on high-strength gypsum, there is no need to make expansion joints and apply a finishing layer of self-leveling floor , which, accordingly, leads to savings in both finances (on average 5-7% per 1 sq. m.) and time ( on average by 20% per 1 sq. m).
Components for manufacturing. Making the right choice
It is not difficult to find mixtures for creating self-leveling floors on the building materials market. Demand creates supply and now there are many different variations of such compositions. Let's get acquainted with the most popular brands and manufacturers.
Table. Brands of mixtures for creating self-leveling floors.
| Brand/Name | Characteristic | Consumption |
| Knauf | These are the most commonly purchased mixtures for arranging self-leveling floors. The company has gained particular popularity due to the quality of the materials produced. Mixtures are often used to create a finishing layer, as they have good spreadability. They set quite quickly. | Consumption depends on the type of mixture and layer thickness, but in general it is about 1.6 kg/m2. when laying a floor with a thickness of 1 mm. |
| Ivsil | The company offers a large selection of different mixtures for creating floors. Ivsil Express and the Thermolight line are especially popular. | The thickness of the floor layer can be no more than 10 mm. With a layer thickness of 1 mm, the consumption will be 1.4-1.8 kg/m2. |
| Bergauf | The company also produces fairly high-quality mixtures for creating foundations. The compositions are convenient for use by beginners, as they are easy to work with. Allows you to level strong differences in bases (up to 10 cm). | Typically, floors are installed with a thickness of up to 7 mm. Consumption is 1.6-1.8 kg/sq.m. to a thickness of 1 mm. |
| Hercules | The mixtures of this company belong to the category of inexpensive, but high-quality, although not standard. Typically used to reduce the consumption of more expensive compounds. | The thickness of the floor created from this mixture can be 20-100 mm. Consumption – 1.5 kg/sq.m. with a layer thickness of 1 mm. |
| Vetonit | Mixtures suitable for repairs and for creating self-leveling floors. Not suitable for creating thin layers (less than 2 mm). The composition contains various components that allow you to achieve a high rate of hardening of the mixture. They are not used as a finishing layer; they usually replace screeds. | Consumption is about 5 kg/sq.m. with a floor thickness of 1 mm. |
| Bolars | The mixture is produced in Russia, therefore it has a reasonable price, which is why it is in high demand. It hardens quickly and can be used at different stages of pouring the floor. | The mixture consumption is 1.6 kg/sq.m. with a layer thickness of 1 mm. |
| Horizon | Mixture option for the finishing layer. Also suitable for creating a screed before laying laminate flooring. The layer thickness can reach 1 cm. The mixture is compatible with various types of rough substrates. | The mixture consumption is 1.5 kg/sq.m. when laying a layer of 1 mm. |
| Ceresit | Such mixtures are used to level bases. Often used to decorate concrete and cement floors. The thickness of the floor can vary from 3 mm to 8 cm. Not used for arranging the finishing layer. | The mixture consumption is 1.6 kg/sq.m. with a layer thickness of 1 mm. |
CERESIT CN 68. Self-leveling mixture
Calculator for calculating dry mortar for self-leveling floors
Go to calculations
Tools and accessories
Here is a list of tools you need to fill your floor yourself.
- A container for a solution with a volume of at least 20 liters , metal or plastic.
- Needle roller . To make the floor uniform, follow the rule: the thicker the layer, the larger the diameter of the needle roller should be! If the layer thickness is 3-4 cm, use a roller with a diameter of about 10 cm.
- Raklya
- Paintshoes
- , a drill with an attachment is suitable for renovations in an apartment .
- Laser or bubble level.
- Lighthouses . They are needed if the floor has large differences. There are different types of beacons (even made from screws), but craftsmen consider reference ones to be the most accurate and convenient .
What is 3D flooring?
3D floors deserve special attention. This is also one of the types of self-leveling floor, but in this case a three-dimensional pattern is created on the surface, which can turn the base into a real picture. Such floors look great in apartments, offices, and even in a retail space. The design can be absolutely anything; sometimes lovers of unusual apartment design even choose images that may shock at first glance.
Self-leveling 3D floor
The technology for arranging such a layer is based on creating the effect of a three-dimensional three-dimensional image of varying depths. Drawings printed on special paper or other decorative elements created by the artist (shells, coins, stones, etc.) can be used.
Floor decorated with multi-colored flocks and glitters
On a note! The depth of the pattern directly depends on how thick the finishing layer will be made.
Original 3D floor
Self-leveling floor 3D
To achieve such a floor, it is important to properly prepare the base and not violate the manufacturing technology. If something goes wrong, the expected effect will not be achieved.
Preparing the base
To prevent peeling and cracking of the screed, the base must be carefully prepared.
Concrete base
The best option is to pour the self-leveling floor onto concrete or a reinforced concrete slab, this will ensure strong adhesion . In this case, the concrete must be matured, that is, maintained to 100% strength gain, according to SNiPs - from 3 months or more. The concrete base in old houses must be dusted and degreased, and old coatings must be removed. If oil or bitumen stains are found (which is rare in apartments), builders advise making a separating layer from rolled waterproofing materials or polyethylene film with a thickness of 100 microns. Small sinks on the surface are sealed with moisture-resistant putty, larger holes and cracks - with the same putty, but with a sickle mesh. The joints between the floor and the wall are also Shrinkage joints are cleaned, a concrete primer is applied, then filled with foam, putty or sealant. It is recommended to grind monolithic concrete to a rough finish. But since this is dusty and stressful work, it can be replaced with Betonkontakt priming.
Cement-sand screed
There is a rule: each subsequent layer of self-leveling floors should be less durable than the base. That is, a floor with a strength of 200 cannot be poured onto a grade 150 screed, otherwise over time the layer may come off, “swelling” will begin, and cracks will creep. So if there is a rough screed, but you don’t know the brand of mortar, before pouring the floor, you need to either determine the strength or remove the screed.
Otherwise, preparation, as with concrete, comes down to cleaning, drying and priming the surface.
Ceramic floor tiles
Tile is a suitable base for a self-leveling floor. But before starting work, all loose tiles must be dismantled. There is no need to re-glue them, just clear the nest and remove the old cement. The solution will fill the voids without damaging the new layer. Treat wide joints between tiles with a strengthening primer. When it dries, wash the ceramic surface from dirt and grease and cover the entire floor with a “Betonkontakt” type primer.
Wooden floor
The first thing to do is to strengthen each floorboard, eliminate all vibrations of the boards and creaks . After this, the old paint is removed and the nails are “sunk” into the floor. The floorboards are treated with a sander or sandpaper with coarse and then fine grain to improve adhesion. Cracks and gaps between the boards are filled with acrylic sealant so that the solution does not “run away” to the neighbors. Potholes and chips are repaired with elastic wood sealant, putty or sawdust mixed with PVA, otherwise the needle roller may “grab” the solution from the recesses, and the surface will turn out uneven.
Wood does not like excess moisture, and it is recommended to treat the boards with a waterproofing compound
Some craftsmen believe that pouring the solution directly onto the wood is not the best option.
Firstly, because wood does not like moisture, and there is water in the solution, and there is a risk that rotten areas will form under the finished self-leveling floor.
Secondly, the wooden floor “walks” due to the seasonality expressed in our climate, and this threatens peeling and cracking of the layer. To avoid this, they make “floating floors” from polyethylene, and on top of it - a semi-dry screed with fiber reinforcement. With this method, the film is laid over the entire surface of the floor, overlapping the walls, and if the film is not solid, the strips are laid overlapping, overlapping each other by 8-10 cm.
If you nevertheless decide to pour the floor on bare boards, they need to be treated with a waterproofing compound. This is especially true for fresh wood, since it is not only susceptible to rotting, but also draws water out of the solution.
Before pouring the first layer of flooring, be sure to treat any base with a primer, otherwise moisture will quickly leave the mixture, and as a result, the solution simply will not have time to spread properly. Make sure the primer is dry before pouring.
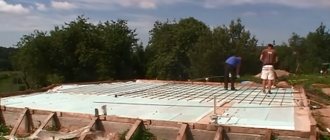
Technology and instructions for pouring
When installing a self-leveling floor, it is necessary to take care of an additional thermal insulation layer, which is laid on the concrete slab. The thermal insulation layer can be made of expanded clay granules. In this case, the material is covered with a cement-sand screed, which additionally levels the base.
Interesting article on the topic: Characteristics of polymer self-leveling floor
Self-leveling mixtures can be poured yourself without the help of an experienced builder. Remember that the working solution must have a uniform consistency. The mixture contains polymer additives such as epoxy resin and fillers. The quality of the coating will depend on the correct preparation of the base and compliance with installation technology. Many users do not know the difference between self-leveling floors and screeds. The first mixture is poured onto a previously prepared base and spreads independently over the surface. The composition can be adjusted using a squeegee and a needle roller. At the same time, the standard cement-sand mortar is leveled along pre-fixed guides, beacons.
An important stage of preparatory work is cleaning the base from dirt and construction debris. After cleaning, a deep penetration primer is applied to the surface in several layers. This composition fills small cracks and improves the adhesion of the base. For concrete floors, it is recommended to use a special solution “Betonokontakt”. To apply the primer, use a wide paint brush or roller with medium bristles. In addition to a concrete base, self-leveling mixtures can also be laid on a wooden floor without a screed (rough screed), but such surfaces must be additionally treated with an antiseptic.
To reduce the consumption of an expensive finishing compound, it is recommended to pour a rough rough floor. This layer is applied 12 hours after coating the surface with primer. The thickness of the screed is within 3 millimeters for polyurethane mixtures. The epoxy self-leveling floor is poured 17 hours after the preparatory operations. During such work, the composition is evenly distributed over the base. If there is a room with a large area, the mixtures are laid in strips, then the sections are connected. To adjust the thickness of the screed, a squeegee with gaps of the required height is used.
When arranging the base layer, it is necessary to first compact the mixture so that there are no air bubbles in its composition. For this, a needle roller with long spikes is used. The tool must be moved in two mutually perpendicular directions. The roller is not pulled out from the screed if the processing direction is the same.
Important! The process of removing air bubbles must be completed 10 minutes after pouring the solution. After the specified period of time it will begin to harden. The work must be carried out in paint shoes, which will prevent the mixture from sticking to the shoes.
At the final stage, a decorative coating is applied, but the interval between the application of the rough and final coating should not exceed two days. The thickness of this screed should be within 2-3 millimeters. To improve the technical characteristics of the coating and give it shine, a thin layer of polyurethane varnish is applied to the surface. Thus, a seamless monolithic self-leveling floor is obtained that will not shrink under the influence of temperatures. The space around the perimeter of the walls and near the doors is filled with sealant.
Preparation of the solution
There are several rules, the observance of which will protect you from mistakes and hassle with alterations.
- For mixing, use clean tools and clean running water.
- The water should be warm, within +20C. Hot water speeds up the setting of the solution.
- Manufacturers indicate the proportions of the mixture and water for mixing the solution on the packaging. Observe them strictly! Excess water will lead to stratification of the mixture, slow drying and loss of strength of the floor; too little will lead to poor fluidity of the solution.
- When mixing, pour water into the container, and then pour the mixture into it, stirring constantly, but not vice versa!
- You need to stir the solution for about 5 minutes using a mixer or drill with an attachment. Then it is advised to leave the mixture for a few minutes, and then stir for another 2-3 minutes.
- Sometimes manufacturers indicate the amount of liquid needed for a certain amount of mixture, ranging up to a liter. How to be in this case? Experiment. To begin with, you can use the average. If you have doubts about the resulting consistency, do a test: cut a 5-liter bottle into a ring, place it on glass or tile, pour the solution over the top and put it away. If the mixture, spreading, covers an area three times the diameter of the ring, the consistency is considered good.
- Never add water to a hardening solution! You cannot mix the solution “for future use”; a portion is made for one pour.
Requirements for work
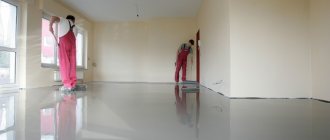
Making beautiful and neat self-leveling floors with your own hands is not a difficult task, but it requires a careful approach. Haste is needed here, but only in moderation, and it is only due to the fact that the mixture polymerizes quite quickly. But as for preparation, there is no need to rush here.
The process of pouring self-leveling floor
Preparatory work consists of thoroughly cleaning and leveling the base on which such a floor will be poured. The best option is a concrete screed. Such foundations cannot be installed on floors. There should be no stains of paint or grease, sand, or debris on the screed itself. In this case, the base should not be wet - the permissible level is only 4%. If the humidity is higher, the subfloor must be thoroughly dried before starting work. Otherwise, all your efforts will go down the drain.
Attention! It is better to pour self-leveling floors at an air temperature of at least +10 degrees.
Preparing the screed for installing a self-leveling floor
All cracks in the foundation must be sealed with sealant or mortar. Only in this case will it be possible to minimize the consumption of the bulk mixture. It is also recommended to sand the surface well and coat it with a primer designed for the use of mixtures to create self-leveling floors. The main thing is to pre-dust the base.
Repairing cracks in concrete floors
On a note! The self-leveling floor goes well with a heated floor system. Therefore, it is worth thinking in advance about whether it is needed in the house. And if necessary, then make it inside the screed.
Warm floor under self-leveling coating
Also, before starting work, you need to take care of acquiring all the necessary tools. These are a squeegee, containers for mixing mixtures, paint shoes, a needle roller, and a construction mixer. If 3D self-leveling floors are created, the desired design is selected in advance and printed.
Tools for self-leveling floors
Types of squeegee blade sizes
Paintshoes
DIY floor filling technology
Craftsmen advise pouring the floor at temperatures from +5 to +30C.
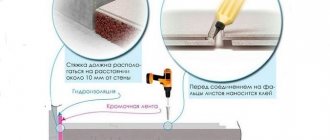
Lay a damper (edge, edge) tape around the perimeter of the room; it will protect the floor from cracking. Use it to surround the risers passing through the ceilings.
It’s better to pour a layer at once! The shorter the interval between pours, the stronger the finished floor will be: with long pauses, the fresh solution mixes with already dried areas, the layer turns out to be heterogeneous, and unevenness occurs. This rule is especially important when working with self-leveling floors - here pouring with a minimum time gap is a necessary condition, otherwise the floor loses its ability to independently accept the horizon. Therefore, to save time, everything necessary for the work must be prepared in advance, and it is advisable to carry out the pouring with a team of 3-4 people: someone mixes the solution, someone pours it, someone is on hand.
If the room is large , you should divide it into sections, rather than trying to fill the entire area with several thin layers . Place dividing bars in the room, fill a separate area with a layer of the required thickness, and after it has dried, remove the block, lay a damper tape along the edge of the new floor and fill the adjacent area. You can start pouring a new area no earlier than 4 hours after the previous one was filled.
At the pouring stage, the beauty of a self-leveling floor becomes obvious: it allows you to skip an entire stage of work, since it does not require the installation of beacons . In other cases, if the layer thickness is more than 1-2 cm, beacons are necessary . To determine the difference, using a bubble or laser level on the bottom of the walls along the perimeter of the room, you need to draw a vertical line and measure the distance from it to the floor. Where this distance is minimal will be the highest point of filling. If the floors are poured not in one room, but in the entire apartment, the highest point is not marked in each room separately, but starts from the highest point in the apartment, otherwise there is a risk that a height difference will form at the joints. Beacons are installed evenly over the area of the room.
Pouring the floor begins from the farthest corner from the entrance to the room, with a small distance from the walls (about 30 cm), taking into account the spreadability of the solution . If necessary, the layer is leveled along the beacons using a squeegee or rule, and then passed with a needle roller, expelling bubbles and voids.
Until the floor gains its initial strength, protect the surface from drafts and direct sunlight ; It is unacceptable additional heating devices (heat guns, heaters, braziers) in the room at this time To protect the layer from drying out, some craftsmen cover it with plastic film, others simply moisten the surface with water. The time frame for reaching full strength is indicated in the manufacturer's instructions.
If you plan to lay tiles on top of a self-leveling floor, it is not necessary to “bring” the surface to absolute smoothness with a finishing layer, since small local irregularities can be eliminated with glue. Under homogeneous coatings, parquet, carpet, a layer of finishing self-leveling flooring is needed. Each new layer of flooring is poured after the previous one has dried!
Pouring self-leveling mixture
Most compounds completely lose their elasticity after 40 minutes, so pouring is best done with a partner. While one person pours and rolls the mixture with a needle roller, a partner mixes the next batch of solution.
For filling we use at least two construction containers. A bag of dry mixture weighing 20 kg can be mixed in a 20 liter construction bucket.
You can use containers that allow you to knead two or three bags at the same time. In this case, due to the reduction in the number of batches, the likelihood of sagging on the floor between individual batches is reduced, but moving such containers is very difficult.
If possible, you should make a supply of water before filling, for example, put it in a bathtub. This will allow you to continue filling even if the water supply is turned off.
We start pouring the floor from the highest area. This way the mixture flows better.
Pour the solution onto the floor so that it flows slightly onto the solution from the previous batch. Afterwards, we roll the junction of two different batches well with a needle roller. This will allow you to avoid dips and sags at the junction of two different batches.
The roller, piercing the surface with numerous needles, helps the liquid to spread more strongly. If the layer thickness is sufficient (from 5 mm), a needle roller allows you to roll out the solution; for thinner ones, you will need a spatula or rule.
There is a small nuance on the roller. The length of the roller needles should be twice the thickness of the layer being poured, otherwise the roller will not roll out the solution, but will drive a wave, which can ultimately lead to unevenness on the finished floor.
Needle roller.
You should not dump the prepared solution in one place and hope that it will spill on its own. This won't happen. Although the mixture is self-leveling, it is within limited limits. Therefore, the solution should be poured onto the floor like a snake and helped to level it with a needle roller, spatula or rule.
If the thickness of the filling layer and the floor area are small, then pouring can be done without beacons. But then you need to fill the entire base with the solution and then roll it with a needle roller until the entire solution is moving. It is important that the first batch has not yet thickened. This will ensure a perfect plane on the entire floor. In this case, special wet shoes will be needed to walk on the poured solution. They allow you to walk on the solution without crushing it.
Wet feet.
Wet mortars can be purchased at a hardware store. Lawn aeration shoes, which can be purchased at a garden store, can be used as wet shoes. The most budget option is to make them yourself from a piece of plywood and several long bolts or screws. When purchasing or making wet shoes, do not forget that the length of the needles on them should be greater than the thickness of the layer being poured.
Homemade wet shoes.
If it is not possible to quickly fill the entire floor so that the first batch has not yet thickened, then you will have to pour it in strips sequentially. In this case, only the last two or three strips of the solution are rolled with a needle roller, and the earlier ones are already beginning to harden.
When pouring the floor in successive strips, you can do without wet shoes, since there is no need to walk on the wet floor.
For high-quality sequential filling, you cannot do without beacons. There are several types of beacons for self-leveling floors. You can buy reference beacons at a hardware store. Such beacons are placed on the floor in increments of 50-80 cm. You can also make beacons yourself. The simplest beacons are the heads of self-tapping screws screwed into the floor at a certain distance or a stretched line along the level.
Reference beacon.
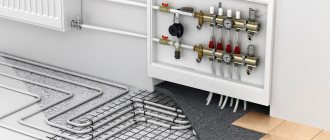
Self-leveling floors with “warm floor” system
There are three types of “warm floors” - infrared (film), water and electric. All of them are compatible with self-leveling floors. When choosing a mixture, look at the packaging to see if it is recommended to use it with a “warm floor” system (and which one) and what the temperature of the coating will be. There are rules when pouring a heated floor yourself and installing a heating system yourself.
- For installation you will need different amounts of solution. The minimum amount of mixture will go to the infrared floor, in second place is the electrical system, and the leader in mixture consumption is the classic water floor: due to the diameter of the pipes, the solution is needed many times more than in the first two cases, and the filling will have to be done in several stages.
- The pouring technology with the “warm floor” system has a different sequence. First, a layer of thermal insulation is laid on the prepared base, then pipes, or cables, or film are installed and secured, on top of which a layer of base self-leveling floor is poured, so that the screed is flush with the heating elements. Do not fill the temperature sensor with solution! Further actions depend on the final coverage. If necessary, the dried screed is primed and a layer of the finishing floor is poured.
- Before starting to pour the screed, craftsmen advise making a drawing of the location of the electrode pipes. It is needed in case of laying any other communications.
- Sometimes beginners think that turning on the heated floor will help dry the surface faster, speeding up the repair. The catch is that drying and hardening are not the same thing. During forced drying, moisture evaporates from the solution, which is needed for normal strength gain, and the finished layer may crack. In addition, the pipes of water heated floors expand when heated, and when the system is turned off, they narrow. And if you turn on the system while the screed is wet, voids will form around the pipes, which will worsen heat transfer. Therefore, the heated floor can be turned on only after the layer has completely dried.
Decorative design
To decorate the floor, chips, flocks and sparkles are used, which are simply applied over a layer of liquid flooring. Rolling a surface with flocks or glitter with a needle roller creates a textured pattern over the entire thickness of the coating. When the polymerization of the floor is completely completed, it is varnished with wear-resistant polyurethane varnish in two or three layers. Applying varnish to the prepared floor is carried out with any convenient or available tool (brush, roller, spray).
The floor acquires an individual, unique look thanks to the application of various patterns and images on it. For this, acrylic or polymer paints are used. You can simply stick a pattern printed on a thick material onto the floor, which is then varnished. This technology is suitable for any type of floor.
Please note that after applying the self-leveling floor, for 2 days you need to create conditions of a certain constancy of temperature and humidity (close windows and doors, eliminate drafts) until the coating completely hardens.
The video shows how to pour self-leveling floors
Conclusion
Compliance with the sequence of all surface preparation operations, strict adherence to recommendations for preparing the mixture and pouring the floor is a guarantee that the resulting result will be pleasing to the eye and will last for many years.
Subfloor primer
Having completed the preparatory work and marking, they begin to apply primer to the base. A primer such as Ceresit CT17 or any similar one is suitable for this purpose. The primer promotes better adhesion of the self-leveling floor mixture to the concrete base. It prevents the absorption of water from the self-leveling floor mixture into the base and, thereby, promotes uniform hardening of the entire layer of self-leveling floor, without losing its strength. The primer must be applied twice, the second time after the first layer has completely dried.
Advice! It is better to use a primer from well-known companies so as not to spoil further work.
Lighthouses from solution
Lighthouses can also be made from mortar - mortar marks. The advantage of this method over using the same screws is its simplicity and the absence of a negative impact on the base in the form of drilling holes. This is probably why this variation of beacons is used quite often by beginners, despite the fact that it is a point variation.
Photos of installed beacons
The main disadvantage of this method is fragility. Such beacons can easily break/fall off, and this does not require much effort . Moreover, correcting such flaws during the work process is quite difficult.
The essence of the method is simple - piles of mortar are distributed over the floor surface in such a way as to create rows of a certain level of beacons. It is important to understand that the mixture for creating such supports must be identical or similar to that used for pouring the floor.
We install beacons on the solution
Types of lighthouses
Beacons for self-leveling floors, as well as for screeds, can be made from a variety of materials, and can also be divided into professional and non-professional, point and linear (rack). Usually you have to choose based on the physical properties of the mixture used and the conditions under which you will work. It is also important to remember the skills of the person who will install the floors.
Self-leveling floor, installation of beacons
On a note! It will be easier for a beginner to work with linear type beacons than with point devices.
Table. Professional and non-professional beacons.
| Type | Explanation |
| Professional | Such beacons are sold in stores and are initially designed for arranging a self-leveling floor - there is no need to invent anything here. All you need to do is place them correctly and that’s it – you can start working. These include the so-called rappers. |
| Unprofessional | As you might guess, this type of product includes all those beacons that are made from improvised means or even from cement mortar. This group includes beacons made of slats, cement mortar, screws, etc. |
Also in the category of rack beacons, several types can be distinguished separately.
- Metal. Lighthouses are made of metal profiles, usually aluminum. You can buy them in the store. Ideal option for small spaces. Their height can be fixed and adjusted using self-tapping screws. Suitable for screeds with a thickness of about 30 mm.
Beacons made of metal profiles
- Wooden. This is the oldest and most familiar type of lighthouse. They are made from simple wooden blocks of small cross-section (about 25 mm, but the size may vary depending on how high the base will be poured). The main disadvantage of wooden blocks as lighthouses is their tendency to deform under the influence of moisture.
Types of materials for beacons
Separately, we can say about point beacons made from solutions. It is enough to mount small supports of the required height on the rough base from a mortar like cement and lay a guide on them.
On a note! Sometimes beacons are made from steel pipes, but, as a rule, this option is applicable for large areas and heavy, thick ties.
Lighthouses made of square pipes
Preparing the base
Before making self-leveling floors, it is necessary to prepare the surface step by step. Anyone who is still unfamiliar with pouring self-leveling floors can watch video tutorials. The general rules are the same everywhere.
- Preparing the floor begins with removing everything unnecessary from it, including baseboards.
- The surface is thoroughly cleaned from any dirt, dust, or oil stains.
- The old peeling coating is removed.
- Before the floor is poured with mortar, potholes and cracks are sealed. This must be done in advance, no later than 24 hours before the start of work.
You can fill the self-leveling floor in an apartment at temperatures from +5 to + 30 C°.
[smartcontrol_youtube_shortcode key=”preparing the floor for self-leveling flooring” cnt=”2" col=”2" shls=”true”]
- The base must be treated with a deep penetration primer. Porous materials are processed several times. Large pores are closed with a high-viscosity primer. Dust should not be deposited on a freshly treated surface. Filling begins no later than 24 hours later.
- A special damping tape for poured floors must be laid along the perimeter of the walls on all sides, otherwise the layer will crack due to temperature deformations. Polystyrene strips up to 10 mm thick can be used. The width of such a strip or tape should correspond to the thickness of the poured layer.
- When leveling the surface, it is checked using a level and a rule. The highest point and the lowest are found, after which the beacons are set.
The beacon for the self-leveling floor is a dowel screwed into the base, which is then easily removed. Setting the beacons in height allows you to correctly determine the thickness of the fill.
Before you make a self-leveling floor with your own hands, you need to select the necessary equipment, and then calculate the consumption of the dry mixture. To properly level the base under a laminate or tile using a self-leveling floor, you must follow the step-by-step instructions. This will help you not miss anything.
USEFUL INFORMATION: How to make a floor screed on a balcony with your own hands