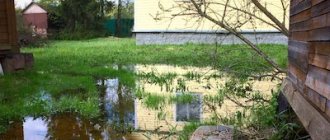
Home drainage is a system whose function is is to abduct atmospheric and underground moisture from the foundation. You can very rarely do without it in areas with well-permeable soil, no flooding and low year-round groundwater levels.
In other cases, this system is necessary, as it protects the foundation and ground floor from rain, melt water and the rise of the primer, as well as from the destructive effect of soils prone to swelling when moistened and frozen. Thus, drainage will extend the life of the building and prevent the development of mold in the basement.
Types of drainage systems according to construction method
To create a system for removing excess moisture, you can use the services of specialists, or do all the work yourself. You just need to choose the right drainage, and there are several types. They differ in the complexity of arrangement, appearance and other parameters.
One of the most common classifications of drainage is based on how complex it is. In accordance with this parameter, there are 3 types of drainage systems .
- Open or surface drainage consists of one or more ravines. The depth of each is about 0.7 m and the width is 0.5 m. This option is the easiest to arrange, but externally it is unattractive.
- The backfill or deep view looks much better. For this species, a trench is also first dug. Geotextile is laid in it, and then a drainage backfill is poured in, which will accumulate and remove excess moisture. For these purposes , broken brick, crushed stone, expanded clay , etc. The drainage layer is wrapped in geotextile and covered with soil. But such a system has one significant drawback: it can only be cleaned after opening.
- The most complex, but at the same time the most advanced system for draining water from a site is closed drainage. In the center of the backfill there is a drain, which is a perforated pipe. Water is collected in the pipeline and discharged by gravity into the drainage well.
It is the third method that has become traditional in recent years when creating a drainage system.
Surface water drainage
The surface water drainage system or surface drainage consists of point drainage systems and linear channels.
Installation of surface drainage systems.
On a note! The system for draining water from the site using open drainage often freezes in winter. So that the storm drain can do its job without delay in the spring, the pipe must be attached to a sand catcher. Thanks to this, the system will not freeze too much.
Point drainage systems are small wells locally connected to roof drainage. The trays are laid below the freezing level of the pipes. The installation of such drainage is similar to the installation of a roof drain. A trench is being prepared (lower than the freezing depth of the pipes, you can find out everything in the same SNiP) at a slope towards the collector. Sand is poured in a layer of 20 cm. Pipes are laid using fittings. If the sealing is maintained, the pipes are backfilled.
Point drainage device.
Point drainage.
Linear channels come in two types - open or closed, equipped with grates or meshes to retain large debris. The gratings should be predominantly made of metal, because... withstand heavy loads (especially in places at the entrance to the garage).
Linear drainage system covered with a grid.
Linear drainage device.
On a note! To effectively collect surface water, a comprehensive arrangement of storm and point drainage is necessary. In case of heavy precipitation, the bulk of the water will be drained by surface drainage
You can see what the process of installing a surface water drainage system looks like in the video:
A deep drainage system is provided if the area where the site is located is prone to prolonged rains. Such a system will protect the site from erosion, protect trees from premature death (due to rotting roots), and protect the foundation from the destructive effects of water.
Classic drainage scheme around the house
Most often, water drainage from the foundation is a system of drains surrounding the house, as well as inspection and drainage wells. Such drainage is arranged as follows:
- trenches are dug around the house the bottom of which has a slope of 5-10 mm per meter towards the lowest point of the site where the drainage basin will be installed;
- crushed stone or other drainage material onto the compacted bottom
- a drainage pipe is laid on top at a slope ;
- in places where drains form a right angle or several pipes intersect, inspection wells are installed ;
- the drains are covered with the same drainage material on top
- at the lowest point of the site , which is necessary for collecting water;
- All wells are backfilled.
It is recommended to insert pipes into the drainage well at a height of 0.15-0.20 m from the bottom, which will protect the check valve and the drainage pump, if installed, from silting.
This is a simplified description of the design of a peri-house drainage system. In reality, drainage can be wall or ring, it all depends on the characteristics of the soil and the private house itself.
Backfill drainage technology
As mentioned earlier, to construct a backfill drainage system we will need the following materials:
- Large crushed stone;
- Gravel;
- Broken brick (instead of gravel or in combination with it).
In general, the technology of the backfill system is in many ways similar to a closed one, only pipes are not used here - instead, the ditch is half filled with crushed stone of large fractions or broken bricks. Next, gravel is poured, the finishing layer is soil with turf.
But this type of drainage gets clogged quite quickly, and it is generally very difficult to clean it. That is why backfill drainage is considered the least effective and durable. In order to at least partially correct this, it is recommended to place geotextiles between the gravel layer and the soil, or even better tecton - the walls and bottom of the ditch are covered with the material. After this, water will not be absorbed into the ground. Such waterproofing should not only completely cover the ditch, but also extend beyond it by about 0.3 meters on each side. Then broken brick or crushed stone is poured in, which is covered on top with the remaining edges of the material. After this, the finishing layer is laid.
Use of tecton
In the manufacture of tecton, modern technologies are used, which makes it possible to obtain a material that almost does not rot when in contact with water. And this is an excellent opportunity to increase the efficiency of such an unreliable system as backfill drainage.
Wall drainage
This water protection is used if the house has a basement and a ground floor.
Moreover, it should be carried out until the backfilling around the foundation of the house is completed. This measure will avoid additional financial costs for excavation work.
The wall system consists of inspection and collection tanks, as well as drains. The latter are laid around the building at a depth of at least 0.3-0.5 m from the floor level, but not deeper than the lower edge of the foundation. The slope in this case is also important to observe.
For reliability, it is recommended to create a half-meter moisture-proof around the foundation from compacted clay as much as possible, or cover the base of the house with geotextiles.
In some cases, to remove only atmospheric moisture, it is sufficient to use only an open type of wall drainage, which is a set of trays located in a ring near the house.
The gutters are covered with gratings on top.
Features of different foundation drainage systems
The choice of a specific type of drainage depends on the presence of buried rooms, the depth of groundwater, the composition of the soil on the site and the topography of the site itself. Let's consider what features the drainage system around the house has.
In total, there are 3 types of drainage, which differ in their location and design:
- Wall drainage. Its presence is considered necessary if the building is equipped with a basement or basement. As a rule, such drainage is made immediately after the foundation has been manufactured and hardened. If the work was not carried out at this stage, then the trenches near the foundation are dug anew, along the perimeter of the entire structure. Drains are laid in the trenches, and inspection wells or vertical pipes are installed at the bends of the trenches, at the junctions of the drains. All drains have a slope that ensures the gravity of the water that gets into them towards the collector well. At a distance of 0.5-1 m from the foundation, a layer of clay is created, the so-called clay castle. Due to its water-repellent properties, clay does not allow moisture to pass through to the foundation.
Installation of a drainage system around a wall-type house - Ring (trench) drainage. If the house does not have recessed rooms, then it is advisable to arrange a ring drainage around the foundation with your own hands. It is located at a distance of 5-8 m from the house and is a trench with drains laid into it. Perforated pipes are protected from clogging by a protective layer of crushed stone and geotextiles. Inspection wells are located in the corners of the system, intended for preventive inspections of pipes and their cleaning. The pipes have a slope of about 2 degrees towards the catchment area. A clay castle must be created between the house and the trench to protect the foundation.
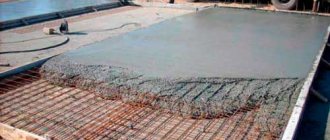
The drainage system around the house can be combined with a storm drain and the water from them can be discharged into one common collector well - Reservoir drainage . This type of drainage is located under the building, so it is made at the stage of digging a pit. Since the pit is usually dug to create a slab foundation, such drainage is used relatively rarely, as is the slab foundation itself. In its area, the reservoir drainage extends beyond the foundation, connecting at least in several places with the wall drainage. Drainage is made from a layer of crushed stone at least 30 cm thick. You can also create 2 layers, from crushed stone and sand. Geotextiles can serve as a replacement for sand.
Important: Please note that reservoir drainage does not replace another type of drainage, but only complements it. Therefore, in addition to it, a main drainage system must be installed.
Please note that if you decide to make a ring drainage around the house with your own hands, the system should be located 0.5 m below the foundation level. This arrangement will ensure high-quality drainage of groundwater from the building at any time of the year.
We have a detailed article about concrete drainage trays with their characteristics.
And if you are thinking about which septic tank to choose for your dacha, then our separate material on this topic may be useful to you.
Trench or ring system
This type of drainage is used to protect a house that is located on a site with sandy soils and does not have a base. The trench system is located at a distance of 3 to 12 meters from the house foundation; it is best to remove it at least 5 m from the building to avoid soil shrinkage, which will lead to the destruction of the foundation of the structure. When constructing such a drainage system from the foundation of buildings, all the same elements as in the classical system described above are used.
For additional protection a clay castle is also . In addition, the general rule is to install drains at a depth of 50 cm from the lowest point of the floor. The remaining parameters are determined in each specific case.
What is drainage and why is it needed?
The drainage system around the house is a special structure whose task is to remove excess moisture from structures. The drainage structure looks like a structure made of pipes through which excess water drains. If this is not done, then the building will begin to collapse due to constant exposure to groundwater and accumulation of precipitation. There will be distortions in doorways and window frames, cracks in the walls and other unpleasant consequences.
There is an opinion that effective drainage and a good blind area around the house can eliminate the need to construct drainage for the area around the house. But experts, including myself, strongly recommend installing a drainage system; this is the only way to reliably protect buildings from moisture.
Attention! Waterproofing and drainage are different concepts, but one of them does not exclude the other.
Drainage around the house (drainage system) helps fight excess moisture and can reduce the water level in the area or remove it altogether. The danger comes from both groundwater and precipitation and flood waters. Waterproofing helps protect the foundation of a building from water penetrating inside.
But even with high-quality insulation of the base, it is impossible to completely prevent water from entering the basement and basement of the house, or to remove water from the foundation for a long time. After all, with constant pressure, water will in any case find weak spots in the waterproofing. But timely drainage will protect the structure from the destructive effects of moisture.
Therefore, installing drainage around the foundation of a house is simply necessary in the following cases:
- the low location of the site is a particularly pressing problem;
- clay soils and loamy soils do not contribute to a rapid decrease in water levels;
- high levels of precipitation in your area;
- low groundwater level;
- deepening of other buildings on the site. If the foundation of a nearby building is deeply buried, there will be no place for the water to go, and it will accumulate on the surface, thereby increasing the likelihood of flooding;
- the presence of waterproof coatings - concrete paths, asphalt yard - these are places that prevent the passage of water.
Installing a drainage system around your home yourself or professionally will eliminate the problems caused by the above factors.
Installation of wall foundation drainage around the house
Before you begin installing a near-house drainage system, you need to decide on its type, which depends on several parameters:
- types of soil;
- whether the building has a ground floor or basement;
- the origin of the water that needs to be drained.
The wall-mounted underground option is used in the presence of a base, high groundwater level and loamy and clayey soils. If it is necessary to protect the foundation of the house only from precipitation, then a surface system will be sufficient.
To protect a house located on sandy or sandy loamy soils with water and without a basement, ring (trench) drainage .
Having decided on the type of drainage, you can begin drawing up a diagram, designing the system and planning all the work. This stage allows you to eliminate all possible shortcomings, which are then expensive to correct.
For the plan , you need to decide on the lowest point on the site for installing a drainage well, which will be connected to the general ring of the system by a pipe.
How to design ventilation in a private house with your own hands? Installation and materials. We assemble an air dehumidifier with our own hands: diagram and principle of operation.
It is better to draw the diagram on graph paper or in a special program. The drawing should show:
- house, as well as adjacent buildings;
- trees and shrubs;
- places where drains pass, depending on the type of drainage chosen;
- inspection and drainage wells.
Inspection tanks are installed at the point where the pipe turns, for example, in the corners of the house, or every 30 m for a straight section of the pipe.
The plan should also record the depth of the pipes. This indicator depends not only on the bottom slab of the foundation and the height of the floor, but also on the level of soil freezing. The pipes must go deeper than the point of zero winter ground temperatures. It is important to write down the diameter of the drains, which affects the width of the trench, and the required slope.
It is better to entrust design to specialists. But you can purchase the necessary material and install the drainage system based on a competent plan yourself.
Device errors
A typical and rather dangerous mistake in arranging drainage around a house is (storm drainage, roof drainage) and deep drainage systems
The former are designed to collect and remove precipitation and capillary moisture from the structure, the latter protect it from lower groundwater.
The direct entry of a large volume of water from the drain into hidden drainage pipes is fraught with overflow, clogging and flooding, which is unacceptable. The combined operation of systems and the collection of runoff from stormwater and deep drainage in wells at the corners of the house or similar end points is permitted, but only if they flow through separate channels or a sufficient volume of receivers. Rings for collecting surface and deep moisture in combined systems are separated.
Also, errors in the design and installation of house drainage include:
• Missing or insufficient slope of outfall pipes resulting in slow drainage or return of water to the foundation or site.
• Selection of drainage pipes without taking into account the composition and parameters of the soil. In addition to the groundwater level itself, when calculating, one should focus on the size of soil particles and its homogeneity. In particular, on clay soils it is strictly not recommended to lay pipes with small perforated holes around the perimeter without the protection of geotextiles; on sandstones there is a need for additional strengthening of their base with a thicker crushed stone backing.
• Poor quality of pipe connections.
• Savings on filters, geotextiles or backfill.
• Laying drains to collect surface moisture under an impermeable blind area, tile or concrete layer.
• Ignoring the need for other measures (installation of a storm drain, backfilling or insulating the blind area, waterproofing the foundation or basement walls) in case of unfavorable climatic or geological conditions on the site.
The consequences of errors appear in the very first full-flowing season: in autumn or spring, water does not drain near the house for a long time, and internal and external structures remain damp. Point wells and storm water inlets help partially correct the situation, but in most cases, work on arranging the drainage system has to be done anew.
How to properly make closed drainage around the house with your own hands
Such a device for protecting a house from water can be done independently even after the construction of the building is completed. First of all, you need to prepare working tools and all the necessary materials:
- two types of shovels (bayonet and shovel);
- spirit level for checking the slope;
- manual rammer;
- a device for removing excess soil from the site (stretcher or wheelbarrow);
- roulette;
- geotextiles;
- backfill for the moisture collection layer (crushed granite stone is best suited);
- sand;
- inspection and drainage wells;
- drainage pump;
- drains and fittings for connecting them to each other and to wells.
Pipes must be perforated. You can purchase ready-made drains, or make them yourself from an existing orange sewer pipe. Flexible products are not recommended. The diameter of the pipeline can be 70-150 mm. The material is preferably plastic with high strength and load-bearing walls. Moreover, the deeper the drains go, the higher this figure should be. You can take asbestos and ceramic products.
Some prefabricated drainage pipes are surrounded by additional filter material, such as coconut fiber.
A plastic inspection and drainage well is purchased ready-made or made independently from a large-diameter thick-walled plastic pipe. You will need to buy hatches for them.
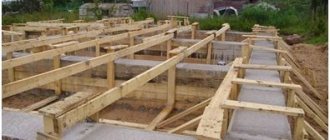
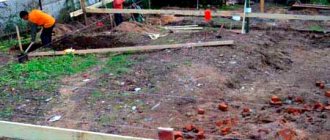
After acquiring everything necessary, they begin taking measurements to mark the place where the drains and other elements of the drainage system will pass. They clear the area of debris and begin excavation and installation work. Let's look at how to properly lay a drainage pipe around the house:
- Dig trenches the required depth, and pits for wells in the right places. Their width should be at least 20 cm larger than the diameter of the pipeline. During excavation work it is necessary to monitor compliance with the slope using a spirit level.
- Prepare trenches and pits for wells. To do this, sand is poured to the bottom and compacted thoroughly. Do not forget to check compliance with the slope. The sand cushion should be 0.10 - 0.15 cm high. At high groundwater levels for plastic wells, in order to prevent them from floating, it is recommended to make a concrete base 10 cm thick, to which the container is attached during installation.
- Geotextiles are placed in the ditch so that the edges of the material extend beyond the upper boundaries of the trench.
- Laying on the bottom of the drainage pipe. The drains are connected to each other. In this case, sockets or special fittings can be used. The pipes are inserted into the inlets of the wells using rubber sealing rings.
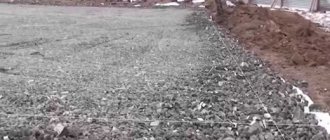
- Pour a twenty-centimeter layer of crushed stone or other material onto the drains. Don't forget about the slope.
- Cover drains surrounded by crushed stone and geotextiles.
- Fall asleep drainage trenches layer of sand, 10-20 cm thick. Carefully compacted, and backfilled with soil on top. If the region is characterized by a large volume of precipitation, then stormwater system trays are installed on the sand above the drains.
- The wells are backfilled and closed with hatches.
The drainage system is ready.
Video on how to make a drainage system around the house with your own hands:
A few words about the plastic drainage well
In its simplest form, it can be a container for collecting water. At the junction with the inlet pipeline, a valve must be installed to prevent the reverse flow of water. It is good if the container has a large diameter, for example, 80-100 cm.
From the drainage well, you can lay a non-perforated discharge pipeline to a ravine, filtration well or reservoir. Water drainage from the collector can be done by gravity or by a drainage pump . Water from the well can be used for technical needs and irrigation.
How to save on utility costs? Read the article - installing a water meter yourself. Installing the meter is not at all difficult, instructions. Basic requirements for a chimney for a gas boiler, what to pay attention to. Details here.
Selection of pipes for creating drainage
After we have decided on the type of drainage system, we need to select pipes.
Types of drainage pipes of domestic and foreign production
- Pipes made of polymers, including polypropylene foam, polyethylene and other plastic masses. They are characterized by low cost and lightness, simple installation and long service life. Almost 90% of all drainage work is carried out using polymer pipes.
- Asbestos-cement pipes are the most durable, reliable and at the same time heaviest. The procedure for making through five-millimeter cuts, approximately every 20 cm, will cause a lot of inconvenience. But manufacturers of asbestos-cement pipes place the main emphasis on the durability of products that can last about 50 years or even more.
- Porous pipes, for the manufacture of which expanded clay glass, plastic concrete and a number of other materials are used.
As the name suggests, such pipes already have a porous structure, so no additional perforation is required. Moisture accumulates in the walls through a kind of capillaries. Very expensive pipes, the required efficiency of which can only be achieved with significant diameters. Porous pipes - Ceramic pipes, or clay. The products are very fragile and may be damaged during installation or even during transportation. Although some types of ceramic pipes have special surface grooves that promote increased moisture accumulation. As with asbestos cement pipes, hand perforation will be required at the assembly site. Installation is a rather complicated procedure, which is due to the same low strength.
Polymer pipes for drainage systems
Important! It is best to use pipes with existing perforations, as this greatly simplifies installation. Consequently, polymer pipes are most suitable, the diameter of which may vary, but mainly 100-110 mm are used for drainage.
Prices for polymer pipes
polymer pipes
Rules for arrangement and preparation of the system
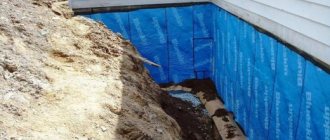
Before you begin constructing the drainage, you need to prepare the foundation:
- the outer part of the base is treated with bitumen-kerosene primer;
- bitumen mastic is applied on top;
- While the bitumen is still wet, a plaster-painting or reinforced mesh with 2x2 mm cells is placed in it.
To close the mesh after the mastic has dried, after about a day you need to apply another layer of coating.
The basis for the design are special drainage pipes. Often these are perforated plastic parts with a diameter of 75 to 100 mm. If it is not possible to buy them, you can use ordinary sewer pipes of suitable diameter for this purpose and drill holes in them. You also need to take into account the size of the gravel in which these pipes will be laid; the holes drilled should be smaller than the diameter of the gravel.
Independent arrangement of water drainage from the house is a completely solvable task. In this case, the following requirements must be met:
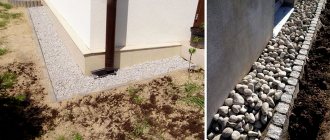
- The perforated pipe is filled with gravel to a depth of approximately 30 cm. To prevent blockages in the system, the parts are wrapped in filter material or geotextiles are laid.
- In the case where part of the structure is located under a road on which there is traffic, metal pipes are installed in this area, which are connected by tightly fitting couplings to the rest of the system.
- In order to be able to freely service and, if necessary, clear the system of blockages in the future, inspection wells are installed at the main nodal points (at bends, at intersections) and every 10-12 m on straight sections.
Water is discharged from the system into a ditch or sump, the simplest design of which is an ordinary welded box with a metal grate. The drainage system is made at a slope to the point of water discharge.