Building a frame house is similar to assembling a construction set. The wooden frame house is assembled in accordance with the diagram. At the same time, the strength and reliability of the future structure depends on the quality of the assembly components. What are the features of the main components and connections of a frame house? And how to properly fix the lower and upper trims, racks, jibs, and crossbars?
Bottom trim connection nodes
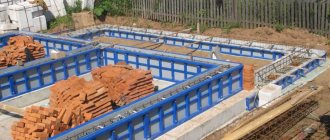
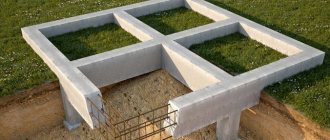
The bottom frame of a frame house is a frame made of wooden beams or several boards nailed together, which is laid on top of a pile-screw foundation. So-called planks - boards - are placed on the concrete foundation under the bottom frame. They perform the main function - they level the foundation and hide those flaws that could have been made during its pouring.
The beds are attached to the concrete foundation using anchors. The installation sites are located at a distance of no more than 0.5 mm. In this case, at least the ends of the beams are secured with anchors.
Connection of the beam to the concrete foundation.
To install anchors, holes of a certain depth are drilled. They pass through the board and go deep into the thickness of the concrete foundation. The depth of drilling and driving in the anchor is determined by the height of the house wall and the design of the foundation. For a traditional 2.5-3 m frame wall on a concrete base, the depth of lowering the anchor into the concrete is 15-20 cm.
The second option for installing anchors is to concrete the anchor studs during the process of pouring the foundation. When casting a concrete slab or strip in specified places, hollow cones with internal threads are inserted into the thickness of unhardened concrete. After the concrete has hardened, anchors are screwed into these elongated cone-shaped studs.
Features of the anchor connection
- The holes in the beam are drilled 2-3 mm larger than the diameter of the anchor pin.
- Wide washers can be placed under the heads of the anchor bolts to increase the area of their contact with the wooden surface and increase the strength of the fastening joint.
Anchor fastening of the lower trim.
Before fixing, mandatory waterproofing is carried out - roofing material is placed on the concrete or its surface is covered with a special waterproof compound, mastic. After installation, check the horizon. Deviations from the horizontal level are allowed in dimensions of no more than 0.5° per 3 m.
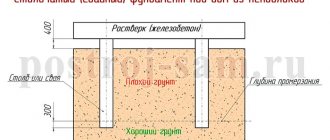
Bottom trim assembly on a columnar foundation
The fastening of structural units of a frame house described above is used on strip and slab foundations. For columnar bases, a different scheme is used:
- For ease of fastening, the upper part of the columnar supports should have a flat horizontal head with holes.
- Wooden beams are placed on top of the head, which act as a grillage.
- Recesses of the required depth are drilled in the beams.
- They are drilled under the holes in the headband. Fix the beam with bolts or screws.
Trimmed planks on a pile foundation.
On a note
It is necessary to attach the timber to the foundation. Shallowly buried strips and slabs are subject to significant movement when freezing. A reliable connection of the floor and bottom trim ensures the reliability and durability of the entire structure.
Disadvantages of building frame houses
Having found out that there are no real advantages in the construction of frame houses, we decided to check what they say about their disadvantages.
1. Wooden material
, which is distinguished by its flammability. Naturally, this problem can be solved by treating it with fire retardant compounds, as well as observing fire safety standards when building a house. We constantly have to face this problem when building houses from logs and timber, so it doesn’t scare us.
2. Another drawback in the construction of frame houses is the difficulty of finding high-quality lumber
: edged board 50x150 or 50x200 mm. It is also difficult to disagree with this, because on the lumber market it is quite difficult to find high-quality first-grade boards with good geometry, and especially dry ones. But in our case, this also did not seem to be a problem, since we produce lumber ourselves.
3. Another prominent disadvantage of frame houses is their relative fragility
. This statement even seemed interesting, since it appears together with the advantage of high seismic resistance. In fact, it really needs to be admitted that these houses are not very durable and houses made of logs or timber are clearly superior to them.
In this case, it is necessary to note two nuances
- In Russia, wooden houses from logs have been built since ancient times, and the embedded logs could lie directly on the ground. When the lower crowns rotted, the house sank, but did not fall apart. If in a situation with a frame house, even on the foundation, rotting of the strapping beam or mortgage board occurs, then the house may collapse.
- In America, especially in the United States, in the central part, they have always preferred to build frame houses in the “ranch” style - these are one- or two-story houses that occupy a large area. This was justified by natural phenomena, namely, frequent tornadoes that destroyed houses. In this case, it was difficult to completely destroy the house (it had a large area), but the destroyed part of the frame type was easily restored or a new one was added. That is, the idea of the technology is rapid recovery in case of destruction!
4. Another mentioned disadvantage of frame houses is a shorter service life
. Often the actual period is overestimated. For example, the service life of a timber house is 30 years, but the beams have to be partially replaced every 10-15 years. For a frame house, 30-50 years are stated, and some 50-70 years. Agree, boards are more likely to rot faster than timber. Therefore, it is hardly possible to talk about the age of 30 years. At least the house, during the dismantling of which I had to be present, was about 25 years old, but for the last 5 years it has not been very comfortable to live in, and the 16 mm plywood, which was used as panels, has deteriorated significantly at the points of contact with the frame.
5. Another drawback is parasites, bark beetles and other insects that can live in a tree, destroying it
. To eliminate this drawback, it is necessary to use various bioprotection impregnations.
Thus, we came to the conclusion that most of the shortcomings of frame houses are typical for all wooden buildings, but houses with a crown structure are still stronger and more durable.
Design of frame house components
Vertical frame posts are installed on top of the lower frame and secured with nails. Fastening with metal corners is used for T-shaped connection of beams without cutting. It's easier to do. Fixing beams with metal nails is used at the junction with partial cutting of the lower beam. This is a more difficult connection to make with your own hands.
A joint without cutting is used for corner frame supports. Butt joints with fixation with plates or corners are used in the main components of a frame house, if the construction is carried out with your own hands, without the involvement of professionals. If experienced builders work, they use a connection with a partial insertion. It prevents strong movements of the timber and frame boards when drying out.
On a note
The size of the cutting for the vertical frame post is 30-50% of the thickness of the bottom trim beam.
The corner joint without cutting is fixed with metal plates using wood screws. In this case, reinforced steel corners with several perforations are used. As well as durable self-tapping screws in light golden and silver colors.
Strengthening the corners for fastening the corners of the house is carried out through technological processing - metal plates are hardened during the manufacturing process. Or through the use of metal with a large section thickness, up to 2-3 mm.
Methods of fastening racks.
A notch joint is often used to attach studs in the middle of a wall. The supports are inserted into the prepared recesses and additionally secured with nails. Then they are secured in a vertical position with jibs - diagonally inclined slats that rest against a vertical post on one side and a horizontal frame on the other. For ease of support, the ends of the jib are made beveled - part of the end is cut off.
Temporary jib
During the assembly of the frame, temporary jibs are also installed, which fix several vertical posts. Temporary jibs are placed between the upper and lower trim at an angle. They connect several vertical posts and are fixed with nails.
Temporary jibs are placed on the outside of the frame. To attach them, you do not need to cut down, but they need to be fixed in such a way that upon completion of construction, the temporary auxiliary beams can be easily dismantled. Therefore, nails are used to fix them.
Temporary jibs for racks.
Temporary jibs hold the posts upright until permanent jibs are installed at the bottom and top of each rack. Once the permanent jibs are in place, the temporary fixing beams can be removed.
On a note
The construction project contains a description of the components of a frame wooden house in the drawings. They often do not describe in detail the method of attaching temporary jibs, since they do not bear the main load and support the frame temporarily.
Advantages of building a frame house
Frame houses are inexpensive to build.
One of the most important arguments in the construction of frame houses is their low cost. One of the factors of low cost is the opportunity to save on the foundation. This is explained by the fact that a frame house is lightweight, which means there is no need to make a massive foundation for it. In this case, reference is often made to the possibility of making the “cheapest” type of foundation - screw piles.
Is it really? The purpose of the foundation is to evenly transfer the load from the house to the ground. According to this, indeed, the supporting area of the foundation for a frame house can be reduced and a pile foundation can be used. But at the same time, the spans between the piles increase, the strapping beam will sag under the weight of the entire house.
This means that it is necessary to correctly calculate both the minimum allowable area of the foundation and the maximum allowable span length. Will a person who decided to build a frame house on his own be able to do this?
In addition, the following should be noted about the foundation for a frame house. If the foundation of a small house does not sink into the ground, then, all the same, it is necessary to take into account another force that acts on the foundation - this is the force of frost heaving. The force that pushes the foundation out of the ground! And the piles may be pushed out unevenly. This may cause deformation of the frame. And he is prone to this! Think of cabinet furniture that becomes loose over time.
Another aspect of the low cost of building a frame house is the material used: boards and insulation, as well as the ability to build thinner walls.
If we talk about the possible thickness of the walls, then indeed, compared to brick, it will be thinner. When talking about the thickness of the wall of a frame house, they mention the figure 15 - 20 cm, comparing it with the width of the board. But when building a wooden house from timber, the thicknesses are the same!
But the actual thickness of the wall of a frame house is thicker by the thickness of two 50 by 50 bars, two OSB3 sheets (12 mm each), as well as the thickness of the finishing of the internal and external walls. That is, the announced thickness must be increased by 15 cm, and in this case it becomes equal to the thickness of building a wooden house from a log and approaches the thickness of walls made of lightweight concrete.
In addition, there is an illusion that the board is cheap. For construction, a dry board of 50x150 or 50x200 mm should be used, and the cost per cubic meter turns out to be higher than the cost of both logs and profiled timber, becoming close to the price of laminated veneer lumber. In addition, the board must be impregnated with fire and bioprotection, and always in dry form. After this, the board must be dried again.
In fact, the builders violate technology: they assemble the frame from a damp board and then dry it in assembled form. In this case, deformation of the board and wall, cracking of the board may occur, which means a decrease in the overall rigidity of the structure. After this it is processed and then dried again.
At the same time, the announced possibility of using any insulation, firstly, is a violation of “American” technology, and secondly, any kind does not mean high quality.
The walls of a frame house protect heat in winter
One of the arguments in favor of building a wooden frame house is that they conserve heat, since they consist almost entirely of insulation. Yes, indeed, the thermal conductivity of ecowool, which is assumed by the technology, is 3.5 times lower than wood. This is undeniable.
But the wall of a frame house is a cake made of different materials. The actual thermal conductivity will depend on a combination of factors; The dew point and how it affects the insulation will play an important role. At the same time, it doesn’t matter what it will be: ecowool, mineral wool or something else. In addition, any loose material has a tendency to settle, mineral wool tends to get wet.
This point requires the test of time and additional study of reviews. In that version of the house, which I happened to be present during the dismantling, it was insulated with glass wool, and it is not prone to shrinkage, especially when filled tightly.
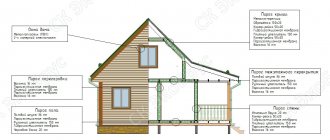
Pie Frame Wall
The walls of a frame house keep cool
Builders of frame houses refer to the fact that in summer the walls warm up more slowly, and therefore the house stays cool longer. This statement is doubtful, since the main heating in summer occurs through the window. In this case, the more massive the wall, which has cooled down over the winter and requires heating, the longer it will take to heat up. In this case, the winner may be brick rather than wood.
Warm walls inside the house
This fact is without a doubt, especially when compared with brick, but if for comparison we take light concrete or solid wood (logs and beams), then you won’t notice the difference.
Premises in a frame house warm up faster
If we consider a frame house as a thermos, then such a house will indeed heat up faster, especially if heating occurs from scratch. But since if you live permanently you have to constantly heat it, this advantage is very conditional. Much more important is the ability to retain heat.
Frame houses are simple and quick to build
This is one of the main factors due to which many one-day companies engaged in construction have divorced, but do not want to be responsible for quality.
In fact, no one measured the speed of house construction with a stopwatch. At least, such data could not be found. Moreover, the “other things being equal” factor was not taken into account.
What does it mean. As a rule, they talk about the speed of building walls, but do not take into account the production of materials, their delivery, and the finishing of walls for use. The walls of a frame house are really quick to install, but first you need to purchase boards, dry or dry them yourself, then process them and dry them again. And so on and so forth.
For this reason, we consider this fact far-fetched. Especially for self-building a house.
Frame houses have relatively thin walls
We discussed this fact above. The key word here is "relatively".
Frame panel houses can be built even in winter
We can agree with this fact, but this statement is true for the construction of a wooden house from any material if there is a foundation (we do not take into account screw piles for the reasons stated above). Moreover! It is more reasonable to carry out the construction of wooden houses from logs and timber in the winter, but the construction of frame houses is only with the proviso that fire and bioprotection treatment will be carried out in the summer.
To build a frame house you do not need special equipment
But this is truly a fact that is difficult to argue with. In fact, construction can be carried out by a team of two people without any equipment. Perhaps this is the only advantage that turned out to be absolutely indisputable in the matter of building frame houses.
Finishing work does not require large expenses
Now, if we talk about finishing wooden houses made of logs or timber, then really large finishing costs are not required: you need to sand and paint the frame. You can do this yourself, or you can use the services of professionals. Depends on the preferences of the developer.
But with regard to frame houses, this is some kind of slyness. If we are talking about the possibility of delaying finishing work, then this is still possible. Let's go in order.
The erected walls are lined with OSB3 on the outer and inner sides; the inside does not need to be finished immediately, but it is advisable to finish the outer wall as quickly as possible. Of course, it is possible to wait for the season, but it is not advisable.
Finishing on OSB is carried out on a block 2-3 cm thick for a ventilation gap, this is especially important on the outside. Finishing on the outside can be done with a blockhouse, clapboard, or less often with siding, and inside - with a blockhouse or clapboard if you want to give the appearance of a wooden house, as well as with plasterboard if modernity is required. It’s impossible to call such a finish cheap. And the total cost of the wall turns out to be more expensive than chopped logs.
Frame houses have good earthquake resistance
I would like to say: “It’s good that no one checked this.” It may be able to withstand one small earthquake, but with a second one it will collapse like a house of cards. If such a house were to undergo the kind of inspection that cabinet furniture used to undergo, then I’m afraid that everything would become clear.
Take two meter-long boards, 50mm thick and about a meter long. Nail them at right angles with a nail, and then try to loosen them - you can do this successfully even with your hands. All rigidity will depend on 12 mm thick OSB boards (almost like furniture).
In frame houses, installation of communication connections is simple.
Installation, in general, depends on experience and tools, but the materials used require a separate discussion. For example, in a stone house the electrical cable can be laid directly under the plaster, but in a wooden house additional protection is required, which increases the cost of construction as a whole. The situation will be similar with the water supply, since additional protection of the wall material from possible condensation will be required.
Laying communications is indeed somewhat simpler, but requires a lot of attention.
Thus, we have come to the following conclusions regarding the advertised “advantages” regarding the construction of frame wooden houses:
- most of the declared advantages have no basis, but rather relate to wooden houses made of logs or beams, but are transferred to frame houses due to the “wooden similarity”, while it is impossible to fully call frame houses wooden;
- if we compare turnkey construction, then the final cost of building frame houses and houses made of logs or timber will be comparable, so there is no real benefit here;
- The real advantage of frame technology is the possibility of construction without the use of special equipment by small teams.
Upper harness knots
The top frame of the frame house is laid on vertical frame supports after installing the corner posts. If the perimeter of the house is large enough (more than 6 m), then in addition to the corner pillars, intermediate ones are also placed - in the middle of the wall. And only after that the top harness is placed.
After laying the top row, temporary jibs are attached - across the entire wall. Next, attach the remaining vertical posts and jibs to them. After which the temporary jibs between the upper and lower trim are removed.
It is most convenient to assemble the walls of a frame house in a lying position, knocking together the lower frame, vertical posts, crossbar, jibs and top frame. And only after that, raise the walls to a vertical position, where all that remains is to fasten all the walls of the house together. To firmly connect the walls of a frame house, a second top frame is used, which is overlapped with the first top frame.
Double top knots.
When using a double top trim, you can do without the use of steel corners. In this case, there is no need to partially cut off the ends of the boards, making a “claw” connection. Because such connections with cutting out part of the end violate the integrity of the board and, accordingly, weaken it.
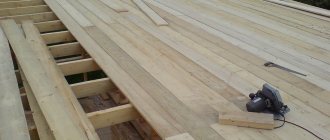
Interfloor beams are placed on top of the second top frame. The beams are laid on the end, the distance between the beams is set depending on the size of the spans and fastened with nails.
Walls
Unlike a stone house, in which the internal partitions do not carry any load, in a frame building the load is distributed across all the walls, which are load-bearing. Before you begin assembling and installing walls, it is useful to familiarize yourself with some concepts of frame elements and installation nuances.
Ukosiny
These are not only connecting elements, but also supports for the frame. They are located at an angle and are a mandatory part of the structure. The ideal tilt angle is 45°. But in some cases (presence of doors, windows, size, location of walls) a slope of up to 60° is allowed. The next step is to install a crossbar under the top trim.
Rigel
This is the horizontal component of the supporting structure that connects the vertical posts. The main task of the crossbar is to mechanically connect the racks. It gives stability to the structure. Crossbars, as a rule, are installed between vertical posts above windows and doorways. Particular attention should be paid to the corners of the house.
Angles
This is an element that carries a greater load than the wall of the house. When arranging a corner, it is necessary to maintain the following parameters: strength, ease of installation, energy efficiency. There are several types of angles with different techniques.
American or Californian.
Its essence is to install an additional rack in an already mounted corner. It provides stability and makes it possible to install internal lining. The disadvantage of this design is low energy efficiency.
Monolithic.
With this design, the corner post is made of solid timber. This is the simplest, but least effective option. Solid wood is susceptible to cracking, which leads to heat loss in the room. In addition, there is a problem with fastening the internal cladding of the building.
Scandinavian.
Is the “warmest”. The insulation of this corner is carried out from the outside, simultaneously with the cladding of the facade. Learn more about this angle design. A warm corner is constructed from three or four beams, forming a niche. The formed niche is filled with insulating material, which tightly covers the joints between the racks.
Walls
The process of erecting the walls of a frame house begins with the installation of the frame. How to properly build a frame on your own? The basic requirements for wooden structures during the construction of a frame structure are presented in SNiP II-25-80 “Wooden structures”.
Assembly
The walls are assembled in a horizontal position. The vertical frame posts and horizontal load-bearing elements (beams) are laid out on the ground, and the angles between the elements are adjusted using tools. The angle must be strictly 90°. It is better to fasten parts with staples and nails.
The racks are installed at a distance less than the width of the insulation by 2-2.5 cm for the most dense installation. Then the jibs are cut into the diagonal between the stand and the lower trim. In this case, as mentioned earlier, the angle should be 45°.
For more rigid fastening of the structure, it is recommended to install jumpers between the racks. The quantity and frequency of installation of this element is not important. The only thing is that they need to be fastened in a checkerboard pattern. This work can be done after installing the walls.
Window
Window openings are installed in the finished frame in the designated places with increased gaps between the posts. Be sure to install a crossbar over the window opening (a board, according to SP 31-105 2002, with a section of 50x100, 50x150, 50x200mm), fixed at the top of the rack, standing on the edge. The function of the crossbar is to uniformly distribute the load from the floor beams onto the window openings. Subsequently, after installing the frames in the prepared place, windows are installed in the openings. A comparison table will help you choose the type of windows (wooden or plastic).
| Advantages | Flaws | |
| Wooden | wood is environmentally friendly and safe; durability with proper care and use; ease of repair; favorable indoor microclimate; good thermal protection; aesthetics; | difficulty of self-installation; highly flammable; hygroscopicity; exposure to pests. |
| Plastic | durability without special care; reliability; do not absorb moisture; not susceptible to pests; maintaining rigidity for a long time; good sound insulation. | the formation of condensation, which provokes the formation of mold; difficulty of repair. |
Doors
Door and window openings are mounted according to the same principle. There is one caveat. The posts between which the openings are attached are made in two or three boards so that horizontal elements rest on them.
Wall installation
The finished structures are lifted and fastened together. The sequence of installation of frames is as follows:
- First, one wall is exposed;
- leveled, attached to the base (floor);
- temporary supports are installed;
- Similar actions are performed with the remaining walls, fastening them together with staples, studs, and nails. Walls consisting of two parts require especially careful installation.
When installing walls, you should ensure that the corners are strictly vertical without tilting.
Upper harness
Assembled from boards or timber, it is a continuous strip located along the entire contour of the frame house. It combines vertical elements into a single frame. For the framing, similar boards are used as for the walls. Important advice: all joints should be overlapped with an overlap of 25 mm, and the corner overlap should correspond to the thickness of the walls.
Interior partitions
Interior partitions divide space, soundproof rooms, and serve as supports for ceilings. When installing interior partitions, similar work is performed as when assembling external walls. Partitions are mounted from vertical elements - racks, which are subsequently filled with sound insulation and sheathed with wall finishing materials. They are modular and can be installed anywhere. To improve sound insulation, it is customary to use soft fiber-based materials:
- mineral wool;
- basalt wool;
- drywall;
- felt;
- ecowool.
Or “elastic” insulating materials:
- latex;
- cork;
- polyurethane foam;
- synthetic rubber.
Wall corner
The corner of a frame house is the place of maximum heat loss. As a rule, it is in the corners that condensation accumulates and it is them that need to be insulated first. Therefore, even at the stage of assembling the frame, it is necessary to ensure that the corners of the future frame house are warm. How to do it?
Smooth fixing plates are placed on the outside of the vertical beam. They connect adjacent single-level surfaces of the vertical post and horizontal beams. The fixing corners are located on the side. They connect mutually perpendicular surfaces. What else is important to know about angles?
When building in regions with cold climates, not solid wooden beams are used as vertical posts, but a corner post is assembled from separate boards. The resulting structure resembles a well. Insulation is installed in this internal space, which retains heat and limits possible heat loss.
Installation of corners in the frame of the house.
The window assembly in a frame house must also be warm; for this, single racks are used, but the load on window and door openings is removed using a crossbar. The crossbar is fastened along the entire length of the frame wall by cutting into all vertical posts. It is important to take into account that under each window opening there must be at least 1-2 vertical support boards.
Ensuring frame rigidity
Classic frame houses are structures whose frame diagram includes the following elements:
- Upper and lower frame beams;
- Vertical racks;
- Jib;
- Jumpers;
- Elements of the roof truss system.
Sheathing with rigid sheets strengthens the main frame, making it stronger and more stable.
The frame is schematically a system of fixed rods that absorb compressive, tensile and bending loads.
The cross-section of the support posts is selected according to their load-bearing capacity. For external walls it is 150x50 mm or 200x50 mm, for partitions 100x50 mm.
It is not advisable to increase the cross-section of the load-bearing beam to accommodate insulation. It is much more rational to lay thermal insulation in 2 layers - one between the racks, the second along the outer sheathing with bandaging. This measure will help avoid heat loss through wooden beams, trim, corners, and frames of openings.
The pitch of the racks for one-story houses is 600 mm. This is a convenient interval for laying basalt wool, fastening OSB or gypsum fiber sheets without trimming. For higher building heights, it is recommended to place the supporting elements at a distance of 400 mm.
Window and door openings are reinforced with horizontal beams made of timber laid on edge. If the gap is more than 800 mm, its thickness must be at least 150 mm. If the crossbar is not strong enough, when it bends, the window frame will become pinched. Cracks may appear on the glass, facade and finishing. The cross-section of the vertical posts is increased when transmitting point loads from the roof ridge and large openings.
Inside the frame, in the load-bearing walls, horizontal lintels are laid 50 mm thicker than the supporting post. The connections increase the spatial rigidity of the structure and serve as support for the top sheet of insulation. They are mounted staggered, flush on the inside of the wall.
For stability, the frame is reinforced with jibs or solid cladding. Jib - boards sized 100x25 mm or 150x25 mm located at an angle of 40-60°. Their upper and lower ends are cut into the frame beams and secured along the length to the posts with 2-3 nails.
If rigid sheathing slabs - OSB or multi-layer plywood - are installed, installation of jibs is not necessary. The sheets are laid with seams staggered to bandage the frame and increase its rigidity. The panels cannot be mounted vertically. At the corners of the windows, solid elements are installed, rather than pieces or trimmings. Sheathing thickness – 11-12 mm.
Tying the beam floors with a front board increases the rigidity of the floor and distributes the load from the wall panels onto the horizontal beams.
The front door is another area where it is important to strengthen the frame. Closing and opening leads to vibration of the entire structure and destruction of the finish. The side racks are further strengthened by joining two boards; the walls are sheathed with a single sheet of multi-layer plywood.
The interfloor strapping is designed to tie the frame, and not go in a circle. First, the timber is installed at the intersections of external and internal walls, then at corners and partitions. The remaining areas are filled last.
Select high-quality fasteners of appropriate thickness and length.
It is impossible to build a proper frame house if the diagram is drawn up without taking into account the type of structures and assembly technology. Various types of residential buildings have been developed for mass development:
- Frame;
- Frame-panel.
In addition, combined or modified systems are used in frame housing construction.
The basis of the houses is a post-and-beam frame that absorbs loads from walls, ceilings, roofing, finishing and filling of openings. The differences are in the order of construction operations, assembly speed, mechanisms and technologies used.
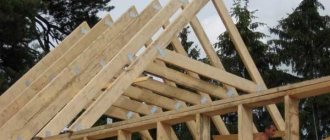
Knots of the rafter system
The nodes of the rafter system include all connections between its elements, namely:
- Fastening floor beams to the top frame.
- Attaching the rafter beam to the top trim.
- Fastening the racks on the gables to the top trim and to the outer rafters.
- Attaching the internal posts to the rafter beam and to the ridge.
- Fastening struts - inclined beams that support the rafters and rest on the beam.
- Attaching the crossbar to inclined rafters.
- Fastening the sheathing.
Knots of the rafter system.
The fastenings listed above can be done using corners or using nails if the elements of the rafter system are connected overlapping each other.
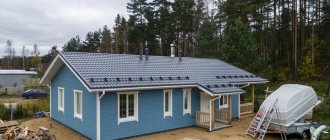
Walls of frame houses - their structure and construction technologies
Walls erected in compliance with the technology provide a comfortable microclimate in the house, ample opportunities for decorating its interior and safety.
Layer-by-layer wall construction
All external walls of frame houses are a “pie” made of various materials. They form it as follows:
- The frame fixed to the foundation is covered from the outside with sheathing material.
- It is covered with a layer of waterproofing.
- A lath is attached over the waterproofing for installation of façade finishing material.
- Insulation is laid inside between the frame posts.
- Cover it with a vapor barrier material.
- Install the internal wall cladding. Usually it serves as the basis for working with finishing materials.
The result is a multi-layer “pie” of the wall, which demonstrates high strength and insulation characteristics. However, the entire range of work does not always take place. Its completeness depends on the chosen construction technology.
Canadian and Finnish technologies for raising the walls of frame houses
Canadian and Finnish frame construction technologies make it possible to build a residential building from environmentally friendly building materials in a short time. However, they have one fundamental difference. It lies in the method of raising the load-bearing walls of a frame house.
Finnish technology involves performing all work on the construction of walls - from installing the frame to vapor barrier - directly on the construction site.
Canadian technology makes it possible to further reduce the construction time of a house through the use of ready-made SIP panels. Usually they are a “pie” of two layers of sheathing material and insulation laid between them. The thickness of the panels and the materials used to make them may vary.
Note! After installing the frame, insulating it and covering it with finishing material, the thickness of the walls for central Russia is 150-200 mm.
Fasteners
The following elements are used as fasteners for the components of a frame wooden house:
- Fastening plates (angles or flat plates with or without holes). Plates and angles are attached to beams or supports using wood screws.
- Staples (straight and angular) are wire fasteners of a certain diameter. Their edges are bent and inserted into the ends or side surfaces of the beams.
- Bolts - used to tighten adjacent beams and rafters, inserted into through holes and secured in them with nuts.
- Nails.
All connecting, fixing and fastening elements for frame buildings are made of metal. To fasten load-bearing elements, reinforced corners made of hardened steel or increased thickness, 3-4 mm, are used. To fasten the supporting elements, angles made of ordinary steel with a thickness of 2-3 mm are used.
Variety of fastening elements.
In order to protect against corrosion, galvanized steel is used for the manufacture of corners and plates. Rust protection is especially important in outdoor construction, when metal fasteners in walls can become a point of moisture condensation, causing a section of the wall to become wet. Therefore, galvanized fasteners are in great demand in various components of a frame house.
Node connection errors
A drawing of components requires the presence of sketches and descriptions. However, despite this, novice builders often make offensive mistakes. Let's list the main and most frequently repeated erroneous actions that novice individual builders make when assembling a frame:
Not all jibs are installed. This is not true. The jibs ensure the wall's resistance to wind loads. In addition to the jibs, to withstand the wind it is necessary to use rigid slabs in the outer cladding.
- Use solid timber or boards placed tightly next to each other as corner posts. This corner will be cold. Moisture will condense and mold will develop.
- Use “black” screws for fastening. They are not strong enough, especially if the wood purchased for construction is not dry enough. When drying and warping, the “black” screws can be simply “torn off”. A more durable option is golden and silver-colored self-tapping screws, galvanized or coated with a layer of chromating and phosphating.
- They use wood that is not dry enough, which causes severe shrinkage and “breaks” existing nodes and connections.
- And another mistake is not to use nails. These proven fasteners are often stronger than any self-tapping screws.
Frame construction is a new technology in which, despite its apparent simplicity, there are many nuances and features.
Finishing
Panels of wall material serve as the basis for interior decoration. If plasterboard (gypsum plasterboard), which has a flat surface, was used for this, then there is no need to plaster the walls. You just need to putty the joints.
An option with higher strength indicators is gypsum fiber boards (GVL). If the walls are covered with OSB or chipboard (oriented strand boards or strand boards), plastering and puttying are required, as they have a rough surface.
After the internal walls have been mounted, joints have been sealed or surfaces have been plastered, you need to prime the surface with wallpaper glue (for wallpaper) or primer for paint (for painting).
Important advice . If the interior decoration involves painting the walls, then the surface must be perfectly flat. As an option, the walls of a frame house can be covered with clapboard. There are many options for finishing external surfaces:
- block house (imitation log house);
- wet cladding (decorative plaster);
- facade brick;
- thermal panels (insulation with cladding);
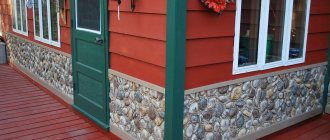
- tiles imitating natural stone, brick;
- siding.
Separately about siding. The advantages over other options are obvious: low cost, practicality, easy to repair, lightweight, variety of textures and colors. The only negative is fragility.
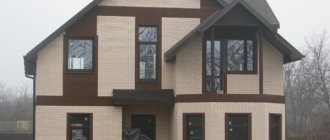
External wall cladding
Taking on a large load, the outer cladding of the wall frame ensures the rigidity of the structure and its stability during operation. Properly selected building materials for cladding will allow the walls to maintain their shape for many years and withstand negative external factors.
Application of OSB-3 boards in frame construction
OSB-3 boards (OSP-3) are moisture-resistant oriented strand boards of increased rigidity. They are made by pressing and gluing three to four layers of wood chips. In each layer it has a different direction, which gives the material increased rigidity.
Advantages of OSB-3 boards:
- The optimum ratio of price and quality.
- Easy to process - cutting, drilling, grinding.
- Suitable for using various fastening elements - nails, screws, dowels, etc.
- Resistant to splitting even when fasteners are used close to the edge of the slab.
- Do not deform due to temperature changes and various atmospheric conditions.
The main disadvantage is the low vapor permeability. Walls made of OSB boards do not “breathe”.
Of no small importance is the fact that synthetic resins are used for gluing chips. This means that the cladding material can release formaldehyde and phenol into the air. However, stoves made according to European standards are safe for humans.
Note! The most environmentally friendly material is the one marked E0 and E1 .
Cement particle boards (CSP)
DSP is a material based on a mixture of wood chips and high-grade cement. To improve its performance properties, special additives are included in the composition.
Cement particle boards have the following advantages:
- Resistant to moisture and, accordingly, to mold formation.
- They are not afraid of rodents.
- Environmentally friendly. They do not release harmful substances into the air.
- Fireproof, belong to the category of low-flammable materials.
- Retains heat well.
- They have good vapor permeability and are breathable.
- When covering the frame, a flat surface is formed.
In contrast to the advantages of DSPs, they also have disadvantages:
- Heavy weight.
- Difficulty in processing the material. Drilling and cutting require a lot of physical effort. At the same time, a lot of dust is generated during the work.
- High price.
The recommended thickness of cement particle boards for frame construction is 12-18 mm.
Fiberboard for external cladding
Fiberboard is wood fibers pressed into a board. As in the production of OSB, they are laid in several layers, in each of which the fibers have their own direction. No adhesives are used. Enough pressure, exposure to high temperatures and resins contained in coniferous wood.
What characterizes this material on the positive side?
- It provides good heat and sound insulation of rooms.
- Environmentally friendly.
- The slabs are light in weight.
- Good vapor permeability.
The main disadvantage of fiberboard is its low stiffness index. When using this material, it is necessary to install jibs and select rigid internal lining.
Note! The recommended thickness of fibreboards for cladding the walls of a frame house is at least 25 mm.
Covering the frame with plywood
Plywood is a sheet material made from several layers of veneer that are glued together. In frame houses, regular walls made of moisture-resistant plywood have a thickness of at least 12 mm.
Useful: Books and films by Larry Hohn - carpenter's desktop encyclopedias
Advantages of plywood:
- not afraid of low temperatures;
- easy to process;
- high compressive strength;
- affordable price.
The disadvantages of plywood include its flammability, the presence of synthetic resins, and its tendency to chip.
Attaching the outer skin to the frame
Attaching the outer skin to the frame is done according to general rules.
- The presence of a temperature gap of 3-5 mm between the plates (sheets) is mandatory.
- Their joints should be in the middle of the frame beam.
- To fasten the sheathing, self-tapping screws 55-70 cm long are used. At the same time, they must go into the frame stud to a depth of at least 40 mm.
- Self-tapping screws are screwed in at a distance of at least 10 mm from the edge of the slab.
- Fixation of sheets or slabs is carried out in increments of 15 cm - along the edge, in 30 cm - in the center.
Since you will be using a huge number of fasteners, stock up on high-quality power tools in advance.