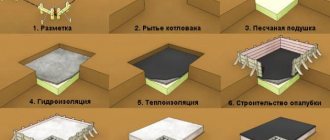
How to knit reinforcement
Since reinforcement in the form of steel rods is mainly used in the construction of foundations and main walls, their connection to absorb compressive or tensile stresses is mandatory. In mass construction, the welding and tying method is used for connections, in individual construction, usually only tying. In this case, the reinforcement is knitted using:
- knitting wire;
- reinforcement clamps.
The term “knitting wire” means round wire made of low-carbon steel in accordance with GOST 3282-74. It can be regular or heat-treated (marked “O”), coated or uncoated. The thickness of the zinc coating determines the class of the material.
When choosing which wire to knit the reinforcement with, you should pay attention to the grade of concrete and the operating conditions of the structure. In this case, mechanical properties are taken into account.
So, if tying reinforcement for the foundation is supposed to be done manually, it is better to choose a thinner option, since without a special tool, thick wire for tying reinforcement requires significant effort.
In addition to industrially produced low-carbon wire, it is permissible to use metal cord from car tires. When tires are burned, the metal cord is released and simultaneously undergoes heat treatment, which makes it easier to work with in the future. This option of knitting material is acceptable only for small volumes of work and individual low-responsibility construction.
Plastic clamps, regular and with a steel core, are also applicable. They are usually used for fiberglass reinforcement. The use of clamps is permissible in cases where liquid concrete will not be subjected to mechanical loads during the hardening process (they will not walk on it, stack heavy things, or load it with other building materials). This option is applicable for low-rise buildings, since during the process of pouring a large mass of concrete mixture, the fastenings can move along with the reinforcement. The displacement disrupts the functioning of the frame and leads to a change in the design strength of the structure.
Wire for knitting
To connect rods in low-rise construction, annealed low-carbon steel wire is used. It is also called “knitting” wire. Its quality and parameters are regulated: all characteristics must comply with GOST 3282-74.
For low-rise construction, wire with a diameter of 1.0 -1.4 mm is needed. Experts believe that the best option is 1.2 mm or 1.4 mm. The millimeter one is too weak and often breaks; the larger diameter one is difficult to rotate.
Regular annealed wire is dark in color. There is also a light one - it is galvanized. The protective coating greatly increases corrosion resistance without affecting flexibility and elasticity. It costs more, but the reliability of the binding, together with the quality of the reinforcement and concrete, determines the reliability of the entire foundation. So this is a case where you need to take the best.
Wire for tying reinforcement can be sold in coils or already cut
Unannealed wire is produced. It costs less, but its ductility and strength are lower, and it breaks more often. So it’s better to take one that has undergone heat treatment.
One connection requires from 25 to 50 cm of wire. Having cut a piece of a given length, it is folded in half and used in this form. The larger the diameter of the rod, the longer the piece of wire needed for knitting. For reinforcement 10 mm is 25 cm, for 12 mm 30 cm is enough, for 14 mm 35-40 mm is required.
Longer sections are needed in those places where three rods have to be connected. And there are many such places. Here you will need 50 cm sections.
They sell wire in coils, or already cut into pieces of a certain length. Sliced packages can be of different weights - from 0.5 kg to 10 kg and more.
How to knit reinforcement for a foundation
Depending on the chosen material for knitting, various fixation methods are used. The simplest situation is with plastic clamps. They are wrapped around the joint as far as the length allows and tightened.
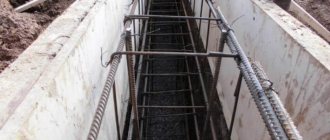
To correctly knit reinforcement for a strip foundation, you will need a tool. Depending on the reinforcement tying pattern, the rods are distributed over the future pouring field.
If you plan to create a foundation, some of the rods are stuck into the prepared base (rammed sand and gravel backfill), this makes the work easier. After completing the connecting work, the frame is raised above the ground on special stands. This is necessary to prevent corrosion of metal elements protruding from the concrete. To connect the rods use:
- special pliers for tying reinforcement;
- crochet hook, homemade or industrial production;
- a curved hook made of a thick nail or dowel, inserted into the chuck of a drill (screwdriver). Thanks to this mechanized hook, wire twisting is done faster and with less manual force.
- semi-automatic hook for tying reinforcement. A mechanism with a leg and a spring return mechanism pulls the wire and makes several rotational movements. This happens thanks to the spiral grooves on the hook leg, which, when pulled back, provide rotation and return to its previous position.
The use of such tools is advisable for small amounts of work, for example, when building your own house, where tying reinforcement with your own hands is done over a short period of time (when preparing the foundation for a frame or brick structure or installing a fence on a concrete base).
A do-it-yourself hook for tying reinforcement is made from a used electrode, nail or other suitable metal rod of the required strength.
Devices for tying reinforcement
How easy and fast the knitting will be depends on the tool you use. You can twist the reinforcement by hand, but it is difficult and time-consuming. There are various devices for this. Simple and more complex.
Hooks
The most widely used are various hooks. There are quite a few of them in stores; they are made independently from any piece of wire of a suitable diameter.
Hooks for tying reinforcement have different lengths, handles and shapes
There are simple ones, with straight or curved steel handles. They differ in the angle of bend of the handle, the shape of the hook, and its size. How to decide which is more convenient? Just try to work. No other way.
There are mechanical hooks - they have a spiral built into the handle. There is no need to rotate them when knitting. Just pull up. The handle slides along the screw groove, turning the hook. Watch the video to see how it works.
Ticks
There is a special tool in which pliers and a mechanical hook are connected. Thicker single wire can be used for knitting with them. It is placed under the intersection of the reinforcement bars and inserted into the pliers. They are clamped in the clamp, the excess wire is bitten off. The next step is to pull the handle a few times. The pliers begin to rotate, tightening the knot. Such a device costs $40-60. How much you need it - decide for yourself.
Mechanical handle pliers
There are other ticks. Also special for knitting, but they are rotated by hand. You don’t need a lot of turns here - the pliers allow you to grab the wire close to the reinforcement and only make one or two turns.
They differ from ordinary ones in the shape of the cutting part - they must hold the wire. Professional knitters on construction sites work using just such a tool. They say that with pliers, tying goes twice as fast as with a hook and a gun. There are two more advantages:
- No need to cut the wire. It is wound into small skeins, which are held in the left hand.
- There is no overspending: “tails” of a few millimeters remain. For large volumes this is important.
When knitting a reinforcing belt, special pliers are used.
They have a different shape of sponges: they hold the wire. Believe it or not - it's up to you. But it looks amazing.
Gun
Devices for automating knitting are available for sale. These are the so-called knitting guns. They are “charged” by wire and run on batteries. All human involvement consists of bringing the gun to the joint and pressing the trigger guard. A second or two, and the gun will wind several turns around the intersection of the bars and make a knot.
Buying such a gun to tie one foundation is an unjustified waste of money. They are rarely purchased even by those who do this professionally. Their cost is considerable: no less than $500.
Professional tool for tying reinforcement
When creating a large volume of reinforcement for reinforced concrete structures (professional activities, large private construction), instead of manual or semi-automatic tools, it is better to use an automatic, so-called gun for tying reinforcement. This useful device was invented in Japan; it allows you to tighten the wire at the connection of the rods with the required force in a matter of seconds.
The operating principle of the device is shown in the video.
https://www.youtube.com/watch?v=FXvuG2_20ys
There are mechanical and electrical versions of the device; they are produced in Japan, Germany, Russia, China and some other countries. Common features of most models presented on the Russian market:
- The diameter of the rods to be strapped varies for different devices - 9...22, 20...40, 30...52, 20...65 mm. The most popular products are for the range 20…40 mm;
- knitting wire diameter 0.8…1.5 mm;
- tying speed is 0.8…1.6 seconds per knot; on average, guns provide tying up to 1000 knots per hour. Thus, the use of one gun replaces the work of six professional rebar tyers.
Advantages of the device in comparison with manual and semi-automatic tools:
- high speed of work and uniform tension of wire for knitting reinforcement;
- expansion of the working area - when using the gun directly or with an extension nozzle, you can knit up to 22 knots without changing position (crochet only 5...6);
- the presence of an extension attachment simplifies work with a frame located at ground level, since it eliminates the need for the worker to bend over and reduces the load on the spine;
- mechanical devices operate for an unlimited amount of time; to ensure the required performance, only changing staple cartridges is required;
- battery models from reputable manufacturers operate without recharging for up to 8 hours;
- it is possible to program the device for a specific knitting method, rod diameter, and tightening level;
- no need to cut the wire yourself, cartridges with staples are sold already loaded;
- the wire is fed, twisted and cut by the device, without worker intervention.
The disadvantage of the equipment is its high cost, which is justified only for large-scale construction. In private housing construction, it is possible to rent the device.
How to knit reinforcement correctly
Regardless of the device used, it is important to know and apply the correct knitting techniques. The diagram below shows the main methods of twisting.
The question of how to crochet reinforcement lies in the correct grip and uniform, not excessive tension on the wire. It is usually recommended to use pieces of wire 250...300 mm long. The version with loops at the ends requires a longer length, about 400 mm (about 100 of which are spent on creating loops). To quickly and efficiently knit reinforcement, a simple pattern is used. The wire is folded in half and wrapped around the knot. Next, the resulting loop is grabbed with a hook (pliers), the double ends are bent to it and twisting is performed.
When using wire with loops, the work is simpler: a single piece is passed around the joint of the rods, the loops are hooked or pliers and twisted.
Important: it is recommended to use pliers on unannealed wire with a diameter of more than 2 mm; thinner and softer wires may break.
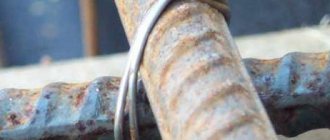
Another interesting connection method that does not require the use of a crochet hook: the reinforcement is fastened with a spring clip.
Such mounting brackets are made of fairly high-quality steel, which ensures their spring properties.
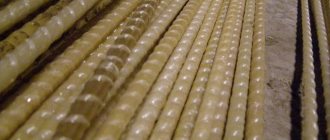
To knit fiberglass reinforcement, plastic (with or without a metal core) clamps and special fasteners made of polymer are used.
Laying and knitting of composite reinforcement is permissible using soft aluminum wire. In this case, standard techniques for steel tying wire are used. Some of them are shown in the gif below.
Methods of knitting reinforcement
Important: at the end of the twist, the edges of the wire are bent inside the frame so that even with a small protective layer of concrete, they do not stick out from the pouring and do not provoke corrosion of the entire reinforcing structure.
FAQ
Reinforcing mesh is used in the construction of the base for laying paving slabs. It is needed when creating a concrete base. It serves to ensure that concrete can withstand high tensile loads. This material is called reinforced concrete.
Why is reinforcement produced?
— improvement of the bearing capacity of the base
— protection of the coating from deformation processes due to soil shifts.
— increasing the service life of the surface
How is this achieved?
The reinforcing mesh undergoes certain processes over time:
— reinforcement with concrete forms a strong bond due to frictional force
- there is also an electrochemical interaction between them
— the mesh is subject to a force such as compression from the concrete.
In order for this interaction to occur as planned, the reinforcing mesh must be laid correctly.
What tools will you need?
To knit reinforcement you will need: reinforcement rods, tying wire, hand hook and reinforcing wire. To lay the mesh into the formwork you may need: a tape measure, an angle grinder, a sledgehammer, a hammer, a crowbar, a shovel, and a screwdriver.
The mesh itself is made from reinforcing bars of various diameters. They can be connected by welding, wire or plastic clamps. The first method - welding - is very simple, but it leads to an increase in the cost of building the base, as well as to a further decrease in strength, since the reinforcement changes its chemical composition.
Wire knitting is the most correct way. You can do this with pliers, but it is better to use a pointed hand hook.
How to knit reinforcement?
It's actually simple. A hand hook is made using an electrode, one end of which is sharpened. Experienced builders say that a hook can be made from a dozen improvised means: an old trowel, a paint roller, a bunch of grapes, a rod of reinforcement, and the like. Of course, ready-made crochet hooks can be purchased at the store.
The reinforcement is tied with wire with a diameter of 1-2 mm. It should be soft, and the rest of the characteristics are optional. If the wire is not completely soft, then you can hold it on the fire for a few seconds, and knitting will become easier. The wire pieces should be 30-40 cm long. It is easier to make them if you wind up a skein and cut it with a grinder, having previously measured the required length. This will save your time.
Techniques for tying reinforcement
- In one hand we hold a wire folded in half, and in the other a hook. We put the wire under the reinforcement and insert the tip of the hook into the loop.
- With the end of the wire remaining in the hand, we circle the reinforcement and place it on the bed of the hand hook.
- We rotate the hand hook around its axis, tying the ends of the wire 4-5 turns and pull out the tip of the hook. Ready!
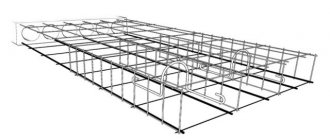
How is the reinforcing mesh installed?
- Carry out soil excavation
- Formwork is installed in the resulting trench
- The reinforcing mesh is lowered into it. It is laid in such a way that the entire surface of the mesh is subsequently covered with concrete by more than 5 cm.
How to lay the reinforcement?
The installation process of fittings is not easy. Typically, 2-3 layers of reinforcing mesh are used, welded or connected with wire. The reinforcing mesh is laid in strict compliance with all stages of the instructions:
- Preparing the reinforcement frame
- Stropovka
- Installation of the structure in the designated place
- Alignment of the structure
- Knitting joints
The preparatory stage of work consists of inspecting the frame, straightening (if necessary), and cleaning it from dirt.
Installation of fittings is the most important process, and it must be treated with due responsibility. To work on fixing the frame, you will need the strength of at least 3 people. High-quality installation of the mesh depends on the coordination of the team; workers usually use special signals to indicate the lowering or raising of elements.
In the case when the reinforcing mesh is lowered to the bottom of the trench, the structural elements are moved using special equipment: guides and a tray.
Before pouring concrete, it is important not to forget to lay all the embedded elements: sewer pipes and ventilation holes. You also need to make sure that the reinforcement is knitted and laid correctly.
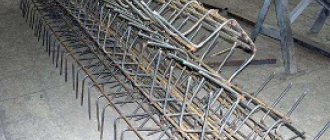
The nuances of working with the foundation reinforcing belt
A strip foundation for a residential or public building inevitably has corners. It is unacceptable to arrange reinforcement in them using the method of sequential connection of frame rods. A larger overlap of reinforcement during tying and special reinforcement schemes are used.
When figuring out how to knit reinforcement at the corners, the designer of the reinforcement scheme gives preference to L-shaped or T-shaped reinforcement, depending on the responsibility of the structure and the possibilities of using one or another form.
When lengthening the rods, an overlap of 20 or more rod diameters is used, and such joints should be spaced so that in one section there is no more than half of the horizontal spliced rods.
Important: in order not to impair the performance properties of the reinforcement, rods can only be bent in a special mill or holder. It is highly undesirable to use gas welding! Related to the danger of corrosion at the welding site is the question of why the reinforcement is knitted and not welded. Welding (arc, not spot) is permissible for rod diameters greater than 25 mm.
Instructions for crocheting reinforcement
It is useless to knit the reinforcement with your bare hands - you can achieve the required force to tighten the wire only with the help of additional tools. Let's take a step-by-step look at the basic techniques for crocheting reinforcement.
Manual
To knit wire by hand you will need a hook. The wire is folded in half and hooked under the fixation point. The free end is threaded into a loop and crocheted until the wire is tightly tensioned.
Simple knot
To tie a wire with a simple knot, you will need to do the following:
- A wire 200 mm long is cut and bent in half.
- The bent section is pushed under the point where the two rods meet.
- The hook is inserted into the loop and catches the free end.
- A full revolution is performed around its axis. The free end must be held.
- Next, while tensioning the wire, the hook is turned several more times until a reliable connection is obtained.
You don't have to buy a hook at the store. You can easily make a convenient tool yourself by giving the required shape to a steel rod and putting a handle on the end.
Dead node
Before crocheting foundation reinforcement, you need to learn how to form a dead knot. This method is especially good for tying vertical rods for columns and beams.
- A piece up to 400 mm long is cut and bent in half.
- The segment is pushed forward by a loop from below the knot being fastened.
- The free end is passed through the top and again bent under the rods.
- The loop and the free end are aligned and then hooked with the hook tip.
- The hook is rotated with tension until the loop comes off.
To obtain a high-quality connection, you need to ensure that the wire is tightly laid on the surface of the reinforcement. The knitting process continues in a checkerboard pattern.
Screwdriver
The scheme of working with a screwdriver is reminiscent of the crocheting process, but instead of manual force, automation is used. Instead of a regular tip, a homemade hook is inserted into the screwdriver; usually a roofing nail is used for this purpose.
It is important to ensure that the speed of the screwdriver corresponds to the required force for tightening the wire. If you apply too much force, the wire will break, and at low speed you may end up with a weak knot.