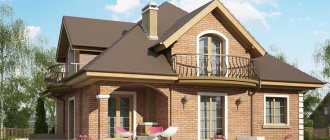
A brick house is strong and beautiful, but... A brick wall is heavy, so it requires a strong foundation. Brick does not hold heat well - it needs to be insulated. There are other additional costs. In general, it's expensive. There is an option to make a structure from timber and cover the house with bricks. It will turn out strong, beautiful, prestigious and... much cheaper.
In this article we will tell you how to properly brick a house.
Covering a house with bricks: pros and cons
Brick cladding has many advantages:
- The brick will well protect the timber from the influence of precipitation, wind, sun and other factors that adversely affect the timber.
- Brick creates a good appearance and increases the price of the house.
- Sound insulation is improved.
- Fire safety is becoming better.
Of the minuses:
- The brick will put additional load on the foundation, you will have to make it wider, which will lead to higher construction costs.
- Before doing brick cladding, you need to wait until the timber house has completely shrunk. Depending on the type and moisture content of the wood used, this will take from 3 to 24 months.
Internal insulation with warm plaster
For a wooden house, sawdust plaster, which consists of cement, clay, sawdust and paper, is best suited. Air passes through it, which allows the tree to breathe.
The work is performed in the following sequence:
- The surface must be carefully prepared to improve adhesion. It is cleaned of dirt, grease and dust, and then impregnated with antiseptic impregnations.
- A sheathing made of thin wooden strips is mounted on the wall.
- A cement mortar is mixed, where the necessary components are added, and then the mixture is mixed well until it reaches a thick consistency.
- The resulting solution is applied to the walls in the spaces between the frame guides and then leveled with a spatula. The minimum layer thickness is 10 mm.
- During work, the room must be well ventilated, otherwise fungus may appear on the plaster.
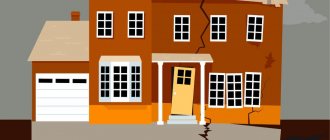
Foundation
If, when designing a house, you already knew that you would cover the house with bricks, then you had to make sure that the foundation was calculated both in terms of the width and the weight of the structure.
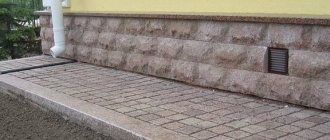
If the foundation was not originally designed for additional cladding, then it must be expanded. It may also have to be strengthened so that it can withstand the additional load of brickwork. Do not forget to make a blind area around the foundation, which will drain rain and melt water from it. It will also protect against getting wet and accelerated destruction.
Methods of external insulation
- Insulation with polystyrene foam and expanded polystyrene can be done in two ways: laying tile insulation in the cells of the frame or gluing the slabs directly to the wall. A detailed algorithm for insulating a house with EPS is described in the article “Step-by-step instructions for thermal insulation of a log house with polystyrene foam.” Thermal insulation with foam plastic is carried out in a similar way.
- Thermal insulation with polyurethane foam (PPU) is carried out by spraying using professional equipment.
- Installation of thermal panels is quite simple. Each element is provided with a “groove and tenon” type fastening. First, a starting profile is installed on which the elements are laid, joining them to each other. After final installation, the space between the wall and the panels is filled with foam.
- When laying mineral wool, installation of lathing is mandatory. The material strongly absorbs and accumulates moisture, which causes a decrease in its thermal insulation characteristics. The frame installation method allows you to make a ventilation hole between the wall and the insulation, as well as install a hydro- and vapor barrier layer on both sides of the insulation. Detailed instructions for installing mineral wool can be found in the article “Features of external insulation of a house with mineral wool.”
Insulation
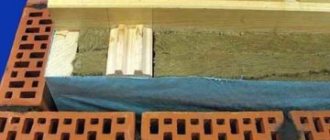
Before facing with brick, it is most likely necessary to insulate the timber walls. By itself, facing brick will not provide almost any additional insulation. If you used timber with a thickness of 150 or 200 mm - this is the most common size in construction, then insulation is definitely necessary.
Of course, first do not forget to treat the timber with antiseptics and fire retardants. Then the walls must be caulked, covered with insulation and windproof film. And after that you can start brick cladding.
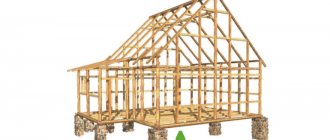
What is wood brick?
If you want to build an environmentally friendly, warm and reliable house, it is recommended to use bricks made from natural material - wood. Such a house or dacha is called a frame panel house. The laying of wooden bricks is specific in its own way, so it is recommended to contact specialists who know how to handle such material. It is faster and cheaper to build a frame house than a block or brick one, and there is no need to carry out additional brick cladding work. You can also sheathe a brick house with wooden blocks, additionally insulating the structure with mineral wool. If the construction of wooden cladding is carried out correctly, such a house will become warm, strong and beautiful.
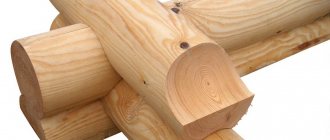
Bundle of timber and bricks
Considering that the brick cladding is made half a brick thick, i.e. by itself it will not be very stable. Therefore, it must be connected to the main timber wall. For this, it is recommended to use welded mesh, usually with a cell of 100 by 100 mm and a thickness of 3-5 mm. Such a mesh must be cut into strips, calculating the width so that on one side it is attached to the beam, and the other side is walled up in brickwork.
Fastening is done through 3-5 rows of bricks, starting from the bottom row and ending with the top one. Such a bond will firmly connect the walls and, at the same time, will not interfere with the timber wall slightly changing its dimensions. And this happens periodically as a result of changes in the humidity of the wall, along with the humidity of the environment.
Wall cladding and insulation
Before the important stage of cladding begins, you should think about winter and insulating the house. To do this, it would be reasonable to cover the entire perimeter of the house with special insulation. Most often, insulation involves attaching slabs of a vapor-permeable heat-insulating substance using dowels.
The main point here is the ability of the material to allow steam to pass through, otherwise there will simply be no ventilation in the house, which leads to increased humidity, and this is a favorable atmosphere for mold and mildew.
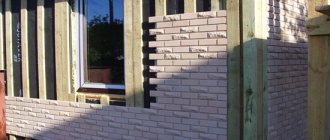
After the insulation has been completed, you can begin laying the walls. The first step is to ensure a strong connection between the two walls. There are two options for fastening wooden and brick walls, and the choice depends rather on taste and budget.
The first method, the European one, uses a flexible bond using galvanized mesh. To do this, buy a welded sheet of mesh and cut it into strips 40-50 cm long and slightly wider than the gap between the walls. Next, the mesh is bent in half, one part is nailed to the wood, and the second is placed in a horizontal seam in the brick wall.
This type of tying is flexible, so if budget allows, it is recommended to use the tying every row, or every other row.
The second method is to use conventional drywall fasteners. It is simpler in that the fasteners cost significantly less and are sold at any hardware store. This type creates a strong bond, so you can use fastenings every 3-4 rows, maintaining a distance between fastenings of 1-1.5 meters. This ensures that the box can withstand unplanned additional load.
Now you can begin the laying process. It will be important to lay the first row of bricks on a special layer of waterproofing, for example, on ordinary roofing felt. For stronger masonry, M400 cement is used, and to protect against moisture, a special solution with moisture-repellent properties is used. Brickwork allows you to come up with colorful home designs, using both ordinary red sand-lime brick and beautiful finishing stone. Here everything depends on taste preferences and trends in modern fashion decisions.
Bricklaying
Before laying the first row of bricks, it is necessary to waterproof the foundation by covering it with special bitumen mastic and covering it with roofing felt or other similar material. Then the laying begins.
As already mentioned, the thickness of the wall is half a brick. Rows of bricks are laid in a checkerboard pattern on a cement-sand mortar.
The thickness of such a wall is 120 mm. Remember that this wall should not be used as a load-bearing wall, because... not intended for this. Therefore, the rafter system, ceilings, etc. should not rest on it.
How to calculate the number of bricks
When calculating the amount of material, the formula is used: 50-55 bricks are needed per square meter of masonry. Therefore, for calculations, you need to obtain the area of all walls and multiply it by 55. For accurate calculations, the area of door and window openings is subtracted from the total area.
It is recommended to increase the resulting value by 10-15% - this is necessary to provide a reserve in case of combat during construction and transportation or in case of detection of a defect.[P3]
To predict the cost of work, the consumption of the solution should also be taken into account. It is calculated according to the rule: 2 kg of mixture is used for each square meter. Brick cladding not only makes a home more attractive, but also protects it from aging, weather, and outside fires. This technology requires precise calculations, but you don’t have to be a professional builder to use it. The main thing is to be consistent and attentive.
Ventilation gap
To prevent the timber and insulation from becoming damp, rotting and mold, it is necessary to leave a ventilation gap between the timber wall covered with insulation and brick, where the air can move freely, taking moisture with it.
Special openings are made in the top and bottom rows of brickwork for free air circulation. Such openings must be covered with rodent bars.
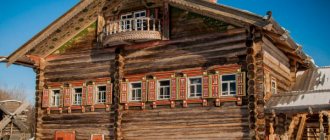
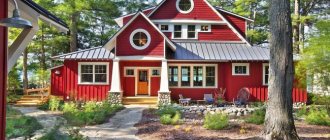
By facing a house made of timber with brick, you can make the house beautiful and durable like a brick one. In this case, you will spend significantly less money.
How to cover a wooden house (timber, log, frame) with bricks
Cladding technology
You can complete the task yourself. The main thing is to carefully follow the technology.
Before building a brick wall, the wood is treated with an antiseptic. The treatment prevents the appearance of mold, mildew, and protects against insects and rodents.
The treated wall is covered with lathing. The planed timber is nailed vertically, the width between the boards should be slightly less than the width of the selected insulation.
Insulation is attached to the sheathing. Recommended material is mineral wool. You should not use polystyrene foam or expanded polystyrene - they do not allow moisture to pass through. Roofing felt is also undesirable due to its unpredictability. The standard insulation thickness is 50 mm, in the northern regions - 100-150 mm. Insulating sheets or mats are laid in two layers so that the second layer covers the joints of the first.
A wind barrier is placed on top of the insulation. The material must be vapor permeable on one side. The permeable side is applied to the wall with insulation, the impermeable side remains outside.
A distance of at least 60 millimeters must be maintained between the insulated wall and the brickwork. This ventilation gap is necessary to ventilate steam, which will eliminate condensation and destruction of wood with insulation. The gap can only be smaller on houses made of logs, but if it is built from beams or using the frame method, a minimum of 6 cm is required.
Ventilation holes are created in the first and top rows of masonry. Ways to create them:
- brick with through perforation is laid on its side;
- several seams are left that are not completely filled with mortar;
- A couple of holes are made in the wall and covered with a grill.
The brick is laid in a bandage. Masonry starts from the corners of the house. Each row is carefully checked for horizontal and vertical evenness using a level and plumb lines. The seam between the bricks is no more than 1-1.4 cm. Door and window openings are closed with concrete lintels.
Wall reinforcement
The facing wall is thin and needs to be strengthened. This is done by tying it to the main wall and reinforcing it.
One of the methods of binding is the use of wire. A 100-150 mm nail is driven halfway into the wall and bent upward. A soft 3mm wire about a meter long is tied to the nail in the middle and twisted. In the middle of the masonry, the ends of the wire are placed apart and the nail is pressed until a ring is formed.
The second method is nailing tin to the wall. You need a tin strip about a meter long and 2.5-3 centimeters wide. Its middle is attached to the wall with a nail or self-tapping screw, both edges are connected, together they reach the middle of the bricks, then they are bent in different directions.
The third method is to use masonry mesh. One side of it is attached to the wall, the other goes to the center of the bricks, where its edges are bent to the side so as not to slip out of the mortar.
Such fortifications should be distributed throughout the entire wall. You can maintain a distance of 50 centimeters between them, or maintain a frequency of 4 dressings per square meter.
To further strengthen the masonry, reinforcing mesh is used. Reinforcement with cells of 50x50 millimeters is selected. It is laid every five rows. Instead of a mesh, rods with a diameter of 6 mm can be used; they lie longitudinally.
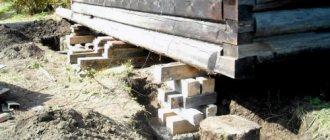
Features in the absence of a foundation
The foundation of the house must support the weight of the masonry. If there is no foundation of the required thickness, it expands. To do this, a trench is dug along the existing foundation to the depth of the concrete. The width of the trench is selected so that after pouring the concrete mixture, the new foundation is equal to the sum of the thickness of the ventilation gap, insulation and bricks.
A sand cushion is placed at the bottom of the trench, roofing material or other waterproofing is laid on top, then reinforcement. Reinforcing pins are driven into the existing foundation with a downward slope of 15-20 degrees. They will be needed to connect the new base to the old one.
Next, the formwork is created and the concrete mixture is poured. The right thing to do is to do this continuously. After pouring, the concrete is compacted so that all air bubbles are released. After a few days, the formwork is removed, but construction of the brick wall begins after at least a month so that the foundation gains strength and undergoes shrinkage.
A foundation for masonry is needed in any case. If it is missing, it still needs to be filled.
We correctly buy and store imitation timber
- To create a suspended wooden facade, it is best to order an imitation of timber with the smallest and average thickness: from 16 to 20 mm (the larger the width of the planks, the more natural the walls of the house will look). Oddly enough, the cladding on the façade of a private house is much less subject to mechanical stress than in rooms. Naturally, products with a cross section of 28x140 mm or, for example, 35x190 mm will not be worse, but the cladding will be much heavier and more expensive.
- When ordering the required amount of material, we strongly recommend that you count products individually and not by quadrature. To do this, it is best to paint each wall separately on the drawings, which will indicate: all intact planks (it is advisable to number them), trims used in the process (also numbered), window/door openings, joints, etc.
- It makes sense to depict and calculate some special zones and units separately, these include slopes, gables, hemmed roof overhangs, bay windows, boxes, etc.
- When making calculations, always take into account the fact that profiled lumber, which has a tenon and groove on the edges, loses part of the front surface area after assembly (the tenon goes into the groove). Therefore, there is the concept of “total area” and “working area”, which remains visible.
- Imitation timber is a planed and dry material, therefore, in order to preserve all its valuable properties (appearance, physical stability, wood health), it must be stored indoors. It does not matter whether film packaging is available, but it is necessary to follow the rules for organizing the stack.
- We recommend that you carefully check all materials before use. It is better to sort in advance the planks that have unacceptable defects or, say, severe curvature. Such parts can be purposefully used on the wall, which is least visible, or you can use them for cutting (slopes, boxes, in the area between windows, etc.).
- We have a separate detailed article on choosing imitation timber.
Sheathing a house with imitation timber
Projects of houses made of brick and timber
Of course, the owners of the land can independently decide what the finished house structure will look like. However, it is much wiser and more economical to purchase a ready-made standard building design. This will help:
- Purchase exactly as many materials as necessary to build a house. Thanks to this, you won’t have to spend the family budget buying raw materials for construction in excess.
Project of a combined building with a tiled roof - You can understand exactly what the finished structure of the house will be like just by looking at it, on a project that will be done by professionals in their field.
- Purchasing a ready-made project will help you make your dream home, which will be built without mistakes and errors that can negatively affect the appearance and facade of the house.
- The owners will definitely be satisfied with the house built according to the project. After all, they will be able to see the future design at the planning stage. If desired, you can order the project even with interior decoration. This will allow you to significantly save on hiring a space designer and renovation work.
All these factors indicate that building a house according to the project is profitable and reasonable. Despite the fact that the finished project itself costs some money, if you analyze the benefits, it is cheaper to initially erect a building that is ideal in its design than to correct errors later, which also costs money.
What projects are worth paying attention to?
- In specialized companies you can purchase ready-made projects of different styles and designs. Undoubtedly, a combined house with any architectural ideas will look aesthetically pleasing, and the exterior of such a building is unusual, but looks very rich. Some choose projects in which the ground floor is made of brick, and the second tier or attic is built of timber. It is these designs that are most often taken into account by those people who prefer the durability and reliability of their houses;
An example of installing a wooden terrace on the second floor - Often, houses are taken into account in which the entire house is built from profiled timber in order to provide a natural and environmentally friendly space inside the living space. The top of this structure must be covered with bricks to make the façade reliable and durable, and the interior of the building noble and environmentally friendly;
- Sometimes there are projects in which houses built from timber need to be partially faced with brick on top of wooden material. With the right design idea, such a design will look very aesthetically pleasing and interesting.
An example of brick cladding of a wooden house
All three projects are worthy and are often chosen by private sector owners. Such houses look noble and harmonious. The space inside is also very cozy and pleasant to be in.