The onset of spring for many is marked by the opening of the dacha season. In addition to the traditional cultivation of vegetables, fruits and berries, summer residents have adapted to keeping poultry in their garden plots.
Chickens are the most unpretentious in the process of keeping. If you have only a few laying hens, you can pamper yourself and your loved ones with fresh homemade eggs every day.
Where to begin
Setting up a poultry house on a personal plot is not difficult. Given the available materials and a minimum of funds, it is quite possible for anyone who wants to acquire a small yard.
First, you need to decide what would be more preferable: buy a ready-made chicken coop or make it yourself. A wide variety of chicken coop models are available in specialized construction stores.
You can buy such a bird house, as well as order its delivery and assembly in person or online. But it will be much more interesting and exciting to build a poultry house yourself.
Limitless fantasy
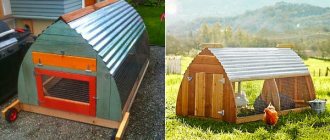
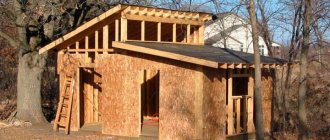
Numerous photographs of chicken coops for summer cottages on the Internet are amazing.
An interested poultry farmer can see both the simplest structures assembled from scrap materials and complex structures designed for all-season poultry keeping.
When deciding on a choice, you should start from what kind of chicken coop you want to build.
We do the interior arrangement of the poultry house ourselves
Now we will try to provide a detailed description, as well as a photo of the arrangement inside the chicken coop with our own hands, and we will start with the structure of the barn itself.
What to make poultry house walls from
They can build a barn for chickens from any material. You can use brick, blocks or stone, but such a heavy building will require a strip foundation. It’s simpler, cheaper and warmer to make the walls of the chicken coop made of wood. This chicken barn will be very light and can be installed on a columnar foundation.
To build a wooden chicken coop, a frame is knocked down from timber, after which it is sheathed with wooden clapboard, chipboard or plywood. If the poultry house is designed for year-round keeping of chickens, the walls must be insulated. Mineral wool, clay with straw or polystyrene foam are suitable as thermal insulation for a chicken coop.
Properly made chicken coop walls should have windows. Their size is calculated in relation to the floor approximately 1:10. It is important to carefully caulk all cracks around the window openings of the chicken coop to avoid drafts.
When the chicken coop is completely completed, the walls are treated with lime solution. This will ensure the safety of the wood, plus good disinfection.
Poultry house floor arrangement
It is the owner who decides what is right, what is best, and what to make the floor of the chicken coop from. The main thing is that it is warm. In general, if a chicken barn is built on a strip foundation, then the floor is usually made of earthen, clay or concrete, and do not forget to lay roofing felt waterproofing and thermal insulation under the top screed. During the frame construction of a wooden chicken coop, the floor is made of boards. To install such a covering, first a subfloor is knocked down from any board. For insulation, gravel is poured on top along the height of the logs. The finishing floor of the poultry house is laid from edged boards.
Advice! To make cleaning the chicken coop easier, poultry farmers recommend covering the floor with old linoleum. However, if the material is too soft, the chicken will peck at it without any problems.
The floors made in the poultry house are not the end of the arrangement of this part of the barn. Now the chickens need to add bedding. First, the floor of the chicken coop is lightly crushed with lime, and then sawdust or sand is poured on top in a 5 cm layer. You can use hay or straw for bedding for chickens, but they quickly get wet and require replacement every two days. In winter, peat is added to the bedding for insulation, as a result of which its thickness increases.
Even during the construction of the walls, it is advisable to equip the chicken coop near the floor with an opening hatch. Through this window it will be convenient to throw dirty litter out of the house.
Correct placement of perches inside the house
When arranging the inside of a poultry house, it is important to make comfortable perches, because chickens spend most of the day on them. Perches are made from timber with a cross-section of 4x7 or 5x6 cm. The perches should be comfortable for chickens. The bird will not be able to grasp poles that are too thick or thin with its paws, and this will cause its instability. Even thin perches can sag under the weight of chickens if they all pile on it at once.
When making chicken poles, the timber is processed with a plane to give it a rounded shape. Next, the workpieces are sanded with sandpaper. Finished perches should be smooth, without sharp protrusions or burrs.
Advice! Good perches for chickens can be made from the new shovel cuttings sold in the store.
When we arrange perches in a poultry house, we always choose their optimal location. The poles can be mounted horizontally or vertically in the form of a ladder, and the appearance of the structure has nothing to do with it. The first type of arrangement is considered the most convenient for chickens, but such a perch takes up a lot of space in the chicken coop. The second type of location is chosen for very small poultry houses. A vertical perch allows you to save space inside the chicken coop, but the birds experience discomfort on it.
Equipping perches in a poultry house requires correct determination of their length. About 30 cm of free space is allocated on the perches for each chicken. Next, the length of the perches is determined by the number of birds. The poles are fixed no closer than 50 cm from the floor. When placing a perch for chickens horizontally, the first pole is removed from the wall by 25 cm, the rest are attached in increments of 35 cm.
Installing nests for chickens
When installing nests, they try to choose a secluded, dark place without drafts inside the chicken coop. In order for the chicken to feel confident and calmly lay eggs, the structure must be stable. It is important that the nests are spacious. To do this, they are made 40 cm deep. The width and height of the nest is at least 30 cm. Bedding of straw or sawdust must be poured inside. You can use hay.
Chicken nests are usually made from wood. You can make them from boards or knock down a frame from timber, then cover it with plywood. Ready-made nests can be obtained from any container or box of the appropriate size. It is also worth providing a small ladder in the form of a ladder. It is installed at each nest so that the chicken can freely enter and exit.
As for quantity, one nest is usually enough for four laying hens. Although ideally, for example, for 20 hens it is advisable to provide 10 places for laying eggs.
Attention! All nests inside the chicken coop are installed at a height of at least 50 cm from the floor.
Feeders and drinkers for chickens
Inside an equipped poultry house, it is also important to properly provide feeders and drinkers. Try to pay attention to the habits of chickens in the summer. Birds constantly dig in the ground in search of food. So it’s better to just sprinkle the grain on the floor. Chickens will even peck food from under the litter.
In winter, of course, a lot of food will be lost in the thick bedding, and over time it will begin to rot. During this period, the chicken barn should be equipped with feeders. You can buy them or make them yourself. Store-bought feeders with a mesh section on top have proven themselves to be excellent. The chicken crawls only with its head to the feed, and is not able to scoop it out. With their own hands, poultry farmers make chicken feeders from scrap materials. PVC sewer pipes with elbows are quite suitable for these purposes. They are fixed in several pieces one next to the wall. An example of such a feeder is shown in the photo.
When arranging the inside of a chicken coop with your own hands, it is important to provide drinking bowls. Typically, poultry farmers place an old saucepan or other similar container for chickens. You can do this, but you will have to change the water often. The disadvantage of such a drinking bowl is the ingress of droppings. The water quickly becomes polluted, after which it becomes unsuitable for drinking.
It is best to install store-bought drinking bowls or those made from plastic bottles inside the chicken coop. As with the feeder, the chicken's head only reaches the water. The likelihood of droppings getting inside the drinking bowl is minimal.
Organizing a swimming area inside the poultry house
When carrying out the internal arrangement of the chicken coop, you need to take into account that birds love to swim. While floundering in the dust, chickens clean their feathers. You can organize such baths inside the poultry house in winter. To do this, place a shallow trough or other empty container half filled with wood ash. Bathing is not just a bird's whim. The chicken's body is bitten by lice and other parasites. By wallowing in the ash, the bird cleans not only its feathers, but also gets rid of uninvited guests.
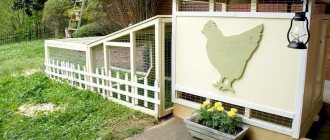
Mesh run for poultry near the chicken coop
Good walking is important not only for the chickens, but also for the owner himself. A bird walking around the yard will peck at everything growing in the garden. To make a simple fence, it is enough to drive 4-6 posts made of steel pipe near the chicken coop, after which the sides and top are covered with metal mesh. They install a run on the side of the entrance doors of the chicken coop. This is where the canopy is attached to provide shelter from the rain.
Poultry house ventilation
Ventilation is needed for air exchange inside the chicken coop. You can use regular ventilation, but in winter the house gets very cold through open doors. It is optimal to make a supply and exhaust system for a home chicken coop from two plastic pipes. The air ducts are discharged through the roof of the poultry house, as shown in the diagram. The exhaust pipe is mounted under the ceiling, leading it above the roof ridge. The supply air duct is lowered to the floor of the chicken coop, leaving a gap of 20–30 cm. The pipe protrudes above the roof of the poultry house a maximum of 40 cm.
Artificial and natural lighting of the poultry house
During the day, the chicken coop is illuminated by natural light through the windows. However, there is not enough daylight for laying hens, and broilers, in general, eat even at night. Installing artificial lighting inside the poultry house will help ensure comfort for the chickens. Fluorescent lamps that produce a white glow are ideal for these purposes. In winter, you can additionally install powerful red lamps. They will help raise the air temperature inside the chicken coop to above zero.
The video tells about the internal arrangement of the poultry house:
Basics for beginners
Before you start making a simple chicken coop with your own hands, you need to prepare.
You need to start preparing for the construction of a poultry house by choosing a location that must meet a number of mandatory parameters.
DIY chicken coop for 10 chickens.
When designing and building a chicken coop, it is important to keep many components in mind. After all, a chicken coop is both a comfortable home for birds and an outbuilding designed to make it easier for people to care for animals and increase labor productivity. Therefore, before making a chicken coop with your own hands, let's figure out what design elements and features should be inherent in every good chicken coop.
1. We rise above the ground
Dampness and moisture are the main enemies of any chicken coop. In a damp room, birds begin to get sick, so the chicken coop is always raised above the ground. Some designs provide for a very high lift - up to a meter, and sometimes higher. If your area, like ours, does not have excessive humidity, then 25-40cm should be quite enough.
2. Placement of the chicken coop
Speaking of terrain! Choosing the right place for the chicken coop is 50% of success. Here are some tips to help with this:
- choose a place in the shade (for example, under the shade of a large tree), otherwise the coop will overheat during the summer months, which can lead to disease
- the place for the chicken coop should be as dry as possible - do not place the chicken coop where water collects after every rain
- try to choose a secluded place that is not too exposed to the wind (this is how the fence protects the chicken coop from the wind, and the trees from the abundance of direct sunlight)
- If you think you've found the perfect place, don't rush - watch carefully for a while: you may notice hidden problems.
3. Inputs and outputs for chickens and people
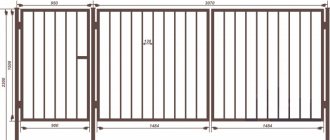
Each chicken coop must have an entrance for birds, as well as access for cleaning the premises. In our chicken coop, the passage for the chickens is made behind the back wall, and two doors provide the possibility of cleaning the chicken coop.
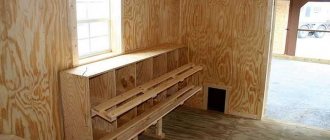
4. Nests and roosts
Chickens will lay eggs in the nests, and you will take these eggs from the nests, so the nests should be comfortable for both you and the chickens. It is believed that the ideal nest size is 30x30cm in length and width, and 30-40cm. in height. In this case, it is recommended to make the entrance to the nests narrower.
There should be easy access to the nests from the outside.
The lid opens, so you don't have to climb inside the coop to collect eggs.
The lid must be inclined so that water flows freely from it and does not fall into the nests.
The total length of the perch is calculated based on 25 cm per chicken. Since we are planning our chicken coop for ten chickens, we have enough crossbar for the entire length of the chicken coop (almost 2.5 m).
5. Lighting and ventilation of the chicken coop
Chickens simply need light. Reduced daylight hours are one of the main reasons why chickens stop laying eggs in winter, and experienced owners know that this problem can be solved by turning on a light bulb. Therefore, there should be windows in the chicken coop!
It is better to make windows on at least three sides so that light penetrates into the chicken coop throughout the day. Also note the hinged ventilation window on the back wall. In wet weather it can be opened for additional ventilation. The windows above the slots on the front wall also open. Ventilation is very important, but remember: no matter what tricks you use to ventilate the winter chicken coop, be sure to provide the ability to adjust the air flow until it is completely blocked - this will come in handy in winter, when ventilation will suck out precious heat.
Size matters
A separate, but no less important point in building a chicken coop is determining its size. This criterion entirely depends on the number of planned poultry population.
The optimal area required for one bird to live comfortably is considered to be 0.5 square meters. m. When choosing a location and drawing up a plan for future construction, you should rely on how many birds you are going to acquire.
Also, it is very important to provide, in proportion to the livestock, the availability of accessible feeders, drinkers and perches.
Layout of the chicken coop inside
Before you start planning your own, you need to have an idea of what the chicken coop looks like from the inside, and you can find such information on the Internet or by visiting your nearest neighbor. The location and number of perches, nests, feeders, drinking bowls depends on the number of livestock, as well as the design features of the barn.
To keep 5 to 10 laying hens you will need a small chicken coop. The birds have enough space inside a barn measuring 2 x 2 m. In winter, the laying hens huddle together. A free area of 2.5 m2 is enough for 10 heads. The optimal ceiling height for a mini-chicken coop is 1.5 m.
When planning the inside of the barn, you place perches with your own hands at the side wall. Nests are placed along the long wall, with feeders in the center. Be sure to provide walking space near the chicken coop. You can easily build it with your own hands from metal tubes and chain-link mesh. The entrance door is located on the south side.
If you plan to keep from 20 to 50 birds, it is better to divide the inside of the chicken coop into sections with your own hands. Each compartment can contain 7 chickens of different breeds. The barn is built 4 m long. The width of the chicken coop is from 2 to 3 m, which depends on the livestock. Inside, each section is equipped with doors. The doors are made by hand and open towards a common corridor, the length of which is provided for the entire length of the chicken coop.
If young chickens are supposed to be kept together with adult chickens, inside the barn they build a separate compartment for an incubator with their own hands. The main space of the chicken coop for one breed is made common without division into sections.
The enclosure is attached to the smaller wall of the barn. In this place they arrange an exit with their own hands. If the inside of the chicken coop is divided into sections, then nests are attached to the walls adjacent to the corridor. Containers with ash are placed against the opposite wall for bird bathing. Feeders are traditionally placed on the floor.
What to make a chicken coop from?
- It is preferable to build the frame of the poultry house from wood;
- wooden or plastic lining is suitable as cladding;
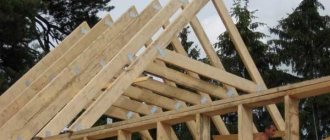
- the roof of the chicken coop can be made of metal or plastic (its most important quality is water resistance);
- the floor of the bird house should be made of wood (this is the most preferred material);
- the presence of a perch provides an easy-to-clean tray, best suited for which is a sheet of galvanized iron;
- It is best to fencing a walking area using metal mesh (chain-link).
Arrangement of a chicken coop begins with space planning
It is not necessary to build a barn for chickens at your dacha if you already have outbuildings. Any room is suitable for a chicken coop, the main thing is that it must be properly equipped. The layout of the poultry house begins with determining the number of chickens. It is allowed to keep a maximum of 2–3 birds per 1 m2 of free space. And then, their number also depends on the breed, since individuals differ in size and habits. When equipping a poultry house, you must immediately decide at what time of year the chickens will be kept. For summer poultry raising, a regular, uninsulated barn is suitable. When keeping chickens year-round, the entire room is thermally insulated.
When planning the chicken coop space, allocate free space for walking. Chickens cannot live only in a barn, and they need to roam. The walk is made of metal mesh stretched over poles. Moreover, its area should be approximately 1.5 times larger than the barn itself. The height of the run is about 2 m. The top of the enclosure is covered with a net to prevent predators from getting to the chickens. It is advisable to cover part of the walk with a roof. Here the chickens can hide from the sun and rain.
Advice! During the construction of a run near the poultry house, about 30 cm of mesh must be dug into the ground. Chickens love to dig out tunnels and can crawl out from under the fence.
Chicken coop zoning
Regardless of the size and seasonal purpose, the space of any chicken coop is divided into three zones:
- part of the chicken coop where the chickens sit on perches;
- the space where they walk;
- the place where their nests are located (the most important area in laying hen coops).
- When and how to prune grapes in the fall before covering
Do-it-yourself cellar in the country: types of construction, features, choice of location on the site. Optimal DIY construction sequence
Which house is cheaper to build - advice from builders, opinions of engineers and a review of the most effective construction options (110 photos and videos)
DIY chicken coop. Summer paddock.
During the warmer months, chickens need more space and will happily spend most of their time outside. Therefore, when making a chicken coop with your own hands, you need to make an open summer pen for chickens. The paddock area is calculated using the formula 1 sq.m. for every chicken.
Pay attention to the mesh at the bottom of the coop - it protects against predators. It should be buried 20-30cm into the ground, since some predators are quite capable of making a tunnel. And if there are large birds of prey in your area, then the enclosure must also be protected from above.
It is also very important that at least part of the pen is in the shade - the chickens should be able to hide from the scorching sun. If there is no natural shade, then build a small canopy.
So that birds can freely enter and exit the chicken coop raised above the ground, a simple ladder is usually built for them.
Everything you need is at hand
Absolutely everyone at their dacha has a warehouse of old things: pieces of furniture that have gone out of use, leftover building materials, etc. Take your time to get rid of the so-called junk. All this wealth can be used when building a chicken coop.
Wooden or plastic panels, metal sheets and mesh are perfect for building small summer portable or stationary chicken coops.
But not all chicken farm owners limit their activities exclusively to the warm season.
Winter housing for chickens
When setting up a winter chicken coop, you will need a different list of materials and a more thorough approach.
What is available on its own in summer must be artificially created in winter. In order for chickens to feel comfortable during the cold season and lay eggs regularly, the breeder must provide them with proper living conditions.
A winter chicken coop is characterized by: the presence of additional lighting and maintaining a certain temperature.
Do-it-yourself utility block - instructions and step-by-step description of how to build a simple and functional utility block (135 photos + video)The best do-it-yourself greenhouse - designs, main options, material selection criteria. 120 photos and step-by-step video of construction
Polycarbonate canopies - a review of the best projects and features of choosing beautiful design ideas for a canopy (105 photos)
Warm housing options
What a winter chicken coop should be like is determined by the number of birds and the area occupied by the housing. In addition, the individual capabilities of the breeder and the specifics of regional climatic features are taken into account.
The size of chicken coops depending on the number of birds
- a small room with an adjacent open fence for walking with a total area of up to 10 square meters. m. (suitable for keeping 5 - 10 chickens);
- poultry house on a warm foundation, the walking area is covered with a roof, the total area is 12-15 square meters. m. (such a dwelling can accommodate 10 - 15 birds);
- an impressive chicken coop of about 20 square meters. m. with a large walking area (capable of accommodating 20-30 feathered residents);
- a huge chicken coop measuring about 40 square meters. m. and an almost 15-meter walking area (such a structure can accommodate more than five dozen chickens);
The larger the size of the winter chicken coop, the higher the requirements for it in terms of thermal insulation, ventilation, the presence of additional heating equipment, as well as the number of perches and nests corresponding to the number of livestock.
Building a chicken coop and raising poultry on a personal plot is relevant at any time of the year. The main desire.
Interior design of a chicken coop for 10 chickens
To make a chicken coop for 10 chickens comfortable, it should include:
- sleeping place;
- nests;
- dining room;
- swimming areas;
- walking;
- ventilation;
- heating;
- lighting.
The most important aspect when building a winter house for 10 chickens is lighting and heating. Temperature conditions significantly affect the development of chickens and chicks.
During the life of the chickens, the room will become damp, so a ventilation system is installed to achieve dryness. In winter, a bedding of sawdust at least 5 cm high is poured onto the floor. This will absorb the droppings and warm the floor of the chicken coop. It also helps maintain the temperature above 5 0C.
Features of arranging a chicken coop for 10 chickens:
The summer version is equipped with supply and exhaust ventilation. Exhaust ventilation is installed at the top of the wall. A supply pipe is mounted on the opposite wall at a distance of 50 cm from the floor. Arranging a roost. The location of the first pole from the wall is over 25 cm. The minimum height of the perch from the floor is 50 cm. A 4 * 5 beam with a rounded side or wooden rods with a diameter of 4 cm are used as a pole. Nests are made from wicker baskets, boxes or boxes
The minimum dimensions of a nest for a laying hen are: height and width 30 cm, length – 40 cm. Attention! The length of the perch is calculated based on 20 cm per bird. For a chicken coop for 10 chickens, the total length of the perch will be 2 m
If 2-3 poles are mounted, then the total distance is divided by 2 or 3.
Arrangement of the dining room. Feeders should be located in a place convenient for birds. The length of the feeder is calculated based on 10-15 cm per 1 chicken. They also install hanging feeders from boxes, which are placed 15 cm from the floor. Swimming area. Set up dust baths. Any container is filled with sand, ash and earth. Such baths improve the bird's plumage and help kill insects. Heating the coop is important to maintain a comfortable temperature for the hens. Poultry house lighting is necessary for regular production of chicken eggs. Laying hens need 16 hours of light.
The construction of the roost includes a place for chickens to sleep. The roost is the bird's main pastime. Retractable storage bins for litter are installed under it and a ladder is attached. The perch is placed at a height of 50 cm-1 m from the floor so that the bird is warm in winter. A perch of 4 poles 1 m long is designed for 10 chickens.
For 10 chickens, 4-6 nests are installed. Sawdust, hay or straw are placed inside each nest to make it convenient for the hen to hatch eggs. The nesting area is located in a shaded area of the chicken coop.
The place for feeding chickens should be 15 cm above the floor so that the feed does not mix with droppings, since in winter the height of the substrate can be 10-15 cm.
To prevent the bird from having the opportunity to fight over food, the length of the feeder should be 10-15 cm per bird. To protect the feeder from overturning, they are attached to the wall or hung on a chain from the ceiling. A drinking bowl for chickens is also installed. Birds consume a lot of liquid, so drinking bowls are placed in a convenient place for the owner to ensure easy passage. In winter, electric heating is placed under the tub of water to prevent the water from freezing.
Feeders come in the form of trays, bins and troughs. To avoid the accumulation of birds at one feeder, you can build several of them and place them in different places in the chicken coop.
After installing the ventilation system, all seams are sealed with foam to avoid drafts.
A mandatory attribute of the poultry house is a drinking bowl. On sale are simple bowls, containers for an inverted jar or bottle, float, siphon and nipple drinkers.
Nests can be made from ordinary boxes or boxes. Straw and sawdust are placed inside. Place them in a quiet corner, away from feeders.
The perch is made from a wooden block with a cross-section of 50x70 mm. For meat-egg breeds, it is fixed at a height of 60 cm from the litter, for laying hens - 90 cm. To prevent the perch from sagging under the weight of the bird, a support is installed in the middle.
DIY chicken coop photo
Did you like the article? Share 
0