Construction activities are inextricably linked with the implementation of reinforcement works. Foundations and floors reinforced with reinforcement frames ensure reliability and long service life of buildings. Reinforced concrete has an increased strength margin, is able to withstand significant loads and maintains its integrity for decades. To make a reliable spatial frame, a reinforcement hook is an indispensable tool. It’s easy to make a hook for tying reinforcement with your own hands or use a purchased device.
Why is crocheting reinforcement done?
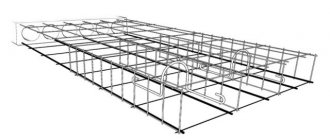
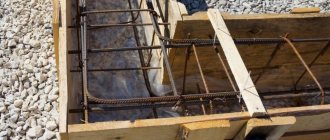
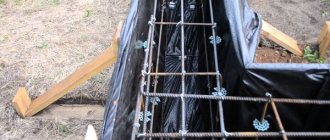
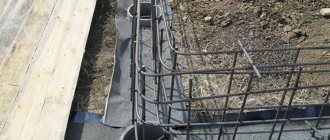
For a small amount of concreting work, steel rods are laid in a formwork frame, which is filled with concrete mixture. However, when strengthening large foundation structures, a spatial frame is constructed from steel rods. The rods are evenly distributed throughout the entire space to be poured. This allows reinforced concrete to evenly absorb loads and increases the strength of building structures.
Tying reinforcement for the foundation using welding
The connection of individual elements of a reinforcing metal structure can be done in various ways:
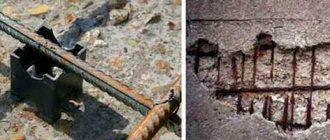
- using electric welding. Despite the increased speed of fixation of parts of the reinforcing lattice, overheating of the material occurs in the connection zone, which disrupts its crystalline structure and can cause the formation of cracks under the influence of load. Welded areas are also more susceptible to corrosion processes, which negatively affect the strength and durability of the metal structure;
- using special clamps made of elastic plastic. They can significantly reduce the duration of knitting activities, but have a serious drawback. Plastic loses its strength properties in the cold season. This is the reason for the weakening of individual sections of the joint and the rupture of clamps when moving along the reinforcing grid;
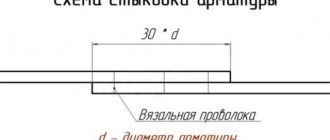
- using hooks for tying reinforcement. This is a fairly simple fixation method with an increased degree of reliability. To complete the work, you need to cut the wire in the required quantity. To assemble the lattice, a special knitting wire is used, which is used to tighten the rods at the intersection areas. To simplify fixation, a hook for reinforcement is used - a knitting tool with a simple principle of operation.
Professional builders use various knitting devices when carrying out reinforcement measures. This is the optimal solution. For small frames, they use a self-made hook for knitting reinforcement, and for increased knitting volumes, they use special guns.
Tips for using a knitting gun
Buying or renting this tool is expensive, and in order not to waste money, you need to follow the operating rules.
In the case of this device it is:
- Full charge of the battery, compliance of the wire and reinforcing bars with the parameters and “original” components. It is recommended to be especially careful when using components from Japanese brands; such a tool can easily be broken by using, for example, Chinese wire. Plus, such a breakdown is not included in the warranty agreement.
- It is also recommended to use extensions to form grating units if work is carried out with large horizontal frames. This will make the work much easier.
- Even though the operator can do more work with a knitting gun, an assistant is still needed.
What gun do you use for tying reinforcement?
BatteryMechanical
Crochet hooks for reinforcement - types of tools
Various types of devices are used to bind steel blanks of a spatial frame:
- manual. Requires significant effort to ensure fixation. It is easy to make such a device yourself, spending a minimum of money;
- semi-automatic. Using industrially manufactured screw devices, you can facilitate the tying operation and speed up the process of assembling the load-bearing frame;
Crochet hooks for reinforcement
- automatic. The use of a professional gun allows you to speed up the process of joining metal rods when performing fixation on an industrial scale.
Let us dwell in detail on the features of each type of knitting tool.
Standard crochet hook for reinforcement
Various types of hand tools are used:
- a tool made independently from an electrode or steel wire;
- ready-made devices purchased in construction stores.
To perform fixation, you must first cut the wire into pieces of the required size. Depending on the skill of the knitter, within a minute you can fix from 5 to 15 sections of the connection.
Advantages of hand tools:
- ease of performing binding operations;
- the possibility of making it yourself;
- insignificant level of production or purchase costs.
Hook for tying reinforcement VOREL 49830
Along with the advantages, there are also weaknesses:
- reduced productivity of knitting operations;
- increased level of effort for twisting the wire.
Professional builders often use a self-made or purchased knitting hook for reinforcement, which provides an increased degree of reliability of the connection.
How to knit the frame?
The following tools can be used for tying reinforcement:
- Hook for fittings.
- Mechanical hook.
- Tying gun.
crochet hook
The first option is the simplest and most accessible. If necessary, you can buy it in a specialized store for a hundred rubles or even cheaper. Moreover, it can be made by hand if the suitable material is available - we will return to this later. The downside is low performance. A novice knitter, with a sufficient supply of wire, will be able to produce 6-10 knitting per minute. An experienced master who has worked in this field for more than one year reaches a limit of 15-20 matings. But this is perhaps the maximum. Therefore, completing a large amount of work will take quite a lot of time. You will also have to spend time cutting the wire into pieces of the appropriate length and folding it carefully. Since even a small object may require hundreds of pieces, this factor must be taken into account.
Screw hook
The screw hook is the next step in the development of the tool for knitting reinforcement. Outwardly, it looks a little like a regular one, but thanks to it, the knitting speed will increase, and the worker will get tired much less. If, when working with a regular hook, a specialist must twist the ends of the wire and manually twist them, then a screw hook is much more convenient. Loop the loop and ends, then gently but firmly pull towards you. The plastic handle will be fixed in the hand, and the hook itself will begin to spin quickly, securely tightening the loop. Such a tool costs from 600 to 1000 rubles, depending on the manufacturer and store. It will be an excellent choice if you need to perform work once on a relatively large object. The knitting speed will increase, however, the wire will still have to be cut and bent by hand.
Automatic pistol
Finally, a special pistol. If you use an automatic gun for tying reinforcement, then even the largest amount of work can be easily handled by a beginner who has never previously engaged in such activities. When working with it, there is no need to cut or bend the wire - a spool of wire is tucked into the gun, which bends and cuts automatically. It is enough to press the gun to the joint and press the trigger - in less than a second the reinforcement will be tightly pulled in place. In a minute, an inexperienced worker can make 50-60 matings. Of course, this is an absolute record. Unfortunately, the knitting gun has a drawback - cost. The simplest models cost about 50 thousand. In addition, not just any wire will work here. You need to use a special one that has a certain diameter and stiffness, and it costs much more than a regular knitting machine. Using the wrong wire can lead to the failure of expensive equipment.
Knowing about the different types of knitting devices, you can easily make the right choice, deciding which option suits you fully.
Automatic hook for tying reinforcement
A special device with a reverse operating principle allows you to speed up and automate the twisting process. At first glance, it looks like a standard manual device, but differs in the presence of a screw mechanism consisting of the following parts:
- plastic handle with internal screw thread;
- working body with a screw thread on the rod.
When assembled, these elements form a mechanism with a reciprocating principle of operation. The reversible device works quite simply - moving the handle causes rotation of the working element on which the wire loop is put.
Advantages of the reversible device:
- increased wire binding performance;
- Possibility of use in areas with limited access;
Automatic hook for tying reinforcement
- ease of knitting operations;
- durability of the device with regular lubrication.
The device has the only drawback - its increased price when compared with the cost of a conventional hand tool.
Using a reversible tool, the knitter can perform an increased amount of work without getting tired. The screw device is superior in efficiency to the manual device when it is necessary to manually pull and twist the wire ends. Without reinstalling the working hook, by cyclically moving the handle you can achieve reliable fastening.
Procedure for using the device:
- Insert the hook of the tool into the twisted loop.
- Pull the handle towards you along the working axis.
- Return the handle to the starting position.
- Perform the next movement cycle.
You can also make your own semi-automatic tightening device using a regular screwdriver. You will need a bent nail without a head or an L-shaped rod, the end of which must be inserted into the tool chuck. With a little practice, it is not difficult to master the principles of operation using this device.
Types of hooks for tying reinforcement
There are two types of hooks for tying reinforcement manually - simple and screw. Also, for large volumes of knitting, use a homemade hook clamped into a screwdriver or drill. And a special, professional pistol will do this job as quickly as possible.
Screw hook
Its design is a little more complicated than the first one. It’s unlikely to be possible to do this on your own. It consists of a handle with a rotating mechanism, which, when the hook is pulled up, causes the working part to rotate. Something like a spinning top. The principle of operation is approximately the same, only it is not the outer part that rotates, but the inner one.
The tip of the hook has the usual shape. Wire blanks are made the same as for a simple hook. It is very important to ensure that the ends of the wire catch on the hook at the moment of rotation.
Knitting with a screw hook is much easier than usual, since you don’t need to rotate your hand, which is why it most often gets tired.
Knitting gun
This is the easiest way to connect reinforcement with wire. Here the tip of the gun works like a shuttle, throwing the wire and evenly making identical loops. There are both battery-powered and mains-powered pistols.
The time of one connection is 1 piece per second. Due to this, the performance of the rebar tying gun reaches maximum speed compared to other methods.
The disadvantages of the pistol include:
1) Availability of an electrical network for connecting or charging the battery.
2) High cost of the device.
3) Wire of the same diameter is used.
4) A rather complex wire feed mechanism that requires maintenance and, if necessary, qualified repairs.
Knitting reinforcement with a screwdriver
Another option is a mechanized hook, a drill or a screwdriver with an attachment. In this case, the hook can be a nail with a bitten off head and a curved sharp end.
The advantage of this method is that it is not your hands that rotate the hook, but an electric motor, and this makes the work easier.
It should be noted that the power tool must be powerful enough to twist the wire.
Professional hook for fittings - use a gun
A knitting gun is a professional tool that is used on large construction sites. Using an automatic hook for tying pistol-type reinforcement, even a beginner can easily handle the assembly of a large reinforcement cage.
The knitting gun is a professional tool.
Advantages of a professional device:
- there is no need to pre-cut the wire into blanks;
- wire is automatically fed from the working drum;
- material savings are achieved due to the absence of wire waste;
- increased pistol performance;
- increased loop tightening force;
- possibility of adjusting the twisting force and wire length.
Among the main advantages, it is necessary to note the possibility of autonomous operation from a battery, as well as the use of a special extension cord, which allows you to perform work while standing, without bending your body. The design of the device allows you to hold it in one hand, while the other hand supports the steel rods without the help of assistants. The duration of tightening the joint does not exceed one second. This is very convenient when performing work on an industrial scale.
Along with the advantages, there are also weaknesses:
- quite high price of a professional pistol;
- increased costs for purchasing special wire;
- inconvenience of use in confined spaces;
- the need to train knitters in how to work with the tool.
It is important to purchase consumables that correspond in cross-sectional size and rigidity to the characteristics of the gun. Otherwise, equipment damage may occur. The gun is used by professionals when assembling the frames of large foundations. And at the same time, in certain places of the grille, fastening can only be done using hand tools.
Knitting gun BM-400
Why should you choose such a device?
A professional tool is the key to a high-quality result that will last for many years.
The main advantages of using a knitting gun are:
- High quality wire knots.
- Operative pace of work.
- Easy replacement of wire cassettes.
- Scope of work – 1 person can do the work for a small team.
- Fairly light weight.
- Possibility of knitting multi-layer knots.
- Adjusting the stretch marks makes the frame more durable.
- Pull tightly.
- Continuity of work during the shift due to a powerful battery.
Expert opinion
Torsunov Pavel Maksimovich
Of course, any tool also has its drawbacks. In particular, for a knitting gun this is a high price, the need to spend money on wire cassettes and inconvenience when working in cramped conditions.
We make a device for tying reinforcement with our own hands
Craftsmen who have been assembling reinforcement frames for a long time prefer homemade tools. This is due to a number of factors:
- If you manufacture it yourself, the device can be equipped with a handle in a form convenient for the hand. This will increase productivity and ensure operating comfort;
- To manufacture the working grip on your own, special grades of steel can be used. Durable material will not bend under loads;
- it is easy to give the working body the required shape and make it, if necessary, in an increased size. This is convenient for working in hard-to-reach areas.
It’s easy to make a regular hook for tying reinforcement with your own hands.
Various options are possible:
- without handle. The simplified design involves the use of a welding electrode;
- with handle. Such a device is not inferior in quality to those manufactured in industrial conditions.
To make a simplified design, you need a welding electrode, a hammer and pliers. Procedure:
- Remove the coating.
- Step back a couple of centimeters from one edge and bend it at a right angle.
- Form a rectangular holder with dimensions of 4x10 cm.
- Sharpen the working part and give it a cone shape.
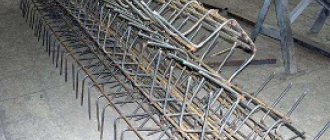
We knit reinforcement for the ceiling with our own hands.
The manufacturing process will take no more than 10 minutes.
The design with a wooden handle is more convenient to use and can be made in a couple of hours . For assembly you will need:
- steel wire with a diameter of 8 mm and a length of 0.4 m;
- wood blank for making a handle;
- washers and nuts corresponding to the diameter of the rod;
- electric welding;
- pliers;
- Bulgarian;
- electric drill;
- a sheet of sandpaper;
- sharp knife.
Assembly algorithm:
- Make a handle.
- Drill a hole in it.
- Sand the surface.
- Weld the nut to the end of the rod.
Do-it-yourself crochet hook from rebar
- Put the washer on and insert it into the handle hole.
- Install the washer and weld the next nut.
- Give the end of the rod the required configuration and sharpen the edge.
- Cover the handle with varnish or soak it with an antiseptic.
After making several connections, check the functionality of the device. If necessary, bend the wire part.
Step-by-step instructions for knitting reinforcement
Some articles claim that knitting reinforcement is easy and simple. This is true if you need to fix 5-10 rods. For large volumes, you need to have practical skills, but they do not appear easily and simply, you need to train your eyes and muscles, and bring your actions to automatism. Only after this will knitting be truly simple and of high quality.
Before starting to work with a grinder, cut the coil of wire so that the length is 15–20 cm, the specific values depend on the diameter of the reinforcement.
Step 1
. Bend the wire in half and place it on the palm of your left hand - the workpieces will always be nearby, no need to make unnecessary movements, waste energy and waste time.
Blanks
The number of blanks is approximately 40–50 pieces, choose as many as are comfortable to hold in your hand. If the ends are tangled, then straighten them with the nose of the hook, the wire should pull out easily and one at a time, the ones located nearby will not fall to the ground.
Important. We specifically tell you in as much detail as possible all the details and secrets of professional knitters. Each of them slightly speeds up and facilitates the process, and in total a noticeable positive effect is achieved.
Step 2
. With your right hand, pull one wire out of the bundle, bend the ends with the fingers of your left hand, and reduce the bend radius with your right hand. There is no need to make the radius very small, as this makes it difficult for the nose of the hook to hit it. You have to take aim for a long time, adjust the position, and only after that the crochet hook can take its working position.
Techniques for tying reinforcement
Step 3
. Bend the tip of the wire at an angle of approximately 90°. It is very important to correctly determine the length of the bent part; the number of turns of the hook and, accordingly, the knitting speed depends on this. The length depends on the diameters of the reinforcement being connected; it should exceed their sum by about a centimeter. If everything is done correctly, tying occurs after 2-3 turns of the hook. We have already mentioned above that professionals never use a screwdriver; while it is being adjusted, the hand will make several rotational movements, and you can begin fixing the next unit. Bending the wire performs another function - it simplifies its supply under the tying knot.
Step 4
. With your left hand, place the bent tip of the wire under the reinforcement; the bend should rise slightly above the surface of the upper rod.
The wire needs to be hooked under the reinforcement
Step 5
. Hold the long ends tightly with the fingers of your left hand, and pull the hook toward you with your right hand. The effort is average, you need to straighten the wire and press it tightly to the reinforcement. Pull the wire until it rises about a centimeter above the mesh. The hook position should be vertical. Here it is important to regulate which side the wire is pulled from. If the bent half is of sufficient length, then firmly clamp the cut ones, do not allow them to increase. And vice versa, if you need to tighten the ring, but let them go a little.
Use a hook to tighten the wire
Step 6
. Place the ends of the wire against the hook and begin to rotate it. Tighten until the force increases slightly. Don't do it too hard, the wire will break and you'll have to do it all over again.
Twisting wire with a crochet
Strength is determined experimentally; after several crochetings, you will already understand how to work correctly and rationally. All movements will become optimal, unnecessary ones will be eliminated.
Knitting reinforcement using a hook
Don't rush or be nervous, knit at a calm pace. Ill-considered movements only bring harm. As soon as the twisting begins, immediately release the ends of the wire in your left hand. The nose of the hook will pry them off and bend them into a horizontal position, so you won’t have to adjust anything later.
Knitting reinforcement
Practical advice. The length of the device depends on the technical features of the reinforcing belt. If it has two levels with large distances between them, then this feature should definitely be kept in mind. Experienced knitters have a set of hooks with different sizes. The fact is that too long ones complicate the process of tying reinforcement at the upper level.
Reinforcement tying pattern
Switch to a semi-automatic hook only after you have solid practical experience with a regular one. This tool requires more precise adjustment of the wire length; if the condition is not met, the work does not become easier, but becomes more complicated than it would have been simple.
When planning the reinforcement of a strip foundation, many calculations are carried out, including the amount of material required. A calculator for calculating the amount of tying wire for reinforcing a strip foundation will help you get an idea of the number of knots to be tied and the amount of wire required for this.
Video - Crocheting reinforcement
Crochet reinforcement with one loop
Before starting tying work, you should cut the wire with a cross-section of 1.2 mm into pieces of 20–30 cm in the required quantity. Further procedure:
- Wrap the wire folded in 2 layers around the knot, placing it diagonally.
- Insert the hook into the formed loop and hook the other end of the wire with it.
- Insert the ends of the wire captured on the other side into the loop.
Rotate the working tool, controlling the degree of tightening of the connection. All that remains is to remove the working part of the grip from the loop and you can proceed to the next joint.