Disputes with neighbors
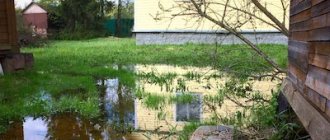
A neighbor's drainage system drains water onto your property.
Sometimes unpleasant situations arise when neighbors, when installing drainage, install structures so that all the water flows onto the site.
If it is not possible to reach an agreement peacefully, you can respond to the offender in this way:
- fill the border of your plot with clay
- raise the ground level with additional soil
- make an earthen embankment around the perimeter
Also, the issue with the neighbor falls under Article 304 of the Civil Code of the Russian Federation “Protection of the rights of the owner from violations not related to deprivation of possession” or the same article 391 of the Civil Code of Ukraine. Thus, the owner of the property has the right to demand the elimination of violations of the rights to use his land due to flooding.
Drainage system
Properly done drainage in a garden or summer cottage helps solve existing problems and prevent the emergence of new troubles. Despite the fact that installing a drainage system seems to be a complex and time-consuming process, it is possible to do it yourself. Do-it-yourself drainage is just as effective, but much more affordable financially.
Advice from an experienced landscape designer on how to make drainage on a site with your own hands is presented in a short training video:
VIDEO: Site drainage. Tips and tricks
How to make drainage on a site with your own hands: drain excess water on different types of soil, correctly and inexpensively (20 Photos & Videos) + Reviews
The video explains how to set up a closed drainage system at your dacha:
How to make a closed drainage ditch
Structures of this class are more technically complex. But with the advent of special plastic pipes and geotextile materials, the technology for arranging drainage has become significantly simpler. If you have some construction experience, then it is quite possible to solve the problem yourself.
Before starting work, a laying diagram with the necessary elevations is also drawn up, and all the necessary material is delivered to the site. Please note that work around the foundation of the house must be carried out as carefully and carefully as possible. You should not immediately expose the entire perimeter; this can cause structural destruction, especially if the house is old and the foundation is made of rubble stone.
What materials will be needed
To make a closed drainage ditch, you will need the following materials:
- perforated corrugated plastic pipe intended for outdoor installation;
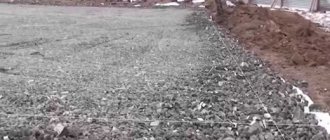
- sand and crushed stone, preferably granite, it is less eroded, which ensures the durability of the structure;
- geotextile fabric separating the surrounding soil and the drainage system.
By the way, a closed ditch under the road is equipped with the same pipe; it will fully withstand the load created by transport. In addition, the depth of the laying significantly reduces the impact, so there are no special requirements for strength.
Technology for constructing a closed drainage network
Let's pay attention to the following points:
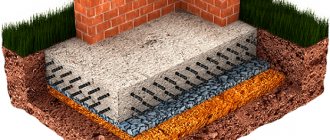
- to protect the foundations, the depth of the drain must correspond to its overall height;
- the normalized slope of a closed-type drainage network is 5 cm per linear meter;
- in practice, trenches with a depth of 1.5–1.7 m and a width of 70 cm are most often used;
- Additional strengthening of the drainage ditch is not required.
The arrangement technology involves performing the following operations:
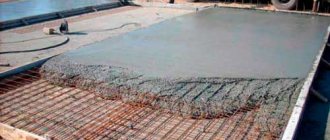
- trenches are prepared in accordance with the diagram and the required slope;
- a sand cushion 2-3 cm thick is laid out at the bottom;
- the ditch is covered with geotextile fabric so that it can be wrapped around the entire drainage structure;
- make a pillow of crushed stone, laying it in a layer of about 20 cm;
- install the pipes, connect it to storage wells, check the tightness of the joints"
- fill the second layer of crushed stone, closing the main drain by 20-30 cm;
- wrap the edges of the fabric, completely covering the filter system.
All that remains is to backfill the drainage ditch and arrange the surface layer. With this design, water coming from the ground will be filtered in the crushed stone and discharged through the main pipe. Thanks to this solution, the risk of silting is reduced, which increases the service life of the entire system. You can find out more about how to make site drainage with your own hands in our popular article.
Open drainage installations
The benefit of this system is as follows. You do not need to use special equipment for work. If you use a small excavator, this will significantly speed up the work, but in a small area you can make such indentations with a regular shovel. This system consists of ditches along the perimeter of the territory and a drainage basin installed at the lowest point.
IMPORTANT! The reservoir can be a reservoir, either natural or artificial. Any ditch along the road can also be used for this purpose.
The site must be provided with a slight slope towards the laying of drainage channels. This slope is provided for at the stage of drawing up the landscape design.
When planning a site vertically, you need to calculate the slopes from the house towards the drainage ditches. Melt water and water from the roof should flow into the drainage channels along a blind area that is tightly adjacent to the house. Or along the recesses along the paths in the garden.
Open type drainage device
The advantage of open drainage is that its installation does not require the use of special machinery and equipment, and an ordinary shovel is quite sufficient. The participation of a specialist is necessary only at the design stage in order to correctly determine the topography of the site and draw a diagram of drainage channels. You can do the rest of the work yourself, following the recommendations.
- Along the entire perimeter of the site, trenches are dug 40-60 cm wide to a depth of 50-70 cm and connected into a central one leading to a pit for discharging water or a natural reservoir.
- The landscape of the drained area should have a slight slope so that water drains naturally. A building level is used to control the slope.
- The number of drainage branches depends on the area of the site, and their location should be in the most flooded areas.
- It is better to make the vertical walls of the trench at an inclination of 30%.
- Drainage trenches can be reinforced with concrete slabs, stone paving or fascines. At the bottom of the ditch, bundles of brushwood from birch, oak or coniferous trees are placed.
- The edges of the ditches are lined with stones, bricks or broken glass. These materials will protect against erosion.
- During operation, the drainage quickly silts up. To prevent this from happening, the bottom of the ditch is covered with geofabric, and its overlapping edges are covered with drainage filler. The geotextile will serve as a filter.
If you have the means at hand, it’s easy to make an open drainage area with your own hands
.
Types of drainage systems
Excessive soil moisture in a summer cottage can have two reasons. The first of them is the high clay content in the soil. Such soil does not drain water well; as a result, water from rain and melting snow accumulates and stagnates in the top layer of soil. Another reason is the close location of groundwater to the soil surface. These waters are a serious problem for building foundations and basements, especially in the spring.
Based on the reason for the increased soil moisture, an appropriate type of drainage system can be used to remove excess water. There are two main types of drainage systems - open and closed. The first of them can be used for clay soil - when it is quite enough to remove water from the surface layer. To drain groundwater, only closed-type drainage is applicable.
What is open drainage?
An open or surface drainage system can be created either according to a previously developed project or without it. There are two ways to make open drainage:
- local method
- creation of a ditch system
The first method is the simplest option for the drainage system. In this case, water is not drained from the entire territory of the site as a whole, but only from those places that are subject to flooding in spring, autumn or during prolonged rainy weather.
The first step in constructing an open drainage is to identify the areas of greatest stagnation of water. In these places, water intake wells are dug or containers dug into the ground to collect water. The water that accumulates there can be used to water garden crops in the future. The most water collects in the following places:
- at the lowest point of the site;
- in areas with a flat surface - for example, in front of the porch;
- in depressions on the surface of the earth.
In the case where water accumulates at the border of the site, a ditch is dug to drain the water beyond its territory. If the place with excess soil moisture is located in the depths of the site, then a drainage well is dug.
Laying the ditch system
This method of reclamation is also used in clay soil conditions. In this case, a network of drainage ditches is created throughout the area. Water collected from the entire territory is drained through ditches into a catchment well. The drainage ditches system is constructed in accordance with a previously developed scheme.
IT IS IMPORTANT TO KNOW:
To ensure high-quality drainage, when digging ditches, a slope in the direction of the drainage basin must be observed. If there is a natural slope, the bottom of the trench is made parallel to the earth's surface. If the ground surface on the site is horizontal, then it is necessary to make an artificial slope. Otherwise, water will stagnate in the ditches.
The number of drainage ditches is set in accordance with the level of soil moisture. The more clay the soil contains, the more trenches need to be dug. The minimum depth of the ditch should be fifty centimeters. The width of the trench is determined by the distance from the water intake. The maximum width should be the ditch into which water flows from the entire network and which directly flows into the reservoir.
IT IS IMPORTANT TO KNOW:
Once the trench network has been dug, it must be tested. To do this, you need to artificially run a stream of water through it. In places where this flow is delayed, the slope of the ditch should be increased.
How does closed drainage work?
A closed drainage system can be pipe or reservoir. A pipe drainage system consists of pipes laid in the ground at a certain depth, the value of which is determined by the density of the soil. The looser the soil, the deeper the pipes must be laid. To create closed drainage, special perforated pipes are used, into the holes of which water from the soil penetrates, which then flows through the system into a drainage basin, drainage tunnel, or stormwater well.
Due to the fact that laying a closed drainage is much more expensive than creating an open system, this method of reclamation is justified only when the groundwater boundary is closer than 2.5 meters from the surface of the earth.
Reservoir drainage is a filter bed made of crushed stone, which is laid at the base of the building.
IT IS IMPORTANT TO KNOW:
In areas with a rainy climate and frequent downpours, a combined drainage option should be installed - a combination of a deep drainage system with a storm drain. You can create both a local storm drain and one consisting of ditches.
Accessories for drainage systems
Before installing a drainage system, you need to decide on its type. The correct choice of drainage type is determined by the specific local conditions. When the type of drainage system is chosen, you must first develop a plan, establish what materials and in what quantities are needed for this, and calculate the construction estimate.
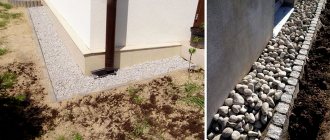
The materials that will be needed for the construction of open-type drainage depend on which trench option is chosen - backfill or tray. For backfill ditches you will need small and large crushed stone, as well as geotextiles.
Trench trenches are more effective for drainage. For their construction, ready-made trays are used, the material for which can be:
- concrete;
- concrete with polymer filler;
- plastic.
The best option is plastic trays, which weigh little and, at the same time, are quite durable.
When constructing a closed type drainage, you will need special pipes, geotextiles and crushed stone.
IT IS IMPORTANT TO KNOW:
The use of geotextiles in the construction of a drainage system is highly desirable - this material allows only water to pass through and retains solid particles. Thus, it prevents the drainage from gradually filling with silt.
Regardless of what kind of drainage system is being built, open or closed, to carry out the work you need to acquire a level and a laser rangefinder, which are needed to study the topography of the site and draw up a correct plan for the system. In order to maintain the required slope when digging trenches and laying pipes, you will need a level. These tools can only be dispensed with when constructing local catch basins.
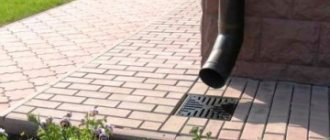
Spot
This type of drainage is installed in places where collected water is directly discharged. As an example, we can consider a system for removing moisture from the roofs of houses. To collect water after rain or intensive snow melting, trays are fixed around the perimeter of the roof of the house. Water flows through them into a drainpipe and enters a point drainage well. It should be covered with a grill to prevent debris from getting in and the structure looks neater. Storm water inlets are connected by pipes and directed to the spillway point. Each rainwater inlet has a filter that needs to be cleaned periodically.
Whole open drainage system
called a storm drain. A better result can be achieved by combining point and linear drainage. A significant disadvantage of an open system is that it takes up a lot of usable space, which is unprofitable for small areas.
Despite the simplicity of the design, its effectiveness has been proven over time. The most popular methods of open drainage in a summer cottage
, because the small area of the territory does not allow for capital deep soil drainage. Moreover, modern methods of arranging ditches make it possible to make them aesthetically attractive. If you equip an open drainage system in compliance with technology and regularly clean it, it will serve perfectly for many years.