↑ Strip foundation: pros and cons
Concrete is used as the base material for the strip base. This building material was used back in Ancient Rome, and was actively used as a basis for the construction of buildings. About 200 years ago, developers decided to increase the strength of concrete. As a result, reinforced concrete was created, combining the beneficial characteristics of steel rods and concrete. Thanks to a foundation made of steel and concrete mortar, it became possible to create strong, reliable and beautiful buildings. Adding steel rods to concrete when building a foundation is called reinforcement.
When designing a country house, in most cases they use a strip foundation as a base. The creation of this foundation takes approximately 25-30% of the budget for building a house.
Advantages of a strip base:
- The strip foundation is considered one of the most reliable in construction. This is due to the fact that all applied loads on the foundation are distributed evenly.
- The structure is easy to erect and fill with mortar.
- It is possible to use the foundation for buildings with a basement and floors made of heavy materials (reinforced concrete and monolith).
- This type of base can be insulated without problems and insulated from moisture saturation.
- Special equipment is rarely used to construct a foundation structure.
- The foundation is durable if construction rules are followed.
Like all foundations, strip foundations also have their disadvantages:
- It is necessary to conduct a soil analysis in advance to take into account its behavior when freezing during the winter months.
- Compared to some foundations, the cost is high and the volume of excavation work is large.
- It takes a long time to prepare the foundation; you have to wait for the concrete to harden before construction can continue.
- This type of base can only be used on dense and rocky soils.
- Not suitable for construction on problematic soil (wet, peaty or heaving). On such soils, the foundation must be poured to a great depth, which will lead to high costs.
The shape for the strip foundation corresponds to the construction plan. The base is a closed structure and is laid along the entire perimeter of the building, always under load-bearing walls and internal partitions.
↑ Types of strip foundation
There are several types of this type of foundation, all of them differ in construction technology and depth of laying in the ground.
- A solid foundation is a reinforced concrete strip, which is erected from concrete mortar with preliminary reinforcement. The base evenly distributes all loads on the soil. To increase the service life of the base and resistance to loads, choose high-quality reinforcement.
- Prefabricated foundation. It is created from pre-prepared or purchased concrete blocks. This type is distinguished by durability and high strength. Stability is increased by using reinforced concrete soles. They are installed on a sand cushion, and the concrete blocks themselves are mounted on top. This type of foundation is used in low-rise construction.
- Shallow base. It is laid above the level at which the soil freezes. The laying depth is no more than 50 cm. If this type of base is used, then insulation is installed along the entire perimeter, which will minimize the impact of natural factors.
- Recessed base. The laying is carried out to a depth that is 15-20 cm below the level where the soil freezing line passes. This type of foundation is equipped with a reinforced belt.
Strip foundation
Often, when creating a frame for such a foundation, rods are laid with an overlap; this is a serious mistake. Also, you should not install it directly on the base, in this case there is a risk of the rods shifting in the spring and winter, which will result in damage to the entire foundation monolith.
It is worth noting that the bundle of reinforcement for the foundation is made here in a standard way. There is nothing unusual here. The cross-section of the reinforcement should not be less than 0.1% of the total thickness of the array. To do this, it is worth making a detailed calculation.
For additional rigidity, reinforcing anchors are used. They allow you to avoid problems with the displacement of the main frame elements. At the same time, it is worth considering that a slight overlap in length is still acceptable. It is usually recommended to make it no more than 20 reinforcement diameters. There is a table for approximate calculations of overlaps, as well as the main indicators of the frame.
↑ For what purpose is reinforcement used?
The foundation for any building is created so that it can withstand the load of this structure.
The base perfectly copes with evenly distributed pressure force. But in reality, the load is not uniform, which leads to the creation of internal tension. There are many reasons for uneven distribution, ranging from changes in the soil on which the foundation stands, to unequal weight of various parts of the erected structure. Concrete shows excellent resistance to axial compression and fairly weak resistance to tension. The use of reinforcement neutralizes the disadvantages of concrete with the help of its tensile abilities. The hardened concrete solution, in turn, protects the metal reinforcement from corrosion. Concrete that resists compression during operation and reinforcement that resists tension, in tandem, effectively resist loads directed in different directions to the maximum.
It is the combination of concrete and reinforcement that will protect the structure from destructive changes for a long time. If reinforcement is done correctly, it will not only lead to increased strength, but will also be a good saving: it will reduce the amount of concrete needed.
↑ Conditions for reinforcement
The foundation is always laid with a margin of safety so that it can withstand mechanical and climatic changes. There is a provision SNiP 52-01-2003, which contains information on the correct knitting of reinforcement with an emphasis on strip foundations. It spells out in great detail the requirements for design and material. The main recommendations put forward for the fittings are:
- The reinforcement cage must be positioned so as not to create obstacles to the correct and technological pouring of concrete.
- When installing reinforcement, specially specified design steps are used. Movable connections of rods at the intersections of frame rods are prohibited.
- Mandatory creation of a protective layer against corrosion.
- It is allowed to change the type of load-bearing rods, but only if the calculated load-bearing capacity does not change.
The photo shows the calculation of the clamp spacing when reinforcing a corner:
Correct choice of fittings
An important step is the selection of reinforcement for the foundation. Often the knitting method depends on this. The classic option is metal fittings. Its characteristics are regulated by GOST 5781-82. All requirements for this material are stated there.
This document is divided into six classes, which differ in strength characteristics. The best option for creating a frame would be class A-III material. You should look at the letter markings. If the letter “C” is indicated, then this reinforcement can be welded, in other cases it can only be tied. Welding, like any other strong heat, will negatively affect the strength of the material.
Another material that is gaining popularity is fiberglass reinforcement. It can be used in almost all concrete structures. It is more durable compared to conventional reinforcement, but it requires a different approach. The best option here would be to crochet the reinforcement. Welding is completely unacceptable here.
↑ What materials are used in reinforcement
Since a frame made of reinforcement allows you to increase the stability of the entire structure, taking on most of the load, a lot depends on its quality. The frame consists of reinforcing bars that are connected to each other. When knitting a frame skeleton, it is possible to use different types of reinforcement. The fittings are divided: 1. According to the materials from which they are made. Steel fittings are a classic that have stood the test of time. Steel is divided into 6 strength classes. Steel reinforcement has several advantages - it can be bent and welded. Composite reinforcement is often used for reinforcement; its rods consist of additional types of fibers: carbon, aramid, basalt, glass. This type of reinforcement is used where there is no need to bend or weld it. It is light, cheap and does not corrode.
By profile. The reinforcement comes with a smooth or periodic profile. The periodic profile has a relief structure and is used to improve the connection with concrete. The smooth profile is most often used for connecting jumpers.
↑ Connecting materials
The reinforcement under the strip foundation is knitted using the following materials:
1. Knitting wire. Time-tested and fairly common technology of knitting using a knot. 2. In places where reinforcement bars are joined, threaded and crimp couplings are used. 3. Metal clips: used to connect reinforcement elements without using a knot. 4. Some professionals (but many are against these materials for connecting reinforcing bars) use plastic clamps and clips. Products made from this material allow for quick installation and have an anti-corrosion effect.
Welding is also used for tying reinforcement. This connection method has both advantages and disadvantages. This knitting option is ideal for connecting between rods, especially large diameter ones. But to make such connections you will need a welder with good skills. The knitting process is quick, but the welds create a rigid connection. Its density is different from the base metal and the connection is susceptible to corrosion. When the load changes, the connection breaks, which leads to a decrease in the strength of the base.
We tie the reinforcement bars with our own hands
The diameter of the tying wire used for tying reinforcement depends on the diameter of the rods. As a rule, wire 0 1.2-1.4 mm is used for knitting. It is very convenient to knit rods 8-14 mm thick with 0 1.2 mm wire, and for thicker reinforcement it is easier to use thicker wire, although there are no specific restrictions.
Wire consumption can be approximately calculated based on the condition that the length of one knitting wire element is 0.3-0.5 m (depending on the diameter of the reinforcement). As a rule, it is determined experimentally.
The wire is easy to cut with metal scissors or wire cutters. Before starting work, you should cut a sufficient number of pieces of wire.
To tie the reinforcement, you can use a screwdriver, holding a hook-shaped attachment in its chuck, which is easy to make yourself.
↑ Tools used to connect reinforcing bars
Welding is not as practical as tying reinforcement for a strip foundation. High strength is created in the connecting nodes when knitting. In addition, there is no need to invite a welder, and this reduces the cost of constructing the foundation.
The reinforcement frame is assembled either in the formwork or nearby. Knitting can be done manually (with gloves), or you can use special tools:
- A knitting gun is the best option in terms of speed. But the gun is very inconvenient in hard-to-reach places. Its second drawback is the huge consumption of wire. And the third one is a big price. A good pistol will cost 30 thousand rubles, the Chinese version, although it will be cheaper, will not last long, it will be enough for one foundation.
- Crochet hook. Outwardly, it resembles a bent and sharpened nail, the head of which has been replaced with a handle. Quite often used in a screwdriver, clamping it in a chuck. The industry produces screw hooks. They are easy to use, but the knitting is too slow and long tails are formed.
- Folk devices for knitting. If there are no suitable tools, then use pliers or a hook, which can be easily made from an ordinary nail. Unfortunately, these tools will not lead to high-quality results, and the knitting method will worsen the strength of the entire structure.
Rules you need to know
Everyone knows that tying the foundation with reinforcement is a mandatory process, but not everyone knows about the rules of this work. You can read more about this work in the design manual, which was published by NIIZhB Gvozdev back in 2007.
There are a few things to consider. There is no need to use plastic ties to tie the rods together. This is one of the most common mistakes. Such ties do not provide sufficient strength to connect adjacent rods. With the inevitable subsidence of the concrete solution, they shift, which negatively affects the strength.
A more reliable way would be to weld the rods or tie them with wire. Knitting wire for reinforcement is available for sale. It is easy to use and also holds the rods together well. The choice of what to do, whether to weld or knit reinforcement for the foundation, directly depends on your capabilities.
Welding is considered optimal, but with thin rods and the absence of a welding machine, simple knitting can be done. You should also accurately calculate the amount of materials, as well as the placement of the rod. Calculating reinforcement for the foundation is a complex task. It is better to use calculators for this, so you can get the most optimal numbers.
↑ Parameters for reinforced frame
The rods that are used in the structure have different uses: 1. Working reinforcing bars.
This is what horizontal longitudinal rods are called; they are installed along the length of the base tape. 2. Clamps can be horizontal (transverse) and vertical. They are used to connect the frame. In private construction, the reinforcement frame has specific parameters: 1. Metal or composite reinforcement with a cross-section of 11-14 mm. These rods are used to lay the foundation for small outbuildings. 2. When constructing large structures, a strip foundation with mandatory reinforcement is used. For the reinforcement frame in such buildings, reinforcement with a periodic profile and a cross-section of 12 to 18 mm is used. Horizontal elements are also used in reinforcement. They are laid with overlap and connected to vertical elements. In the foundation, which is buried up to 50 cm, two layers are used and each has from 2 to 4 rods. If the foundation is deep, three layers are used. The rods should be located at a distance of 30-40 cm.
Vertical elements support and connect the bottom and top layers. They are placed in increments of 50-90 cm. There is a small load on them, so they use a cross-section of rods of only 6-11 mm.
The frame of reinforcing bars must be completely filled with concrete mortar. The frame is separated from the formwork by a distance of 6-8 cm. When constructing the foundation for a private building, the reinforcing bars are most often fastened with a crochet hook.
↑ Material consumption for reinforcement ties
To determine the amount of material required, the foundation data is taken as a basis, namely: length, width and height. The reinforcement scheme is studied in detail. Pay attention to the number of layers indicated in the diagram and the number of longitudinal rods in width. Sales of reinforcement material are carried out in kilograms, which are converted into linear meters in special tables. But plastic fittings are most often sold in linear meters.
Scheme of reinforcement for a strip foundation:
↑ Determination of step length
Vertical and horizontal reinforcement elements are installed with a certain step length. In the reinforcement of a strip base, the pitch is the distance between a pair of longitudinal rods. There are various formulas and methods for calculating this length. For small buildings, calculations are usually not performed, but recommendations are followed, according to which the standard distance does not exceed 40 cm. This parameter is a guideline for the strip base.
How to determine the distance between horizontal and vertical reinforcement for large projects? To ensure anti-corrosion properties for steel rods, they must be located in the thickness of the concrete and have a minimum distance from the edges of the formwork of 5 centimeters. The distance between the rods along the horizontal and vertical laying is 10 cm less than the parameters of the tape. For example, we take a base width of 50 cm and get a distance between two rods of 40 cm (50 cm – 10 cm = 40 cm).
Let’s again take a strip base of 80x30 cm as an example. With these parameters, the reinforcement is located at a distance of 20 centimeters. The calculation is simple: 30 cm – 10 cm = 20 centimeters. The foundation, which has a height of 80 cm, is equipped with two reinforcement belts with a distance between them of 70 cm (80 cm - 10 cm = 70 cm). Data on the distance between jumpers is located in SNiP. Following professional recommendations, they start from a step that does not exceed 30 cm. This applies to both horizontal and vertical jumpers.
Materials and tools for tying reinforcement
Considering that the reinforcing belt imparts stability to the entire structure, absorbing a significant share of the load, a lot depends on its quality performance.
How to properly knit reinforcement for a strip foundation? It is generally accepted that steel rods are needed to create a frame base. Builders prefer to use the following types of reinforcing steel, divided into:
- manufacturing materials. Iron bars are considered a classic option, repeatedly tested in practice. They are divided into six groups according to strength level; the material is bent and welded. Composite rods contain fibers of basalt, carbon, glass and aramid. This type of material is lighter in weight, reasonable in cost, does not rust, bend or be welded;
- profiles. Smooth profile is more often used instead of jumpers for connections. Rod grease, which has a periodic profile, is distinguished by its relief, which improves adhesion to the solution.
For proper knitting you will need special tools. If you follow the rules of knitting, you can achieve a more reliable connection than welding. The strength indicator in the connecting nodes will not decrease, the help of an experienced welder is not required, all work is carried out directly in the formwork structure or in the immediate vicinity.
What is more convenient for knitting reinforcement? The frame is assembled manually or using appropriate tools.
Let's figure out how you can tie the reinforcement for the foundation. When carrying out such work you can use:
- knitting gun. The fastest method. The device is inconvenient to work in hard-to-reach areas, and it also consumes large quantities of wire intended for knitting. The main disadvantage of the tool is its high cost. If you use Chinese-made devices, then one gun is enough for 1 base;
- crochet for knitting. It resembles a curved and sharpened nail, which has a handle instead of a head. On the Internet you can find materials on how to knit reinforcement with a screwdriver, using such a hook as an attachment. Industrial-made screw hooks work effectively, but they slow down the process, leaving long tails;
- folk remedies. For small working volumes and the absence of special tools, it is permissible to use pliers or a homemade hook prepared from a suitable nail. The quality of the work will not be the best; such a scheme for tying reinforcement for a strip foundation will not provide the required strength.
Structural rods are distinguished according to their purpose:
- working rods. Longitudinal reinforcement elements located along the strip base;
- clamps. There are transverse, vertical and horizontal, I connect the frame structure into one whole.
To know how to correctly knit reinforcement for the construction of a foundation for a private house, you need to know a certain scheme of work:
- use composite or greasy rods with a diameter of 11 - 14 or 12 - 18 mm, a periodic type profile;
- the rods are laid out with an overlap and connected by horizontal elements. For a shallow foundation, two layers of 2–4 rods are sufficient; in other structures, three layers are used. The gaps between the rods should not exceed thirty to forty centimeters;
- vertical elements support the upper and lower layers, placing them in increments of forty to ninety centimeters. The load on them is small; material with a diameter of 6 – 11 mm is suitable for manufacturing;
- protection against corrosion is provided. The frame must be completely filled with concrete; it must be separated from the upper edge of the formwork by at least six to eight centimeters. When laying the foundation for a private house, a hook is used to tie the reinforcement.
We already know how to knit reinforcement correctly. How much will it take to build a foundation? The volume of material is determined based on:
- foundation dimensions;
- diagram determining how to tie steel rods. It includes the number of layers and longitudinally located rods across the entire width.
↑ Schematic model of reinforcement connection (tying) and corner reinforcement
The optimal and correct viscous reinforcement for a strip foundation is considered to be a “cage” connection between the steel rods of the frame. In this knitting option, the rows are attached using various methods and materials (for example, knitting wire) at an angle of 90 degrees. The check knitting pattern includes several steps:
- Take a coil of wire and cut a piece 25-35 cm long from it (suitable for rods with a cross-section of 8-16 mm).
- Next, the wire is bent in half and placed under the overlapping steel rods. The wire is placed diagonally.
- The third step is to hook the place where the knitting wire is bent. The opposite end of the wire is circled above the intersection of the rods and placed above the hook.
- Three to four turns are used to twist the wire by rotating the hook around the upper end of the knitting material.
- The last step is to remove the hook and bend the ends from the wire into the structure.
The corners of the strip base must not be reinforced by simply overlapping the rods.
This is a gross mistake and a violation of technology. The corners of the base are reinforced and connected to linearly located reinforcement using bent rods. To strengthen the reinforcement angle, U-shaped and L-shaped anchors are used. Reinforcement that is laid at the corners of a building at right angles or without bending is unable to create a rigid structure. During operation, the corner sections of the foundation will be primarily subject to destruction.
Scheme
Let's see how to properly knit reinforcement for the foundation, this will help you avoid a lot of mistakes. Be sure to overlap the reinforcement when knitting. It will not be possible to tie the reinforcement without overlap.
It is advisable to explore all possible options for the placement of rods. The design should be most effective for a given type of foundation. This will ensure the greatest strength of the structure. In general, the process technology is the same for any material. Let's see how to crochet reinforcement.
- For medium-sized rods, 22-25 cm of wire are cut off from the coil.
- It is bent in half and placed under the overlap of the rods diagonally.
- Take a crochet hook and insert its point into the loop.
- The wire clamp is stretched.
- The free end is placed on the hook.
- We rotate the hook, thus creating a twist of 3-4 turns.
- The hook is removed, the remaining ends of the wire are bent inward.
Now you know how to knit reinforcement for the foundation. The process is not complicated, but still requires a certain skill.
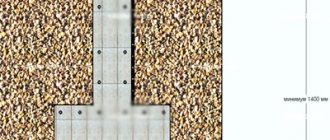
↑ Sole in strip foundation
If the ground has weak bearing capacity or the construction is carried out on heaving soils, or the structure itself is quite heavy, then a sole is also laid in the strip foundation.
Its main function is to distribute the load over a larger area. This will increase the stability and reliability of the foundation, and also reduce the percentage of subsidence. To prevent the sole from becoming unusable due to a large vertical load, it is reinforced. The image shows two types of sole reinforcement, where one or two belts of longitudinal rods are used. On normal and medium heaving soils, the first type is used; on soils with a strong tendency to winter heaving, it is better to use the second type with two belts.
Those reinforcing bars that are laid lengthwise are considered working elements, and they are placed in two belts. It is permissible to use fittings of the second and third classes. The step length between them is 20-30 cm; they are connected to each other by short fragments of a rod.
When a narrow sole is installed, it has structural transverse rods that do not take part in the load. Therefore, it is sufficient to use reinforcement with a diameter of 6-8 mm. They tie it using knitting wire with rods that are located at the edges.
In a wide sole, the transverse reinforcement takes on a certain part of the load and is classified as working. During operation, the soil tries to “collapse” the transverse rods. Therefore, ribbed reinforcement is used for the wide sole. And it must be the same diameter and class as the longitudinal one.
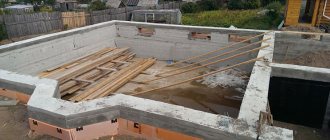
Before you begin constructing a strip foundation, you must:
- Dig a trench that meets all the requirements of the drawing, taking into account the size and location of the foundation of the building.
- Next, assemble the formwork inside the dug trench. To create it, various materials are used (for example, unedged boards, special plywood, etc.).
- In the last preparatory step, a sand cushion is organized at the bottom of the trench. It is used as a substrate to distribute the concrete evenly.
Calculation of the required quantity
Correct calculation of quantity saves money, time and nerves. This truth is clear to everyone. First, let's estimate the ribbed reinforcement. If you're not interested, scroll down. The equation would be something like this:
(The perimeter of the bathhouse) + (the total length of the internal walls under which the foundation will be) x (the number of rods in the planned scheme). Example: We take a structure with a foundation length of 5 m on one side and 7 m on the other. With an internal wall, 7 m long. Let’s say the diagram includes 5 longitudinal rods ø 10 mm. We count:
It's not me
(5+7) x 2 = 24 m. This is the outer perimeter of the foundation.
24 + 7 (internal wall) = 31 m. We obtained the total length of the foundation in meters.
31 x 5 (number of rods in the structure) = 155 m. This is the total number of reinforcement.
If you can’t find a rod of the required length, you will have to connect it in segments. This should be done with an overlap of at least 1 meter. Let's take this moment into account.
We assume that the longitudinal reinforcement bars in the frame will have one connection.
5 (number of rods in the structure) x 5 (total number of external and internal walls resting on the foundation) = 25.
This means we will have 20 connections, which will require 20 additional meters. Let's take it into account. 155 + 25 = 180 m. That's it. We are done with the horizontal rod.
We calculate the vertical transverse jumpers. Take, for example, ø 6 mm, and cell pitch = 0.4 m.
Dividing the length of the foundation (total) by the cell pitch, we get the number of so-called “rings”.
31 m: 0.4 m = 77.5 (78). All. We know how many rings there are.
Let's assume that the height of the reinforced structure = 0.4 m and the distance between the rods = 0.25 m. We count. (0.4 + 0.25) x 2 = 1.3 m. This is the perimeter of one ring.
We calculate the total quantity: 78 x 1.3 = 101.4 (rounded to 102) m.
“Usually, reinforcing bars are sold by weight (not by meter). To determine the mass, consult a reference book (Google can help). The main point is compliance with GOST 5781-82. It accurately indicates the mass of 1 meter. Also GOST 2590-88. In it you will find the parameters of the circle.”
Rebar frame
Classic example:
- Long segments of the reinforcement frame receive the greatest loads. Based on the characteristics of the soil, ribbed reinforcement from 10 to 14 mm in diameter is usually used for them (more differences around the perimeter of the future foundation - larger cross-section).
- The reinforcement laid along the trench must have a distance from the side walls, bottom and the level of the upper boundary of concrete pouring, within 50 - 80 mm. By the way, this is exactly what many people ask about.
- For example, for a foundation with a pour width of 40 cm, the optimal distance between the longitudinal rods in one horizontal plane is 30 cm, and in a vertical plane - from 10 to 30 cm. The pitch depends on the nature of the soil and the expected load on the foundation.
- For vertical and transverse elements, use a smooth rod ø 6-8 mm. This diameter is sufficient since they bear less load.
- The pitch between the vertical transverse ribs is from 10 to 30 cm (maximum up to 50 cm).
↑ Arrangement of formwork and cushions
In order to make formwork, choose one of the types of material: OSB boards, wooden panels, plywood or fiberboard. The main task of formwork is to hold the concrete so as not to bend under its weight and pressure. It is important to understand that the higher the foundation, the stronger the material for the structure should be.
The assembly stages can be divided into 3 steps:
- First step. Install spacers along the entire perimeter of the trench so that the length of the spacers is twice the height of the foundation. They are located, retreating from the bottom of the base by 70% of its height. Their main task will be to hold the wooden base.
- Second step. At this stage, formwork is installed from a material that has been selected in advance. So that it can be disassembled, wooden elements are fixed inside. Gaps in the finished structure of more than 3 mm are prohibited. This approach will prevent concrete from leaking out and will not lead to deformation of the finished foundation.
- Third stage. At the final stage, lubricate the formwork with technical oil (inside). This is necessary for easy dismantling of the formwork after the concrete solution has hardened. After this, a sand cushion is placed at the bottom of the trench. Its thickness is up to 20 cm. It is recommended to lay this thickness in two layers of 10 cm. After laying a 10 cm layer of sand, tamping is performed. The second 10-centimeter layer is also compacted. To simplify compaction, the sand must be moistened.
↑ Reinforcement technology: step-by-step execution and features
The reinforcement process begins after the formwork is installed. There are two ways to make reinforcement cage:
- The structure is assembled in a trench or pit. But if the tape is narrow and high, then this complicates the work. It is difficult to tie steel rods together in a narrow strip.
- The second option is much more practical, although it is not without its drawbacks. Not far from the trench, sections for the frame are prepared. Then they are transferred to the required location followed by installation. It’s more convenient to work this way – this is undoubtedly a plus. The downside is that heavy reinforced structures make it difficult to work alone.
Everyone chooses the option that is best suited in a certain situation. Below is an action plan for working in the trench itself.
- First, the longitudinal bars of the lower reinforcing chord are laid. They rise 5 centimeters from the surface of the pillow. It is optimal to use special legs for this. But usually developers use pieces of bricks for these purposes.
- The formed contours or transverse fragments of structural reinforcement are fixed at the selected interval using a binding wire. To tie the elements together, use a knitting gun or hook.
- Then use one of the options. First option: if the contours were used in the form of formed rectangles, then an upper reinforcing belt is tied to them at the top. Second option: when vertical posts and cut cross-pieces are used during installation, first tie up the vertical posts. And only then do they begin to work on knitting the second reinforcing longitudinal belt.
There is another technology for concrete reinforcement. It allows you to make a very rigid and strong frame. But its cost will be many times higher, since reinforcement is consumed for vertical posts: the rods are driven into the ground.
- The posts are driven in vertically at the corners of the tape and at the joints of the rods horizontally. The material for the racks must have a sufficiently large diameter: from 16 to 20 mm. Place the racks with a distance between them of at least 25 cm. Check verticality and horizontality using a plumb line or level. It is calculated that the depth of immersion of the rods into the ground is 2 meters.
- Next, vertical rods are driven into the ground. The installation step was determined above, each is calculated from its own foundation parameters (according to SNiP 30 cm). At the junction of the walls, the numerical value of the step is divided in half (15 cm).
- The longitudinal rods of the lower reinforced belt are tied to the vertical posts.
- At the points where the posts and longitudinal bars of the reinforcement will intersect, horizontal jumpers are tied.
- Next, the upper reinforced belt is knitted. It is placed 5-7 cm lower than the top plane of the concrete.
- The horizontal jumpers are fixed with knitting wire.
It is convenient to make a belt for reinforcing the strip base using a prepared contour.
To do this, the rods are bent to form a rectangle with the required dimensions. But the whole difficulty is that the rods must be identical, with minimal deviations. Another difficulty is that a large number of them are needed. The advantage of the prepared contour is fast work in the trench.
During the process of laying the reinforcing belt, pipes are laid between the rods. Their installation at this stage is mandatory: ventilation systems and utilities are subsequently laid through the pipes.
After installing the reinforcement, the concrete solution is poured. Filling is done in different ways. Some developers pour the strip base manually or using a vibrating platform in several approaches, leveling each layer. The technology allows you to evenly distribute the concrete solution.
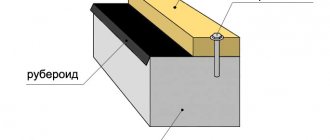
The next step is waterproofing the foundation. After the concrete mixture has hardened, the base tape is covered with roofing felt (usually in two layers) or bitumen mastic. Waterproofing is an important measure for preserving the foundation.
If the frame is mounted in a trench, steel rods are first driven into the soil, observing the calculated intervals. Transverse jumpers are fixed on them, first the lower and then the upper reinforcement belt is fixed.
↑ Video on how to knit reinforcement for a strip foundation
↑ Conclusion
Reinforcing the foundation is a long and difficult process. But with the proper desire and skill, you can cope without assistants, although working in a team is faster and easier, and there is also less chance of making mistakes.
It is not for nothing that laying the foundation is one of the most important stages of construction, because it is the foundation that determines the strength and reliability of the supporting structure and the entire building. In order for the foundation structure to properly bear the load placed on it, the work is often entrusted (especially to those new to the construction business) to professionals. But you can tie the strip foundation with reinforcement yourself.