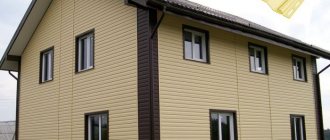
A gazebo is a great place to relax in a country area, where you can relax after work, enjoy the beauty of nature, and spend time with friends and family. If you choose the right material, you can make it yourself without spending a lot of money on construction. A do-it-yourself polycarbonate gazebo will decorate your site and provide a comfortable seating area.
Pros and cons of polycarbonate gazebos
Recently, more and more summer residents and owners of their own plots give preference to polycarbonate as a material for construction. This is due to the advantages of the design:
- light weight of materials - no need to make a foundation; if necessary, you can move the gazebo from place to place;
- low price - polycarbonate is inexpensive, and frame elements can be made from used materials, which makes construction cheaper;
- the ability to do it yourself - working with polycarbonate is very easy, so even inexperienced summer residents can cope with this task;
- design variability - there are many varieties that can be built due to the pliability of the material;
- long service life - a properly assembled structure costs 15-20 years;
- safety – polycarbonate is non-toxic, does not burn, and does not deteriorate due to temperature and moisture.
Types of polycarbonate
Polycarbonate, a building material of high quality and durability, is well suited for wall cladding and roof covering.
- Benefits of coverage:
- Lightness . Polycarbonate differs from other building materials in its relatively low weight, which allows it to be used to build structures such as a gazebo without first pouring a foundation.
- Easy to use. Construction of recreation areas using polycarbonate does not require special efforts and construction skills.
- Favorable price-quality ratio . The inexpensive material has excellent performance characteristics: strength; reliability; long service life (up to 20 years).
- Versatility . Polycarbonate harmoniously combines with other building materials: wood; metal; plastic; stone.
- Easy to process. The product can be easily divided into fragments, and cutting and drilling tools can be used on it.
Types of polycarbonate:
- cell phone;
- monolithic;
- wavy.
Did you know? Transparent polycarbonate is capable of transmitting the same amount of light as glass - about 80%. This property of the material allows for growing indoor plants in the gazebo.
Cellular
Differences in types of polycarbonate products are due to the characteristics of their structure. Thus, the structure of a honeycomb sheet resembles honeycomb cells. They are formed by rigid ribs installed directly or at an angle. The air contained in the cells gives the material additional properties - insulation (noise and heat), as well as strength. Several types of centenary sheets with different structures are available.
Types of cellular polycarbonate:
- 2H . This option is a two-layer sheet with rectangular cells inside. The thickness of the jumpers is 0.4–1 cm;
- 3X . Sheets consisting of three layers separated by straight and inclined partitions. The thickness of layers and partitions is set by the manufacturer;
- 3H . An option presented in the form of three-layer panels, between which there are rectangular cells. The thickness of the honeycomb walls is 6, 8 and 10 mm;
- 5W _ A sheet divided into five layers, each of which consists of rectangular honeycombs. The thickness of the partitions varies from 16 to 20 mm;
- 5X . The sheet is presented in the form of a five-layer panel. The cells are located straight and at an angle. The walls of each cell are 25 mm thick.
Monolithic
Monolithic polycarbonate is a building material similar to silicate glass. In particular, both are single-layer. However, unlike silicate glass, polycarbonate cannot be broken. It is also not easy to scratch its surface. The structure of such a coating is presented in the form of a continuous array. The product is marked indicating the features of its structure and purpose. Such designations make it easier to select materials.
Important! Polycarbonate does not withstand heavy loads.
Brands of monolithic products:
- PC-6 . It is a polymer that transmits a large amount of light. Used in optics for the manufacture of measuring equipment;
- PK-M-1 . Friction-free version of monolithic carbonate;
- PK-M-2 . A unique polymer compound that is highly resistant to cracking. It is the only coating in the world that is not exposed to fire;
- RS-007 . An option with a medium viscosity;
- RS-010 . Low viscosity material;
- RS-003 . It differs from other options in its high viscosity.
Wavy
Monolithic coatings are available in two types: straight, which was described above, and wavy. The second is wave-shaped profile sheets. This type of material has the same properties as direct monolithic carbonate: strength; reliability; durability; resistance to temperature changes. In addition, corrugated sheets can be combined with roofing materials of similar shape, for example, metal tiles.
Types and variety of gazebos
Before you make a polycarbonate gazebo with your own hands, you need to choose its type.
- Form. An open gazebo is easier to build and requires less materials; a closed one can be used in any weather.
- Stationarity. The portable gazebo can be folded and moved, the permanent one remains in one place, and a foundation is laid under it.
- Complexity. Simple gazebos are a canopy attached to a frame; complex ones can be a separate architectural work of an unusual shape. At dachas, an intermediate option is most often used.
- Functionality. Some serve exclusively for their intended purpose, others also decorate the yard with their exterior.
Drawings and projects
To create a drawing, they first determine how much space on the site can be allocated for the structure, determine whether there is a slope there, and whether trees growing nearby will interfere. After this, the drawing is selected from existing ones or created from scratch. If the project is individual, you need to look for photos of analogues on the Internet and, based on them, draw all the necessary types of gazebos and write down the estimated dimensions of the structure.
In this case, it is necessary to take into account the weight of the structure, provide for the need to install a foundation, and the presence of collapsible elements. At the stage of creating a drawing, you need to correctly assess your strengths and not take on an overly complex project for which you will not have enough skills or materials.
Choice of material thickness and color
The dimensions of polycarbonate coatings, as well as their colors, depend on the specific type of product. Thus, the thickness of honeycomb sheets varies between 0.5–2.5 cm. The width of one such product reaches 210 cm, its length is 6–12 m. The weight can exceed 10 kg.
Important! Wavy monolithic sheets are available only in color versions. In this case, a transparent structure is not provided.
Color palette of cellular polycarbonate:
- turquoise;
- blue;
- red;
- bronze;
- orange;
- crimson;
- yellow;
- green;
- grey;
- transparent;
- milky (matte).
Monolithic sheets are produced according to standard parameters. The length of one product is 305 cm, the width does not exceed 205 cm. The thickness varies between 0.2–0.6 cm. If necessary, you can order products of greater thickness - 0.8–1.2 cm.
You will be interested to know which color polycarbonate is best to choose for a greenhouse.
Color palette of monolithic polycarbonate:
- transparent;
- bronze;
- black;
- red;
- milky (matte);
- green (matte).
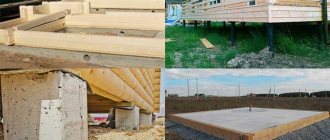
What to make the base from
Despite the fact that some gazebos are made entirely of polycarbonate, it is better not to use this option. In this case, the structure will not be very durable, and the appearance will be untidy. To avoid this, you need to choose a material for the frame.
- Tree. A wooden frame will look beautiful and natural and will fit well into any country landscape. It is inexpensive and wood is very easy to obtain. But a wooden frame requires pre-treatment; it is better to protect it from precipitation and not load it with too much weight.
- Metal. Metal corners are durable, resistant to water and snow, look universal, can withstand heavy weight and last a long time. The only disadvantage is the high price.
- Profile. This material is almost as strong as metal, can be easily decorated, is durable and waterproof. To save money, you can use undamaged used profiles.
What tools will be needed for installation?
The sheets are marked according to the project, the required sizes and shapes are indicated. Polycarbonate is cut along the contour with a jigsaw, hacksaw or regular knife.
To attach the material to the metal or wooden frame of the gazebo, you should prepare a drill and a screwdriver. A tape measure, file, marker or pencil will also come in handy.
Mounting recommendations
When starting to cut and install the material, follow the following recommendations:
- Don't forget to protect the ends of the sheets. They need to be treated with silicone or plugs installed. In summer, this will protect against debris and dust, and in winter, cold air.
- Make fastenings carefully. Regardless of whether the polycarbonate is mounted to wood or metal, the holes for the screws must be drilled 2 times wider than the diameter of the screws themselves, and when screwing in, leave a 1-2 mm gap from the screw head to the sheet, since this material expands when heated. Additionally, press washers should be used.
- Apply sealant. It is recommended to treat the joints of the material with the structure frame with transparent silicone. This is a guarantee of surface tightness.
- Maintain proper bending and cutting. When shaping polycarbonate into an arch, you can bend the sheet only across the honeycomb lines. Cutting should be done along these lines.
Photo: installation of polycarbonate on a metal frame
The installation process will be simplified by installing fasteners in parts. In this case, you will not have to take another person to help.
Made of wood
Working with wood is simple and convenient, so even beginners can cope with this task.
Frame
At the beginning of work, wooden beams are sawn in accordance with the dimensions in the drawing. You can label the design elements so as not to confuse or damage the frame. After this, assembly begins.
- Floor. The beams are laid on pre-assembled supports. Large tree cuts, foam blocks, and interconnected bricks are suitable for this. The structure is connected by metal corners on the outer and inner sides. They are drilled into the wood.
- Walls. In the corners, beams intended for the frame of the walls are installed vertically, and they are also drilled to the floor with metal corners. These elements must be located strictly perpendicular to the floor. The angle is checked using a plumb line.
- Additional partitions. In order for the frame elements to better adhere to each other, you can secure them with horizontal beams running along the future walls and inclined boards connecting the vertical surface with the floor.
- Roof. Most often, this element is assembled on the ground in accordance with the drawing, and after that the firmly fixed structure is lifted up and connected to the wall frame.
After assembling the frame, you need to check how strong it is and whether there are any backlashes or loosening. If necessary, at this stage it can be strengthened with additional partitions or corners.
Roofing and wall finishing
After this, they begin to cover the walls with polycarbonate in accordance with the selected type of gazebo. Markings are applied to the material according to the drawing, it is cut, and then screwed to the frame. Even at the cutting stage, you need to ensure that the internal stiffeners are parallel to the surface. This is necessary to ensure that moisture does not get inside the sheet and destroy it.
When installing, you need to use special washers that are rubberized on both sides. This way you can preserve the material and avoid cracks. The screws also need to be screwed in correctly. They should not be recessed into the material or fixed not parallel to the surface. After finishing the covering, it is better to treat the joints with sealant.
If the roof structure is complex, it can be sheathed at the stage of assembling the frame and mounted to the walls already covered with polycarbonate. It is better to cover the joints with plastic or aluminum corners to prevent moisture from getting inside the gazebo. The floor is concreted and covered with wood on top.
Gazebo design
After the wooden gazebo is ready, it is decorated inside and out. Wooden beams can be varnished or painted. In an open structure, the openings can be covered with mosquito nets. Inside there are chairs, benches, sofas, and a table. There you can organize a summer kitchen, dining room, and recreation area. For evening entertainment, you can provide lighting.
The outside can be painted or the walls can be painted. If necessary, a path is arranged, flowers and shrubs are planted, fountains or lanterns are installed. Buildings decorated with waterproof garlands look beautiful.
Installation features
During any construction there is always a struggle: on the one hand, you want to save money, on the other hand, you want it to be beautiful, of high quality and reliable. In the case of polycarbonate, it is better not to save money. Firstly, the quality greatly depends on the manufacturer, and secondly, even if you buy a thin sheet, you will end up saving a little. After all, the pitch of the sheathing depends on the angle of the slope and the thickness of the polycarbonate: the smaller the thickness, the more often it is necessary to install the sheathing. Well, we discussed a number of other reasons why this should not be done above.
Each manufacturer has a similar table. But already from this it is clear that the thinner the sheet, the more often it is necessary to do the sheathing
What can be the basis for polycarbonate? Any material: wood, plastic, metal. If polycarbonate is mounted on wood, it must be treated with antiseptics that will prevent fungi and bacteria from multiplying. This happens because condensation forms between the plastic and the wood. High humidity creates conditions for the development of fungi.
The ends of the slabs must be covered
When laying on metal, another problem may arise. It gets very hot under the sun, causing the plastic to heat up in small areas. This phenomenon causes it to swell above the metal frame. To avoid local overheating, a thin layer of heat-insulating material is glued to the metal. If you buy polycarbonate from a reputable manufacturer, self-adhesive thermal insulation tapes are included in the kit. If the material is “unknown”, any dense and flexible material with the appropriate characteristics can be used. Rubber and cork come to mind first, but a strip of felt, thin polyethylene foam, etc. may work. It will have to be glued with sealant.
If the base is plastic pipes, there are no problems: the materials have similar characteristics and coexist without problems.
The process of making a polycarbonate carport is described here.
What and how to cut
You can cut polycarbonate sheets with any tool used to work with wood. This is a hand saw, a jigsaw, an angle grinder with a wood disc.
You can cut both along and across the honeycomb. The ends of the transverse cuts must be sealed. When purchasing branded materials, you will be offered a sealing tape (glued to the top cut) and perforated tape (closes the cut at the bottom, and the perforation is used to remove water vapor or condensation drops), which are glued to the cut. If you don’t have such tapes, you can cover the honeycombs with a transparent sealant, but so that there are no gaps.
Cut sheets using a jigsaw or grinder
Why can't they be left open? Firstly, dust and debris get into them, which over time makes the roof or walls untidy and almost opaque. Secondly, when air enters, condensation forms on the walls, and microscopic green algae reproduce well in it in the light. And the polycarbonate becomes a strange color, and at the same time it looks... ugly.
After the sheet is cut, the honeycombs need to be cleaned of any dust that has gotten into them. The best way to do this is with a vacuum cleaner. Then seal the honeycombs.
Read about how to build wooden gazebos here.
How to attach
During installation, it is important to remember that polycarbonate roofing has a protective coating against ultraviolet radiation on one side. It cuts off the harmful spectrum. Manufacturers stick film with logos on this side. When installing the roof or walls, this film should be on top. It is removed immediately after installation is completed. Not “before” - so as not to scratch it, and not after a week - the film will stick in the light, and it will be problematic to remove it.
For fastening, special thermal washers with plugs or bolts with a mandatory metal and rubber washer are used. A hole is pre-drilled for each fastener. Its diameter should be 3-4 mm larger than the diameter of the fastener. If a thermal washer is used, it has a fairly thick stem. Therefore, the diameter of the hole must also be larger.
Thermal washers ensure reliable fastening of polycarbonate
When installing fasteners, the main thing is not to overtighten. The plastic should not bend. When using a thermal washer, its leg serves as a limiter, but with self-tapping screws you will have to control the force.
Special profiles are used to join the plates. They allow you to compensate for thermal expansion (approximately 3 mm per meter of length) and at the same time guarantee reliable fixation. The profiles and all the intricacies of installation are described in detail in the video.
Made of metal
Metal gazebos are more durable, but more difficult to work with.
Required material and tools
When working you will need the following tools:
- shovel and container for mixing the solution;
- welding to connect the frame;
- a hacksaw for metal to correct the length of structural elements;
- dowel for grinding and removing rust if used materials are used.
Installation of supports and subfloor
First of all, you need to dig the foundation. You can limit yourself to a tape depth of 40-50 centimeters. After this, supports are installed in the corners of the trench. They should form a perfect rectangle with angles of 90 degrees - it will be impossible to correct the mistake after the concrete has hardened. The presence of a slope to the ground is determined by a plumb line.
After the supports are secured, the foundation is poured with concrete, constantly checking that their position has not changed. After hardening, the lower horizontal elements of the frame are welded. They are fixed a few centimeters above the foundation level. This is the foundation of the future floor.
Formation of supports
After this, they begin to assemble the frame. The supports are connected to each other by several horizontal elements that are welded to them. To make the structure more durable, perpendicular pipes are connected to each other by additional jumpers at an angle of approximately 45 degrees.
After all the wall elements are connected to each other, they begin to assemble the roof. If it is made of lightweight material, then it can be welded on the ground, and then raised and connected to the walls. This will not work with a roof of complex shape, and you will have to mount it directly at the top. The evenness of all elements is checked with a plumb level.
Sheathing
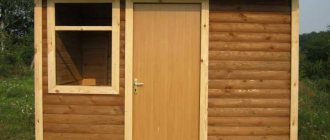
After the frame is welded, polycarbonate sheathing can begin. In a closed gazebo, the walls are completely covered with it, leaving only an opening for the entrance. He also sometimes closes himself with a door. In this case, it is advisable to provide lighting in the room. If the gazebo is open, only the lower part is sheathed with polycarbonate. But even in this case, the wall opposite the entrance can be completely sheathed - this will make the recreation area more comfortable and protect it from the sun and wind.
The polycarbonate is drilled to the base using self-tapping screws. To do this, holes are first made in the metal, into which connecting elements are then screwed. To avoid damaging the polycarbonate, use rubberized washers. The roof is sheathed using the same principle, only the joints on it are additionally treated with sealant and covered with corners.
From profile
The profile is an inexpensive and reliable material, working with which requires certain training.
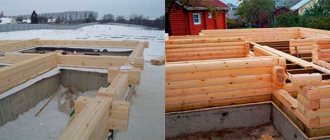
Foundation
A gazebo made from a profile requires a strip foundation. On the ground cleared of grass and branches, the lines of the walls of the future building are drawn and then trenches measuring 70 cm deep and 40 cm wide are dug. To increase the strength of the foundation, the walls of the pit can be lined with roofing felt.
After this, guide pipes are installed in the corners, which are dug a little into the ground. If this is not done, they may change position during the concrete pouring process. When the base is leveled, mix a solution of cement and sand and pour it into the trenches. The next stage of work begins only after the concrete has completely hardened.
Base assembly
When the foundation is ready and the supports are secured, proceed to assembling the frame. Profile pipes are welded to the base in accordance with the selected drawing. To secure the structure, you can additionally connect adjacent perpendicular pipes to each other. Short lengths of pipe are suitable for this. The roof is welded immediately at the top, its evenness is constantly checked with a plumb line.
Polycarbonate is drilled to the pipes with self-tapping screws. To prevent them from damaging the material, use special rubberized nuts. The connection points are additionally covered with sealant to prevent liquid leakage.
The gazebo serves as a relaxation area at any summer cottage. You can equip it yourself, saving on building materials and labor. When making a polycarbonate gazebo with your own hands, you need to choose the right material for the frame and a design and drawing that is suitable in appearance and purpose.
Detailed instructions for building a gazebo
Before construction begins, the site is cleared of debris and plants.
The soil surface is leveled with special devices. Then they begin to carry out the designated scope of work:
- Carry out markings. Between the supports leave 1.5-2 m, depending on the dimensions of the summerhouse.
- Digging or drilling holes. The diameter is 30-40 cm, and the depth is 50-70 cm.
- Drainage is formed. Crushed stone or gravel is poured into the bottom of the pits, and then a layer of sand (15-20 cm).
- Creates waterproofing. Ruberoid is laid between wooden beams and sand. A pipe is also formed from the material, fixed with wire and inserted into the recess.
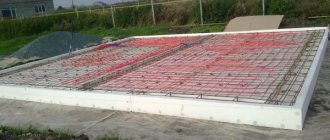
- The formwork is being erected.
- Install the reinforcement cage inside the holes. The cross section of the rods is 12 mm.
- The pillars are filled with concrete mixture. Leave to harden for several days.
- Remove the roofing material.
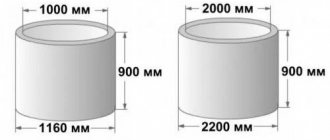
At the same time, a columnar foundation for a gazebo can be made from concrete blocks with dimensions of 20x20x40 (in cm). They dig 1.5-2 m holes in advance and fill them with crushed stone up to 20-30 cm. For reliability, install metal rods and fill them with concrete, leaving 5-10 cm from the surface. Then the blocks are laid out in a checkerboard pattern in two rows using cement mortar. The resulting support pillars should rise 20 cm above ground level. The blocks are again covered with waterproofing material. Now they are moving on to the next stage of construction.
Since the most popular options for do-it-yourself summerhouses are wooden structures, it is worth paying attention to the detailed instructions for their construction. On this topic:
On this topic:
BACK
FORWARD
1 of 2
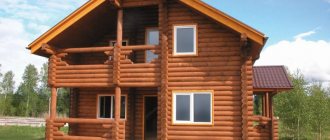
Wooden gazebo from the “Do it yourself” series
After laying the foundation, the starting crown of the building is attached to it. The bottom trim is made from 10x10 cm timber, carefully treating it with an antiseptic. The ends of the beams are cut at an angle of 90˚. When connecting them, the pillars of the wooden gazebo support are inserted into the resulting holes with your own hands.
Wall installation is carried out in 3 stages:
- Each of the four walls is formed.
- Raise the structures one by one.
- Secure with self-tapping screws at the base.
To build high-quality walls, only support posts are mounted at the four corners of the framing. They are then covered with clapboard or boards. Experts advise making the front bars 20-30 cm higher than the rear ones. Then it will be more convenient to make the roof slope. Then the upper crown of the wooden gazebo is fastened according to the same principle. The bars are placed parallel to each other using a level. Fixed with metal corners.
Do-it-yourself cladding for semi-closed timber gazebos is done at a height of 1 m from the floor. At the top of the row, polished railings are fixed. Closed buildings are constructed from beams as tall as the building. Holes for windows are cut out in them. Then they move on to flooring. To do this, choose boards made from hardwood that are resistant to rot. The material is carefully polished and attached to the bottom trim.
Construction of the roof of a summerhouse
First, the shape of the roof is determined and its layout is assembled. Rectangular gazebos require the presence of gable structures. For the proposed models, choose 2 load-bearing beams (10x10 cm) and the same number of cross beams (10x5 cm). Then 8 rafters are prepared. Before starting assembly, grooves are cut out at each end of all wooden roofing elements.
Next, assemble the structure and move on to:
- Formation of the sheathing. The beams are mounted perpendicular to the rafters in increments of 35 cm.
- Laying metal tiles. Self-tapping screws are screwed under the edge of the beams. This will create the effect of the absence of fasteners.
- Fastening the skate. The remaining roofing material is first leveled. Then they bend it a little and fasten it in the right place.
A luxurious option for such a gazebo would be a hipped roof of the hipped type. To build it, determine the center line of the frame. A cross beam is installed at this location. An axis is attached to it in a perpendicular position. Eight beams are connected to the 4 corners of the structure and each side of the structure. These beams should protrude 15-20 cm beyond the frame. The corner beams are complemented by transverse rafters. Then they begin to cover the roof.
cb4edabce429c16663d7299903dde5ca.jpe 0751f2a9c760c9e5c7006b741371c608.jpe