Reinforcing the corners of a strip foundation is necessary to strengthen the structure of the entire structure, eliminating the possibility of deformation and destruction of the structure under the influence of heavy loads and external negative factors. The corners and junctions of this type of foundation structure experience strong multidirectional loads, so work must be carried out in accordance with established norms and standards.
Otherwise, the entire structure may collapse, leading to delamination, spalling, and deformation. Provided the task is performed correctly, the reinforced concrete structure will be strong, able to withstand all loads, and will not be afraid of tensile and compressive forces.
Why do you need to reinforce a strip foundation?
The need to reinforce a strip foundation on ordinary soil or on loam in the corners is explained by the properties of building materials. Concrete itself is not flexible and strong enough to easily withstand tension and other loads operating in different parts of the foundation, especially when it comes to uneven loads (caused by soil heaving, temperature changes, moisture, etc.).
During deformation, zones of tension and compression appear in a concrete structure. And while concrete can survive compression, tension destroys it. In order to counteract this load, reinforcement is needed: a metal frame is placed inside the concrete structure, which absorbs tensile loads and significantly strengthens the material, extending the life of the entire structure.
The angle of the tape and the junction points are the most important points of the structure; greater pressure is exerted on them compared to the longitudinal parts, so special attention should be paid to their strengthening.
How to make the right reinforcing frame
Proper reinforcement of important structural elements plays a very important role in ensuring the long life and performance of the entire structure. Therefore, you can do everything yourself only after carefully studying the parameters and standards, paying attention to each stage. Otherwise, it is better to leave the work to professionals.
Primary requirements:
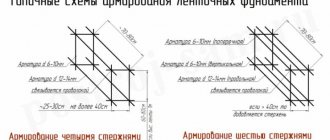
- Reinforcement rods in the corners must be knitted while maintaining a distance between the rods of 50-80 centimeters.
- The distance between the longitudinal reinforcing belts is 50 centimeters, their number is calculated in each individual case.
- On both sides of each corner, 3-4 belts are installed transversely, with a step of 0.5 from the main one. Do the same in the corners.
- The diameter of the working reinforcement should be 1-2 centimeters, the diameter of additional rods can be 4-10 millimeters.
- Strict adherence to the sequence of work: first, vertical rods are driven into the ground, then horizontal rods are welded to the vertical rods at the top and bottom.
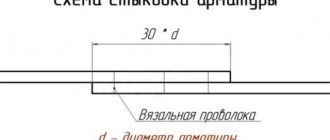
- It is advisable not to make joints in the corners, it is necessary to use bent rods, on straight sections of joints it is better not to make them at all, but if a joint is made, then only by the overlap method with the following parameters: 50 rod diameters for M200 concrete, 40 for M250, 35 for M300 . Vertical joining of longitudinal reinforcement is possible only with a spacing of at least 60 centimeters or 1.5 times the total overlap length.
- The main methods of joining materials: welding, overlap joining, using mechanical devices. Knitting of reinforcement at the corners of the strip foundation is carried out exclusively using special wire.
- To form a protective concrete layer at least 5 centimeters thick after pouring, special devices are used - “frogs” or “chairs” are installed on the bottom, and “stars” on the sides.
Methods of knitting reinforcement
Let's consider all the existing ways to connect reinforcement. Each of the options is good in some way, and is used by builders, depending on the type of building and design requirements. There are 3 ways to connect rods; with their help, a strong and reliable metal frame is created:
- Wire knitting.
- Welding.
- Plastic clamps.
These methods of tying reinforcement have their own characteristics. Each of them is correct and is applied depending on the requirements and the material used. When reinforcing a strip foundation for a private house, the reinforcement is often connected by welding rather than tied with wire. But which option is the best?
Advantages and disadvantages of welding connections
Despite the fact that these are different technologies, the right choice can save money and time on construction, without sacrificing structural strength. The method of connecting elements by welding was previously considered one of the most reliable and effective. However, such technology is not always appropriate. Usually it was used when installing bulky frames that strengthen the foundation for multi-story buildings and large cottages.
This method has some disadvantages:
- You need to have skills in working with a welding machine, otherwise you need to spend money on the services of a professional welder. In this case, the cost increases.
- Welding points are the weak point of the structure. There the strength of the frame becomes lower.
- The method is not suitable if you use fiberglass reinforcement. In addition, the A-400 (A-3) fittings, which are the most popular, cannot be connected by welding. Only rods with the index “C” are suitable for work, for example: A500C reinforcement.
Therefore, in modern monolithic construction, welding has been replaced by viscous welding. For private and residential houses, construction of a bathhouse, garage or other buildings, this is the best option for connecting reinforcement.
Pros and cons of joining using the knitting method
Why is this method so good? It has the following positive aspects:
- Speed of work completion. Knitting with wire takes little time, it is simple and does not require skills. However, if you do it manually, the process slows down. Next we will look at how to quickly knit reinforcement.
- Ease of troubleshooting. When working with welding, it will be more difficult to eliminate errors; you will have to take a grinder and cut the welding seam. The wire can be simply bitten off with wire cutters or unwound with a crochet hook.
- You don't need to be a professional to knit reinforcement.
- The reinforcement process can be performed in formwork.
- The cost of work is much lower.
An example of knitting a mesh of reinforcement with wire.
If we talk about shortcomings, we note the precariousness of the finished frame. True, this is not a big problem. The structure will be strong, the only problem is that when the frame is moved into the formwork it begins to loosen, in this case it is possible to tack the reinforcement in several places by welding. To solve this problem with fiberglass reinforcement, you need to attach several braces to make the structure more rigid and stable. By bending, the tension in the knitting areas changes, the frame moves. Therefore, you need to be careful when installing it in the formwork. It is better to knit the reinforcement in the formwork or above it if the strip foundation is being reinforced.
Features of connecting reinforcement with plastic clamps
The main advantages of this method are that it does not require special skills, it has a high speed of work, and reliable fixation of the reinforcement. The disadvantages of this method are the following:
- Price. For large volumes, the wire will be more economical.
- Speed of work (when compared with other methods of knitting).
- Correction. You made a mistake somewhere, you will have to bite off the clamp, it becomes unusable, but the wire can be tied up.
- Reliability. It is not advisable to move around a structure connected with plastic clamps.
- Temperature. They burst at subzero temperatures.
Based on these data, we can say that this method is more suitable for private construction, with small volumes, and it is also suitable for people who want to do the reinforcement themselves with their own hands.
Types of angles
Before knitting the corners, it is necessary to determine the type of corner and, in accordance with this, organize the work and select materials. Sharp angles in knitting are the most difficult, obtuse angles are simple.
The angles are:
1. Direct - most common. Can be T or L shaped.
2. Blunt - arbitrary (bay windows). Rotated angles from 160 degrees are easy to work with - the reinforcement is laid from the outside to the inside, doubling the frequency of crossbars compared to the rest of the foundation length, and then tied together. Angles of 90-160 degrees require the installation of vertical rods.
3. Sharp - in private low-rise construction they are rare and very difficult to work with.
Stages of construction of a strip foundation according to SNIP
This device consists of concrete, which undergoes reinforcement and is then poured into the formwork, thereby forming a monolithic complex. There are various types of construction of a strip base, but we will consider the most optimal and simple process diagram.
Drafting
At this stage, all necessary quantities are calculated
At this stage, all necessary quantities are calculated, namely:
- Depth;
- Width;
- Material selection;
- Establishing the level of soil freezing;
- Other soil parameters.
The device must run along the entire perimeter of the building, so this data plays a huge role in construction work.
Important! If the building has a shape other than a square, then installing the tape will be more difficult.
Performing markup
After completing the project, it is necessary to place marks for the future foundation
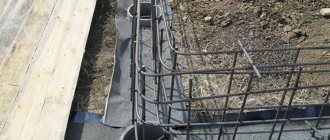
After completing the project, it is necessary to place marks for the future foundation. This is done in this way: the pegs are placed around the perimeter and tied with a cord around the outer and inner space. When you are erecting a building on soft ground, the trench should be a little wider. This is necessary for using formwork when performing work. It is also necessary to provide a 10 cm cushion, which is covered with sand.
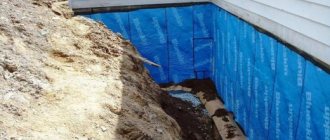
Regulatory requirements for foundation waterproofing
Excavation
At this stage, the trench is completed
At this stage, the trench is completed. The depth should be identical to the size of the foundation, but have a margin of 30 cm for the pillow. To perform this task, it is better to use a stretched rope so as not to get lost from the markings. When digging, take into account the characteristics of the soil. For example, for hard soils it is better to make vertical walls for ditches.
Important! If your site has loose soils, then the dimensions of the trench should be larger than specified in the project/
Installation of formwork
The formwork is erected outside the base of the house, that is, the width of the boards must correspond to the design value
The formwork is erected outside the base of the house, that is, the width of the boards must correspond to the design value. The installation process is quite simple and is performed in much the same way as with wooden panels. Upon completion of its construction, it is necessary to fill the bottom of the canal with river sand and compact it thoroughly. This is called a pillow. If you add crushed stone and fill it with concrete, we form the base of the building.
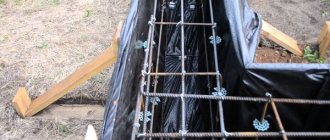
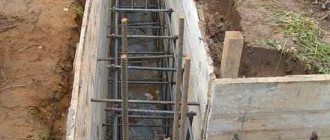
Reinforcement
The next step is to perform reinforcement
The next step is to perform reinforcement. For this, rods with a diameter of 12 cm and wire will be useful, which will hold the structure together. Vertical reinforcement parts should have a distance of 10 cm from the foundation and be connected with wire in all directions. At the end of the work, we will receive a belt that will perform the reinforcement.
Pouring concrete with mortar
When filling simultaneously in all areas, it is necessary to use several machines to mix the solution
When pouring simultaneously in all areas, it is necessary to use several machines to mix the solution and mix the poured concrete with a crowbar to avoid the formation of empty spaces.
If all work is carried out gradually, then the concrete will lie evenly. To make the solution, one mixer is also suitable, which will cope with its tasks for an average building. We recommend filling in a circle shape - this allows the base to rise gradually. The last step is leveling. The technology of this process is identical to the screed.
It is best to fill the foundation in a circle so that the entire perimeter rises gradually. At the final stage, the concrete is leveled in the same way as a screed to ensure more convenient laying of the first row of brick or other material. It is worth noting that all norms and requirements for calculations and construction are specified in the Construction Regulations. So study the documents and only then feel free to start doing the work.
Reinforcement materials
To reinforce the corner and junction of a shallow foundation, only high-quality reinforcement with a diameter of 10-20 millimeters is chosen. For transverse and vertical structural parts, it is allowed to take smooth rods with a diameter of 8-12 millimeters, for knitting - wire with a cross-section of 0.8-1.2 millimeters. The rods must be corrugated, smooth, long (so that there are minimal joints), without corrosion and large areas of rust.
The standards allow the use of fittings:
- Allowing the connection of parts into concrete and reinforced concrete structures using welding (index C in the marking).
- Resistance to corrosion that may appear in the concrete composition (in the marking it is indicated by the letter K).
- Resistance and strength when fixing parts with binding wire - usually such rods are made from steel 35GS, class A-2 and A-3. They are not connected by arc welding.
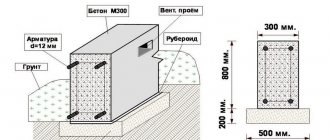
The solution is prepared from cement grades M200, M300, M400, crushed stone or gravel, sand and water. The proportion is calculated based on the assigned tasks and operating characteristics.
What kind of reinforcement is best used for reinforcement?
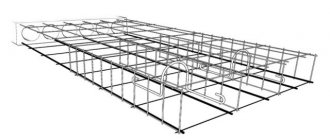
Foundation reinforcement.
No reinforcement can take place without reinforcement, but in order for the metal frame to be strong and of high quality, it is necessary not only to follow the rules of reinforcement, but also to choose the reinforcement correctly, especially if the foundation is made by hand. So, when choosing fittings, you need to pay attention to the designations:
- Index C - this indicator indicates that the reinforcing bars are weldable.
- Index K - this indicator indicates that the reinforcement is quite resistant to metal corrosion and does not crack under stress.
If the selected reinforcement does not contain any of these indicators, then it is better to refuse to use it, since it is not suitable for the foundation and will not guarantee a high-quality foundation.
Anchoring during dressing
The choice of connection type depends on the parameters of the reinforcement and the section of the structure in which it is made. Metal rods are bent in a vice or on a special machine.
Types of anchorage:
- Direct is the least desirable; connecting two reinforcing rods in the corners using these methods is only relevant for small buildings. It is performed by simply overlapping the rods and then tying them with wire. Here it is important to ensure maximum rigidity to avoid shifts when pouring concrete.
- Hook - bend 180 degrees so that the end is adjacent to the main part of the rod.
- Foot - the end of the rod is bent at a right angle.
- Loop - the rod is folded in half, the loop is in the corner.
- By welding crossbars.
- With the additional use of a steel angle or washer.
The last two methods can only be used for anchoring longitudinal reinforcement that can be welded. Claw and direct anchoring are used only with rods of different diameters.
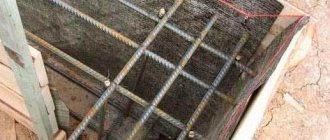
Strengthening corners
In the corners of the strip base, stress is concentrated, acting in various directions, compressing and stretching the structure. When strengthening is performed correctly, the stress is absorbed by the steel bars of the reinforcing frame. Improper reinforcement causes a violation of the integrity of the strip base.
The fixation of steel structure elements must ensure complete transfer of forces between the reinforcement bars. If the reinforcement of the corners of the strip foundation is carried out without breaks, and the connection of the elements is rigid, then the monolithic strip foundation will have the necessary strength due to the solid spatial frame.
A simple connection of two reinforcing rods in the corners is unacceptable under any circumstances
Fixing perpendicularly located reinforcement, the ends of which are simply connected using knitting wire, is not allowed. This causes cracks to appear in the corner parts of the foundation, delamination, and spalling of parts of the foundation.
Let's look at how to properly reinforce corners and what are the main mistakes made by developers who are not familiar with the specifics of reinforcement.
When carrying out work, pay attention to the following points:
- in each of the corner parts of the base, horizontally located rods must be mounted in a bent form;
- Butt jointing of reinforcement is not allowed, which causes a break in the power circuit;
- corner sections should be reinforced with rods whose diameter exceeds one centimeter.
After completing the reinforcement, be sure to compare the compliance of the assembled frame design with the previously developed diagram. Insufficiently rigid fastening of the rods, violation of the recommendations leads to rupture of the steel bars at the fixation points and subsequent cracking of the base.
The main mistake that developers make when reinforcing the corners of a strip foundation is fixing the perpendicular ends of the rods. This violates the integrity of the rigid spatial structure, leads to cracking of concrete, and disruption of the stability of the structure.
The choice of thickness of reinforcing rods largely depends on the distribution of loads
Reinforcement of bases is carried out in various options:
- With the use of steel mesh for reinforcement, placed in the upper and lower tier, secured to transversely located reinforcing bars. Corner joints are reinforced with bent rods of increased diameter up to 2 cm. The mesh is fixed to the vertical rods at intervals of 0.5 m.
- Using separate steel rods. This makes it possible to ensure a rigid connection between the base and the main walls of the building and securely fix the steel rods. The method involves connecting overlapping rods, the ends of which have the necessary overlap.
When bending steel rods more than 150 degrees, solid rods with a slight bend are used. At smaller angles, the outer rods, which have a rectilinear configuration, remain intact. The corner elements of each tier are curved accordingly and intersect in the fastening areas. Strengthening the right angle of the base is carried out using separate L-shaped rods.
Incorrect corner reinforcement
Reinforcing the corners of a strip foundation is a complex task, so it is not surprising that in the process craftsmen make mistakes, which, as a rule, are similar. Errors in calculations and savings on the materials used, attempts to make everything simpler and faster usually result in big problems - at least the appearance of deformations and cracks, and at maximum - the destruction of the building.
Tying reinforcement for strip foundation corners: mistakes.
It is no secret that without reinforcement in the form of high-quality reinforcement, the foundation will not last long enough. It is for this reason that it is very important that the laying and tying of the reinforcement is done correctly. Some builders forget that the area of corners and abutments is the weakest part of any strip foundation. As a result, very serious and unacceptable mistakes are made when laying reinforcement. First of all, we are talking about the following points:
- only the outer contour is applied;
- there is no connection between the base of the strip foundation and the reinforcement frame;
- The reinforcement is knitted by twisting onto ordinary wire;
- there are welding seams at the corner of the building;
- When using two frame contours, there is no connection between them.
Reinforcement of strip foundation corners.
Of course, it cannot be stated unequivocally that all the mistakes that are made when reinforcing corners and abutments are fatal and make reinforcing the corners of a strip foundation a useless procedure. But if you want to give the foundation a noticeable strengthening, you should do everything correctly and avoid mistakes.
Reinforcement options
The correct scheme for reinforcing corners requires mandatory anchoring, the formation of connections of different strengths for different zones of the wall. After all, corners and junctions are constantly subjected to severe loads and must be as rigid as possible.
You cannot simply knit the longitudinal rods directly; this will not provide adequate structural strength. There are three methods of reinforcement of this type.
Basic reinforcement methods:
U-shaped installation
Special U-shaped elements are used at the corners and junction points. The width of the element is equal to the width of the frame, the length is at least 50 diameters of the longitudinal rod. The elements are tied to the main longitudinal rods with the open part of the P side in the direction of the corner, in each of which two elements are installed (for each horizontal level). At junction points, one per level is sufficient.
Claw and lap joints
Rigidity is ensured by bending the free end; the internal reinforcement is overlapped with the horizontal reinforcement, and knitted with a paw to the external ligament. The pitch of transverse corner and vertical reinforcement is calculated in the ratio of 3/8 of the height of the foundation. The length of the paw should be 3-5 centimeters.
Using an L-shaped clamp
The internal longitudinal bars are rigidly attached to the external longitudinal bars with an overlap, the pitch is ¾ of the height of the foundation, the external and internal longitudinal frames are connected by additional transverse elements. The length of the overlap joint is equal to 50 diameters of the horizontal rods.
How to knit reinforcement at corners correctly
Initially, design documentation is developed, in which the potential load on the base is calculated and the layout of the elements is prescribed. Also at this stage, the required amount of rolled metal and its characteristics are calculated. And only the next step, after theoretical preparation, begins to implement the project.
The procedure is as follows:
- Vertical rods are installed along the entire perimeter at equal distances (about half a meter).
- You need to attach the upper and lower horizontal rods to them using wire.
- In the central sections, additionally lay a reinforcement contour.
We will describe below how to accomplish the task of increasing the strength characteristics in places with the greatest load.
How to knit corners of foundation reinforcement: common mistakes
- Insufficiently strong fastening. Often, corner joints use regular tie wire, and the ends of the loops are simply overlapped. This is not enough.
- Sometimes the ends of the rods bend, but there is no additional fixation. This method does not provide sufficient resistance to tearing of the frame.
- Saving on materials is also contraindicated. If you make only one perimeter of the rods, this will lead to disastrous consequences.
- Even if you install two reinforcement circuits, without their proper connection to each other, stability will be insufficient.
- Ignoring the need for connection between the lower layer of the foundation and the load-bearing frame.
- Lack of alternative fastening methods other than welding.
How to knit reinforcement at corners correctly
To carry out the work you will need the following tools:
- welding machine;
- devices for cutting metal (grinder, etc.);
- directly rolled metal.
The first and most important step is a preliminary calculation of the amount of materials and drawing a diagram of the base along with reinforcement elements. One of the main conditions for initial preparation will be the installation of a sole under the entire structure. They start by installing two contours of longitudinal reinforcing parts with a small indentation (4-6 cm) from each edge. Please note that there should be no welds in the corners.
Bends are made at 90 degrees, and metal is welded only in places where there is no high pressure. This entire frame is laid out on the bottom of the prepared recess and additional perpendicular rods are driven in. A perimeter of two rolled metal strips is attached to them using a welding machine. By analogy, the upper longitudinal contours are executed. To ensure high-quality joining of all parts together, you should use the knitting methods that we described above.
Scheme for reinforcing the corners of a strip foundation: tips for beginners
- If the rods driven into the ground have a cross-section of less than 2 cm, then they must be installed at a distance of at least half a meter from each other, but not more than 0.8 m.
- We recommend choosing the diameter of the base materials in the range from 10 to 20 mm. All other parts can be assembled from thinner rolled metal (but not less than 5 mm).
- When setting gaps, use non-metallic spacers for a more stable fixation of the gaps.
- Docking without overlap is strictly prohibited.
- Minimize the number of breaks in the structure.
Correct reinforcement of the corners of a shallow strip foundation
- The frame is placed at a distance of 5 centimeters from the foundation.
- Connections are made using reinforcement bent at 90 degrees, without welding. Fasten on straight sections with wire.
- Be sure to lay a cushion of sand and gravel at the bottom of the trench, which will ensure sufficient strength of the base.
The maximum stress is usually concentrated in the corner and different layers of the frame experience different loads. And the main task of the reinforcement is to make sure that the steel rods absorb these loads evenly, completely taking them over themselves. And if the metal rods are connected incorrectly or with breaks, then the foundation will simply turn into a set of parts, each of which by itself will not give any benefit, and the concrete will quickly delaminate and become covered with chips and cracks.
Therefore, all work must be performed correctly, avoiding simple crosses of the ends of the rods in the indicated places, as can often be found in construction practice.
Corner reinforcement: what materials are used
To increase the strength and stability of a strip foundation located at a shallow depth, high-quality rods should be used, the thickness of which is at least 1 cm. The maximum diameter is 2 cm. Knitting is carried out using a special wire with a cross-section of about 1 mm. The rods must be free of damage (including no corrosion). Have a corrugated surface. The maximum possible length is selected to minimize the need to organize docking. The following standards are regulated when choosing suitable raw materials:
- The fittings are taken suitable for welding (if suitable, then the name will contain the letter C);
- high level of rust resistance (letter K in the name);
- the strength index is determined based on the main material of manufacture (A2 or A3 steel is the best option); such rods do not change when tied with wire.
Concrete requires high-quality cement (M-200 - M-400). As well as a fraction of gravel, sand and water. All this is combined in shares determined on the basis of a specific construction project.
How to properly reinforce corners
First, frame drawings are made, where the main values are written down, important parameters and indicators are calculated, and the required minimum reinforcement in the calculation is determined. Then they implement the task.
Reinforcement scheme:
- Fix the vertical rods at intervals of 60 centimeters.
- Using knitting wire, fasten the horizontal power rods at the top and bottom of the contour at the places where they intersect.
- Strengthen the areas located in the middle of the spans with additional rods.
Errors when tying reinforcement at corners:
- The reinforcement is simply crossed in the corners, secured with wire. This is wrong, although the scheme is quite common.
- In the corners the rods are bent, but not anchored. Thus, SP 50-101-2004 says that prefabricated monolithic and monolithic foundations must be rigidly connected by cross strips. A connection with a regular crosshair means a break at the bend, which will not provide sufficient rigidity. In places where they overlap, the rods can be connected only in the indicated ways: mechanically with couplings, welding, without welding (overlapping corrugated rods with straight ends, with transverse or welded rods, with bends at the ends).
- Using only one strapping circuit.
- Using two circuits without properly securing them together.
- Lack of structural connection between the reinforcement frame and the base.
- In the corners of the structure, the rods were connected by welding, ignoring other joining methods.
How to knit reinforcement correctly
Knitting of reinforcement in the corners of the strip foundation is carried out using the following means: grinder, rods, gas or electric welding machine. First, everything is calculated - the number of rods, their diameter, and knitting methods depend on the calculation. Particular attention is paid to strengthening the sole, making the structure on site.
Two contours are welded, one with an indentation of 5 centimeters from the outer perimeter of the foundation trench. The second is placed at the same distance from the inner edge. The weld seams should not be in the corners. The reinforcement is bent at right angles, the bending points are heated, welding is used only where the loads are relatively low.
Next, the structure is lowered into the trench, and vertical rods are installed in the corners. The pins are driven deep into the ground, the contours are welded to the vertical posts. The upper part of the foundation should also be made of two contours.
Before tying reinforcement, it is necessary to study the types of tying. Simple connections are not suitable in this case. It is imperative to use bent elements that will continue the longitudinal rods of the frame and protrude beyond the corner by 60-70 centimeters. If the length of the rod is not enough, you can fasten it with clamps with sides equal to at least 50 diameters of the reinforcement used.
Useful tips for correct installation of reinforcement
- The distance between vertical rods up to 20 millimeters should be equal to 50-80 centimeters.
- You need to use working steel rods with a diameter of 1-2 centimeters, additional elements must have a cross-section of at least 4-10 millimeters.
- It is advisable to use non-metal pads that will fix the frame at the required distance from the ground and nearby structures.
- Horizontally located rods are mounted exclusively in a bent form.
- You cannot connect end to end.
Reinforcement of foundation corners - criteria for selecting reinforcement
It is important to take a responsible approach to the choice of steel rods for the strip base.
There are a few things to know before you start laying reinforcement in the corners of the foundation.
You should study how reinforcing bars are designated and use bars with the following marking features:
- indicated by the index C. It indicates the possibility of connecting elements by electric welding;
- marked with the letter K. This confirms the increased resistance of the rods to the effects of corrosion processes;
- with the alphanumeric abbreviation A2 or A3. Such wire cannot be connected by arc welding; it can only be fixed with binding wire.
The reinforcement frame is strengthened with rods with a diameter of 1–1.2 cm. Rolled products that meet the requirements of the drawing are used.
Corner reinforcement process
Due to the fact that the corners of the strip foundation bear the bulk of the load, durability and absence of deformation directly depend on the correctness and quality of the hardening. The rules for performing the work are based on construction standards and indicators.
Basic principles of proper reinforcement
- The maximum loads are placed on the longitudinal part of the strip foundation - these areas are strengthened with the thickest rods with a cross-section of up to 15 millimeters.
- The density of the soil directly affects the rigidity and quality of the reinforcement (it is especially difficult when the soils are loose, unstable, or clayey): a strip foundation on loam should be made with maximum rigidity characteristics from a larger layer of large cross-section rods.
- The rods must be corrugated, with good adhesion to the concrete mixture.
- Corners are strengthened more carefully than walls and junctions.
How to correctly calculate a metal reinforcement frame
- The frame must be at least 5 centimeters from the edge of the base.
- The lower rods cannot be located below the ground level by more than 5 centimeters.
- A distance of 50-80 centimeters is maintained between the vertical posts.
- The diameter of the supporting rods of the support is 10-20 millimeters, the additional ones are 4-10 millimeters, the wire for knitting is less.
Before starting work, you must draw a drawing and make a diagram. This way you can avoid the most common mistakes.
Algorithm for manufacturing a metal frame
First, load-bearing rods with a diameter of 10-20 millimeters are driven into the ground in increments of 50-60 centimeters. The supporting rods are welded from below and above in a vertical position, then additional working rods are welded in increments of about 8-10 centimeters.
Nuances of additional reinforcement of corners
- Welding at the joints of the structure is unacceptable, and straight sections are not fastened this way - it is better to knit.
- At the corners, the rods are cooked slightly at an angle, bending them in advance.
- Cross fastenings to strengthen the strip base at wall joints are not allowed.
- It is recommended to additionally fasten each rod with bent reinforcement.
- All reinforcement should turn into a monolithic structure from frame rods, and not an assembly of individual blocks.
Rules for good construction
When performing work, only high-quality materials that meet the specified physical characteristics are used. It is the foundation that requires the use of the best materials, since this is the basis and the service life of the entire building depends on how reliable it is.
You need to be able to correctly use different types of connections depending on the contours of the frame - in some places welding is needed, in others it is unacceptable to weld and needs to be knitted. Under no circumstances should you do it at random. The frame can be lowered into the finished pit, and it must be poured with concrete in one go to avoid joints and delaminations that weaken the base.
To create the required solidity of the base at the joints of the walls, bent rods are used and they are installed diagonally - at an angle to the main grid. This way it is possible to achieve the required characteristics of reliability and strength.
Important rules for reinforcement.
When building a foundation, it is important to follow not only the foundation diagram, but also take into account some important points:
- It is necessary to maintain the distance between the reinforcing bars. It is important to place the vertical rods at a distance of 50-80 cm from each other, no more and no less.
- It is important to understand that the diameter of the main (working) reinforcement for high-quality reinforcement should be 10-20 mm. The additional one may have a diameter of 4-10 mm.
- It is necessary to strictly follow the sequence of reinforcement: vertical reinforcement is driven into the ground first, after which horizontal reinforcement is welded to them from below and above.
- When reinforcing foundation corners, it is best to avoid joints in corners and use bent rods.
Reinforcement of obtuse angles
When foundations of complex configurations are made, angles of more than 90 degrees may appear. They are strengthened in accordance with special schemes and two types of reinforcement structures are used.
First way
The external longitudinal reinforcement is bent at a set angle. The longitudinal internal whips are bent in a similar way, then knitted to the longitudinal outer part of the frame. Each bent portion of the longitudinal inner bar must be at least 50 times the diameter of the main bars.
Second way
This is done using additional bent elements (they are already prepared and correspond to the desired angle). The curved element must have a shoulder equal to at least 50 times the diameter of the longitudinal rods. The overlap in the knitting can be in the range of 35-50 values of the cross-section of the reinforcement (depending on the brand of cement used in preparing the mortar).
Tools for tying reinforcement, technology for working with them
Nobody does the work manually. It's practically impossible. There are special tools for this purpose that speed up and simplify the process. Each tool has its own characteristics of use. The following devices are available for tying reinforcement:
- Hand hook.
- Knitting gun.
- Screwdriver.
- Ticks.
Each of the tools has its own pros and cons, we will consider them, as well as the technology for their use, and based on these data and the opinion of an expert (a reinforcement specialist with 10 years of experience), we will summarize and choose the best option for tying reinforcement.
How to crochet reinforcement correctly?
The peculiarity of the work is that it is done manually. At first, the process will be lengthy, as you need to get better at it. The hook is made of steel, and the handle is made of wood or plastic. The cost of such a hook is 1 thousand rubles.
There are even automatic hooks on sale, but reviews about them are mixed. Some note the short lifespan, others say that it is difficult to twist wire 2 mm or more thick.
There are several options for connecting knots when crocheting reinforcement. Let's look at the most popular ones.
Simple crochet rebar tie knot
The most common and simplest knot is performed as follows:
- To connect the rods to each other, you need to take a wire 15–20 cm long and bend it in half.
- The bent wire is bent again, but not completely, you should get a hook.
- We insert the wire under the reinforcement that needs to be tied.
- Next comes the hook itself. You need to insert it into the resulting loop and hook the free end of the wire.
- One revolution is made. It is important to hold the free end.
- Pulling the hook towards you, twist the wire until it comes off.
Step-by-step diagram for making a simple crocheted reinforcement knot.
Note! In order not to buy a crochet hook, you can make it yourself. You will need a piece of steel rod, and the handle can be made of plastic or wood. Having done it once, you can constantly use the knitting tool. See step-by-step instructions for making a hook with your own hands here.
"Dead Knot"
This unit is used for reinforcing structures consisting of reinforcement bars and clamps, such as beams and columns. Since it reliably fixes the reinforcement into the corner of the clamp, reinforcement specialists called it a “dead” knot. To quickly and efficiently perform such a knot, you need to practice a lot. Consider the instructions for executing the node:
- We take a wire 20–40 cm long, its size depends on the diameter of the reinforcement used, and bend it in half.
- We run the wire, loop forward, under the bottom of the reinforcement to the left of the clamp, leaving 2–4 cm to complete the knot.
- We bring the wire to the top of the clamp and bend it again under the bottom of the reinforcement.
- Insert the hook into the loop and hook the free end of the wire.
- We pull the hook towards ourselves and at the same time make several turns until we feel that the wire is clamped, or until the loop comes off.
Scheme of tying reinforcement with a “dead” knot using a hook.
It should be noted! In order for this knot to reliably fix the reinforcement into the corner of the clamp, the wire should be pressed as tightly as possible to the reinforcement and the corner of the clamp, otherwise the tie will turn out to be unreliable.
You can check the quality of the assembly by tugging the clamp with your hand; if it wobbles, it is done incorrectly or is not fully tightened. We tighten it or make an additional tie with a simple knot.
When performing reinforcement of complex structures, for example, semicircular beams, nodes can be combined. First, a “dead” knot is made, and then two simple crosswise ones, as in the photo below.
Special gun for mating
This is an ideal tool for tying reinforcement. It makes the process much faster and easier. It is most convenient to assemble a metal frame with it. The only caveat is that such a unit is not cheap. That's why it is used on large-scale construction projects. The minimum cost is 30 thousand rubles.
It looks like a regular drill. Only a roll of wire is inserted into it. To tie, you need to point the gun at the joint and pull the trigger. He will do the knitting himself in a matter of seconds. This is the simplest and most affordable option for tying reinforcement.
On a note! It takes 9 seconds to make 1 knot tied with a hook. If you take an automated hook, it will take 7 seconds. And tying with a gun takes only 1 second per 1 knot.
But this method also has its disadvantages:
- Not everywhere they can get to perform mating.
- Price.
- When you fix the reinforcement, you can no longer untie the knot with a crochet hook.
- You cannot knit large-diameter reinforcement.
Using a screwdriver with a hook
To speed up the process and make it automated, a modernized screwdriver is used. It is enough to insert a homemade hook into it. A slate nail is suitable for this purpose. It is clamped into the screwdriver and is ready to go.
The principle of its operation is no different from the previous version. The only difference is that the process is significantly accelerated. And if the screwdriver has a speed adjustment, then it is adjusted so that when the wire is stretched to maximum, it does not break.
Tying reinforcement with pliers
This method of knitting is good because it saves wire during the work, due to the fact that you can knit into one, and you don’t have to make loops, as for a crochet hook.
Of the minuses it should be noted:
- Requires more practice for speed knitting.
- The knitting speed is 2 times less than that of a hook.
- When knitting with 2 wires, the result is a rigid knot with a sharp end; you must wear special shoes, otherwise you can pierce your leg.
The video below shows what speed can be achieved with viscous pliers, but this requires a lot of practice. A professional fitter makes the tie in 3-4 seconds.