Installation
Publication date: 10/02/2018
0
2495
- Types of siding for finishing a house
- Calculation of material for house cladding
- Necessary tools and components
- Preparatory work
- Installation of sheathing
- Siding installation
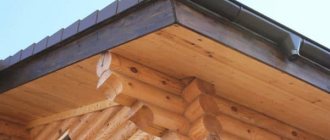
- Roof gable sheathing
- Working with the finishing profile, designing openings
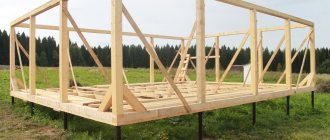
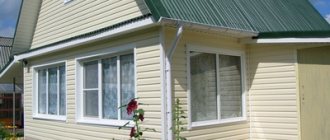
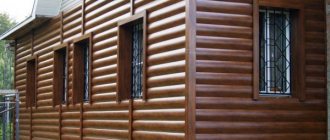
Siding has become an ideal solution for cladding frame houses. The light weight of the sheets and ease of installation allows even a beginner to cope with the finishing. To do the job at a decent level, you don’t need specialized skills; you just need to follow simple recommendations.
Frame house covered with siding
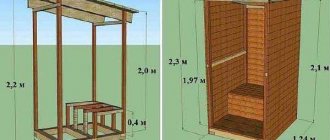
Calculation of the required amount of siding
To calculate the required amount of siding, you need to measure either the house itself or take the drawing data. In addition, in some cases (with complex architecture of the building) it is recommended to increase the volume of building materials by 10% (but I will not do this, relying on the thoroughness of my calculations). And the more accurate the calculation, the less waste.
For the calculations, I used drawings of the facades with the dimensions of window and door openings marked. This allowed me, firstly, to accurately calculate the required amount of siding, and secondly, to once again put it in my head and calculate where and what additional elements I would need.
Having a picture with dimensions before your eyes, and also knowing the length of the siding panel, or the strip of one or another additional element, it is not difficult to scatter each panel (plank) across different walls (openings). When calculating the required number of additional elements for window and door openings, I numbered each segment with a serial number. The final number showed me the required amount of additional element.
Drawing
In principle, for preliminary calculations you can use the calculator on the website.
Siding storage features
Siding storage
- The cardboard boxes in which siding is usually supplied are stored in a lying position on pallets or racks no more than 7 boxes in height.
- The room in which the siding will be stored must be spacious enough and the floor level so that the boxes are not subject to bending.
- Siding is not afraid of water, however, the storage area for boxes must be dry and ventilated.
- During storage, boxes with siding must be protected from accidental falling of various materials and building structures onto them.
- It is strictly forbidden to store siding without packaging near heating devices (at a distance of less than 1.5 m) and at temperatures below -35°C.
- To avoid warping, siding should not be stored at temperatures above 50°C (for example, in hot sunny weather on a crushed stone-asphalt road surface or under dark tarps without air circulation).
Which siding to choose
Cladding panels are made from different materials. A wide range of products allows you to choose a coating of any color, texture, quality. Depending on the source raw materials, siding panels can be:
- Vinyl
- Wooden
- Metal
- Cement
Each variety has its own advantages and disadvantages. These are the ones that people pay attention to when choosing cladding. Polyvinyl chloride (PVC) panels are valued for their high-quality imitation of natural materials (wood, stone, brick). They are distinguished by their low weight, affordable price, long service life, variety of shades and textures, durability, resistance to temperature changes, easy assembly and maintenance.
Decorating a house with natural wood siding is an expensive pleasure. But the high cost is compensated by numerous advantages. Wooden panels made of beech, pine, spruce, and larch increase the presentability of the building. Another significant advantage is the absolute environmental friendliness of the material. This cladding serves as an additional thermal insulation layer and protects the house from heat loss and strong heating. However, the panels require pre-treatment against fungus and insects. Maintenance of the coating is also necessary during the operation of the building.
Metal siding is also suitable for the exterior of a home. Panels can be zinc, steel, aluminum. The latter metal is the most preferable, as it allows you to paint the outside of the house and create an exclusive design. Metal siding panels are valued for their long service life, high strength, resistance to biodegradation and critical temperatures. However, when choosing a metal, you must remember that it can be deformed as a result of impacts and be subject to corrosion.
Cement panels are made from high quality cement and cellulose. This combination allows you to create the visual effect of stone in the cladding of a house. This type of siding is advantageous due to its high strength, immunity to moisture and light, fire resistance, and resistance to microflora. The advantages also include the ease of replacing panels in the event of a defect. The existing advantages are partly offset by the disadvantage - the large weight of the panels. This fact somewhat complicates and delays installation.
To choose the appropriate type of panels for external cladding, it is necessary to take into account the quality of the material from which the frame of the house is assembled.
Vinyl siding is suitable for a structure made of timber or solid logs, and wooden siding is suitable for a frame house. If the building has brick walls, then its purpose should be taken into account. Metal siding is appropriate for industrial facilities, and vinyl siding for private homes. It is recommended to cover buildings made of aerated or foam concrete with PVC or metal panels.
Preparing the building surface for siding installation
When preparing the building surface for siding installation, you should carefully inspect the building and eliminate all visible defects. There should be no poorly secured elements on the frame. It is necessary to secure wind insulation on the façade and install lathing. I installed cross-insulation of the facade back in the fall. I will be installing a wooden sheathing, for which I purchased a board before the start of construction. The lathing must have high strength and be securely attached to the facades of the building, since it is thanks to it that the siding will withstand weather conditions. I will treat the wooden sheathing with fire-bioprotection (or simply an antiseptic compound). The pitch of the vertical sheathing is 400 mm.
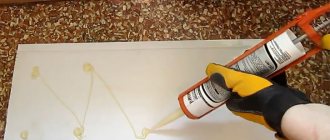
When applying markings for the starting strips, do not forget about the need to install ebbs.
At first, I also thought about putting ebb and flow on the border between the basement and façade (ordinary wall) siding, but then I changed my mind: I won’t have a drop in the wall (protrusion), so I don’t need the ebb. You can see the result of joining the basement panels with the siding in the photo. It turned out pretty neat. I had to tinker a little with the corners, but even there the result satisfied me.
Joining basement siding and wall panels D4 - Joining basement siding and wall panels D4
Design of the corner at the junction of basement panels and siding - Design of the corner at the junction of basement panels and siding
More information about installing drip tides
For the construction of houses, three types of bases are used:
- sinking when the wall hangs over the base;
- protruding when the base is wider than the wall;
- smooth, when both the wall and the base are the same width (this is exactly my option).
For a flat and sinking base, one technology for installing the starting strip is used, for a protruding base - another. When sheathing houses with vinyl, in some cases a protruding plinth can be turned into a receding plinth by the thickness of the sheathing. In protruding plinths that are not corrected by the thickness of the sheathing, you need to install a vinyl molding under the starting strip (in the picture).
The base itself can be left in its original form or also lined with base siding, which has higher performance properties.
To install the ebb, horizontal markings are made above the protruding base. The horizon level in this case is very important, so they use a water level.
Installation of the ebb tide begins from the corner of the house. First, a corner element is made (as shown in the figure), which is attached to the corners of the house. Subsequent flashings are installed with an overlap of the working surface of about 25 mm.
The starting profile is mounted approximately 30-40 mm above the ebb nail strip. Based on the specified dimensions, it is necessary to make markings.
Installation of ebb tides begins from the corner of the house. To do this, a piece approximately 50 cm long is cut from a solid ebb, which is marked as shown in the figure, trimmed and bent. Aligning the top of the nail strip with the chalked line, the corner is installed on the wall. Subsequent flashings are installed with an overlap of the working surface of 25 mm and cutting of the nail strips by 14-18 mm (12.5 - half the overlap, plus 1-5 mm - temperature gaps) in both directions, which ensures the expansion of the profiles.
The internal corner of the ebb is performed in the same way as the outer one, with the only difference that the bending of the ebb occurs not along the drip, but along the nail strip.
All fastenings of ebbs are carried out in the center of the nail holes in increments of no more than 40-45 cm (preferably 20-25 cm).
The starting strips are installed 30-40 mm above the low tide (on top of the low tide).
Before installing the siding, you can apply horizontal markings to the sheathing - this will allow you to control the horizon level of the panels during the installation of the siding.
Before installing ordinary siding on the walls, you need to install a number of accessories, which includes:
- starting profiles;
- corner profiles;
- moisture-proof film on window openings;
- J-profiles (or finishing panels and moldings on walls, windows and roof lines).
Installation of siding sheathing
Sheathing for siding is a rigid frame that is attached to the surface of the walls for their further finishing. It is necessary for a number of reasons:
- Allows you to maintain the strict geometry of the walls and the entire structure.
- Forms a ventilation gap between the wall and the facade material, helping to remove moisture from them.
- Allows for external insulation of walls.
There are several lathing options.
Features of wooden and metal lathing
The lathing for covering a frame house with siding can be wooden or metal. To make a wooden structure, use a beam with a cross-section of 50x50 cm. This should be a well-dried material without signs of rot or delamination. Before installation work, the wood is carefully treated with fire retardants and antiseptics.
Wooden sheathing, compared to metal, is a more budget-friendly option. However, over time, it is susceptible to external factors, which negatively affects the quality of the cladding. The panels may swell and warp.
The metal frame is more resistant to moisture and temperature changes. It retains its rigidity and geometry for many years. For work you will need: UD-profile guides, ES-brackets (U-shaped).
One- and two-layer lathing
The frame for fastening the siding can be one- or two-layer. The choice of design directly depends on whether you will perform external wall insulation.
Useful: Wind protection of a frame house
A single-layer frame, be it wooden or metal, is one row of guides to which the siding is attached. This option is ideal for houses with smooth, already insulated walls.
A two-layer frame is two layers of guides fixed perpendicular to each other. Insulation is placed in the cells formed by the first layer. The second layer forms a ventilation gap between the cladding and the insulation. This design is relevant for any wooden house.
Note! Quite heavy basement siding, the installation of which almost always also involves laying insulation, is attached only to a metal frame.
Preparing walls and plinth for installation work
The lathing is installed only on a pre-prepared base. It should be as smooth and clean as possible. To do this you need to do the following:
- Remove all protruding elements of the facade that may interfere with work: shutters, grilles, lanterns, etc.
- Securely fix the old coating if it is coming loose. It can be lining, block house, board.
- Dismantle the finishing of poor quality.
- Treat the wood with antifungal agents.
It would be a good idea to remove around the perimeter of the house those plants that can grow under the ventilated façade.
Assembly and installation of the frame - basic rules
The frame for the siding of a wooden house must be reliable and durable. To make it so, you must follow a number of rules.
- The lathing is mounted only on top of the waterproofing material . If you are building a frame house, then lay this layer of wall “pie” on top of the rough sheathing.
- The frame guides must be perpendicular to the facing panels. If you use vertical siding, then place the guides horizontally, and vice versa.
- The pitch between the sheathing elements on which the sheathing will be attached is 300-400 mm.
- The structure must be reinforced with stiffening ribs around the perimeter of window and door openings.
- The outer guides are installed at a distance of 100-150 mm from the corners.
- The frame is fixed with fasteners in increments of 300-600 mm.
Do not forget to use a building level at each stage of work. Immediately detected deviations of the frame along the vertical and horizontal axis will save you from financial, time and labor losses.
Installation of wooden sheathing
You can attach the guide bars of the wooden sheathing directly to the walls of the house if you do not plan to insulate them. The main thing here is to maintain the step between the posts and align all the elements along the axes.
If you cannot do without insulation, the scheme may be as follows:
- The insulation is laid between the beams of the first layer of sheathing.
- A vapor-permeable membrane is stretched over the walls, securing it with staples.
- A counter-lattice made of slats 30-40 mm thick is attached parallel to the frame beams. They form a ventilation gap.
This option is inconvenient because the pitch of the guides for the insulation is greater than the optimal pitch of the slats for installing siding (600 mm versus 300-400 mm). The insulation will have to be cut, and this is a rather labor-intensive process.
A worthy alternative is the installation of cross lathing. In this case, the guides of the first layer of the frame are mounted horizontally. Insulation is laid in them, covered with membrane material and pressed with a second layer of beams, mounting them vertically.
Assembling a metal frame for siding
Installation of metal sheathing profiles is carried out on pre-fixed ES-hangers. They are fixed on the working surface according to the markings made. A profile 3 m long requires at least four hangers.
After fixation, the perforated plates are folded back. Guides are inserted into the formed U-shaped brackets, aligned along the axes and secured with metal screws. The presence of perforations on the brackets allows you to adjust the distance from the profile to the wall of the house.
If you need a metal frame with insulation , follow the following instructions:
- Install hangings on the walls of the house.
- Place insulation boards on them. For convenience, you can pre-make holes in them with a knife.
- Using the same pricking method, attach a vapor-permeable film over the insulation.
- Attach the guides to the hangers and secure them.
- Trim or bend the protruding “ears” of the hangers.
To prevent the formation of “cold bridges” in the places where the mounting brackets are attached, place paronite gaskets .
Useful: Isoroc - a wide range of insulation materials for domestic and industrial use
Installation of starting siding profile
Starting strips (starting profile) are mounted on the sheathing not only along the bottom of the walls of the house, they can also be used:
- on the gables of roofs, for example, when only attics are sheathed with siding, and the walls of the house remain unsheathed;
- on the gables of roofs or at the beginning of subsequent floors when they want to separate the cladding for design, engineering or other reasons.
I will consider installing a starting profile on houses with a flat and sinking base, since this is exactly the type of base I have (other options can be viewed at the link).
The color of the starting profile does not matter; it will be completely hidden by the subsequent cladding.
Procedure for installing a starting profile:
1) mark the horizon line to set the starting profile;
Houses with a base perfectly aligned “with the horizon” are rare, so first you need to use a water level on the sheathing to mark out the horizon line (which I will then control and draw using a laser). Walking around the perimeter of the house with a water level, you should arrive at the same point from which you started.
The height of the starting deck profile is 64 mm. This allows you to cover the top strip of the basement siding panel on a flat wall (after installation of the siding, moisture protection of the entire wall is ensured; installation of a drip lining is not required). The size of the overlap on the base can be chosen arbitrarily, but not more than half the height of the starting strip.
To mark the top of the starting profile, you can stretch a thin cord, which will allow you to get a visible border of the top of the starting bar (or beat off the line with a chalk coated cord, which is what I will do so that the stretched cord does not interfere).
A lot depends on the installation of the starting strips: if they are horizontal, then the rest of the siding will be installed in even stripes.
2) mark the installation locations of corner vertical elements (corner profile or J-profile);
At the corners of the house, we measure horizontal distances equal to the width of the shelf of the vertical corner profile (75 mm) or the width of the shelf of the J-profile (46 mm), if the corner will be formed by it, plus the temperature gap (1-5 mm).
Having set aside the size of the corner profile on the wall, you can mount the starting profile.
3) installation of the starting profile.
We take the starting profile panel, step back from the corner of the house by the width of the corner vertical element and one temperature gap (5 mm), align its upper edge with the broken horizon line and fasten it to the sheathing (can be fastened with nails or self-tapping screws, I will use self-tapping screws - I think convenient). We place the fasteners in the centers of the perforated holes.
After installing the fasteners, the starting profile (like any plastic panel) should move left and right along the wall and not cling to anything.
Next, the panel is moved to the center of the mounting holes, after which a second starting profile is installed (indented from the first panel by a distance of double thermal gap (7-10 mm). The perimeter of the entire house is done in a similar manner.
During the installation process, it is advisable to check the horizontality of the panels.
Care methods
Siding does not need cosmetic repairs; even after several decades it does not lose its excellent appearance. But from time to time, polymer types of siding need simple care that extends its service life:
- The surface is washed with a garden hose; if the panels are heavily soiled, it is permissible to use a mop with a brush;
- You can use a specialized product (Tide, Soilax), diluted with water in the required proportion;
- Mold is cleaned with Clorox;
- Stain removers and abrasives should be avoided, but if very stubborn stains appear, you can use Comet, Ajax.
Do not use cleaning and detergent compositions containing chlorine, organic solvents and acetone. All this can ruin the surface of the finishing material.
Read more about installing basement siding with your own hands and about what other materials can be used for cladding a house in this article.
Installing the Outside Corner of Siding
When cladding houses with receding and level plinths, and with a corner profile length exceeding the height of the wall being tiled, the required length is marked on the profile, equal to the height of the corner plus 3 mm. Having placed the profile to the corner of the house and stepping back from the roof eaves or soffits by 1-3 mm, install fasteners (nails or self-tapping screws) in the upper part of the uppermost nail hole on both sides of the corner. After fastening, the part should hang vertically on these two nails and be 1-3 mm from the roof eaves, and its lower end should be 4-6 mm lower than the starting profile.
After checking the verticality of the corner profile, install the remaining fasteners at the centers of the nail holes at a distance of 20-40 cm from each other. Remember not to fasten it too tightly.
Installing the Outside Corner of Siding - Installing the Outside Corner
Before installing the corner profiles, you can trim the nail strips by 4-6 mm at the bottom of the corner profile so that they are not visible from under the siding when thermal expansion occurs.
If the height of the corner is greater than the length of the vinyl corner profile, join the two profiles.
All corner profiles at all corners of the house are joined at the same height.
The upper profile is placed on top of the lower one: first, the lower corner profile is mounted, then, on top of it, the upper one. The result is a knot protected from rain and snow.
The main conditions that must be met when cutting off part of the upper profile:
- the height of the cut part of the profile must be no less than the full temperature gap (2-9 mm);
- The overlap of the panels should be 25 mm.
When installing corners from prefabricated elements, the same rules are followed as for a regular corner profile. That is, at the top they leave a gap of 1-3 mm to the cornice or soffit, and at the bottom they leave 4-6 mm of the lower edge of the starting strip.
Note on installation with protruding plinth
When cladding houses with protruding plinths or when the extension of the corner profile will be hampered by installed structures, for example, when cladding verandas - floors, profiles are cut and made shorter than the required corner required by the veneer. As in the previous case, in the upper part of the corner profile a gap of 1-3 mm is left between the profile and the cornice, and the bottom of the vinyl corner is trimmed, it should not reach the obstacle (existing floor or plinth) by 1-6 mm.
Installing the inside corner of siding
I will not go into detail about installing internal corners, since my frame house will not have such corners. The fastening rules are the same as for external corners.
I’ll just give you a drawing from which everything is clear.
What is siding made of?
- Plastic (vinyl) siding has a low price, is light in weight (which is important for a frame house), and does not rot or corrode. It is available in a very wide range of colors, incl. in designs imitating wood and natural stone. It has the best ratio of price and performance characteristics, therefore it is the most common;
- Metal (usually aluminum or steel) siding is resistant to mechanical damage and non-flammable. To protect against corrosion, polymer coatings are applied to it or painted;
- Fiber cement siding is a pressed mixture of cellulose and cement, which is then painted with acrylic. Externally, it is designed to imitate various natural coatings such as natural stone, therefore it is often used to finish the base;
- Ceramic material is made from clay with plasticizers and other additives. Among the important advantages are fire resistance;
- Wooden siding is made from boards and timber. The material is environmentally friendly, has a pleasant appearance, but needs to be impregnated with antiseptics and fire-resistant agents to protect against pests and combustion. In terms of performance characteristics, it is significantly inferior to other types, therefore it is rarely used in exterior decoration, more often in interior decoration.
Naturally, the material should be purchased with a reserve. Although you can often buy it in quantities of one strip, even products from the same manufacturer, but from different batches, may differ slightly in color.
Installation of connecting H-profiles
Installation of H-profiles for siding - Installation of H-profiles for siding H-profiles are used for joining two row panels.
They belong to vertical siding elements, so during installation you must adhere to the rules for installing vertical profiles. The first fastener (nail or self-tapping screw) is installed in the upper nail slots with the fastener offset towards the upper edge of the hole. The H-profile will hang on this fastener. The remaining fastenings are carried out in increments of 20-40 cm along the centers of the holes. The placement of the H-profile on the wall must be thought out in advance so that the vertical section of the row panels, visually emphasized by the H-profile, fits organically into the overall picture of the siding sheathing. Since the installation location of the H-profile is almost always known in advance, two vertical slats are installed under it, or at this point the direction of the vertical slats is changed to horizontal.
H-profiles, like corner profiles, are installed on the wall before or simultaneously with the installation of the starting strips.
The H-profile, like the corner profile, has two nail strips, so marking and installing the H-profile is carried out in the same way as marking and installing corners.
Increasing the length of the H-profile is done by overlapping joining. The joining is structurally similar to the joining of two corner profiles - the upper profile overlaps the lower one.
Advantages of using siding for cladding a frame house
When finishing a frame house, the material has many advantages:
- The frame is usually made from dry wood. It doesn't dry out much. Therefore, when the siding coating dries out, it does not deform.
- Siding is not subject to rotting or corrosion.
- PVC material is lightweight.
- The technology is easy to install. Even a beginner can handle the job.
- The panels are attached not to the walls, but to the sheathing. This ensures good ventilation. You can also put insulation under the facade.
- The locking fastening ensures good fastening of the parts to each other.
- The material is durable. They often come with a 50 year warranty.
- The panels are easy to clean.
- Vinyl siding belongs to the budget segment of finishing materials and does not require large investments.
- This material is non-toxic.
- Resistant to sun exposure, does not require painting or impregnation.
- Finishing allows you to revive an old building and give it a stylish modern look.
Installation of finishing profile
Installing the finishing siding profile - Installing the finishing siding profile
The finishing profile is installed on the wall:
- directly below the roof eaves or soffit, or
- in the place where siding is replaced from horizontal to vertical;
- above (in an inverted position) and below window openings protruding from the wall.
For ease of work, the finishing profile is often installed simultaneously with the installation of ordinary siding, since it is located quite high on the wall and there is no point in climbing a ladder or constructing scaffolding to install this one element. It is much easier to install it when the installation of ordinary siding approaches the location of the finishing profile.
In any case, the finishing profile must be installed before the adjacent ordinary siding panel.
When installing the finishing profile, we do not know in advance where the row siding panel will be cut, so we can install the finishing profile on the wall by inserting it into the J-profile. Then, wherever the strip siding is cut, it will engage either the finish profile or the J-profile.
Necessary tools and components
To get started you will need:
- external and internal corners;
- a profile designed for the design of door and window openings of a frame house, the joints of the pediment and roof;
- the starting strip is used to attach the first row of trim;
- The H-profile allows you to create horizontal seams at the junction of siding panels;
- the finishing strip allows you to disguise the fastening of the top row of panels to the frame structure;
- Low tides will ensure that moisture is removed from the windows.
To cover a frame house with siding you will need universal tools:
- Bulgarian;
- screwdriver;
- hammer;
- square;
- level;
- roulette;
- metal scissors;
- ladder.
An ordinary staircase is not enough to cover a tall house.
Installation of horizontal row siding
See also P
Slide the first panel into the receiving gutter of the corner profile if you are starting installation from the corner of the house, or into the receiving gutter of the platband if you are starting installation from the doorway. Engage the bottom locking hook of the siding with the lock of the starter strip and pull the panel up until it clicks into place. Then you need to make sure that you have locked the panel lock along its entire length.
Don't pull the siding too hard or you may bend the hook.
Installation of siding panels - Installation of siding panels
Check if the panel can slide freely in the lock. Approach the corner profile (or trim) and move the regular siding panel so that a temperature gap is provided between the edge of the siding and the bottom of the receiving vertical gutter of the additional element, taking into account the outside air temperature at the time of installation.
Start attaching the siding from the center of the panel, moving towards its edges. The last fastener (nail or self-tapping screw) must be installed 10-15 cm from the end of the panel to take into account the net overlap of the next panel of ordinary siding.
When attaching subsequent panels to the wall or sheathing, make sure that there is no sagging at the other end of the panel.
Maintain uniform tension of all panels from one edge to the other: a slight distortion of one of them can gradually develop into a curvature of the entire skin. You can control horizontality using a building level - the longer it is, the better.
Try to maintain a horizontal installation line for rows of siding on both sides of the corners of the house. Coordinate the lines from the joined rows at all corners.
Dormer window of a frame house - Dormer window of a frame house
Siding joining rules:
- If possible, overlap panels should not be located on the main facade, and if this is not possible, they should be stepped in height with an interval of at least 60-70 cm from one seam to another.
- Avoid uneven vertical placement of seams. Place the joints vertically at the same level on at least two rows.
- Vary overlap locations every other row at least.
- Avoid overlapping panels above or below window openings.
During the exterior finishing of the cold attic of my frame frame with siding, I complied with the requirements of clause 8.1.4 of SP 31-105-2002 (roof structures must include ventilation openings that allow moist air to be discharged outside, penetrating into the attic from heated rooms), and equipped both facade dormer windows.
Siding installation video:
Installation errors:
Installation
Although you can install siding yourself at any time of the year, at high subzero temperatures the material becomes brittle and must be cut especially carefully.
The first to be installed are the lower starting strip and the corner elements, into which all subsequent siding panels are inserted, connected to the previous row or starting strip until the lock clicks, and secured with self-tapping screws in the center of the oblong holes in the panels to the guides. The installation of panels is completed with finishing strips. If the house is longer than the siding strips, then they are fastened together with a connecting element, under which a guide should also be installed.
With significant temperature fluctuations, siding strips may change slightly in size. Therefore, you should fasten them with your own hands only in oblong holes specially designed for this, without screwing the screws in all the way, but leaving a small (no more than a millimeter) gap. You cannot screw or drive fasteners through the planks themselves. Also, due to thermal expansion, the strips should not fit into the side connecting elements all the way; there should be about a centimeter of empty space, otherwise the siding will swell in extreme heat.
To summarize, we can say that siding is a fairly simple material to work with, and covering a house with it yourself is not difficult if you follow the installation technology.