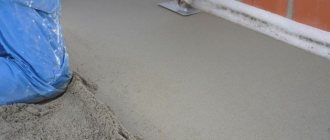
Options for beacons for pouring screed
Special elements display and indicate the level of the future floor. They are installed at the same horizontal level at an equal distance (between each other) in the same room. This makes the screed easier. In different cases, different types of beacons are used. There are rack screeds, which are structurally a linear, strong structure, and are used when constructing wet (concrete, cement-sand) screeds. The quality, appearance, and service life of the final coating depend on how correctly the beacons for the screed are positioned. Dry (expanded clay) screed is also performed on the slatted elements (their top). Benchmarks (tripods) are installed for the construction of self-leveling floors.
Wood slats
Filling a floor using wooden beacons is done very rarely today, and dry screeding on them is done more often. This method is now almost never used. The guides are wooden beams (30 mm thick), which must be thoroughly soaked in water before use. After completion of the work, such beacons are pulled out of the set solution, and the resulting voids are filled with fresh mixture. The level is maintained according to the laid screed. To correctly position the beacons, their height is adjusted using wooden wedges, pads, and self-tapping screws.
Video:
Other types of beacons
In addition to the types of beacons described above, string beacons are also used in practice. They are mainly used for plastering walls, since the strings sag when stretched horizontally. In small spaces they have undoubted advantages:
- reusable;
- easy sliding of the rule along the string;
- no trace after removing the string;
- easy to install.
The installation of such beacons comes down to attaching string holders to the wall at a given level. Properly installed beacons allow you to obtain a flat surface for installing the floor. High-quality smooth screed, high-quality floor.
Metal plaster profiles
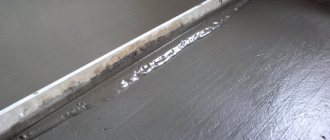
Today this is the most common method of arranging a not very high screed. Along the line of future placement of the guides, self-tapping screws are screwed into the floor, by screwing in and out of which the height of the profiles is set. To control the horizontal position, a thread, cord or fishing line is pulled between the screws. The zero level of the future floor is drawn, and tubercles of solution are laid out around the thread. To make the mixture harden faster, alabaster is sometimes poured in. Simply, cement-sand mounds dry out in 2-3 days (the composition with additives sets within 3-4 hours). Quite often the role of beacons is performed by plaster profiles. Experts recommend fixing the profiles with the same mixture that is used to make the entire screed (without additives, alabaster breaks down quite quickly). It turns out to be much more reliable, but often special plaster compounds are used to attach the guides. Profiles are placed on such tubercles and pressed into the mixture to the required level. Plaster profiles are easily deformed. Therefore, it is necessary to carefully align the screed with beacons. Using such guides, you can make screeds in a layer of up to 2-3 cm. It will no longer be possible to lay out a thick layer (6-10 cm) (under the pressure of the solution the profile will bend).
Video:
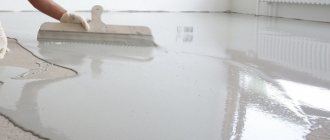
Installation of beacons for wet and semi-dry screeds
In finishing work, various types of screed beacons are used, each of which has its own advantages and disadvantages. The easiest way is to install point beacons, but to navigate using such marks you need to have considerable experience in pouring screeds.
Setting the fill level using the CPR is also not difficult, but this option requires a lot of time and also serious experience. It is difficult to install a profile for beacons, but working along such guides is much more comfortable and easier.
To understand how to make floor screed beacons in different ways and choose the most suitable option, you need to familiarize yourself with the order of work for each type of marking.
Linear beacons
For novice builders, it is best to install floor screed beacons with your own hands, focusing on the design of the guides. There are two options for mounting the planks: on self-tapping screws and on mortar.
How to install beacons on self-tapping screws using guides? Initially, you need to prepare the necessary tools and material:
- aluminum rule, at least two meters long;
- laser level;
- hammer drill or impact drill;
- yardstick;
- dowels;
- self-tapping screws;
- bowstring;
- U-profile;
- screwdriver
The number of profile rows depends on the length of the rule.
Number of guides. A – walls, B – guides.
Start marking from the wall. The first self-tapping screw is tightened at a distance of 40 mm from the vertical surface. The height of the screw takes into account the thickness of the profile, i.e. The thickness of the guide is subtracted from the desired fill level mark and the self-tapping screw is tightened to this height.
In the same way, install a self-tapping screw on the opposite side and connect them with a stretched bowstring. Self-tapping screws are placed along the string line with a run of 400-500 mm, bringing them to the desired level. This is how each marked row is installed, after which the height is checked with a level and, if necessary, adjustments are made.
There is no need to worry about how to secure the U-profile to the screw heads. It fits on the heads and holds up perfectly. After pouring is completed, the strips are removed and the screws are unscrewed. The installation locations of the slats correct the central position and bring them into the general horizon.
Mortar beacons
How to properly install beacons from a profile on a solution? You will need to purchase a special mixture for beacons, which hardens faster than the usual CPR. Usually a rotband is used. Any material can be used as guides, but a metal profile is most convenient to use.
Initially, the level required for pouring the screed is marked, and the installation of each guide is marked, taking into account the length of the rule. Focusing on the markings along the line where the guide should be installed, small piles of rotband are laid at a distance of 300-400 mm from each other. The height of each pile is aligned with the fill level minus the profile height, after which you can begin installing the guides.
To fix the profile on the pile, it is grabbed with mortar from the sides, but it must be remembered that the rotband will have to be removed after filling the CPR, so you should not apply too much mixture to install the guide. After pouring, the screeds, profiles and excess rotband are removed, and the unevenness is sealed with mortar and leveled.
The use of alabaster for installing guides is not recommended, since it does not adhere reliably to cement-sand mortar.
Point beacons
Any novice builder can figure out how to install point-type beacons, but for further laying of concrete along these beacons, you will have to invite an experienced craftsman.
The heads of self-tapping screws, set to the height of the pouring level, act as beacons. Self-tapping screws can be installed in the same way as in the version with linear beacons, only a profile is not used.
Beacons from the Central Station
Pouring screed over mortar beacons requires a lot of experience and skill, so this method of installing beacons is used mainly by professional finishers. The beacons are set in the same way as in the case of installing linear beacons on the solution, only without the use of guides.
In order to perform high-quality pouring of the screed along the mortar beacons, it is necessary to begin work only after the mortar has completely risen.
Metal profiles for plasterboard UD 27
U-shaped profiles for drywall are also used to display beacons. First, self-tapping screws are screwed into the base (the step should be 40-50 cm). Their size is chosen so that at least half fits inside the dowel. Self-tapping screws near the walls are set to the zero level of the future floor (adjustment is made by screwing in or unscrewing). To make it convenient to install guides, a thread, cord or wire is stretched between the walls. U-shaped profiles are placed with the base up on top of the screws. The remaining screws are twisted along the stretched thread to align the guides to the zero level of the future floor. The rule checks the correctness of the horizontal, as well as the correct placement of the profiles among themselves. Beacons can be installed similarly:
- on wooden blocks;
- bricks;
- tubercles from solution.
Then, where the screws are located, a solution is placed under the guides.
After the mixture has set:
- the correctness of the horizontal is checked;
- the beacons are removed and sealed with mortar.
When the mixture is completely dry, screed is poured around the profiles.
Video:
How to set beacons for floor screed at zero level
Setting to the zero level is carried out in accordance with the preliminary markings made, taking into account the thickness of the array. The supporting elements are fixed in such a way that the upper plane, which will be in contact with the rule, corresponds to the zero mark.
Sequence of events:
- Fix the first profile at a distance of 30–50 cm from the wall.
- Fasten the next element in parallel, taking into account the length of the rule.
- Check that the location of the guides corresponds to the zero mark.
Depending on the design of the beacons used, use the appropriate fastening method and the necessary elements for fixation.
It is important to ensure:
- fixed distance between supports;
- immobility of guides.
Steel pipes
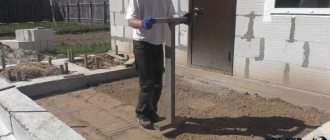
To equip a floor where it is necessary to install powerful concrete screeds, pipes of various sections are used. Pipes can be used round or rectangular, they are durable and do not deform. In spacious rooms, it is more convenient to make beacons for the floor of this type: the zero level of the future floor is set; a cord, thread or fishing line is pulled, you should focus on it when making a tie; mounds of mortar are laid out; pipes are installed on them and slightly pressed in; the horizontal and the correct placement of the guides among themselves are verified using the rule and level; The height of the future floor is adjusted by pressing, or by placing mortar where there is not enough mixture. It is easier to set up screed beacons using square pipes.
Video:
Mortar walls
First, 2 screws are screwed into the base. They are connected by wire (fishing line), which is wound several times. The future guide is covered with the mixture to form a low wall, along the top of which a rule is drawn. The wall is leveled to the level of the future floor, and a mortar guide is obtained. The horizontal surface (top of the wall) is a beacon. The movement is usually performed perpendicular to the wire, along the heads of the screws. When the beacons are dry, you can finish the screed.
Video:
Slides of solution
To install a semi-dry screed, it is convenient to install beacons on the floor from piles of mortar (cement-sand). Mounds of the mixture are placed in the corners and brought out below the zero level of the floor. It is imperative to maintain the distance between the tubercles no longer than the selected rule. The piles dry, and the solution is placed in the free space. The tubercles are used as guides along which the rule moves when the mixture is leveled. This is a good way to arrange thick, high screeds (6-9 cm).
Video:
Preparatory work
First of all, you need to decide what floor leveling beacons are. This is understood as a certain structure, which most often consists of guides that are installed at the same level on the surface and create the necessary plane for quick alignment. The use of ready-made profiles is not necessary; you can use suitable materials at hand.
Both special guides and improvised means are used as beacons, but they all must be perfectly smooth and rigid
Installing beacons for floor screed is not always easy, regardless of the type. Before installation, it is advisable to prepare the surface:
- The base is cleared of all foreign elements, and when working with concrete slabs, the remains of construction debris are removed. Peeling or crumbling areas are removed from finished coatings that require leveling.
- Existing cracks are expanded and covered with the prepared solution.
- The surface is well primed. A minimum of two coats of a deeply penetrating compound should be applied.
- A layer of waterproofing is laid.
Cleaning and repairing the base is a mandatory procedure before installing the screed.
These procedures are mandatory and are carried out some time before pouring the screed.
Definition of zero level
Beacon screeding should definitely begin with determining the zero mark. A level is used for work. Laser is considered the most accurate, but the standard version is also suitable.
The most accurate result when marking a floor line is obtained by using a laser level, but this is expensive equipment
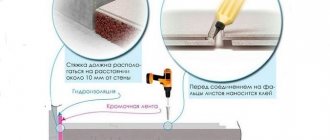
100 cm away from the floor from the highest part of the room, a point is marked on the wall, which is transferred to the rest of the surfaces. For example, in a flat rectangular room there will be 4 points. A line is drawn. The greatest elevation is determined by measuring the distance to the floor; the minimum distance is considered the highest point of the floor. 30 mm are retreated from the resulting mark, which is equal to the optimal thickness of the screed, and the resulting marks are connected. This line will be the zero level; if necessary, they retreat further from it.
The level of the finishing screed can be “beaten off” using a hydraulic level
Naturally, when pouring a solution with a layer less than 3 cm, such a procedure is quite difficult to carry out; it is more suitable for rough surfaces. For the final version, calculate the highest point of deviation using a level or a stretched cord and add 1 mm. This event helps to achieve a minimum thickness of 3 mm.
Attention! It is important to consider that beacons are mounted at some distance from the walls, usually this figure is 15–20 cm.
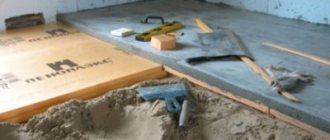
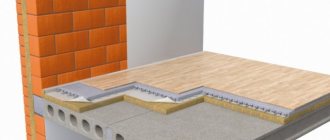
U-shaped profile
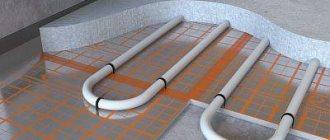
When there are no special slats, craftsmen use a U-shaped profile (when arranging a backfill screed) to level and control the amount of expanded clay. The guide walls are 27 mm (when the screed height is 30 mm). The beacons are left in the backfill material. A ceiling profile (60x27 mm) is also used, which is placed with the edges up. The space between the edges, as well as the space around the guides, is filled with material. To level the expanded clay, the rule is placed on the beacons and pulled towards itself, thus removing excess material. Correctly placing the beacons under the floor screed is a very important stage in preparing the base for final finishing. The quality and appearance of the flooring depends on this. It remains controversial whether to choose guides from the wet screed (or they can remain inside). The argument for removal is that the metal profile rusts over time and the screed is destroyed. You can always purchase aluminum guides that are specially designed 
Video:
Beacons made of self-tapping screws
Those home craftsmen who have a desire to install a self-leveling floor can use a homemade design similar to professional flooring. To do this, take self-tapping screws already screwed into the dowels, fasten them with a piece of punched paper tape and align the homemade device relative to a given level. Self-made landmarks, as well as benchmarks, should be dismantled before the self-leveling floor hardens.
Installation of beacons for arranging floor screed is a critical process. It requires a lot of time. Experienced specialists have learned from their own experience that one should not rush to the detriment of the quality of the pouring arrangement. Otherwise, adverse consequences cannot be avoided, since the finishing coating laid on top of a screed with an uneven surface will not only have an unpresentable appearance, but will also last much less than its service life.
In order for the flooring to be installed efficiently, when placing beacons, it is necessary to check with a level that they are correctly placed in all directions.
Adjustable reference points for self-leveling floors
Benchmarks-tripods (Benchmarks or point beacons for self-leveling floors) are installed before pouring the floor. The self-leveling floor spreads independently over the base and forms a horizontal line. Benchmarks are used to control its height. The benchmark is a tripod containing a rod inside. It moves up and down, this is how the zero level is indicated. Benchmarks are considered professional instruments. Several of these tripods are required per room: first, the surface is primed; benchmarks are installed on the floor after 5-6 hours (maintaining a distance of 1 m); The horizontality of the screed is adjusted on the central rod (using caps).
Video:
Calculation of the number of beacons for a room
It is customary to place beacons in parallel, the beginning of their path is the front door, and their movement leads to the wall opposite. The distance between parallels should be 10 cm or a little more less than the rule itself. The extreme lines are drawn at a distance of 3-4 decimeters from the walls. First you need to calculate where beacon No. 1 will be.
Lighthouses
For example: S (distance) between supposed parallel ones is 6.55 m. The rule is 1.5 m. Reaching the wall, it should be with a margin of 15 cm, which means 1.35 m from the wall. The row next to the first from the edge there will be somewhere S = 1 m, and between the extreme ones there remains 3.85 m. With a maximum S between the beacons of 1.2 meters, there will be 3.85 m: 1.2 m = 3.2 (beacons). It is clear that in this case, in addition to the extreme ones, 2 more will be enough.
(6.55 – 0.7) / 5 = 1.17 m.
0.7 – S from the side beacons to the walls.
5 – number of spaces between beacons.