Wallpapering walls is the most popular type of finishing.
The quality of the pasting largely depends on the condition of the base.
A prerequisite for preparing the base for wallpapering is puttying.
Putty walls are a perfectly flat and smooth surface.
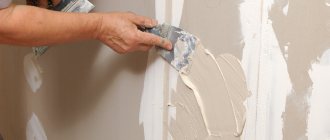
Figure 1. Puttying walls for wallpapering.
Why putty the walls?
Puttying surfaces allows you to eliminate minor defects and flaws: cracks, chips, scratches and unevenness.
The adhesion of the wall surface to the wallpaper improves, and the strength of the base increases.
Due to reduced water permeability, glue consumption is reduced.
A homogeneous white putty surface will ensure uniform color even with translucent wallpaper.
Depending on the type of wallpaper, different requirements are imposed on the preparation of walls:
- liquid wallpaper does not require careful leveling, since its textured surface hides small cracks and irregularities;
- thick vinyl wallpaper will hide minor flaws;
- thin wallpaper requires a perfectly flat base, since the slightest defects and irregularities will be reflected on the pasted surface.
If the walls are finished with plasterboard, puttying them is also necessary. Putty will increase the strength of the surface of the sheets, improve adhesion and prevent the cardboard layer from damage when removing the wallpaper.
Tools and materials
Puttying walls requires the presence of tools and devices, without which high-quality work is impossible:
- A drill or hammer drill with a special mixer attachment for preparing putty. The device will help achieve a homogeneous, uniform composition.
Figure 2. Drill with attachment.
Important!
It is almost impossible to make a putty solution from dry mixtures without using a mixer, so if you don’t have one, buy putty in the form of a ready-made paste.
- A container in which we will stir the mixture. It is good to use round-shaped construction basins made of impact-resistant plastic for this. They are easy to clean, convenient to mix the solution and collect the mixture.
Figure 3. Construction basin.
- Rule for leveling thick layers of putty in case of significant deviations.
Figure 4. Rule.
- Spatulas with a width of 300 and 100 millimeters for distributing and leveling putty. Choose a tool with a perfectly straight blade and a comfortable handle.
Figure 5. Wide spatula.
Important!
A wide spatula is the main tool when applying putty. Choose it in a higher price segment, because the ease of application and the quality of the putty surface depend on the evenness and reliability of the blade.
- Special profile spatulas for finishing internal and external corners.
Figure 6. Angled spatulas.
- A manual grater-skinner on which sandpaper or a special mesh is attached for grinding the surface.
Figure 7. Devices for grinding putty surfaces.
- A fur or foam roller for applying primer and a painting tray for distributing the composition and removing excess.
Figure 8. Paint roller and tray.
- Construction level for constant monitoring of the straightness of the wall.
Figure 9. Construction level.
- Protective equipment: gloves, goggles, respirators to protect against dust and small particles formed when sanding putty layers.
Figure 10. Gloves, glasses, respirator.
In addition, you will need materials:
- Primer for treating walls before filling and before wallpapering. It is better to choose formulations with antiseptic additives to protect against mold and other microorganisms;
- Putty mixtures for starting and finishing layers.
- Special polymer-based putties for leveling significant unevenness.
- Serpyanka tape for reinforced joints between sheets of drywall.
TOP 3 best products according to customers
Putty Basic cement Prospector 20 kg
240.00 rub.
Product code 12155
Purpose: Used for leveling walls made of concrete, brick, plaster indoors.....
Gypsum putty Knauf Uniflott/Knauf Uniflot 5 kg
550.00 rub.
Product code 294
The dry mixture is a fine powder of gypsum and modifying polymers. AREA P…..
Universal gypsum putty Knauf Fugen/Knauf Fugen white 25 kg
405.00 rub.
Product code 268
Dry putty Knauf Fugen with a fine-grained structure made of natural gypsum and polymer modifications.....
Plasterboard putty under wallpaper
It happens that the walls and partitions are made of gypsum plasterboard, plywood, and other sheet materials. After pasting with expensive wallpaper, it will be very annoying if the joints of the drywall sheets and screws become “treacherously” visible.
Plasterboard putty comes down mainly to masking rough seams. The gypsum board itself is a smooth and even material. Gross defects in a structure made of a fairly fragile material can be hidden under putty with reinforcement made of sickle mesh. Protruding joints will have to be cut off, and the screws will need to be deepened. After eliminating the defects, you can putty with a finishing composition based on gypsum or acrylic.
Plasterboard putty comes down mainly to masking rough seams.
Types and purpose of putties
The construction market offers a large assortment of ready-made paste putties and dry mixtures that need to be prepared immediately before starting work.
You need to choose a mixture taking into account the characteristics of the walls and the type of wallpaper.
Ready-made putties are very easy to use; no mixer is required for stirring; the finished mixture is stored for a long time in a closed container. Its significant drawback is its too high cost.
Dry mixtures are much cheaper and are not inferior in quality to ready-made mixtures. This putty should be used immediately after preparation.
There are starting, finishing and universal putties.
The starting putty is made from components with coarser grains and creates a strong base with good adhesion for applying the finishing layer.
The finishing putty consists of finely ground gypsum powder, capable of creating an impeccably smooth, glossy base for any type of wallpaper or color.
Universal mixtures are suitable for applying any layers in several stages.
Cement
They are resistant to moisture and temperature changes. Used for leveling walls made of concrete and brick. Suitable for finishing kitchens and bathrooms.
Figure 11. Cement putty.
Plaster
Plastic, easy-to-use putties. Perfectly eliminates unevenness and defects in the base. They are environmentally friendly and safe. They create breathable surfaces that can regulate humidity and create natural air exchange in rooms.
They do not lose their properties within two hours after production.
Can be applied in a layer of up to 30 millimeters. Suitable for starting and finishing coats.
Figure 12. Gypsum putty.
Polymer
Modern polymer-based putties, characterized by plasticity, impeccable smoothness of treated surfaces and cost-effectiveness. Can be applied in layers up to 0.5 millimeters. There are latex and acrylic. There are starting and finishing acrylic mixtures, suitable for any substrate. Latex ones are used for finishing leveling and are able to eliminate even the smallest flaws, creating a perfectly flat surface. The most expensive type of putty.
Figure 13. Polymer putty.
Water-dispersed
Acrylic or latex based putties with high performance qualities. Suitable for leveling any base, even wood, concrete or fiberboard. Due to the presence of resins, the putty dries quickly after application, but is easily diluted with water if the mass thickens.
It is characterized by high moisture resistance, resistance to high temperatures, good adhesion and shrinkage resistance. It belongs to the middle price category and is produced completely ready for use.
Figure 14. Water-dispersion putty.
All putties are suitable for leveling walls under wallpaper; it is only important to choose mixtures that are suitable for the base, type of wallpaper and are affordable for you.
I recommend!
If you do the puttying yourself, purchase a ready-to-use polymer-based mixture. It has an ideal consistency, is easy to apply and can be stored for a long time in a closed container.
What mixtures should I use?
The choice of putty mixtures is huge. They differ:
- quality;
- technical characteristics;
- at a price.
The following mixtures are suitable for working with wallpaper:
- Acrylic-based polymer putties. Their advantages: easy to apply to different surfaces, easy to sand, have a high degree of protection, and additionally strengthen the base.
- Water-dispersion mixtures. Popular because they are suitable for different types of surfaces, durable, strong, and easy to work with. They are produced in dry and ready-made form.
- Cement-gypsum putties. They form a durable layer, are easy to apply, and are moisture resistant. The compositions are sold in dry form and are diluted with water during preparation.
- Plaster. They are easy to apply and process, are not afraid of moisture, and practically do not shrink when dry.
Putty compositions are:
- Leveling (starting) . Used to apply the first layer. They help remove significant differences on uneven grounds and hide their defects. The starting mixture is applied in a layer of 1.5 cm. To improve the adhesion of the material to the surface, craftsmen recommend using a painting mesh.
- Finish. Apply a small layer before wallpapering the walls. They remove all small irregularities and create a perfectly smooth surface.
- Universal. Suitable for applying both first and second layers.
Preparing walls for puttying
Walls to be puttied must be cleaned of old coatings, peeling plaster, oil stains, dirt and dust.
To remove wallpaper, you can moisten it with water using a roller or brush. You can make notches on thick vinyl wallpaper for better moisture. We remove the wallpaper by prying it off with a scraper or spatula, starting from the joints.
Figure 15. Removing old wallpaper.
It is better to completely remove oil-based paint with a scraper or using a grinder with a stiff brush attachment. Heat treatment with a hair dryer or gas torch will make paint removal easier.
Figure 16. Heat treatment for paint removal.
We remove old whitewash from walls and ceilings using a wet sponge and spatula, having previously soaked it.
We remove damaged areas of plaster using a spatula or a hammer and chisel.
We fill out the cracks and wash them thoroughly with water to remove dust.
After cleaning the walls, we check them for evenness.
We treat the surface requiring repair with primer mixtures.
In case of significant damage, unevenness and deviations, we level the walls with ready-made repair compounds, gypsum or cement plaster. We carefully repair all cracks and chips.
Figure 17. Repair of old plaster.
The dried plaster layer must be sanded with coarse sandpaper.
After the repair is completed, we prime the entire surface with penetrating primers with antiseptic additives that prevent the appearance and development of mold.
The primer will increase the adhesion of the base to the putty and extend the service life of the finish.
Figure 18. Priming surfaces.
We apply priming with a roller or brush in two layers. Apply the second layer after the first has completely dried.
If there are plasterboard walls, we cover the joints and seams with serpyanka mesh to prevent cracks from appearing during operation. We cover the sheets with primer. We fill the recesses from the screws and the joints of the sheets with starting putty.
Figure 19. Preparing plasterboard walls for puttying.
Recommendations for selection
For high-quality preparation of the room and when deciding which putty to putty on the walls under the wallpaper, choosing a cement-gypsum mixture would be ideal. It does not require additional treatment of the wall and is not able to react with wallpaper glue, because it is also mixed with water.
Necessary materials to putty walls with your own hands:
- 2 types of mixture: starting (base) and finishing putty;
- primer with additives against bacteria and fungi;
- To putty drywall, you will additionally need a serpyanka mesh tape to rub the joints.
The most popular brands of putty mixtures from which it is better to choose:
- Knauf - products are used for sealing seams between plasterboard boards.
- Concrete - better suited for walls under wallpaper, but not for painting.
- Eunice Kron - this putty is used as a finishing putty, it has an increased whiteness of color, but is not suitable for a non-professional, as it involves difficulties when putting putty.
- Prospector and Hercules are Russian-made mixtures that are best used to putty walls in rooms with high humidity.
- Bolars is a super-finish putty; the applied layer should be less than 2 mm.
On video: how to choose putty for walls and ceilings.
How to calculate the required amount of putty
Before purchasing putty, you need to correctly calculate the required amount. The average consumption of the mixture can be found on the packaging.
Material consumption depends on many factors:
- Areas of leveled surfaces. It can be determined by measuring the perimeter of the room and multiplying it by the height of the wall.
- The thickness of the applied layers, which directly depends on the size of the irregularities and deviations. The size of the irregularities can be easily determined by applying a two-meter strip to the walls. We measure deviations from the vertical using a plumb line.
- Wall material. Depending on the material of the walls, we select the type of putty. Smooth plastered walls can be covered with a thin layer of polymer or water-dispersion putty, up to 1 millimeter layer.
- Type of putty. The consumption of cement putties is much higher than latex or acrylic ones.
The average starting putty, with a layer thickness of two to five millimeters, will be from one to three kilograms per 1 m2. The consumption of cement or gypsum putties with a layer of 6-9 millimeters will increase from four to six kilograms per square.
The final coating is applied in a layer of no more than one millimeter, and ranges from 500 grams to 1.5 kilograms of putty per square meter.
Wall putty technology
The quality and durability of the final finish depends on the correct preparation of the putty, adherence to the technology and procedure for performing the work.
We carry out puttying at positive outside temperatures, not lower than ten degrees.
We carry out the work in the following sequence:
1.Preparing putty
We dilute dry construction mixtures strictly following the manufacturer’s recommendations.
Pour the dry mixture into a container with water at room temperature, based on the production of the solution within the estimated time indicated on the package.
Stir the solution with a mixer until it reaches a homogeneous, easy-to-work plastic consistency.
I recommend!
After producing the solution, rinse the container and all tools with water. Even the smallest grains of dried mortar can ruin the entire work, leaving streaks and furrows.
To improve the ductility, strength and reliability of the coating, we add PVA glue, deep penetration primer and hydrophobic additives.
Mix the mixture thoroughly using a mixer or drill with a special attachment.
Figure 20. Preparation of putty.
Mix the prepared putties thoroughly with a mixer at low speed. Slight dilution with water is allowed, but not more than 30 milliliters per kilogram of composition.
2. Starting layer
Using a small spatula or trowel, the putty is taken from the container and applied to a wide spatula.
The leveling mixture is applied to the base using a wide spatula, holding it at an angle of approximately 45 degrees.
Figure 21. Applying putty.
We start the work from the bottom from the corner of the wall, distributing the solution in an even layer over the surface with smooth zigzag movements.
We putty the corners of the room using a special corner spatula. It makes the job much easier by creating a perfectly even 90-degree angle.
Figure 22. Puttying corners.
The thickness of the starting layer can be from one to three millimeters. If it is necessary to apply a thicker layer, the wall must be reinforced with a mesh of fiberglass or polymers. In this case, the mesh should be in the mass of the putty solution.
Figure 23. Reinforcement of the putty layer.
Rub the dried starting layer with a hand grater with a mesh attached to it or fine-grained sanding paper. Large surfaces are best treated with an electric grinder.
We control the evenness of the surface using the rule.
The putty dries, depending on the thickness of the layer, temperature, humidity and the presence of ventilation in the room, for at least 24 hours.
In hot, dry weather, for uniform drying, the putty surface must be periodically moistened.
3. Finishing layer
The finishing layer is applied to the completely dry starting putty.
The solution for this layer should be of a more liquid consistency and applied with a thickness of no more than one or two millimeters.
The finishing layer must be applied in two layers, the second - after the first has completely dried.
Figure 24. Grouting putty.
The first layer is sanded with fine sandpaper, and the final layer is sanded with a leather or suede pad.
The finishing layer should completely hide the smallest irregularities and pores in the coating and create a perfectly smooth surface.
Preparing the surface for puttying
Not only the quality of the putty and the level of skill affect the quality of the work, but also how correctly the surface was prepared.
If we are talking about repairs, then you will need to remove the external decorative coating: wallpaper, paint. Sometimes it may be necessary to remove the putty layer, and in very difficult cases even remove the plaster.
It is imperative to conduct a thorough examination of the surface for the presence of hidden peeling areas and make a prompt decision to eliminate them, depending on their size and specificity. In a new building, such problems do not exist, and puttying is carried out on a pre-plastered surface.
Primer of walls before putty
When starting work, you should definitely find out what the difference is between plaster and putty, since people often confuse these two completely different types of finishes. In addition to the fact that different types of materials are used for them, they perform completely different functions.
The question often arises as to whether plasterboard should be puttied, since this material already provides a smooth and even surface, or whether one can limit ourselves to just sealing seams and holes for screws.
Of course, you can save money, but only if the surface is covered with wallpaper, but when a light material is chosen, it is impossible to guarantee that the grayish or greenish color of the sheet will not show through.
But puttying drywall before painting is mandatory, but is carried out only using a finishing mixture, which is applied, on average, in two thin layers. To ensure that the seams between the sheets of drywall do not appear over time, they are puttied using fiberglass or painting mesh.
The final stage of preparing the surface for puttying is the application of a primer, which solves several problems:
- serves as an antiseptic treatment;
- strengthens the surface of the base;
- reduces absorbency, which is especially important when using putties prone to cracking:
- provides improved surface adhesion to putty.
It should be borne in mind that priming the walls before puttying is a mandatory process also after each layer has dried. Despite the fact that the amount of composition increases, this fact cannot be considered wasteful, since the quality of work and the durability of such finishing depend on it.
It is necessary to begin applying the next layer of putty only after the primer has dried, which takes on average 2-4 hours, depending on the air temperature, humidity and the properties of the material itself.
Useful tips
When starting puttying work, listen to the advice of professionals:
- When purchasing ready-made putty mixtures, pay attention to the production time. It is better if they were produced no more than two months ago.
- Buy putty from reliable construction supermarkets. Here, unlike markets, storage conditions are observed and there is less chance of stumbling upon a fake.
- Use putty from the same manufacturers for the starting and finishing layers. They are most compatible with each other.
- The main tool when applying putty is a wide spatula. Choose it in a higher price segment, because the ease of application and the quality of the putty surface depend on the evenness and reliability of the blade.
- Take precautions when preparing the solution and sanding the surface, protecting your eyes, skin and respiratory tract from contact with dry components. Wear rubber gloves, goggles, respirators and special protective clothing. Keep animals and children away from work.
- Do not pour dry mixtures or putty residues down the drain or throw them in the garbage chute.
Additional selection criteria
Putty can be purchased in the store in the form of a dry mixture or a ready-made solution. Professionals prefer dry mixture, but if you are doing this kind of work for the first time, it is better to choose a ready-made one. It will cost a little more, but then the question of how to properly prepare putty from a dry mixture will not arise. In addition, the ready-made solution is produced in a hermetically sealed container, but the putty you prepare yourself must be used before it dries.
USEFUL INFORMATION: How to remove old paint from a wall: removing oil and water-based coating
If you chose a dry mixture, then this video will help you prepare a high-quality solution.
You shouldn’t skimp on the quality of putty; you won’t need much of it. It is better to choose a trusted manufacturer, for example, the Knauf or Vetonit brand. Excellent quality and price served as the key to the wide distribution of Vetonit products in the building materials market. It meets European quality standards and is made from environmentally friendly materials. The entire line of putty mixtures, from starting to finishing, with various binder fillers is produced under the Vetonit brand. This includes waterproof putty, as well as solutions that can be used at sub-zero temperatures. Vetonit mixtures are packaged in bags that provide reliable protection of the contents from atmospheric influences and are provided with clear labeling.