A similar foundation with a grillage is suitable for medium-heavy structures, for example, buildings made of foam blocks, terraces, frame houses or bathhouses.
Let's consider in the article what a foundation with a grillage is, what it is like and what materials are used. We'll tell you how to build such a structure with your own hands and what steps you need to go through to achieve the result.
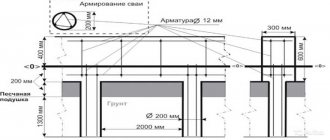
Calculation of the number of pillars and marking of the building site
Installed support columns
Construction begins with marking. Before this, the required number of pillars is calculated.
Calculation of a columnar foundation is an important stage of construction. To do everything correctly, carry out the following operations:
- geological survey of the construction site soil to determine its bearing capacity;
- calculate the weight of the future structure;
- dividing the resulting value by the load-bearing capacity of 1 cm2. soil on the site, the total foundation area is obtained;
- to avoid possible miscalculations, 20-30% is added to the final figure;
- to obtain the required number of pillars, divide the resulting area by a similar parameter of the cross-section of one support.
Load-bearing capacity of different types of soil and supports of different diameters
The table shows that the higher the load-bearing properties of the soil, the more 1 foundation column can be loaded.
The weight of the building being erected is calculated based on the material of the walls, roof and ceilings. They also take into account the approximate number of future residents, the weight of household appliances and furniture, snow and wind loads.
In addition to the found number of supports, the following factors are taken into account:
- the pillars must be located at all corners of the building under construction;
- supports should also be installed at the intersections of the walls of the building being erected;
- in other areas, it is recommended to install pillars at equal intervals from 2.5 to 3.5 m, depending on the load, as well as their number found by calculation.
The marking of the area for a foundation with a grillage is carried out taking into account the above recommendations. Pegs are driven in at the location where future posts will be installed. If you plan to place the grillage on the soil surface or slightly deepen it, then its entire perimeter is marked by pulling a rope along the contour.
It is recommended to have a diagram of the location of the supports drawn on a piece of paper in order to accurately see their locations and not miss important areas. The reliability and durability of the structure being built on a given foundation will depend on how the builder accurately calculates the required number of columns and places them correctly under the structure.
Excavation work
After marking for the construction of a columnar foundation with a grillage, excavation work begins. Round or square recesses of different sizes are dug under the supports.
Ground work is carried out in the following sequence:
- remove a layer of vegetation from the soil surface;
- remove stones, debris and other unnecessary objects;
- in pre-marked places they drill or dig holes for installed supports, the depth of which should be below the level of soil freezing in the region, taking into account the height of the cushion;
- the bottom of each excavation is covered with a sand-crushed stone layer about 10 cm thick;
- The pillow is compacted and roofing felt or plastic film is placed on it.
Excavated holes for foundation pillars
If trees grow, you will need to cut them down and then uproot the stumps. Such work is carried out after obtaining the necessary permission.
When other buildings are located nearby, then the boundaries of the construction site should be discussed with the neighbors.
If the grillage is shallow, then trenches of the required depth and width are dug under it, or the soil is simply leveled.
The recommended width of the pit should correspond to the thickness of the walls of the building under construction plus another 20 cm on each side. This reserve is necessary to simplify the installation process of the formwork structure.
Land works
The initial stage of all preparatory work begins with removing the turf over the entire area of the future foundation. Next, in the places where the pegs are driven in, they dig holes for supports. The depth of the holes should be greater than the freezing value of the soil plus 20 cm for the middle zone. Additional centimeters are necessary in order to arrange a pillow, which will further contribute to the correct distribution of loads. The width of the trench will be equal to the width of the wall of the future building. From this size, add another 20 cm on each side of the pillar and install the formwork.
The construction of a columnar-grillage foundation begins with the installation of a cushion of slag or crushed stone, which must be thoroughly compacted. The material must be laid across the entire width of the pit. Roofing felt is laid on top of the compacted slag. This requirement is due to the fact that moisture from the concrete solution is not absorbed into the ground while it gains strength.
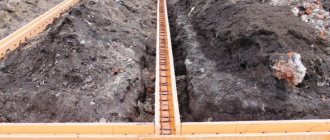
Assembly and installation of formwork and reinforcement cage
To construct a columnar-grillage foundation, it is necessary to assemble and then install the formwork and reinforcement cage.
Formwork with assembled reinforcement cage
The material for panel structures is often boards more than 2 cm thick, as well as plywood. This is due to their accessibility and ease of working with them. Metal analogues are expensive, so it is not advisable to purchase them just once.
The formwork is knocked down from the boards, which is then installed around the perimeter of the base with a shallow grillage. If the latter is raised above the ground surface, then horizontal shields will also be needed.
Pipes made of different materials, roofing felt, cardboard, and polyethylene are also used as formwork for pillars. These are cheap options. Ruberoid or polyethylene are used only on dense types of soil. The integrity of the form is supported by the walls of the pit.
Installation of the foundation reinforcement frame begins with the connection of transverse reinforcement with longitudinal wire or by welding. Choose rods with a thickness of 10 to 14 mm. The shape and dimensions of the frame correspond to the same parameters of the pillars. It is taken into account that the minimum distance from it to the walls of the shields should be 5 cm.
The longitudinal rods are taken of such length that they can be connected to the grillage frame. Its shallow-depth version is reinforced after the pillars; the version located above the ground (at a height of at least 15 cm) is when the supports harden and the formwork is mounted on them.
The structure is made on the ground, and then installed in the prepared recesses. Tying the rods with wire will speed up the use of the gun. Welding in operation is available if the marking of the fittings contains the letter “C”. Plastic clamps are also used to assemble the frame.
Installation of formwork for foundation pillars
The most commonly used material for formwork is boards with a thickness of at least 20 mm. They are lightweight, which makes installation easy, and are also cheaper than metal and wood-based materials, which can also be used for the construction of formwork.
The boards are knocked down into panels, and those, in turn, into boxes, after which they are installed in previously prepared holes. The surface of the wooden formwork must be thoroughly moistened with water, which, firstly, will not allow it to absorb water from the concrete, and secondly, will facilitate dismantling after the concrete mixture has set.
In addition to boards, asbestos, ceramic and iron pipes of the required diameter can be used as formwork. Unlike board panels, they are not removed from the ground after concrete is poured, but remain there forever.
It is also possible not to install formwork at all if the walls of the pit are dry and do not collapse, and are dug exactly according to the design cross-section of the pillars. In this case, the perimeter of the pit is simply lined with polyethylene so that the ground does not absorb water from the concrete.
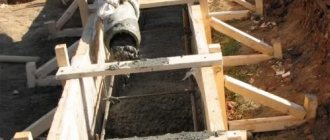
Pouring concrete
A suitable option for the job is a grade of concrete starting from M200, and in general its choice depends on the future load on the base. A pre-prepared, well-mixed solution is poured into the exposed formwork with the reinforcement cage installed. It is recommended to do this in layers. Every 30 cm, the poured concrete is compacted with a shovel or vibrator.
Pouring concrete into formwork
After pouring, the formwork is covered with plastic film or roofing felt. The process of complete hardening of concrete depends on the climatic conditions of the area. Often 1 month is enough.
An important point is to thoroughly mix the solution, which allows you to remove air from it. This allows you to achieve maximum strength of the monolith.
The low grillage is poured immediately after the supports, also in layers, compacting each one. Work continues until the required height is reached. First, a sand cushion is poured onto the bottom of the trenches.
The heads of the posts are waterproofed (for example, with bitumen) to prevent capillary penetration of water through them into the grillage.
The panels can be dismantled 3-4 days after pouring.
The remaining unfilled sections of trenches or excavations are covered with previously dug soil (if it is not subject to heaving) or sand, then compacted.
It is better to fill the foundation in the warm season. All supports should be at the same level in relation to the soil surface. They should not be left unloaded during the winter period, because the integrity of the structure may be compromised. All work must be completed in one go to avoid the appearance of seams that reduce the strength of the foundation.
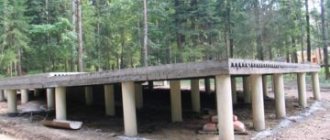
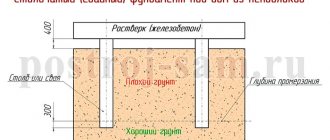
Columnar foundation with high grillage
This design scheme is the most correct and correct, since the grillage in it is located at a certain elevation above the surface of the earth. Usually this distance is at least 15 cm. The gap under the grillage eliminates the pressure on it from rising soil due to frost heaving.
Sequence of work:
1) All foundation pillars are being erected. Their elevation above ground level is determined based on two requirements. The first was mentioned above - this is a minimum gap of 15 cm. The second condition is that the pillars must be recessed into the body of the grillage by 5-10 cm.
2) The tops of the pillars are covered with coating waterproofing, which prevents the capillary rise of moisture from the soil and its penetration into the grillage.
3) The base of the formwork is made. There are two ways:
a) With a minimum elevation of the grillage, a poured layer of sand is used as a base. It is moistened, compacted with a tamper and leveled, forming, as it were, the lower surface of the formwork. After filling the grillage, the sand is removed from underneath it.
Note: With this method, the sandy base must be covered, for example, with plastic film or glassine (by cutting holes for the posts). Otherwise, when pouring concrete, the laitance from it will quickly be absorbed into the sand and the grillage will not be able to gain the necessary strength. In addition, it will be more difficult to remove the sand later, as it will harden.
b) With a higher grillage, the base is made of boards or plywood.
4) The side walls of the formwork are installed. The cross-sectional dimensions of the grillage are selected depending on the material of the walls and their thickness.
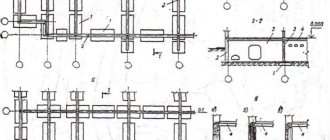
For wooden houses, the height is taken to be at least 40-60 cm. At the same time, sufficiently high bending strength will be ensured, and the lower crowns of the walls will not get wet when splashed with rain from the blind area or in contact with snow in winter. The width is selected depending on the thickness of the walls and the design of the basement. The figure below shows that floor beams can be installed on separate pillars (as was generally done before) or placed on a specially formed grillage extension.
For stone houses, the height of the grillage is taken to be at least 20 cm, and the width corresponds to the thickness of the wall. The low height is due to the absence of large bending loads. Stone walls themselves have great bending strength and bear the main load.
5) After installing the formwork, the reinforcement frame is knitted. The working reinforcement is located in the lower and upper parts of the belt, going deeper into the concrete by at least 5 cm. The number of rods is selected depending on their diameter: ∅10 mm - 8 pieces; ∅12 mm - 6 pieces; ∅14 mm - 4 pieces. Reinforcement of large diameters is not used; it begins to work worse in conjunction with concrete.
6) Concreting is in progress. Do not rush to remove the formwork and remove the sand from under the grillage. You can start building walls and even a roof with them already on the 4-5th day after pouring. And you’ll remove all the unnecessary stuff later, when you need to finish the base and build a blind area.
Grillage arrangement
Grillage made of wooden beams
A grillage is a horizontal structure lying on supports and connecting them into one whole. For its manufacture the following is used:
- various blocks;
- reinforced concrete monolith;
- wooden beams;
- channel;
- I-beams.
There are two types of grillage:
- tall (hanging);
- low (prefabricated or monolithic).
The first option is used if the soil under the building is subject to severe heaving, which will eliminate its impact on the grillage. In this case, the minimum distance from the soil to the harness is 15 cm.
A low grillage is located directly on the earthen surface or goes slightly deeper into non-heaving soil. It is most often made monolithic or from reinforced concrete blocks.
Installation of a wooden grillage on a columnar foundation located above the ground is possible when constructing relatively light buildings. The remaining materials are used in the construction of heavier and larger buildings.
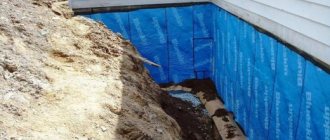
Waterproofing and insulation of the constructed foundation
In the case of a hanging grillage, after the structure is erected, a gap remains under the structure. It is recommended to protect such a base in order to reduce heat loss from the building through the floor, as well as to reduce the destructive effect of moisture on the base.
Waterproofing and insulation of columnar grillage base
The base is covered with the following materials:
- brick;
- logs;
- boards;
- siding;
- various sheet products.
To ensure normal ventilation, holes with dampers are made in the base. The buried grillage is waterproofed, for example, with mastic from the outside. Expanded polystyrene or polystyrene foam is often used for insulation.
The entire process of constructing a columnar foundation with a monolithic grillage is shown in the video below.
The construction of a columnar-grillage type foundation is a technologically simple process for carrying out the work independently. At the same time, financial costs are significantly reduced compared to strip and slab types of bases. An important point is to correctly calculate the required number of supports, taking into account the load-bearing characteristics of the soil. The option for constructing a grillage, as well as the material for its manufacture, depend on the heaving of the soil and the planned load on the foundation under construction.