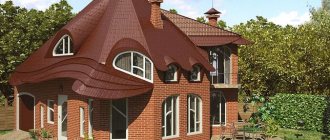
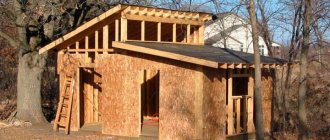
Low-rise construction is very often started by people who previously had nothing to do with the construction of houses. To make a building high-quality and durable, you have to pay attention to every detail. When the foundation and walls are finished, it is the turn of the roof, which cannot exist without a special supporting structure - the rafter system. Here it is important to understand what elements should be used, how to choose a building material - wooden rafters or metal, and how to correctly approach their installation. However, to understand this issue, it is worth starting with the basics.
Definition and criteria for choosing material ↑
The rafter system is a supporting structure on which the roof is installed. The task of the rafters is to withstand and redistribute the weight of all loads to which the roof is exposed: snow cover, strong winds, rain and other natural anomalies.
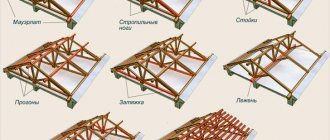
Each element of the rafter system has its own function, and this factor should be taken into account when creating the structure:
- Rafter legs - must have a high margin of strength to withstand the load of the entire roof.
- Mauerlat is a beam laid on top of the erected walls, which evenly redistributes the weight from the rafters.
- Racks are wooden beams that are vertical.
- Screeds - they bear the entire load from the tensile forces of the roof.
- The sheathing is the base on which the roof is subsequently laid. The beams of the structure are mounted perpendicular to the location of the rafter legs.
The rafter system is the basis on which the roof of the entire house is based.
The classic solution for the rafter system is wood, but this is not the only possible option. You can find proposals for the manufacture of rafters from the following materials:
- Wood, as already mentioned, is the most popular material.
- Reinforced concrete. Three configurations are possible: rafter systems, trusses or panels.
- Metal.
The choice of material is usually carried out using three factors:
- its cost;
- complexity of installation;
- compliance with the design of the building being constructed.
In addition, roof parameters also play an important role. Without knowing them, it is impossible to make a final decision. What the rafters will be made of depends on:
- fire resistance;
- service life;
- required span size;
- tilt angle;
- thermal performance indicators.
Structural elements of a gable roof truss system
And yet, the leader in the construction of this element of the building is wooden rafter structures, which, thanks to the variety of technologies, can meet almost any design requirements.
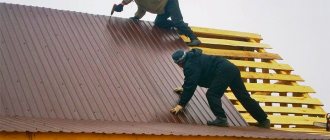
DIY rafter installation
Calculation of the angle of inclination of loads
In principle, any owner can calculate the necessary parameters of a gable roof himself, but it is advisable to entrust this work to professionals. Then you will be confident in the accuracy of the results, and this will guarantee that the design will be reliable.
When you determine the angle of inclination, you need to pay attention to the following points:
- For some roofing materials, a 15 degree angle may not be suitable. Therefore, before you start calculating the rafter system, you must decide what type of coating you will use.
- If you choose a slope angle of more than 45 degrees, keep in mind that this will increase the cost of purchasing roofing elements.
When calculating the design, it is necessary to set the maximum load from snow exposure at the level of 80-320 kg/m2 . If a slope angle of up to 25 degrees was chosen for the roof, then the calculated coefficient will be equal to 1, and for a structure with a slope of 25 to 60 degrees - 0.7. In practice, this will mean that if 1 square meter of coverage is designed for a load of 140 kg of snow cover, then for a roof with a slope angle of 40 degrees, the load will be equal to 140*0.7=98 kg/m2.
The wind load can be determined using the aerodynamic influence coefficient and wind pressure fluctuations. The constant load indicator is calculated by adding the weight of all elements of the roofing pie, which on average does not exceed 40-50 kg/m2.
Based on the results obtained, it is possible to determine the indicator of the total load on the roof, and from these data it is possible to calculate the number of rafter legs, their dimensions and cross-section.
Installation of Mauerlat and rafters
The first stage of installing rafters with your own hands is the installation of the Mauerlat. It must be secured with anchor bolts to the longitudinal walls.
After this, they move on to the following steps, which must be performed in a certain sequence:
First you need to make a template, which will be required for the manufacture of the rafter system. We simply take two boards and fasten them together with nails.
These scissors need to be installed with two edges where you will attach the rafter legs. To fix the angle between the beams, install a crossbar.
Now we need to make another template: this time we will need plywood for it, with its help we can make mounting cuts on the rafters.
Using a template, you need to cut mounting cuts on the rafters , after which they are fastened to each other at a pre-calculated angle of inclination of the slope. Upon completion of these steps, we should have a roof truss.
The finished trusses are transferred to the roof and fixed to the Mauerlat:
- First you need to secure the front trusses;
- You will have to stretch twine between the top points of the front trusses. From it we will know the place where the ridge should pass, and it will also serve as a hint for us when we begin to install the remaining rafter legs.
Now you can install the remaining trusses , remembering that the rafter elements must be placed at a distance of at least 0.6 m from each other.
In some cases, it may be necessary to strengthen the truss structure. To do this, use supports, crossbars or struts.
The final stage is the installation of the ridge girder. It is installed on special supports, after which short, diagonal and intermediate rafters are attached to it.
Wooden rafters: advantages and disadvantages ↑
Typically, coniferous wood is used to make rafters. There are very serious requirements for it in terms of grade, the presence of defects and a number of other indicators, the main of which is humidity (no more than 18%). In addition, according to SNiP, roofing structures are required to withstand a total load of about 200 kg per square meter. This means that the thickness and strength properties of the timber must be high.
Important! The optimal cross-section of the rafters is 50×150 mm, while the cross-sectional area should be at least 50 square meters. cm.
Sometimes it happens that the boards for the rafter system do not meet the stated requirements. In this case, they are connected together, increasing the required length or width.
The main disadvantages of wood material include:
- flammability;
- susceptibility to pests;
- insufficient choice of beams in length during the construction of large buildings.
For the production of rafters, timber with a section of 50x150 mm is used
The first two factors are neutralized with the help of special products, the regular application of which and impregnation of the wood before installation work begins to help cope with the natural characteristics of the tree. As for the third point, there are two possible solutions: increasing the length by connecting the necessary elements or choosing a different material.
Usually they stop at the first option, despite the complexity of this process. The reason is the advantages of wooden rafters over other systems:
- Environmental friendliness of the material;
- Light weight;
- Possibility of installation without the participation of construction machines;
- Low cost;
- Possibility of adjusting the size at the work site;
- A variety of ways to attach system elements to each other and to the walls of the house.
Thus, it turns out that wood is not only a tribute to tradition, but also a truly convenient solution when developing and installing a rafter system.
Wood is the material most commonly used for rafters
Kinds
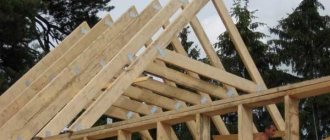
There are two types of rafter systems - with hanging and layered load-bearing elements. One or the other type is used in different cases, depending on the size of the house and other factors.
| Hanging rafter system . Hanging rafters imply a triangular-shaped structure that has two support points on the wall. The legs experience significant stress; to avoid stress, tightening is used. The bottom tie often acts as a floor beam, and during the construction of an attic it can serve as the basis for its floor. | |
| System with layered rafters . From hanging rafters, layered rafters differ in that they have an additional support point - the middle one; usually a stand located in the middle is used for this. Suitable for building large houses with spans exceeding six meters. This ensures greater reliability and rigidity of the structure. |
Types of rafter systems ↑
Wooden rafter systems come in three types:
- Layered;
- Hanging;
- Roof trusses.
Each design has its own characteristics and recommendations for installation.
Layered rafters and their characteristics ↑
They are considered the most inexpensive and most common solution in the construction of houses. Their main design feature is that the system is supported not only on the perimeter of the external walls, but also on the internal load-bearing wall or a support replacing it. This approach allows you to increase the width of the rafter system.
Important! Layered rafters experience only one type of load - bending, which increases their strength characteristics and service life.
Layered rafters have become widespread in houses with the following parameters:
- For pitched roofs - with a house width of up to 7 meters;
- For gable roofs - the width of the building is up to 18 meters with an increase in the number of racks from 1 to 3;
- For four- and two-slope roofs - at an angle of inclination up to 40 degrees.
Layered rafters are an inexpensive and reliable solution for forming the roof of a building
The convenience of layered rafters is that they can be installed perfectly in almost any building. A convenient layout, simple installation and a classic roof solution - all this serves as a stabilizer of demand for rafter systems of this kind.
The main feature of the installation of this rafter system is that after laying the Mauerlat, a waterproofing layer should be laid on it. And only the next step will be the installation of rafter legs.
Important!
Layered rafters help create a lighter roof than with other structures.
But not every configuration of a house under construction allows for the installation of layered rafters. Sometimes it is worth using an alternative option.
Features of hanging rafters ↑
It is worth considering the installation of hanging rafters if the building design does not provide for internal load-bearing walls. The recommended span width in this case can range from 6 to 12 meters. In rare cases, an even greater distance is possible, but the requirements for the design of the rafter system will become more stringent.
The peculiarity of hanging rafters is that they rest with their entire weight on the external load-bearing walls
Hanging rafters press the entire weight of the roof onto the outer walls of the building. To ensure a more rigid structure, the rafter system uses a tie, which ensures optimal structural rigidity.
The rafters are fastened in a spacer, and the attic floor, if there is one, is attached directly to the trusses. Most often, such structures are used in houses with single-, double- or hipped roofs.
For information! Hanging systems are mounted separately, and a ready-made rafter configuration is installed on the roof
The third solution for installing a wooden truss system is trusses. Unfortunately, they are practically never found in low-rise construction. In the rare cases where they are applicable, one may see a complex lattice system where load distribution occurs in different ways.
What elements does the roof structure of a wooden house consist of?
There is a wide variety of standard rafter systems, but each master makes his own changes taking into account the specific features of the building and the availability of lumber assortment.
Mauerlat
It is used as a supporting structure for the heels of the rafter legs, made from 100×100 mm timber. If there is no timber, then double boards 50 mm thick can be used for the Mauerlat. They are not used in log houses; the function of the mauerlat is performed by the upper crown. To increase stability, it is fixed to the lower rims with metal dowels. In frame wooden houses, this structural element of the rafter system is installed, it allows you to evenly distribute point loads along the entire perimeter of the load-bearing walls and prevents deflection of the fragile top chord.
Mauerlat
Rafters
The main element of the roof structure forms its geometry and appearance. The rafter legs bear all the loads, including the weight of the roofing coverings. Most often they are made from boards 50x150 mm; the pitch of the rafter legs is calculated individually or can be standard. The standard step is used in cases where it is planned to build a warm roof. This is done to simplify and speed up the installation process of the roofing pie. The fact is that all insulation, regardless of the material of manufacture, has a width of 60 cm. The standard pitch of rafter legs is within 57–58 cm, which allows you to immediately install insulation in niches without preliminary adjustment of dimensions.
Rafters
For rafters you need to choose only high-quality boards; if the length is not enough, then they can be extended.
Splicing rafters along the length
Depending on the length of the rafters, the type of roofing system and the climatic zone of the building's location, options and installation locations for purlins, stops and braces are selected. The heels of the rafter legs can be fixed to the mauerlat or upper crown either rigidly or using special connections that allow reciprocating/forwarding movements during shrinkage and changes in the linear parameters of a wooden house.
Runs
They serve as a point of emphasis for long rafter legs and do not allow the rafter system to sag under the influence of various forces. They are very often used in attic roofs, due to which it is possible to significantly increase the height of residential premises.
The purlins are made of timber, the vertical legs rest against the supporting structures of the house. Depending on the installation location, they can be side or ridge.
Purlin - a wooden beam, with the purpose of supporting the rafters (preventing them from bending)
Puffs
Special beams are installed specifically to support the rafter legs in the absence of a mauerlat. The ties simultaneously serve as ceiling beams. They are made from timber 100×100 mm or boards 50×100 mm. They remove bursting loads from the walls of a wooden house and are recommended for use during major repairs of old buildings. Tightenings significantly increase the stability of the roof structure; the lower parts of the vertical supports can be additionally fixed to them.
Tightening the rafters
Rigid pinching of the ridge beam between two rafters. This rafter connection unit ensures high rigidity of the rafter system.
Racks
Mounted in a vertical position, they take on bending loads on the rafters. The number and distance between posts is calculated individually for each roof structure. The elements are made of 100×100 mm timber; an oblique cut is made in the upper part so that the stop is across the entire surface. To prevent slipping, special fixing methods are used or thrust boards are packed.
Racks
Struts
They can work independently or in pairs with racks, resting on the rafter legs at a right angle. The appropriateness of installing struts is determined by an experienced roofer. If you plan to use the attic space as an attic, then struts are not made - they significantly reduce the free space. They support relatively small loads and can be made from the same boards as rafter legs.
Struts
Stretch marks
They connect two rafter legs into a single truss and counteract the bursting forces. Stretch bars work in tension, which makes it possible to use thin boards for them. The fact is that boards work much better in tension than in compression.
Stretch marks and other elements on the diagram
Sill
Longitudinal beam in the middle of the frame of a wooden house. It is recommended to install in cases where the design of the rafter system requires a run under the ridge. The element can be solid or extended; the material of manufacture is 100×100 mm timber. The bench must be located above the load-bearing partitions of the wooden house; the lower parts of the vertical posts of the ridge girder rest against it.
Lay on the diagram
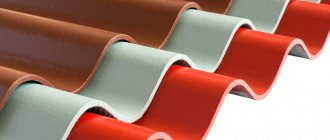
Lathing
Prices for OSB (oriented strand boards)
OSB (oriented strand board)
The type depends on the roofing materials. Under the soft coverings of wooden houses, only continuous sheathing is made from OSB boards or plywood; there are options for making continuous sheathing of their edged boards. But they are used very rarely - they are expensive, time-consuming and difficult.
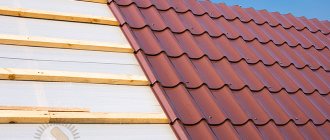
For metal or piece roofing materials, the sheathing is made from unedged or edged boards and slats. The sheathing pitch is selected taking into account the technical parameters of the coatings.
The sheathing elements should be joined lengthwise on the rafters, securing each end with nails or staples
Counter-lattice
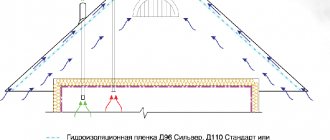
This structural element of the rafter system is installed only for warm roofs with mineral wool insulation. The purpose of the counter-lattice is to provide effective natural ventilation of the under-roof space.
Roofing diagram
Mineral wool has a very negative attitude towards an increase in relative humidity, its thermal conductivity increases significantly, and the efficiency of insulation decreases significantly. In addition, prolonged contact of wet mineral wool with wooden structures of the rafter system causes putrefactive processes with all the negative consequences. None of the most modern vapor barriers can completely eliminate the penetration of steam into cotton wool. Ventilation is required for removal, but it is impossible not to cover the insulation; cold wind blows out warm air, which also reduces heat saving performance. To solve the problem, a special wind protection is used, which allows moisture to evaporate and protect the mineral wool from the wind. Moisture must be constantly removed; this is why the counter-lattice is made. There are vents between the wind barrier and the roofing materials; the natural ventilation process effectively removes moisture that has evaporated from the mineral wool.
Windproof film
Prices for windproof membranes
Windproof membrane
fillies
Used to economically increase the length of rafter legs. Thin boards are nailed to thick boards; they do not carry significant loads. By lengthening the rafters, it is possible to increase the protection of the facade walls of a wooden house and adjust the parameters of the eaves overhang.
fillies
Manufacturing and installation of wooden rafter systems ↑
If previously wooden rafter structures were assembled in fact on the territory of the facility under construction, now there is no need for this. Having a house project in hand, it is very easy to order the necessary configuration from enterprises engaged in this type of work.
Rafter systems for roofs of complex configurations must be calculated and installed by specialists
This solution will allow you to obtain rafters with precisely sized dimensions and reliable fastening. Builders will only need to assemble the necessary structure from blanks and lift it for installation on the load-bearing walls of the house.
If you still want to do all the work yourself, then you should adhere to strict consistency and adhere to a number of conditions. The installation instructions contain the following requirements:
- Treatment of all wooden elements with antiseptic and fire-fighting compounds. First of all, this concerns mauerlats and supports of internal load-bearing walls.
- The rafter legs at one end rest against the mauerlat lying on the outer walls of the building. A notch and nails are used as fastening.
- For layered rafters, it is worth considering the width of the building, since if its value is less than 6.5 meters, then there is no need to use support on the internal wall. If the width varies up to 12 meters, then one intermediate support is required, if more than 12 meters - two.
- Installation is carried out from bottom to top.
- There is a special requirement for the height of the Mauerlat - it must rise at least 400 mm above the height of the attic floor.
- Fastening of vertical posts is carried out using two alternative methods: cutting with a hidden veneer into the frames and additional reinforcement with nails.
- The racks are plumb and equipped with a pair of fasteners. This helps maintain the integrity of the structure in high winds or other bad weather conditions.
- A purlin is laid parallel to the ridge, which can be made by extending the boards to the required cross-section.
- The purlin serves as support for the upper ends of the rafter legs.
Traditionally, rafters are installed immediately at the construction site, but you can order a ready-made structure in production
Important! Some projects allow the rafters to rest directly on the racks, without the participation of a purlin.
- At the ridge, the rafters are connected by overlays.
If we talk about the sequence of work, then first the two outer pairs are installed according to the project, and then the remaining elements.
Important! The upper part of the first pairs should be strictly horizontal.
After installing the rafter legs, you can begin work on installing the sheathing, and then continue with the rest of the roofing work.
Methods for connecting rafters
The main ways in which rafters are connected are shown in Fig. 3, they depend on the influence of various forces. The rafter leg should be cut into the tie at a distance of 250-300 mm from its end, so as not to cause chipping (shaded area in Fig. 3, a). To improve the connection, you can make a spike or tooth in the leg of the beam, the size of a quarter of the tightening height.
To make the support area for the rafter beam larger, it is cut in with a double tooth (Fig. 3, b), where the height of the first is a fifth of the tightening height, and the height of the second is a third. For the first tooth, both a stop and a tenon are installed on the tightening, and for the second tooth, only one stop is cut out.
Figure 3. Basic methods of connecting rafters (description in the text).
Fastening the rafter leg and horizontal beam can be done using bolts or clamps (Fig. 3,c). When connecting with bolts, there is a slight weakening of the sections and beams of the legs and tightening, so most often they use clamps.
Figure 5,d clearly shows how the headstock in the ridge and the truss struts are connected. For a reliable connection, a socket is hollowed out in the headstock, and a tenon must be cut out in the brace. The entire structure is secured with brackets and clamps to provide greater rigidity. If the tightening is composite, then it is spliced using a tooth, bolts and metal plates.
Rafter legs and tie rods can have an overhang for water drainage of at least 55 cm from the line of the load-bearing wooden wall (Fig. 3e). The Mauerlat along the perimeter of brick or concrete walls is placed 100-150 mm above the top of the attic floor and is isolated from the stone with a gasket (Fig. 3, e). In the last picture you can see that a wire clamp about 5 mm thick is put on the rafters, which is attached to a pin driven into the wall. This fastening is necessary to prevent the roof from being blown off by strong winds.
Conclusions ↑
It is impossible to build a cozy wooden house without a rafter structure. There will also be no comfort in the new building if the installation was carried out with errors and shortcomings. Therefore, you should choose: order a ready-made rafter system or invite professional craftsmen to assemble the required configuration according to the project.
Accurate calculation of the rafter system for roof loads is important
It is better not to take on such work on your own - there are too many nuances to take into account when working with wooden material. In order for the rafters to please you with quality, like the whole house, it is worth responsibly resolving issues related to their installation.