Select the size of the new canvas
This is necessary so that you don’t have to bother with narrowing or, conversely, widening the opening. Standard door sizes are 2 m high and 60, 70, 80 or 90 cm wide. Double doors are usually combined from two panels. For example, 120 cm is 60 + 60.
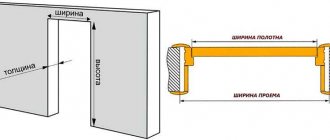
Since the leaf is installed in the door frame, and even with gaps for polyurethane foam, the opening should be a little larger. As a rule, 8–10 cm. This includes the thickness of the frame and all necessary clearances.
- Measure the width of the opening and choose a canvas 8–10 cm narrower.
- Measure the height of the opening from the finished floor and make sure that it is 6–9 cm greater than the height of the door.
- Take measurements in several places and take into account the smallest result. For example, if the width of the opening at the bottom is 89 cm, in the middle - 91 cm, and at the top - 90 cm, then the width should be considered equal to 89 cm.
What do you need to know before installing an interior door?
Before you start installing interior doors with your own hands, you need to carefully study the requirements for the room. Information directly about the requirements for the door and the process of its selection would also be useful.
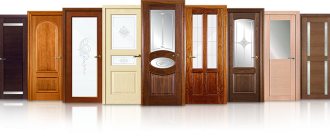
Types of interior doors.
Interior doors are installed after completion of the so-called. pre-finishing. That is, before you start installing the structure, you need to level the walls, cover them with putty and plaster. All this wet work must be done first. You can begin installing interior doors only after all elements of the room have been dried. Otherwise, the box or door will simply suffer from dampness. Before starting installation, you need to complete the construction of the subfloor and select the type and thickness of the future finished floor. Thanks to this, you will be able to correctly navigate and install interior doors taking into account the height of the threshold. If you are not making repairs and are only replacing doors, you can skip these steps, because... They will not affect the quality of work in any way.
There is a huge range of different doors available on the modern market to suit every taste. They have a different appearance, which allows you to choose interior doors to match the interior of the room without any problems. However, in terms of geometric dimensions, everything is a little worse. For example, you can purchase a door, one side of which will differ from the other by a couple of millimeters. In appearance, such a difference is usually imperceptible, but at the installation stage, even this couple of millimeters will create very great difficulties. Therefore, there is no need to be lazy and embarrassed to measure the door you like right in the store. Upon receipt, be sure to measure the door again. Make sure you receive exactly what you ordered.
Related article: Mortars for laying tiles on a stove - from mixing by hand to preparing from a dry mixture
Interior door assembly diagram.
Be careful when choosing a door frame. Some doors are sold immediately with a frame. They already have markings for loops. In addition, in the case of such doors, you can be sure that the manufacturer has met all dimensions. If the canvas is sold without a box, you can make it yourself if you wish.
There is nothing complicated about making a door frame with your own hands. The material for the manufacture of this structure is box timber. The structure consists of a horizontal crossbar and a pair of vertical posts. If you make a frame for interior doors yourself, when choosing timber, make sure that it does not have any unevenness or black knots. The timber for assembling the box must have the same thickness as the door leaf. Otherwise, you will not be able to complete the installation.
Decide on the opening and hanging side
If the canvas is installed flush with the wall in the corridor, then it will open into the passage. If there is a wall in the room, then the door will open there. Think about what is more convenient and take this point into account.
To open to the right, the hinges must be hung on the right side, and to open to the left, on the left. To avoid mistakes, stand in front of the door and imagine that you are swinging it open towards you. If it has glass, then the matte side should face the corridor, and the glossy side should face the room.
Hang the hinges
If you are installing a door for the first time, it is better to use butterfly hinges. They are universal and suitable for both right-hand and left-hand drives. But the most important thing is that they do not need to be cut into the box, which is very convenient for non-professionals.
- Place the door on its edge with the front side facing you, placing a piece of cardboard underneath.
- Measure 250 mm from the edge of the canvas and make a mark with a pencil - this will be the center of the loop.
- Place the closed loop on the canvas with the side where the holes in the small part are chamfered.
- To determine where to screw in the screws, mark the centers with an awl and carefully drill holes with a diameter of 2–2.5 mm.
- Screw in one of the screws. It will secure the loop and make marking easier.
- Mark all the holes in this way and screw in the screws.
- Remember: the small part of the hinge is attached to the door leaf, and the large part is attached to the door frame.
- Repeat the same procedure for the second loop.
How to install hinges?
The main thing is to decide on the use of the door: where it will open. Before you start, you will need to purchase the hinges themselves and all the necessary tools. The side of the fabric for inserting loops should be the one that is more massive and does not have any cracks or defects. Features of the insert depend on the type of loops. Standard type interior doors are most often installed with two hinges.
As a rule, they are quite sufficient. When it comes to entrance structures, three loops can be installed here for greater reliability. For optimal load distribution, the third loop is installed slightly above the middle. You can determine the place where you need to install the hinges as follows: measure 20 cm from the bottom and top and make markings. Next, the loop is applied to the marked place on the end of the door and outlined with a pencil, then with a knife.
Now, using a hammer and chisel, you need to cut out a place for the hinges with a depth of about 3-5 mm, otherwise they will either dangle or stick out. In order to get the ideal depth, you need to cut the wood gradually, applying a loop periodically. The final stage is trying on the hinges and marking the places for screwing in the screws. Next, holes are drilled. The hinges are secured with screws.
Embed the lock
- Turn the canvas over so that the loops are on the floor, and the opposite side, where the lock will stand, is at the top.
- Position the lock correctly - in the center of the door. The square hole for the handle should be at the top, and the beveled part of the latch should be directed towards the closure. If necessary, the tongue can be easily turned over by simply pulling with your fingers.
- Measure the length and width of the lock mounting plate, as well as the thickness of the door. Make a mark and place the bar strictly in the center of the canvas.
- Turn the lock around and apply it to the door. Mark the center of the location of the mounting holes, drill, and screw in the screws.
- Trace the plank along the contour with a pencil and carefully cut the film with a sharp knife to clearly mark the boundaries of the selection for installation and not damage the edge.
- Remove the lock and separate the cut film from the canvas with a chisel.
- Attach the mechanism to the door, aligning it with the planned location, and mark the width of the body. Measure the thickness of the lock at its widest point and mark it on the canvas.
- Draw boundary lines 2 mm from the edges of the groove on both sides.
- Using a drill with a diameter of 6–7 mm, make holes along the contour of the hole for the lock mechanism. To use the maximum area, arrange the holes in a checkerboard pattern. Act carefully and do not protrude beyond the boundaries of the markings.
- Slowly cut off the drilled wood with a chisel and trim the edges of the groove so that the lock fits freely, but does not dangle.
- Use a chisel to remove the wood little by little until the mounting strip is flush with the wood. Check by applying the lock with the back side rather than pushing it into place - otherwise it will be difficult to remove.
- Place the lock on the side and use a pencil to mark a square hole for the pen shaft. Make a mark on both sides and remember that this figure should be on top and not below when the door is installed.
- Insert a piece of wood inside the groove as a support and use a drill with a diameter of 20 mm to make a hole on one side and then on the other.
- Place the lock in place and secure it with screws, having previously drilled holes for them.
Installation of door locks
To install the simplest mortise lock on a wooden door, you will need the following tools:
- lock and adjacent set (lock, key, locking mechanism, screws, escutcheon);
- drill;
- screwdriver;
- ruler;
- pencil.
On the door, mark with a pencil the place for the lock, about a meter from the floor. Using a drill, drill out a place to install the lock. It will be convenient if you measure the parameters of the lock, circle it on the door with a pencil and prepare the place. The lock should fit tightly, but without obstacles, into the opening.
After this, prepare a place for the key. Trace the key shape with a pencil and transfer it to the door to avoid unnecessary holes. Drill out with a thin drill pen, remove abrasions and tails with a file. Using screws, you fix the linings for beauty, and secure the lock with self-tapping screws. For longevity of the lock, secure the locking plate with two screws.
If desired, you can choose a more modern and complex lock mechanism.
Assemble the door frame
- Place the side posts of the door frame along the edges of the door to avoid confusion. They should be facing a quarter towards the door hinge. That is, you should see the seals.
- Calculate the height of the post for proper trimming. It consists of the size of the leaf (2,000 mm), the gap between the frame and the door (3 mm), the thickness of the frame itself (22–25 mm) and the gap between the leaf and the floor (8–22 mm). The lower threshold is made only in bathrooms; in other cases, a gap is left for carpets and other coverings.
- Calculate the width of the door frame crossbar. To do this, add 6 mm to the width of the door leaf, so that you end up with a gap of 3 mm on each side.
- Carefully cut all planks to size. It's better to use a miter saw, but you can also use a fine-tooth hacksaw.
- Remove the quarters on the side posts to mate with the top rail. To do this, move the seals to the side, make cuts with a saw, and then chop off the interfering pieces with a chisel. Use scraps of the box as a template for greater accuracy.
- Trim the rubber seals on the side posts at a 45-degree angle to avoid an unsightly gap after assembly.
- Place the frame strips together, align the edges and fasten with screws. Pre-drill holes for screws and screw two into each rack. Use box scraps for precise markings.
Installation of the structure
Before you install interior doors in an apartment or house yourself, you need to measure the frame and prepare the parts for its assembly. The upper cross member is taken, applied to the top and cut to the required length. You should do the same with the longitudinal crossbars, after which all parts are fastened together with self-tapping screws, 2 pieces on each side.
When installing the frame, it is important to pay attention to this point: the gap between the frame and the wall should be about 5 mm, so that in the future the door fits well into the opening, preventing it from rubbing.
In addition, it is necessary to take into account the distance when installing the canvas itself. There should be a gap of 10-15 mm between the floor and the door.
Insertion of hinges
After the box is already assembled, you can start inserting the hinges. To begin with, they crash into the door leaf. From the end of the canvas, 200 mm is measured from the bottom and top, marks are placed, and a loop is applied. A contour is drawn along it, after which, using a hammer and chisel, a recess is made to the thickness of the loop.
The same procedure is carried out with the box. To correctly mark the location of the hinge, you need to attach the door to the frame and trace its outline. When everything is ready, holes are made in the canvas and on the box through the holes in the loop, after which the screws are screwed in.
When installing an interior door, you should pay attention to the fact that there are two types of hinges - left-handed and right-handed. Therefore, they are selected based on which direction the doors will open.
Installation of the box
Now you can start installing the box. It is well aligned in the opening, centered, and secured with small wooden wedges at the top and bottom. Three holes are made in the racks, along which the box will be attached to the opening.
Now the box along with the wedges is removed. Using the marks obtained, holes are made in the wall using a drill with a concrete drill and dowels are inserted into the resulting holes. Next, the box is inserted back into the opening, fixed with wedges and attached to the wall with long self-tapping screws. After that, the caps of the screws, which are visible on the box, are closed with special caps to match the color of the canvas.
Installation and insertion of the lock
It is better to hang the door leaf to the frame together. After this, its movement is checked and if everything is fine, you can start cutting in the lock and installing the handle.
To begin with, measure the length at which the handle will be installed from the bottom of the canvas. It should be at a comfortable height for opening. After this, markings are made from the end of the blade for the lock body. Using a drill, a groove is drilled for the lock, but you must use a drill one size smaller than the thickness of the lock itself.
The next step is to knock out the recess with a chisel and clean its edges with a chisel. It is important to remember that the depth of the hole should be 3 mm greater than the body of the lock itself. Next, markings are made to select the groove. As a result, the plane of the lock bar should be completely aligned in the plane with the end of the door.
Next, a lock is placed and if it fits tightly, then you can start drilling a hole for the lock cylinder. If it provides a latch, then you will also have to drill a hole into which the rod will be inserted to attach the handle. After this, the handle and lock are screwed to the door using screws.
The next step is to attach the strip. It is necessary to mark the place on the door frame where the lock tongue will fit. To do this correctly, you need to smear the tongue itself with a marker, close the door and release the handle. As a result, a mark will remain on the door frame, which will make it clear where to make the hole. It is done using a chisel and drill. Next, you need to make a recess for the receiving pad. It is applied to the right place, its outline is outlined and a small recess is also made to the thickness of the lining so that it forms a single plane with the door frame. The strip is screwed on using self-tapping screws.
Sealing cracks
After going through all the steps described above, you need to start filling the gaps between the frame and the wall using polyurethane foam. But before starting this work, the doors are wrapped with plastic film, and the frame is covered with construction tape.
It is very important to make spacers inside the box before blowing foam into the cracks - one at the height of the handle and two more at the height of the hinges. This is done because during the hardening process, the polyurethane foam can lead to deformation of the box and then all the work will go down the drain.
The gap between the box and the wall must be cleaned of dust by wetting it with a small amount of water or using a vacuum cleaner. Now you can carefully blow out the cracks. After the blowing process is completed, the door is closed, and small pieces of cardboard are inserted into the gap between the frame and the door so that the door does not jam. The structure should remain in this state until the foam has completely hardened (about 12 hours).
In order to understand as clearly as possible how to install interior doors with your own hands, experts recommend watching special videos that explain the essence of the process.
Installation of platbands
It became clear how to install an interior door correctly, and now it’s time to start installing the trim. This is the last stage, which also needs to be approached with full responsibility. Before starting to measure the platbands, use a utility knife to cut off the remainder of the polyurethane foam.
Installation of platbands occurs in several stages:
- The plank is sawed at an angle of 45 degrees;
- The length is measured from the floor to the middle of the box. This will be the length of the bar along its short part;
- The measurements are transferred to the bar, after which it is applied to the box and if all is well, it is attached with nails;
- All other planks are measured and attached in the same way.
After all the parts are installed, a visual inspection is carried out and if everything is satisfactory, then you can hammer the nails into the box, but do not finish them by 1 mm. Next, you need to take a Phillips screwdriver, place a nail on the head and finish it off with a hammer. This is done so that there are no traces of impacts left on the platband.
After all the nails have been hammered in, take construction wax and rub over the places where they were hammered. At this stage, the installation of the interior door can be considered complete.
Hang the canvas on the door frame
- Place the door frame on the floor and carefully place the panel in it. Place 3mm thick fiberboard pieces around the perimeter to form an equal gap.
- Mark the top of each hinge on the frame with a pencil.
- Remove the screws from the side post and “open” it up on its hinges. To prevent the canvas from falling, place the cuttings of the box underneath it on top and bottom.
- Align the top of the hinge with the mark on the frame and use an awl to mark the centers of the screw holes. Screw in the screws, having previously drilled holes for the fasteners.
- Repeat the procedure for the second loop and fasten it.
- “Close” the box and reassemble it, attaching it to the top bar with screws.
Place the box with the canvas in the opening
- Lift the hinged door and insert it into the opening. Align the canvas with the wall using wedges as spacers. You can buy them or cut them yourself. Insert one wedge into small gaps, two wedges into large ones, turning them towards each other. This is necessary for accuracy of adjustment.
- Align the post with the hinges first, then the rest. Apply a level and recess or pull out the door to achieve a strictly vertical position. If the wall is blocked, the canvas still needs to be leveled so that it can be easily closed and opened.
- Using pieces of fiberboard or other templates, create 3 mm gaps around the perimeter between the leaf and the door frame. Place them opposite each other. This will avoid deformation of the frame while the polyurethane foam hardens.
- Place a level on the edge of the door or two pieces of fiberboard and make sure the door is perfectly vertical.
- Fill the gaps between the door frame and the wall with foam, starting at the bottom and moving up. Use high-quality foam with a low expansion coefficient so that it does not deform the box as it hardens and increases in volume.
- If the gap is large, for example, above the top bar, then fill the space gradually, moving the gun up and down with a snake. Do not fill the foam flush with the wall - it is better to leave a small gap, the composition will fill it after hardening.
Mount the handles and strike plate of the lock
- Using the supplied hexagon, loosen the locking screws at the bottom of both handles and insert the square rod into them until it stops. Attach the assembled structure to the door. The distance between the handles should be less than the thickness of the blade. If it is larger, shorten the rod slightly with a hacksaw or grinder.
- Remove the decorative rosettes from the handles by unscrewing them counterclockwise along the threads. Insert the handles into their places so that the locking screw is at the bottom, and mark the locations for fastening with a pencil. Drill holes and screw in screws. Replace the decorative rosettes.
- Close the door and mark the top and bottom of the latch on the frame with a pencil. Measure the distance from the edge of the canvas to the outside of the tongue. Mark this measurement on the frame and draw a line to the latch boundary marks.
- Turn the striker over and align it with the center of the tongue mark. Drill holes and screw in screws to secure the strip to the frame. Trace the contours with a pencil and cut the film with a sharp knife, as you did with the lock.
- Remove the bar and use a small drill to make holes along the contour of the future groove for the latch, and use a chisel to make a hole. It’s okay if the sample slightly protrudes beyond the boundaries of the marks; after installing the bar, all the gaps will close.
- Using a chisel, carefully remove the film along the outer contour of the striker to make it flush with the door frame. Secure the strip in place with screws. Check: if everything is done correctly, the closed door does not hang loose.
Install additional strips
They are mounted from the side of the room when the width of the door frame pillars does not allow covering the entire thickness of the opening. Additional strips are inserted into the frame and attached to the wall with foam, and later trims are nailed onto them.
If your frame thickness matches the dimensions of the doorway, proceed immediately to the next step.
- Use a chisel to cut off the pieces protruding from the sides of the frame and use a chisel to keep them out of the way. Remove any remaining foam around the perimeter of the door frame.
- Measure the width of the opening and cut the top trim to the appropriate size. Attach it to the desired place and, if it protrudes beyond the boundaries of the opening, mark with a pencil and remove the excess part. Insert the trimmed board into the box, level it and secure it with wedges on the sides.
- In the same way, measure, cut and fit the side trim strips. Reinstall them and align them.
- Apply a continuous strip of foam at the junction of the door frame and the top and sides. At the outer edge of the additional strip, fill the joint with the wall with small strips. Do not fill the entire space with foam, otherwise it will expand and deform the extension.
Fasteners and other items
Components of a metal door frame.
To install the door frame, you will have to prepare (purchase at a hardware store) all the components for these purposes. List of everything required for work:
- door leaf;
- vertical wooden (or MDF) bars (250 cm) - 2 pcs.;
- horizontal block of wood (or MDF) - 1 pc.;
- wooden (or MDF) trim - 3 pcs.;
- additional wooden (or MDF) parts for the trim - 3-4 pieces as needed;
- wooden wedges of a size corresponding to the gap between the block and the wall - 15 pcs.;
- suspended metal strips for fixing bars to the wall surface (similar to those to which profiles are attached) with individual sizes - from 5 to 7 pcs.;
- anchor bolts for attaching bars (sizes are selected individually) - 9 pcs.;
- self-tapping screws with dowels of various sizes - 20 pcs.;
- a can of polyurethane foam and a special dispensing gun for it.
Related article: How to make a lamp from an LED strip with your own hands
For preliminary preparation and self-assembly of the box you will need:
- construction pencil for marking;
- carpenter's knife for small modifications to wooden elements;
- sandpaper.
Special tools that any carpenter has:
Sections of door frames of different types.
- electric screwdriver with drill;
- a miter box for sawing at a given angle the ends of the wooden blocks of the box that are joined together;
- electric hammer drill;
- two sets of drills: 1 - for wood, 2 - for brick or concrete in a hammer drill in accordance with the diameter of the fastening elements;
- chisel or milling cutter for installing fittings;
- hand saw;
- level (at 100 and 150 cm);
- carpenter's plumb line;
- crowbar or pry bar;
- hammer;
- Bulgarian;
- nail puller
Stuff the trim
- Using a sharp knife, cut off the foam protruding beyond the plane of the door frame.
- Attach the trim to the frame from the side of the hinges, close to them, and see what kind of gap there is to the inner edge of the box. The same distance must be maintained around the entire perimeter on other trims.
- The joints of the top and side trim strips can be made at an angle of 45 or 90 degrees. If you don’t have a miter saw at hand and you’re installing a door for the first time, it’s better to go with the second option. It's much simpler.
- Install the side strip, pressing it against the hinges, and nail it with nails in increments of 20–25 cm. Do not hammer them in completely and do not forget to first make a hole in the platband with a drill of a smaller diameter than the nail.
- Attach the second side strip and, having maintained the required gap, make a mark with a pencil and cut off the excess to the desired length. Nail the platband with nails as before.
- Try on the top bar, cut it to size and fasten it. Important! It should not lie on the sides, but be between them. In this case, the cut end of the upper casing will be hidden.
- Using the same principle, fill the trim on the other side of the door. If additional strips are installed, then align the edges of the platbands with them. If there are no additions, maintain the same gap around the perimeter of the door frame as on the opposite side.