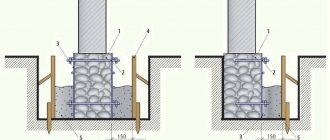
Factors that indicate the need for foundation repair or replacement
Before starting restoration work, it is necessary to understand why the foundation was destroyed, how serious the damage is, and also determine how the damaged building can be reconstructed.
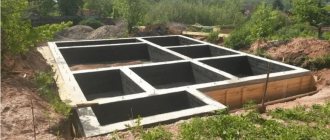
Brick foundation that requires complete replacement
Causes of damage to the foundations of wooden houses
To prevent a similar problem in the future, it is necessary to understand the factors that lead to the destruction of the foundation. And this happens for several reasons:
- geological and hydrological changes that lead to subsidence or displacement of the soil under the building;
- violation of construction technology and use of low-quality materials;
- absence or improper operation of the drainage system;
- time factor - even high-quality materials lose their performance properties over the years;
- weighting of the structure due to additional superstructures.
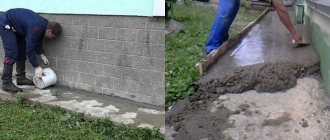
It is quite simple to determine whether the house is currently subsiding or whether the foundation has found new support points. To do this, beacons made of plasterboard or paper are installed in the busiest places. Their damage indicates that the destruction process is continuing.
What are the types of deformations?
The second thing that needs to be done during the research process is to determine the degree of destruction. The complexity of restoration work depends on this factor. Conventionally, 4 types of deformations can be distinguished:
- Small defects that manifest themselves in the peeling of the foundation finishing.
As a rule, the strength of the foundation does not suffer from this, and problems can be eliminated without any problems. Peeling of plaster, as well as small cracks, are easily removable defects - Moderate damage, indicated by cracks in the base that appear as a result of its displacement.
To reveal how much the foundation subsidence is progressing, a layer of putty is applied to the problem area. A crack that appears at the slightest deformation can tell about the rate of deformation, as well as its nature and direction of displacement. Cracks whose propagation has stopped at the initial stage can be sealed with mortar - Significant or catastrophic damage resulting from significant subsidence, displacement, or failure of the foundation.
They are revealed in the violation of the geometry of the walls, the appearance of large gaps between the crowns, and the warping of windows and doors. Problems of this kind lead to the impossibility of operation or complete destruction of the house, so urgent reinforcement or replacement is necessary. If deformation of the foundation can lead to complete destruction of the building, repair work should begin immediately - Unavoidable consequences. If the moment is missed, then repairing the house will most likely be unprofitable. In this case, a decision is made to demolish the building and build new housing.
After carefully analyzing the nature and extent of destruction, a decision is made on how to reconstruct the foundation. If deformations can be eliminated and prevented in the future, then the foundation can be strengthened. Otherwise, it will need to be completely replaced.
In some cases, it is not practical to renovate a house - it is easier to build a new one
Strengthening or replacing the foundation may be required not only when it is destroyed. Reconstruction is also carried out in cases where there is a need to build a superstructure on the house, and the existing foundation is not designed for increased load.
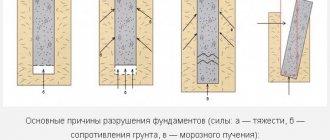
Causes of foundation destruction
Before you begin a detailed study of how to repair the foundation of a wooden house, you need to understand what caused its deformation. Two factors can contribute to this:
change in the bearing capacity of the soil. This occurs due to an increase in the load on the foundation, and therefore on the soil underneath it. The reason may be improper drainage of rain/melt water or an increase in groundwater levels, which leads to soil erosion. The construction of other buildings near the house also increases the load on the soil. As a result, the soil seems to be squeezed out from under the foundation of the house, which can ultimately lead to subsidence of the house or its warping.
loss of strength of the material from which the foundation is made. Among the main reasons are the following: incorrect choice of foundation type, exposure to water, incorrect brand of concrete used during construction, incorrect calculation of the depth of soil freezing, violation of construction technology.
Identifying the cause of foundation failure provides a starting point for investigation.
How to repair the foundation of a wooden house yourself
Several types of foundations are used in the construction of wooden houses, so we will select the most common cases and consider the most effective and popular restoration methods.
Repair of strip foundations
Small single cracks that appeared due to sedimentary changes in the soil under the house can be repaired with mortar (provided that the process has stopped and the base of the building has found new support points). To do this, the foundation is dug to the entire depth of the defects, the cracks are cleaned and filled with a sand-cement mixture.
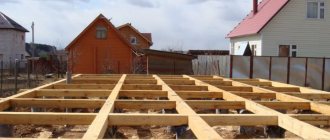
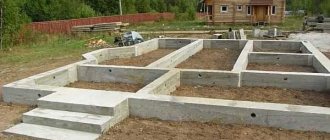
Strip foundations are often used in the construction of wooden houses
Serious damage requires thorough restoration work. Most often, a new reinforced concrete structure is erected next to the old foundation strip, which is combined with the existing foundation using grooves and rods. Due to the fact that the repair structure is built on a stable cushion, as well as due to the redistribution of the load over a large area, it is possible to completely stop the deformation processes and return the foundation to its former solidity.
A groove (colloquial groove) is a recess, groove or groove in a monolithic concrete base, which is intended for laying cables and other utilities, as well as embedding reinforcement elements in order to strengthen or combine reinforced concrete structures.
Repair of uniformly subsiding strip foundation
In the case when the subsidence of the house occurs evenly along the entire perimeter, work to strengthen the strip foundation is carried out in the following order:
- A trench is dug along the perimeter of the building, which covers the old foundation to its entire depth. The width of the pit is chosen so that it is possible to work comfortably. In addition, it is necessary to take into account the increase in the thickness of the foundation during restoration activities.
If the subsidence is caused by miscalculations in the design or mistakes made during the construction of the foundation, then the supporting structure is built taking into account previous mistakes. Perhaps the building began to sag due to the high groundwater level, which was not taken into account at the stage of its construction. In this case, the bottom of the repair trench should be below the freezing point of the soil.
- Thoroughly clean the concrete surface from soil residues. Remove crumbling fragments of brick or rubble masonry.
- The bottom of the pit is carefully compacted and covered with a layer of crushed stone 10–15 cm thick.
- Holes are drilled in the old foundation to install the rods.
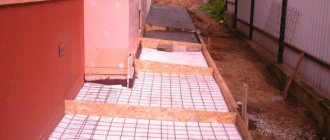
It is best if the reinforcement fits into the holes made with a slight interference. Strip foundation repair technology - Individual boreholes (in a checkerboard pattern) are drilled to expand their entrance hole to a diameter of 100 mm to a depth of 100–150 mm. During the process of pouring the foundation, concrete will fill these voids, combining both structures into one.
- Create a reinforcement belt. To do this, the driven rods are welded to a three-dimensional reinforcement grid.
To strengthen a reinforced concrete base, it is best to use not welding, but connecting rods using knitting wire. Such fastening is much easier and faster to make, and its elasticity will avoid damage and displacement of the reinforced belt during concrete pouring.
- Formwork is installed along the outer contour of the trench, for which any suitable lumber is used - boards, bars, wooden panels, etc. Before pouring concrete, the walls of the structure are covered with plastic film.
- It is best to pour concrete gradually - in sections 1.5–2 m long. This will allow the solution to better penetrate into the grooves and fill all the voids and defective areas of the old foundation. To do this, a shield is made, which is installed across the formwork.
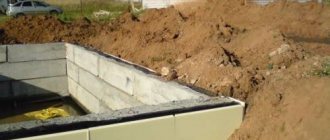
- After the structure is filled and the concrete has set, the timber structure is removed and the foundation is waterproofed.
- The remaining space is filled with soil.
Of course, you should add soil gradually, adding a new portion of soil only after the previous layer has been thoroughly compacted. The repaired foundation will extend the life of the old wooden house
To drain water from the foundation, a concrete blind area is made around the house. If the site suffers from excess moisture, then the base of the building is protected with drainage, which can be installed in parallel with the repair work.
Repair of individual sections of the foundation strip
If individual corners or small areas of the foundation are damaged, spot repairs can be done. It is performed in the following sequence:
- A local trench is dug near the defective area, which exposes the surface of the old base.
- The bottom of the pit is covered with crushed stone and thoroughly compacted.
- On the sides of the foundation, brick (stone) masonry is built up or a supporting concrete block is installed. The width of the repair structures should cover the defective area by 10–20%. At the same time, it is important to ensure a connection between the structures. To do this, drillings are made in the old base into which metal rods are driven. Subsequently, they are placed in masonry joints or welded to an armored belt.
- The masonry is protected with waterproofing.
- The trenches are filled with soil.
Repair of individual sections of the strip foundation
If inspection of the base reveals its weakening along the entire perimeter, then the structure can be strengthened using a narrow (15–20 cm) encircling reinforced concrete clip. It is concreted using an anchor bond to the foundation, using reinforcement and formwork.
Replacing an old foundation with your own hands
If the foundation is destroyed or has sunk so much that it cannot cope with the functions assigned to it, then it is completely replaced. The log house does not weigh that much, so it is quite possible to do without a truck crane. To raise the walls to the required height, hydraulic jacks with a force of 5–10 tons and supports from logs or metal structures are used.
To avoid mistakes during repairs, work is carried out in stages.
- Determine the weight of the building. To do this, the total cubic capacity of the log house is multiplied by the specific density of the wood from which the house is built. Based on the calculations, a decision is made about what lifting mechanisms will be needed and their quantity is determined.
You can lift a small, light house without jacks at all, if you use a pole - a long pole with a cross-section of at least 80x80 mm. One of its edges is placed under the corner of the building and rested on a round deck, and the second is used as a lever.
- To reduce pressure on the foundation, bulky items and equipment are removed from the house. In some cases, the floor and stoves are even dismantled. Naturally, if the heating devices are installed on separate bases, then there is no need to disassemble them.
- Using wooden beams and boards, window and door openings are carefully strengthened. This will prevent distortion during the lifting of the building.
- A wide trench is dug around the perimeter of the house. It will provide access to the foundation and provide convenience when replacing it.
- The old rubble or brickwork of the base is dismantled in small sections 0.3–0.5 m long - jacks will be installed in these openings.
For small houses, it is enough to place lifting mechanisms only in the corners, while massive buildings will require additional supports in the middle of each wall. To distribute the load on the jacks, you can use a powerful angle or channel - Install jacks. To prevent subsidence of lifting mechanisms, they must rest on a solid, reliable foundation. Plates made of thick steel or pieces of springs from a heavy truck, which are placed under the lower crown, will help to avoid damage to the log house.
- Slowly and carefully they raise the house. It is important that all corners rise as evenly as possible. To protect yourself in case of insufficient load-carrying capacity of the jacks or their displacement, wooden wedges are inserted between the lower rims and the foundation cushion. Spacers should be increased every 15–20 mm.
When lifting a wooden house, the main force falls on the lower crowns. To prevent them from sagging, the logs are tied together with a steel hoop or reinforced with boards and bars.
- Next to the jacks, as well as in other accessible places, temporary supports made of channel bars or powerful steel angles are placed under the frame - they will help unload the old foundation.
Any suitable materials can be used as temporary safety supports. - The house is lowered, after which they begin to dismantle the damaged foundation.
At the same time, you should not save money and dismantle only the damaged areas - a partial replacement will not significantly reduce the cost of repairs as it will weaken the new foundation. Dismantling the old strip base - Having reached the ground, it is excavated to a depth of 15–20 cm and a sand-crushed stone layer is created. The pillow is thoroughly spilled with water and compacted.
- Construct corner and intermediate supports. They can be metal, reinforced concrete, stone or brick columns.
- Reinforcement is installed and formwork is arranged. The wooden structure is made in such a way that it can combine the reinforced concrete base with the previously installed columns. To avoid leakage of the solution, the inside of the formwork is covered with plastic film.
The formwork for the new strip foundation is constructed according to all the rules - with reinforcement and protection against leakage of cement laitance - Concrete is poured into the established form. The solution is compacted by bayoneting, using a vibrating screed or manual tamper.
- After the concrete has completely set, the formwork is removed and the structure is left open for another one or two days for the solution to dry completely.
- Several layers of waterproofing are applied to the concrete surface, and the top of the foundation is covered with roofing felt. This material will prevent the spread of moisture from the base to the lower crown.
- The gap between the foundation and the side wall of the trench is filled with soil, which is thoroughly compacted.
- Slowly and evenly lower the house onto the new foundation.
On a new foundation, a wooden house will stand for many more decades
After completion of the repair work, a blind area is built around the house and the surface part of the foundation is lined.
Features of leveling a skewed base
If uneven shrinkage is observed, and the foundation tape has sagged and skewed, then a jack or a wagon is also used to repair and level it. The first thing they do in this case is to determine whether the deformation processes have stopped or whether the subsidence of the foundation continues. For this purpose, the already known beacon method is used. Based on the experiment, a decision is made on the repair method:
- with strengthening the foundation using additional reinforced concrete tape;
- increasing the sagging part of the base to a new height.
In order to restore the straightness of the surface in the first case, a trench is dug on both sides of the sagging corner. Its length should be such as to cover areas where the upper part of the foundation has deviations from the horizontal. After this, the building is raised to a height of 15–20 mm above its original position, after which a repair foundation is installed next to the problem area.
You can level the foundation using brick or stone masonry
Leveling “horizontally” is carried out using brickwork and is regulated by a layer of mortar, into which pieces of steel reinforcement, crushed stone, etc. are laid. The repair is completed with waterproofing work, after which the trench is filled up and the house is lowered into place.
If the shrinkage processes have stopped, then there is no need to dig a pit. The building must be raised and the surface of the sagging section of the foundation must be brought to zero. For alignment, use the method discussed above.
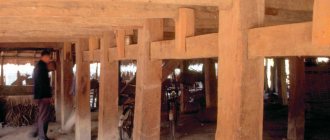
Repair of columnar or pile foundations
Owners of wooden houses installed on a columnar foundation may eventually encounter certain problems:
- the tilt of individual pillars due to heaving of the soil, and, as a consequence, the tilt of the building towards the defective columns;
- subsidence of supports, which led to skewed walls or excessively close location of the lower crowns to the soil.
Such problems require strengthening the foundation and replacing individual supports. One of the most effective and at the same time simplest methods is the installation of bored piles.
Foundation repair scheme using bored piles
The house is raised according to the method described above (to restore the strip foundation) and rigidly fixed in order to relieve the load on the support columns. The defective pillar is dug up and removed. After this, the pit is expanded to dimensions of 400x400 mm (for columns with a diameter of 200 mm), deepened 0.3–0.5 m below the base of the old support and prepared for installation of a new pile:
- A sand and crushed stone cushion is installed, which is carefully compacted.
- A hollow column is laid at an angle to the surface. It can be used as a metal or asbestos-cement pipe of suitable diameter.
- The base of the bored pile is arranged. To do this, 1–2 buckets of concrete are poured through an inclined pipe.
- After the solution begins to thicken, the column is reinforced and the trench is completely filled with concrete.
- The pillar is installed vertically and at the same time brought under the lower crown.
- The hole is filled with soil and compacted, and the house is lowered.
The corner of the house received a new reliable and durable support
An intact, skewed column can be straightened. To do this, a tunnel is made from the side opposite to the direction of inclination, the pile is installed vertically, and the space around it is filled with concrete.
Complete replacement of the building's foundation with a new one
Many owners of old mansions are interested in how to completely replace the foundation under a wooden house. This procedure is very labor-intensive, but in cases where the support structure is in poor condition, repairs do not make much sense.
The most popular method is in which a wooden house is installed on a strip-type foundation with a base poured at the required height. Before changing the foundation, a continuous trench is dug around the perimeter of the building walls, into which reinforced concrete is poured. Waterproofing work will also be required, and before the foundation is finally strengthened, it is insulated and covered with cladding.
The second method of overhauling the foundation of an old wooden house involves the use of screw piles. With strength characteristics comparable to a strip foundation, the updated foundation on screw piles is more economical and does not require much time and effort for installation. The supports of a wooden house are installed with your own hands using levers specially designed for this purpose. The installation depth of the pile for the foundation under an old wooden house should be at the level of freezing of the soil layer. The installed piles are connected by electric welding using a channel belt, creating a single structure.
What can you do to avoid future damage?
The reliability and durability of the foundation depend not only on its design and compliance with climatic conditions and soil characteristics, but also on proper hydro- and thermal insulation.
The cause of most problems associated with foundation subsidence are errors associated with choosing the depth of its underground part. Foundations whose base is below the soil freezing level require restoration or restoration work much less often than shallow foundations. At the same time, certain types of soil (for example, peat) require reclamation measures or the excavation of unsuitable earthen soil and subsequent replacement with imported soil.
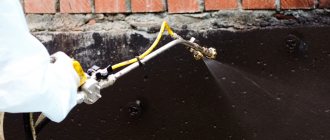
An important detail on which the safety of the foundation depends is proper waterproofing. Since the foundation is affected not only by wet soil, but also by atmospheric influences, the waterproofing system must be ensured by:
- wide blind area;
- vertical and horizontal waterproofing;
- effective drainage.
For wooden houses without basements, only horizontal protection against moisture penetrating into the wood will be sufficient.
High-quality waterproofing will protect the foundation from the damaging effects of moisture
For these purposes, Bicroelast, Akvaizol, Bipol and other rolled materials are used, which are laid between the foundation and the lower crowns. Waterproofing is laid in 2-3 layers along the edge of the foundation.
Vertical waterproofing prevents moisture from penetrating into the basement of a wooden house. It is applied both to the outer surface of the foundation and on both sides. In this case, insulation work is carried out in several ways:
- installation of roll or film materials on a layer of mastic;
- coating the surface with a bitumen-rubber or bitumen-polymer mixture;
- installing geotextile membranes or arranging waterproof locks using bentonite clay panels;
- applying penetrating cement-polymer compositions.
Special attention is paid to the drainage system - it should ensure water drainage no closer than 2–3 m from the extreme point of the foundation.
If the walls of the basement suffer from excessive moisture and fungi, then in addition to waterproofing, the base of the building is also insulated. For this purpose, special waterproof boards are used, which are glued to a layer of bitumen mastic and then sealed with plastic protective materials.
When choosing adhesive compositions for installing thermal insulation boards, you must ensure that they do not contain acetone or other chemical solvents.
Determining the causes of damage
Identification of the cause, strength, and extent of damage depends on the type of defect.
Minor delamination of the concrete surface can be easily eliminated, and the load-bearing capacity of the structure remains the same.
Subsidence, distortion, and fracture create conditions under which it is impossible to correct anything. The building is cracking with the foundation splitting. There can't even be any talk of repairs here - the house is being demolished, the foundation is completely dismantled, and everyone starts over again.
Cracks in the foundation are more common than others. Faults vary in size, depth, and correction methods. Repair actions are determined after a full inspection of the damaged areas.
Opening of cracks
If it is impossible to hire a repairman, it is better to spare no expense for a complete diagnosis. The more accurately the cause, effect, and parameters of the damage are established, the better the repair will be carried out.
During the examination, the specialist voices useful information, documents the results of the study in writing, and gives fairly clear recommendations. Good craftsmen often go to the meeting and advise construction stores.
Without access to specialists, you have to rely on yourself.
Inspection of cracked areas is carried out with beacon markers made from a cement-sand mixture with the addition of gypsum, or from a pure gypsum solution. Before laying the beacon, you need to make sure that the composition dries quickly, does not stretch and is brittle.
Gypsum beacon on a crack
The main criterion for the quality of a solution is the degree of adhesion to the main surface: peeling is unacceptable. To increase the adhesion force, the base is pre-cleaned and peelings are removed.
The finished mixture is placed inside the crack to a depth of 3-5 mm, distributing the composition 10-15 cm in the lateral direction, 3-5 cm in height.
At one point of damage, at least 2 markers are installed, which will be located at both ends of the crack.
Immediately after applying the solution, a thin longitudinal cut is made in the middle with a spatula or metal ruler. Each gypsum beacon is numbered and all mix information is documented for tracking purposes.
If cracking continues, the applied marker will also be damaged. The resulting depression is measured. Based on the data, it is possible to make accurate predictions about where the crack will advance and how deeply the concrete will be damaged.
Pit digging as a research method
The most accurate assessment method is direct access to an open area of the foundation through a pit - an excavated part of the soil.
For a large-scale inspection of the structure, several pits are dug over a long distance. Only after they are buried back can you create the next ones. The approach is justified by the fact that otherwise too much of the foundation will be exposed and problems will arise where there were none.
Drilling the foundation
The pit method is used to repair foundations, representing a small hole that only one person can fit inside. Typically, the width of the excavation does not exceed 1 m, the depth must correspond to the depth of the foundation - otherwise the scale of the problem cannot be understood.
In the process of digging a pit, the soil is examined, its composition is studied, and the exact level of groundwater flow is determined, if this was not previously known.
If you can immediately detect a breakdown, carrying out the restoration procedure will be a relatively easy task.
An example of repair using a pit can be seen in the following video:
Video: how to repair the foundation of a wooden house
In conclusion, I would like to remind you that work related to strengthening and replacing the foundation is particularly complex and risky. At all stages of construction, safety regulations must be observed and repair technology must be adhered to. Only in this case can you count on the fact that restoration measures will take place without unpleasant incidents and will give the wooden house a new life.
- Author: Victor Kaploukhiy
Thanks to my varied hobbies, I write on various topics, but my favorites are engineering, technology and construction. Perhaps because I know many nuances in these areas, not only theoretically, as a result of studying at a technical university and graduate school, but also from the practical side, since I try to do everything with my own hands. Rate this article:
- 5
- 4
- 3
- 2
- 1
(10 votes, average: 4 out of 5)
Share with your friends!
Base repair
The restoration process can be carried out using different methods; the final choice depends on the analysis performed.
If there are no cracks on top of the beacons, partial repairs are allowed; first, the gap that has arisen is widened. Then, you need to clean the surface as much as possible, prime it, and lay fresh concrete mortar.
For other types of damage and other causes of faults, more radical methods of eliminating problems are required.
Support liner
The method of laying the base involves deepening the support area of the sole part of the structure and increasing it. The increased pressure point will bear the imposed load.
The implementation of the process involves two options - partial or complete replacement of the masonry.
In individual areas, partial concreting is carried out, simultaneously covering up to 2 m of space. The deeper the support is laid, the larger the grip will be formed - the formwork under the mortar to expand the support.
If the base is made too deep, the grips are additionally reinforced by installing racks and beams. All that remains is to pour the concrete correctly.
The opening of the catch with concreting of the voids is carried out after it has been established that one form for filling overlaps the adjacent one.
Restoration work with clips
Reinforcement with concrete block clips is a solution for old masonry. It is not recommended to use wide blanks due to a large number of inconveniences with little rationalization. It is better to take two-branch elements that are not affected by torque.
You can use tubes pumping the solution and perform layer-by-layer filling.
Reinforcement with clips
The clip method allows you to strengthen the base throughout its entire thickness. Some craftsmen are inclined to use concrete; the solution will completely fill the voids of the masonry, significantly strengthening the base.
A trench is dug under the concrete blocks, up to 50 cm deep, 1 m wide, up to 3 m long. Holes are drilled on both sides, staggered, reinforcement is placed, and connected to the main frame.
All that remains is to set up the formwork and fill the voids with concrete mixture.
Using an expanded base based on the principle of a reinforced concrete jacket
It is possible to improve the foundation, a section of the wall of the main building, for which an increase in the supporting area of the base is used.
According to the general idea of implementation, the method is to install several grips every 2-3 m.
Extension of the foundation base
A single trench is dug around the building. Inside the excavated space, the bottom is covered with crushed stone, and holes are created on the base for transverse reinforcement.
At the junction of the wall and the plinth, a longitudinal beam is mounted, assembled, and the formwork is placed for cementing. All that remains is to pour the concrete, give it the necessary shrinkage, and cover it until it dries completely.
Reconstruction of the foundation with screw piles
Strengthening the foundation with screw piles must begin with preparatory work:
1. Disconnection of communications - gas pipelines, electrical networks, and so on.
2. Reducing the weight of housing - remove all heavy objects from the house.
3. Removing the floor covering.
To lift the box at home, mechanical or hydraulic jacks for light-duty trucks are used. The weight of the house is preliminarily determined - this is simple, knowing the density of the wood and the total volume of the tree, calculated from the thickness of the walls and the size of the house.
When lifting a house, it is important to consider the following nuances:
• it is necessary to arrange a wooden platform for a jack for the foundation pillars;
• the jack can only be installed under entire walls;
• lift the building only from the corner side;
• the selected part of the crown must withstand the load from lifting;
• the lower crown of the foundation is preserved by removing the brickwork and making a closed base;
• experts advise digging a trench along the length or at restoration points, which provides easy access to the foundation and the ability to measure the level of groundwater rise.
Important! Wooden wedges between the base and walls of the house will provide a safety net during the restoration process.
Stages of work to strengthen the base with screw piles:
1. Selection of typical piles of the required number, taking into account the characteristics of the soil, the depth of the soil freezing layer and the load on the future foundation.
2. Dismantling the old foundation - raising the house and removing elements of the worn-out foundation.
3. Installation of screw piles. It is necessary to initially install piles under load-bearing walls and their joints, screwing them deeper than the freezing layer of the soil.
4. Checking the horizontal placement of the top of the elements with a level.
5. Coupling of piles with a metal profile, the thickness of which depends on the future degree of load on the entire structure.
6. Installation of the house on a finished foundation.
Basic recommendations for restoring and strengthening the foundation
1. Repair work should always begin with determining the type of soil and its stability. This is best handled by professional engineers and surveyors - independent assessment of the condition of the soil is almost impossible. It is the type of soil that will dictate the depth of the foundation and the required characteristics.
2. It is rational to restore/strengthen the foundation if the first crown of the foundation is not broken. Otherwise, repair work is considered inappropriate.
3. Wooden piles must be provided with sufficient waterproofing, and thermal insulation material will protect the base from temperature fluctuations.
4. On sloping and swampy soils, when restoring the foundation, it is recommended to screw in screw piles, which will last up to 100 years and will not damage the soil layers. The pile foundation is easy to reconstruct - it is not necessary to replace all the piles, it is enough to replace only the destroyed ones.
Creating formwork and strengthening the foundation
Minor violations in the solidity of the base, cracks, are not a reason to panic. It is enough to strengthen the foundation by performing the work in the following sequence:
1. Dig a trench 30-40 cm wide close to the foundation.
2. Place metal pipes or suitable fittings with a diameter of up to 20 mm inside the trench.
3. Fill the trench with concrete solution, which will be absorbed into the ground. Add solution as needed until the trench is completely filled. Be sure to monitor absorption over 48 hours.
4. Install beacons, thereby checking for foundation shifts. If no gaps are observed, it means that the strengthening has yielded results.
Concrete mortar can be prepared by taking water and cement 1:1. To impart plasticity, it is necessary to add a plasticizer in an amount of 100 grams per 15 liters of solution. By adding sand and crushed stone you can ensure frost resistance.