There are often situations where construction conditions do not satisfy at least the minimum requirements of the standards.
Most often this is due to unsuitable soil conditions.
Excessive plasticity or fluidity, waterlogged or excessively loose soils, peat bogs and other problem areas force us to abandon generally accepted and traditional support structures.
In such cases, a pile foundation is used, which depends little on the quality of the upper layers of the soil, since it rests on deep dense rocks.
Considering the abundance of problem regions, the technologies for constructing pile foundations have been developed for a long time and allow some types to be installed independently.
What is a pile foundation
A pile foundation is a system of point supports immersed in the ground to a certain depth before contacting solid layers.
The length of the vertical elements can be significant , depending on the depth of stable soils and often exceeds the height of the above-ground part of the building.
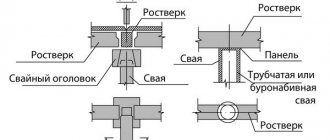
The upper part of the supports is rigidly connected into a single system, which allows you to distribute the load across all piles and obtain the most efficient mode of operation of the base. The strapping is called a grillage; it is designed to receive and transmit loads to the support rods .
According to the principle of operation, the operation of a grillage is in many ways similar to the functions of a strip base, but the difference between them is that the strip rests on the prepared soil surface along its entire length, and the strapping is installed on the top points of the piles.
This difference puts forward special requirements for the rigidity and strength of the grillage beams, the spans of which work only due to the own rigidity and strength of the walls.
What does using a pile-strip foundation give?
From the name of the scheme, it becomes clear that one design combines two completely different systems - pile and classic strip, most often in the form of a simplified shallow concrete strip. The costs of constructing such systems are noticeably higher compared to strip or piles, but thanks to the design features of a pile-strip foundation, it is possible to achieve higher quality characteristics of the foundation of a future home:
- The use of piles can significantly reduce the sensitivity of strip foundations to soil heaving. If the soil is excessively oversaturated with moisture, the pile-tape scheme will allow you to transfer most of the weight of the building box to more rigid layers of soil at a depth of 1.5-2 m;
- A concrete strip grillage on a pile foundation increases the rigidity of the foundation several times, so on a pile-strip structure you can easily build houses from lightweight materials, for example, foam block, aerated concrete, wood concrete;
- The presence of a “bridge” in a pile-strip system connecting individual piles does not mean that this option is suitable for buildings of any weight. Most often, the foundation is relatively cheap and rigid enough to support the weight of a frame or log building, no more than two floors high.
In some cases, for example, on quicksand, sandy and loamy soils with weak bearing capacity, and even with a slope and a high level of surface water, the construction of a pile-strip foundation is, in fact, the most optimal in terms of strength and cost of arranging a base for the building box .
For your information! You can, of course, drive reinforced concrete piles, but such a scheme will cost much more, and you will still need to assemble a frame from a steel channel or wooden beam for laying the walls.
In addition, for a foundation based on concrete piles, it will be necessary to make a fairly serious calculation and check the bearing capacity of the soil, and the driving of reinforced concrete supports, in contrast to the pile-and-belt version, is carried out with a diesel hammer. It is clear that it is almost impossible to do this part of the work with your own hands, especially since the rental of equipment and the piles themselves will cost half the cost of the entire pile-strip foundation.
Kinds
There are various design options for a pile foundation, each with its own specific characteristics.
According to the material of the supports there are:
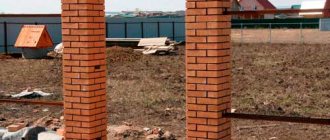
- Wooden . Sanded logs with a pointed end are used. The most ancient type of piles, which has practically disappeared at present. The reasons for this were the disadvantages of wood as a building material and the availability of stronger and more durable options. Occasionally found in private construction as supports for auxiliary or outbuildings.
- Metal . There are two types of metal piles - screw and driven. Screw piles resemble screws that are driven into the ground using cutting spiral blades on a pointed tip. Driven piles are not specially produced and are pieces of various types of rolled metal - channel, I-beam, rail, etc. They have high strength and are able to bend plastically while maintaining load-bearing capabilities. The disadvantage is the tendency to corrosion, which reduces the service life of the supports.
- Reinforced concrete . There are two types of reinforced concrete piles - driven and cast-in-place. The first ones are produced in specialized production conditions, have a robust design with stressed longitudinal reinforcement and are resistant to all loads. The latter are made directly on the site by filling the formwork (waterproof pipes) placed in the well with dense grades of concrete.
By load transfer method:
- Rack piles . They are supports that are in rigid contact with dense layers of soil. The depth of the shafts depends on the level of hard rocks.
- Hanging piles . They do not have support in the lower part of the trunk, using only friction on the side walls and partial support on the ground. There are both driven and cast-in-place friction piles. The load-bearing capacity depends only on the depth of immersion; for stuffed ones, it is enhanced by thickening in the lower part of the well.
By design:
- Hammers . They are a monolithic rod with a pointed end, immersed using mechanical action at the upper end.
- Printed . They are a concrete casting into a pre-prepared well. They have a lower load-bearing capacity than driven piles, but can be made independently.
- Screw . They are made from a pipe with a pointed tip and spiral blades. They can be installed independently, although in practice this is only used for auxiliary buildings or structures.
IMPORTANT!
All types of piles, regardless of design or material, are capable of working effectively on complex or problematic soils.
Advantages and disadvantages
Before installing the structure, you should familiarize yourself with the positive and negative sides of the issue and study important operational characteristics.
The advantages of a foundation made of reinforced concrete piles include:
- Positive results of construction in problem areas (except for rocky soil)
- Rapidity. The structure can be installed within 24 hours, while the traditional method of constructing a foundation requires at least 7 days. After this, the construction of load-bearing structures can be carried out immediately (the monolithic foundation allows work to continue only after 3-4 weeks).
- Reducing construction and excavation materials to a minimum.
- All-season. It is possible to form a foundation on driven reinforced concrete piles at any time of the year, regardless of climate and weather.
- Duration of use. Reinforced concrete piles for the foundation are very wear-resistant and can withstand any weather disasters. The term of their suitability can be about one and a half hundred years.
- Strength. Reinforced concrete foundation piles, in the construction of which metal rods are used, are characterized by the ability to carry multidirectional loads, which is a necessary quality in unstable areas.
The foundation on driven reinforced concrete piles has only a few disadvantages.
- Possibility of subsidence or curvature of the foundation. There is always the possibility of unreliable characterization of deep soil, since it is not possible to consider a multi-meter layer.
- Mandatory use of expensive specialized equipment for installing piles.
- The lack of a basement and basement is a real inconvenience that people who decide to build a foundation on reinforced concrete piles will have to face.
Device
The main part of the work on creating a pile foundation comes down to immersing the trunks in the ground.
This is the most difficult and critical stage, which determines the strength and stability of the entire system.
If failure, failure, or other problems occur during immersion, the ability of the entire base to perform its function is compromised. Any deviations during the work indicate non-compliance with the technology, unscrupulous geological survey of the site or low quality of piles .
The second stage is the creation of a grillage. It performs equally important functions and must meet all existing requirements.
The technology of creation directly depends on the type of piles, material of manufacture and parameters of the future house .
For light buildings, the grillage can be made of wood (a beam or a bundle assembled from an edged board until the desired thickness is obtained).
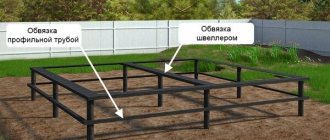
When using metal piles, it is customary to create a grillage from metal - a channel, an I-beam or a profiled pipe.
For reinforced concrete piles, the grillage is cast from concrete using a technology reminiscent of making a strip foundation.
NOTE!
Both stages of creating a pile foundation must be carried out by experienced builders or, at a minimum, under the supervision of a competent specialist. There may be violations of the technology or deviations from the calculated parameters , which must be noticed and corrected in a timely manner, which is not always possible for untrained people.
Stages of construction of a pile foundation
Marked area
To build a high-quality pile foundation with your own hands, you must clearly understand the instructions for its construction. It consists of the following (will be described step by step).
First, you need to mark and clear the area where the house will be built. This process must be approached carefully. Before you begin, you need to have in front of you a drawing of the house, indicating all the load-bearing walls, internal partitions, and other design features. Marking the site is not so easy.
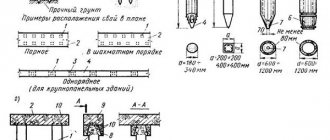
First you need to clear it, and then start marking the places where the piles will be located. Despite the fact that this is preparatory work, clear markings will save the entire structure from destruction. When marking places for piles, you must use the following algorithm:
- the distance between the piles should not exceed the minimum mark of 1.5 meters, and the maximum of 2.5 meters, and this distance between the piles depends on the weight of the structure, the heavier it is, the smaller the distance between the piles;
- the piles should be located under the load-bearing walls of the house, at their intersections, as well as in the corners and under the internal partitions of the house, it is also necessary to take into account what the distance between the piles will be, that is, the planning and drawing of the house will directly depend on the number of piles and the distance between them .
This is exactly the step-by-step instructions for planning, and the location of piles, and the step between them.
Taking soil samples
This step involves examining the soil and selecting the length of the piles and their diameter. You can learn about the properties of the soil in a particular area from various reference books that are in general use; if you have some questions, you can contact specialists who will conduct geodetic exploration of the area.
How to calculate diving depth
The depth of immersion of piles is determined based on their type:
- Rack piles are immersed to the depth of dense layers of soil. In this case, no calculation will help; it is necessary to drill test wells and determine the true level of solid soils.
- Friction piles have a load-bearing capacity that is determined by the properties of the soil and the length of the side surfaces. The higher the load, the longer and, accordingly, deeper the pile must be immersed .
- Bored piles rest primarily on a wide platform - a cushion. Its area is determined by the soil resistance and the magnitude of the vertical load.
- For screw piles, the immersion depth is determined by the level of soil freezing in winter. This parameter is relevant for all types of piles , but other types usually sink much lower.
A complete engineering calculation of immersion depths is a complex and responsible task, which not all specialists risk taking on.
Therefore, independent calculation is strongly not recommended; you should contact a specialized design organization.
At a minimum, you can use an online calculator.
Calculating height above ground
The height of the pile foundation above ground level is determined by the height of the top line of the grillage.
Selecting the correct value is determined by several factors:
- Snow cover thickness in winter.
- Possibility of flooding, water level during spring floods.
- Groundwater level.
- Temperature conditions in the region.
By comparing these parameters, we come to the choice of the optimal height of the grillage.
The optimal values are considered to be 30-40 cm for conventional bases and 1.5-1.7 m in the presence of a basement.
IMPORTANT!
The possibility of equipping a basement room is extremely rare; most often, a technical underground is installed in which communications are located.
Step-by-step DIY installation instructions
Let's consider the procedure for creating a pile-screw foundation.
The work is carried out in stages, the sequence of actions has a strictly defined sequence:
Preparation
A pile-screw foundation has an important feature - it can be created on uneven terrain that does not require preliminary leveling (planning).
It is possible to build on slopes or in folds, which makes it possible to effectively use areas that are inconvenient from the point of view of traditional construction . Therefore, preparatory work can be reduced to clearing the area of plants and foreign interfering objects.
Make markings and mark all pile installation points with pegs. Then, small (up to 30 cm) recesses are made at the installation sites, which facilitate the entry of the blades into the ground.
The fertile layer of soil creates noticeable resistance due to the abundance of roots, plant stems and other obstacles, so it is better to remove it.
Driving piles
Installation of screw piles is done either manually or mechanically. Manual installation is possible in the presence of relatively soft soil without man-made inclusions or rock debris .
The diameter of the barrels available for manual immersion is limited to 87 mm.
The most common piles with a diameter of 108 mm are often too difficult due to the high soil resistance.
The machine method allows you to obtain high-quality installation of screw piles, observing a certain angle, screwing force and depth.
The power of construction equipment allows you to freely work with piles up to 159 mm in diameter, which is quite enough for the construction of a fairly large private house .
The piles are driven to a predetermined depth. Usually it is determined by the level of occurrence of dense layers, or the soil resistance force exceeds the force permissible for a given shaft, which breaks off the technological hole.
A pile that has reached the required level of adhesion to the ground rotates with great force or stops doing so altogether..
You cannot try to continue rotating - the welding may not hold up, the blades will come off and the pile will become unable to perform its functions.
NOTE!
When installing screw piles, it is forbidden to reverse - try to unscrew the trunk back. This weakens the adhesion of the blades to the ground and eliminates the possibility of repeated immersion in this place .
Harness
After installation of all piles, trimming is performed . This is a procedure that allows you to adjust the height of trunks protruding from the ground to a single level and form them into an even horizontal plane.
Install a laser level with the function of constructing planes at the required height and cut off excess sections of pipes.
After trimming, the internal cavities of the piles are filled with concrete, increasing their strength.
Then they install the strapping (grillage) - a belt that connects all the piles into a single system and at the same time serves as a supporting element for the walls of the house. The cut tops are covered with caps with horizontal platforms on which metal or wooden beams are installed.
For fixing on the platforms there are technological holes for bolted connections.
IMPORTANT!
Sometimes the trim and grillage are different elements. The piping is performed below the level of installation of the grillage and connects all the piles together, forming a system like a lattice. Metal sections of a channel or I-beam are used, welded to the walls of the trunks .
DIY pile-strip foundation: step-by-step instructions
Today construction work is quite expensive. Therefore, many owners of suburban areas decide to build a strip foundation on piles themselves, using improvised means. This type of work has some peculiarities.
Cleaning up the area
Preparing the site for installing a pile-strip foundation begins with cleaning the area. This may take several days. Before the construction of a strip foundation on piles, garbage is removed from the territory, trees and bushes are removed. At this stage, some difficulties may arise.
It is important to determine a place for the fire in which unnecessary garbage will be burned. It should not be stored on site. The fireplace is dug up a little. This is necessary to comply with fire safety requirements. Stumps are removed with roots.
When clearing the area for a strip foundation on piles, it is important to remove weeds. The better this work is done, the fewer problems will arise in the future with landscape design. In areas where there will be beds and a lawn, remove the soil layer to a depth of 4-5 cm.
Axle breakdown
First, the site where the strip foundation on piles will be erected is leveled. Then they make a breakdown. This process involves transferring the plan from paper to the construction site. Using cords and cast-offs, mark the position of the foundation axes, the width of the tape and the points where the piles will be installed. All this data is determined based on preliminary calculations.
Before choosing materials and starting construction work, determine the type of structure and think through an action plan. It includes a detailed layout of the house on the territory, features of the foundation on stilts.
Then the breakdown begins. This type of work has several specific features, so it is better to contact surveyors. This is due to elevation changes on the site. If they are not taken into account, in the future there will be problems associated with shrinkage of the house and deformation of the foundation. The cost of axle alignment is affected by the volume of work.
Layout consists of transferring the dimensions of the building axes to the site and creating markings. Afterwards, trenches are dug on the piles for the foundation. The dimensional axis is a conditional guide indicating the center or boundaries of the location of floors and formwork. The guides correspond to the dimensions of each supporting structure and the foundation as a whole.
You can lay out a strip foundation with bored piles using the following tools:
- red paint;
- hammer;
- red rags;
- nails;
- pegs;
- construction tape;
- boards;
- wire or twine.
The casting angles must be created ideal. This will allow you to properly lay out the foundation. Otherwise, the walls will be at an angle to each other, which will reduce the strength of the entire structure. When creating floors from standard materials, the dimensions of the axes should be exactly transferred to the area for the strip foundation on piles. It is important to constantly take measurements and triple check each result obtained.
Dimensional axes are lines that show the dimensions of the house foundation and its shape on the site. Finding the overall axles is quite simple:
- Two points are placed on the site, distant from each other at the distance of the longest axis, located horizontally.
- Indicate on the diagram of a strip foundation on piles the distances between the guides and the connection of the base to them.
The procedure for laying out a strip foundation on piles is as follows:
- identify the main axes;
- apply them to the site;
- carry out stripping (attach house markings to the ground).
It is quite difficult to determine the main axes, so it is better to invite surveyors for such work. The main axes are called perpendicularly located lines starting from the supporting structure to the central points. Where they intersect, there should be an intersection of diagonals built from the corners of the house.
Then, using the available data, you can find out the location of other points. The place where the main axes intersect is marked with pegs. When building a small house with a simple shape, it is not necessary to break it down. You can immediately find the overall axes. They are fixed with wooden stakes and reinforcement so that they do not become loose.
Professional builders adhere to two mandatory rules that help when marking the foundation:
- If the building is rectangular or square, you should carefully ensure that each corner is right.
- If the floors are made of concrete panels with large voids, you should ensure that the dimensions of the strip foundation correspond to them.
After the breakdown, you will need to dig trenches whose width corresponds to the width of the tape and formwork walls. The depth is selected based on the depth of the foundation strip. It should be below zero, taking into account the gravel-sand cushion. The average is half a meter.
When installing a pile foundation on soft soils, settlement may occur. To prevent this from happening, it is worth performing a series of calculations that will help determine the limiting states of soils. When calculating the settlement of a pile-strip foundation, the main value is the total settlement indicator S, which should not be greater than the maximum permissible deformation Su.
Excavation
If there is stable soil on the site, the width of the trench is chosen equal to the width of the foundation strip on piles. In such cases, formwork is not required. Its role will be played by the walls of the trench. If the soil is unstable, the width of the trench increases - with the expectation of installing formwork for the foundation on both sides.
After calculating the pile-strip foundation, wells are drilled along the axis of the trench to a depth exceeding the soil freezing level by half a meter. The sand cushion occupies 30 cm. Wells are drilled with a hand or garden drill. The distance between them is no more than two meters. The diameter of the wells should be greater than 1/3 of the width of the strip base.
After all the holes are made, sand 10-20 cm high is poured into the bottom of each well. The pillow is compacted. It is capable of well protecting the foundation strip on piles from water. Then piles are installed in the holes. The walls of the wells are covered with roofing felt.
You can reduce the cost of constructing a pile-screw foundation by doing the construction work yourself. The concrete is mixed on site. Usually the power of concrete mixers is not enough to pour everything at once. Therefore, first a pile field is created, and only after that the strip base is concreted. A foundation made of tape on piles can be made monolithic if you order mixers. In this case, concrete is poured directly into the piles and MZLF formwork.
Pile field
A pile field is a platform for a strip foundation on which piles are installed according to a pre-created pattern. Usually this is a continuous field prepared for the construction of a house. Pile fields consist of two or more rows of supports. In fields with a small area, it is permissible to place piles in a row. Typically, this option is applicable when constructing foundations for various fences.
A continuous field is an area prepared for the construction of a monolithic foundation or a prefabricated foundation. Often piles are installed in a staggered pattern.
When designing a pile field for a strip foundation, the following parameters are taken into account:
- Selecting the type of piles taking into account the characteristics of the soil on the site.
- High groundwater level.
- Determination of pile sizes taking into account the type of grillage and the expected load on the base.
- An indicator of the bearing capacity of a pile. It is calculated based on the data on the ultimate soil resistance, length and cross-section of the pile.
- Number of piles and their placement scheme.
When constructing a pile field, it is important to keep excavation work to a minimum.
Installation of foundation piles
When installing a pile-strip foundation with your own hands, first formwork is made under the supports, then reinforced and filled with concrete. If the foundation is installed on screw piles, small holes - 10-15 cm - are dug in the places where they are installed.
When purchasing ready-made concrete piles, the cost of building a foundation increases significantly. They are driven into the ground using special equipment. It is important to create a footing for each pile. Concrete should be poured into the pipe to a depth of 40 cm, and then the pipe should be raised by 30 cm. From below, the concrete begins to spread and forms a heel - an extension on which each support of the pile-strip foundation is fixed.
Metal piles with blades are twisted manually or using special equipment. In the first case, it is necessary to monitor their vertical position. A crowbar is inserted into the technological holes on top of the pipe, and hollow pipes are put on its ends. They serve as levers with which it is easy to screw the piles into the ground.
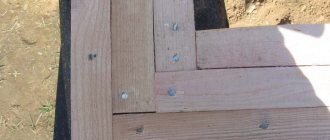
Making formwork for the foundation
A sand cushion is poured into the bottom of the trench for a pile-strip foundation. It is made at least 15 cm. The pillow should be laid in an even layer along the entire perimeter of the foundation. As for piles, sand is filled with water and then compacted. To give the structure additional strength, you can fill in a layer of crushed stone.
Then they begin to manufacture the formwork for the strip foundation on piles. It is usually made from chipboard, boards, and special panels. If it is necessary to use the formwork material in the future, it is worth covering the walls with plastic film.
The finished shields are nailed to stakes driven into the ground every meter. Supports for the formwork walls are located on the outside. Additional strips are nailed along the bottom and top of the formwork to hold the walls.
When completing the installation of the formwork, you should make sure that it is located above the concrete pouring mark. Then bricks can be laid on the bottom and reinforcement can begin. For reliability, it is worth strengthening the foundation walls with ties and struts.
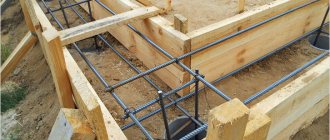
Reinforcement of piles and grillage
Steel rods are placed inside the formwork. They should be laid in three directions, forming a three-dimensional grid. At the points where the rods intersect, they are tied with knitting wire. Be sure to tie the reinforcement of the strip foundation and piles together. This connection ensures the strength of the base.
There should be 3 rods for each pile. They are mounted in the form of a triangle. The ends of the rods should protrude 20 cm above the top of each pile. To enhance the reinforcement, it is possible to create a solid frame from rods.
All that remains is to mix the solution and begin pouring the pile-strip foundation. It is worth remembering the method of creating the base when concreting piles. During pouring, the solution is compacted by bayonet.
Features of pouring a pile-screw foundation
Portland cement grades M200-M500 are chosen as the binding element of the concrete mixture. Subtleties of preparing and pouring a pile-strip foundation:
- The solution is made of medium density; it should not be liquid.
- The pouring of strip foundations on piles is carried out simultaneously over a short period of time. First, all piles are concreted. However, this should be done only after connecting all the reinforcement bars - both pile and strip.
- First, it is recommended to fill the load-bearing structures (piles). Then they are left for a couple of days to allow the concrete to gain strength. It is better not to fill the tape immediately after the piles. This is explained by the fact that it is quite difficult to achieve a tight seal on a pipe on a sand bed. Some of the concrete will still leave the bottom of the pipe.
- When the concrete gains strength, the strip foundation is poured simultaneously at several points. To do this, it is better to use several concrete mixers. The process must be automated.
- After filling the tape part of the base, it is left for a week. During this time, the concrete will gain half its strength.
After shaking the foundation, check the horizontality of the grillage. If necessary, level the surface.
Important! The foundation should not be poured in wet weather. If this condition is not met, the strength coefficient of concrete will decrease significantly.
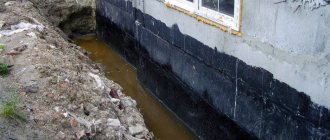
Waterproofing and ventilation
When constructing a pile-screw foundation, it is important to protect it from moisture. It is also necessary to ensure proper ventilation of the structure. Asbestos-cement and metal pipes do not require waterproofing. If ready-made pipes were not used for the piles, they are covered with the same waterproofing as the concrete strip.
Features of creating reliable waterproofing of a pile-strip foundation:
- Sheets of roofing felt are rolled into a tube and placed in the pile hole. In the trench, all the walls are lined with this material and covered on top.
- Surfaces covered with roofing felt can be additionally treated with hot resin.
- A modern mixture added to concrete creates reliable waterproofing not only from above, but also protects the structure from the inside.
When choosing any material, waterproofing is done for the sole purpose of protecting the concrete strip foundation from the destructive effects of moisture and protecting it from mold. Afterwards they do ventilation.
Parts of an asbestos-cement pipe are laid horizontally along the perimeter of the strip base and then covered with sand. This is necessary so that concrete does not get into them. After the solution has hardened, the pipes are removed. The result is ventilation holes.
Pouring the foundation with concrete
One of the final stages of constructing a pile-strip foundation is pouring concrete. It's better to do this kind of work in one go. This will require several people and more than one concrete mixer. In this case, the tape will be monolithic, which will give it strength. During the pouring process, the solution is compacted using a submersible vibrator.
When pouring piles, it is important to control the density of the solution. This will help eliminate voids inside the piles. Otherwise, the supports will collapse. To connect concrete piles to a strip foundation, you should not wait until the concrete in them has completely hardened. It is necessary to start pouring the tape two days after concreting the piles.
When making concrete yourself, it is important to maintain the optimal proportions of sand and cement. It is better to choose a high quality binder (not lower than M200). This will prevent cracking of the monolithic tape. If the weather is hot after pouring, the foundation should be watered. At high humidity it is covered with film.
To reduce time, you can buy ready-made concrete, which is supplied in a special mixer. To save money, prepare the solution yourself. In this case, you will need to prepare sand, gravel and cement. It is important to observe the following ratio of components of the solution for the strip base on piles:
- one part binder;
- three parts sand;
- four to five parts crushed stone or gravel.
The volume of water used is monitored visually. The solution for a pile-strip foundation should have a consistency that is not too liquid and not too thick. The quality can be improved by adding various modifiers and plasticizers. It is not recommended to violate the proportions, as this will significantly reduce the quality of the concrete.
Thermal insulation
Typically, the design of a pile-strip foundation provides only external insulation and moisture protection. The side walls form a base, which should be insulated. For this work use:
- Bitumen. This material covers the side surfaces of the grillage. This waterproofing protects the base well from moisture.
- Polystyrene foam or polystyrene foam. These materials are polymer thermal insulation. It is glued to bitumen or to a leveled grillage.
- Then each seam is sealed with polyurethane foam to prevent the formation of cold bridges. However, when choosing penoplex, you should not install it in several layers. Sheets of this material have special projections and depressions for reliable connection with each other.
- Reinforcing mesh is used as additional thermal insulation. It is used to protect insulation material from rodents, and also as a base for plaster applied to the base.
- When the adhesive composition dries completely, a mesh is tightened under the slabs. The top of the structure is plastered.
The work of insulating pile-strip foundations differs little from the thermal insulation of standard strip grillages. Along the perimeter of the building a base is created from ready-made blocks or bricks. From the inside, the foundation space is filled with expanded clay. This type of work is complex and time-consuming.
Features of insulation of a pile-strip foundation:
- First, waterproofing of all areas of the base is done and drainage is provided under the blind area. All open elements of the grillage are covered with roofing felt or bitumen. It is possible to use a liquid waterproofing agent. Its only drawback is its high price.
- Then the vertical surfaces of the strip foundation on piles are waterproofed - both inside and outside. The waterproofing technology is quite simple - it is similar to the method of insulating a grillage from the outside. The upper part is covered with roofing felt. The well itself is made with a larger diameter than the size of the pile.
- After installing the piles, a bulk cushion is created. It is performed between the zero mark and the lower level of the strip foundation on piles. The pillow is made from a mixture of expanded clay and sand.
Despite the variety of modern insulation materials, people often prefer to use traditional insulation methods. The reasons for this behavior lie in the durability of the methods used. When insulating with traditional materials, it’s easy to do all the work yourself. A properly executed blind area, which has an optimal slope and waterproofing of the junction of the plinth with the concrete platform, can provide good protection from rain. Inexpensive and lightweight foam is excellent for insulation.
However, polystyrene foam is suitable for soils with high humidity. It is better to use waterproof thermal insulation materials, since only they can withstand the prolonged action of groundwater.
Any technology used to insulate a pile-grillage foundation has its pros and cons. It is important to take into account the cost of materials and work performed, the features of the strip foundation and its shape. Therefore, it is important to independently determine how to insulate a structure on stilts and how to save on construction work.
Scheme for creating a bored base
Construction of a bored foundation is a more labor-intensive task.
Procedure:
Site marking
Excess vegetation or objects are removed. The surface of the site is planned, and if necessary, the top layer of soil is removed .
Then, using pegs, the points for creating bored piles are marked.
It is necessary to monitor the accuracy of compliance with the design data, carefully measure all distances.
Be sure to check the diagonals and make sure they are equal. If any discrepancies are found, errors are corrected immediately.
Drilling of the wells
Based on the marking results, wells are drilled . The depth is determined in the project; only the creation of depressions in the ground is required.
Sometimes a hand drill is used, more often special equipment is used, which significantly speeds up the work and improves quality.
If you need deep wells - from 3 m or more, manual methods cannot be used.
Reinforcement
Formwork is lowered into the finished well, the role of which is played by a piece of plastic pipe of the required length and diameter..
They often make do with a pipe rolled from roofing felt. It remains in the well and performs waterproofing functions.
Then the reinforcement frame is assembled . Usually it is a spatial lattice of 4 vertical working rods connected by transverse sections of thin smooth reinforcement.
The dimensions of the frame should allow it to be lowered freely into the well, but not allow it to dangle too freely in it.
The optimal distance of vertical rods to the walls of the well is 3-5 cm.
Pouring concrete
Heavy grades of concrete from M200 and above are used for pouring . Either ready-made material is used, or one made independently right there on the spot.
The entire cavity of the well is filled with concrete and bayonet is performed - a long rod is used to pierce the concrete, removing air bubbles from it.
After pouring, the concrete should be cured to gain structural strength. This period lasts from 20 to 30 days depending on the diameter of the wells .
Harness
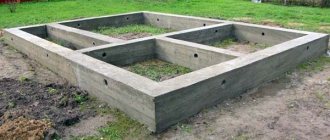
The piping of drilled wells involves the creation of a grillage - reinforced concrete tape.
Its dimensions are close to the parameters of a shallow strip base, therefore the entire method of manufacturing a concrete grillage is as close as possible to the tape casting technology.
The only difference between them is the lack of support on the ground, which forces the construction of formwork in the form of a trench with a durable bottom.
The result is a powerful and durable concrete belt located under all load-bearing walls and connecting bored piles into a single support system.
Foundation on reinforced concrete piles: pros and cons
Reinforced concrete piles are capturing the low-rise construction market. The appearance of concrete rods alone inspires confidence. Associations with the “big brothers”, which form the basis of high-rise buildings, also play an important role. However, some consider such a foundation to be the most reliable, while others are suspicious.
There is no clear answer to the question “who is right?” we won't find it. The truth is that reinforced concrete piles have their pros and cons, just like any other product. Let's talk about this in more detail in this article.
What to pay attention to
The design of a reinforced concrete pile is based on reinforced high-strength concrete. The KKZM plant installs foundations on reinforced concrete piles made of M300 concrete. The products comply with the requirements of GOST 19804-2012.
The supports transfer the load from the building to the ground. As a rule, they are made from concrete with a high level of frost resistance, that is, the product can withstand severe temperature changes. This is very important for the foundation of a residential building in our climate. When choosing piles, pay attention to the frost resistance class, which should be at least f150 or f200.
Advantages of reinforced concrete piles
Reinforced concrete piles can, perhaps, only be compared with piles. And the first thing that concrete supports benefit from is load-bearing capacity . Depending on the cross-sectional size and type of soil, one piece can withstand a load from 9 to 60 tons. For example, paired with a shallow grillage of 600x400 mm, you can safely build a three-story brick house. Metal piles cannot boast of such load-bearing capacity.
Another advantage is the material from which they are made. Concrete practically does not break down in the soil . Due to this, the service life exceeds 100 years. In addition, this type of piles also has such advantages as resistance to pressure changes, fire resistance and moisture protection, and during installation it is almost impossible to move from the design axis.
Reinforced concrete piles can be installed in one to two days. Read more about this...
How to install?
For installation of reinforced concrete piles, a mini-pile driving machine is used. The tracked vehicle moves independently over off-road conditions, mud and snow. Thanks to the adjustable legs, the machine can drive piles even on small slopes. It can be used all year round at temperatures from -25 to +40⁰.
Using this installation, you can drive up to 40 reinforced concrete piles with a cross-section of 150x150 mm in one work shift. That is, it is possible to install the foundation for a country house in one day. It is possible to deliver the car to the construction site using a tow truck.
A little about the cons
The disadvantages of reinforced concrete piles include the lack of economic feasibility. For example, if we compare reinforced concrete and screw piles, the former are more expensive, have a greater load-bearing capacity, but are located on the pile field in the same way as the latter. It is impossible to grow them during installation, since the standard length is 3 meters. If there are large differences in the area, then it will not be possible to use a mini-piling machine, since there will be nowhere to install it. In this regard, screw supports benefit. And finally, if you decide to use a pile foundation, you must take into account that regardless of its type, equipping the basement floor will be problematic and sometimes impossible.
Summarize
What can be built on driven piles? Almost the same as on screw piles: fences, garages, hangars, houses made of timber, logs, bricks, aerated concrete and foam blocks, frame-panel buildings, bathhouses, gazebos and industrial buildings. It is unlikely that it will be possible to install a pier or jetty. As for low-rise construction of residential and guest houses, reinforced concrete piles with a section of 150x150 mm and 200x200 mm with a length of 3000 mm are best suited.
Tip: when choosing, consider the type of structure and soil. If you decide to build a bathhouse or the site has waterlogged soil, then screw piles are ideal. If the project involves a brick house, then it is better to opt for reinforced concrete driven piles.
Grillage technology
Installation of a grillage is the process of creating a load-bearing belt for walls.
Procedure:
- Construction of formwork. A durable gutter is installed from board panels, the internal dimensions of which repeat the cross-sectional shape of the grillage.
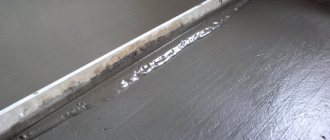
- The inner surface of the formwork is hermetically covered with a layer of polyethylene or roofing felt. This is necessary to prevent concrete leaks during pouring.
- The reinforcement cage is assembled and placed inside the formwork. It is welded to the armored well belt , forming a single frame for all elements.
- Concrete is being poured. The process must be completed in one go, breaks are not allowed. Pouring is carried out from different points, evenly distributing concrete along the entire length of the formwork.
- After pouring, the tape is covered with burlap or polyethylene and kept for 28 days. The formwork can be removed after 10 days .
- The finished grillage is carefully waterproofed and proceeds to further construction.