Frame houses are increasingly appearing in our country. Although building such a house is not difficult, knowing some of the nuances will help maximize the service life of the building. One such nuance is the lower trim of a frame house. It acts as the main support of the entire structure, and errors during installation can provoke premature destruction of the house. What is a bottom harness and what do you need to know about it?
Removal of load-bearing walls beyond the pile foundation
Sometimes private developers try to find solutions that allow them to save on the purchase of building materials and the work of screwing in additional piles. At the same time, they forget about the strength of the building structure, which can be broken very recklessly.
Here is an example of a gross violation of construction technology; the photo shows the removal of the outer wall beyond the boundaries of the pile row.
What can you recommend to people who prioritize questionable savings? The most important thing is to avoid self-indulgence, and then everything will work out for you. If building regulations provide for the installation of piles under each corner or wall of the future room, then so be it. There is no need to make any overhangs or indentations that are not supported in the form of a pile firmly screwed into the ground. This will not lead to a reduction in the cost of construction, but it will provide additional problems for the developer.
Guffych FORUMHOUSE user
If you make an overhang or indentation, then this structure will hang on the logs. In this case, you will have to make a double strapping from the inside and connect it somehow with the external overhang (so that the structure does not completely fall apart). It won’t be cheaper (due to savings on piles), since you will have to spend money on strengthening the lower floor, but this will add problems.
If you plan to add additional architectural elements to the house (a veranda or, for example, a porch), their corners should also be supported by metal piles.
Land user FORUMHOUSE user
In general, according to the technology of constructing a pile-screw foundation, piles must be placed under all cuts, corners and load-bearing walls. This is the most important rule.
Trim installation options
Before performing all the work, it is worth deciding on the type of foundation piping. Currently, grillage equipment methods depend on the type of raw materials used, the thickness of the beam and the material capabilities of the developer.
Installation of piles with fasteners
The most popular of them are:
- Fitting onto threaded fasteners. It is important to place emphasis on correct thread calculations, since errors in determining the load can lead to detrimental consequences.
- Fastening using a welding machine. The only option for attaching metal piles to grillage beams made of similar material. In the case of using various types of foundation, laying the grillage beam on the pile head is carried out without the use of fastening devices. With this option, it is important to take into account that the width of the grillage and cap parts should match as much as possible.
- Installation with special clamps. The presented method is universal and suitable for each of the materials used. It is also the most rational type of fastening of beams and piles with a small thickness of transverse elements.
Timber or board - which is better?
Let's talk about what material is best to use to create a wooden frame. Construction regulations allow the use of solid wooden beams (150x150, 150x200, 200x200) or timber sewn from several boards (50x200). Laminated timber qualitatively replaces solid timber and even surpasses it in some characteristics. Three boards sewn together replace a beam with a section of 150x200, while four boards are similar to a beam of 200x200.
The beam, one side of which is 200 mm, is laid on the heads with the smaller side. The height of the strapping is equal to 200 mm.
Both options (both with timber and with boards) are popular and both are correct. At the same time, having studied the advantages and disadvantages of each material, many developers make their choice in favor of stitched boards.
AlexSpb User FORUMHOUSE
Why do you need to use 150*200 timber? Knock down 3 50*200 boards instead and don’t bother with this log. This topic constantly comes up on the forum.
The word “log” was not mentioned by the user by chance. Solid timber is a relatively heavy building material and, with a limited number of workers, moving it from place to place (even on a small construction site) will be very difficult. In addition, solid timber does not resist bending well (worse, in any case, than boards placed on edge), which makes its use less practical.
Boards, unlike timber, must be firmly connected to each other before installation on piles. And these are additional costs, and this, perhaps, is their main drawback.
builder FORUMHOUSE user
The boards are nailed together with nails in two rows with a pitch of 20 cm. At each head they are fastened not with one wood grouse, but with four.
As for the length of the nails: for a composite beam of three boards (50x200), nails with a length of 90 - 120 mm are sufficient. They are made on both sides in a checkerboard pattern, as user builder indicated. The distance between the nails is 20...45 cm. If the beam is made up of four boards, first 3 boards are knocked together, then the fourth is attached to them (with the same nails).
Now let's talk about the "grouse" mentioned in the quote. “Capercaillie” is a fastening element - a self-tapping screw, the head of which is made in the form of a hexagon (for a wrench or impact driver).
With the help of a capercaillie, the beam is attached to the head of the pile (the capercaillie is screwed in from below).
The diameter of the capercaillie for attaching the strapping beam is 8...10 mm, its length is 100...150 mm.
To prevent the beams or composite beams from splitting while screwing the wood grouse, a hole must be pre-drilled in the wood.
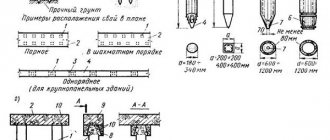
A small table will help you determine the diameter of the drill.
| Thread diameter, mm | 6 | 8 | 10 |
| Drill diameter, mm | 4,5 | 6,5 | 8 |
Timber strapping technology
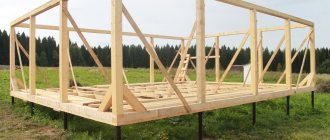
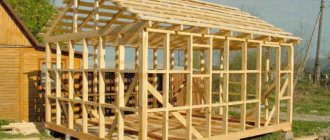
Most cases of using timber frames relate to the construction of frame houses on bored or screw piles.
Procedure:
- Cutting beams to length 200x200. Since a half-timber connection is usually used, the length of each span is measured in full, without taking into account the thickness of the adjacent beams.
- Laying the perimeter, connecting at the corners. A double layer of roofing material is laid on each head. The connections are sealed with jute strands .
- The timber is fixed to the heads using “wood grouse” - special wood screws with hexagonal heads.
- After laying the external beams, they begin to install the internal spans located under the load-bearing walls. Above the corresponding piles, recesses are made to the width of the beam (200 mm) and to half the depth (100 mm) . Suitably prepared connecting elements of the internal spans are placed in these recesses.
- All parallel spans are connected with additional beams or boards installed on the edge. Self-tapping screws and galvanized corners with stiffeners are used for connections.
- The surface of all wooden parts is coated with an antiseptic and fire retardant composition . After drying, apply a layer of waterproofing (hot bitumen or bitumen mastic).
Technology for connecting and extending timber
The length of a wooden beam (both solid and composite) rarely corresponds to the distance between the pile heads. In order to adjust the beams to the dimensions of the foundation, they have to be cut or sewn together. When building timber, you must follow one important rule.
Any joints must have a support point underneath. This applies to both stacked beams and solid timber.
builder
The joints of the boards do not need to be made hanging. Join the boards at the pile heads.
By splicing timber in this way, you will increase the consumption of wood, but ensure the strength of the pile frame.
The beams on the pile heads also need to be spliced correctly. If a solid beam is spliced, then cuts are made on two adjacent beams. The upper half of the beam is sawed on one beam, and the lower half on the other. After this, both beams are connected into a lock. This connection is called a “half-tree connection.”
At first glance, everything looks extremely simple. But there is an important rule for connecting two elements of one load-bearing beam: both adjacent beams must rest on the head of the pile at the point of connection of the load-bearing beams, and not just one. First, let's give an example of an incorrect connection.
Dimc FORUMHOUSE user
The support area of the beam on the head (at the junction of two purlins) must have a length of at least 90 mm. In the figure, the beams are “cut” at the junction. One has the upper half cut off, the other has the lower half. If the beam rests on the pile head only with the “cut” part, then its working section should be taken as the cross-section of only this part. If the beam rests completely on the head (at least 90 mm in length), then everything is correct: the harness will work like a solid beam.
The purlin in this case is the supporting beam in the framework of the frame house.
This rule also applies to corner trim joints. Here are examples of correct beam connections.
Basic beam connection diagrams (top view).
In order for the beam to have a sufficient support area, the pile heads must initially have dimensions corresponding to the cross-section of the beam.
The question naturally arises: how to lay beams at the junction of several beams (for example, if three beams are joined at once on one head)? This is what the experience of our users suggests.
Dimc
Beam junctions can be arranged in two ways. In the first case (when all the beams are load-bearing), in order to provide a sufficient support area, it is necessary to increase the head. In the second (when only one beam is load-bearing), we place the load-bearing beam on the head, and the auxiliary beam can be attached to a suspension - such a part (in fastener stores it is called a “beam holder”).
The increase in the support area is carried out according to the following scheme:
With the correct placement of piles, even auxiliary beams will have several points of support, which will make the foundation structure quite strong.
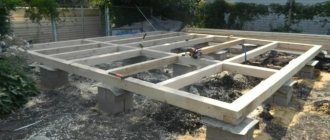
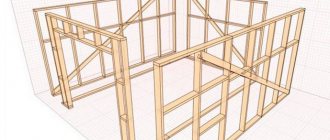
If you approach the design of the harness more rationally, if, where possible, you use beams of small width, then there should be no problems with constructing the correct connections. Here is an example of tying a frame house.
Dimc
I designed the framing as follows: the purlins (main load-bearing beams) marked with green arrows are load-bearing. The outer beams consist of 3 boards 50x200, the middle one - of 4 boards 50x200. And the beams marked with yellow arrows are auxiliary (not load-bearing) and consist of 1 50x200 board. They serve to increase the overall rigidity of the structure.
Stacked load-bearing beams (beams made of boards) at the junction points must also have a sufficient support area. We present to your attention examples of correct connections of inlaid timber in various sections of the strapping.
The listed recommendations should be followed, if only so that after assembling the wooden frame you do not find the following picture at the base of the house.
The need for tying screw piles and types
Screw piles must withstand the calculated static and dynamic loads from the house being built.
Parts of pipes protruding above the surface should not wobble, they must maintain a vertical position, rigidity during horizontal natural and man-made soil movements, and heaving. By type of strapping they are divided into:
- lower,
- top harness.
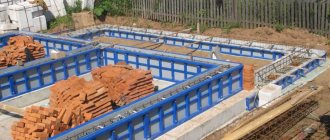
Bottom harness
The lower strapping is necessary to impart rigidity to the entire structure of the pile field. Designed to eliminate impacts from the mobility of the upper parts of the piles protruding above the surface, regardless of the composition of the soil.
Important! Filling the internal cavity of a screw pile with concrete with fine crushed stone increases by an order of magnitude the rigidity of the head against the influence of bending moments during soil movements.
The use of the lower frame is necessary even if the upper frame is subsequently mounted in the following cases:
- For foundations installed on rough terrain with protruding parts of screw piles >5 meters.
- When ground movements or high seismic activity in the construction area are possible.
- Significant vertical load from the designed structure.
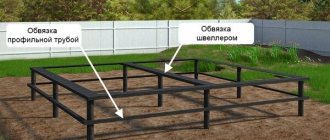
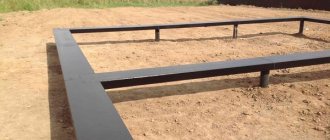
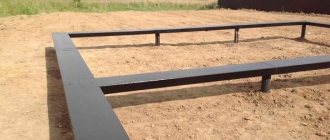
The lower trim is made of metal:
- channel,
- corner 50*50,
- thick-walled profile pipes.
The main installation condition is to weld metal profiles horizontally or with a slope only in the center of the screw pile body. The installation of guy wires with welding to the side parts of the pile is not allowed.
Only the weld seam will work during bending, and not the body of the metal profile.
An example of incorrectly executed lower piping with profile pipes. The entire structure is held together by small welds.
If it is difficult to determine the dimensions of the braces or a significant number of undercuts when fitting, it is recommended to first weld thick-walled metal plates to the middle of the piles, and then weld the braces to them.
Calculation of the lower trim, like a frame structure, should be carried out only in design organizations.
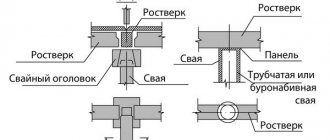
Upper harness
This option involves the construction of a grillage, which is a rigid frame that simultaneously serves as the foundation for the structure under construction. The frame is designed to withstand the loads from the building and evenly transfer it to all screw piles of the field.
The technology for arranging the top trim of screw piles is different and completely depends on the material used for these purposes. It is performed in the following ways:
- Wooden strapping made of timber or boards fastened into a package.
- Metal from channels, I-beams or thick-walled profiled pipes.
- Reinforced concrete with grillages installed on the heads of piles protruding above the surface.
In each case, it is necessary to follow the frame installation technology. Screw piles must be located strictly in one vertical plane, the difference in horizontal levels should not exceed 0.02% of the outermost piles along the entire length of the foundation.
Preparing timber for installation on piles
Preparing the harness for installation on piles involves treating the wood with antiseptic compounds, as well as cutting pieces of the required length. For antiseptic treatment, bioprotective compounds that can simultaneously perform the functions of a primer are best suited. You can find out the recommendations of developers regarding the use of certain protective compounds here.
Some developers strive to dry the wood to optimal humidity before installing the trim. What should be the moisture content of the timber used for the construction of the frame? Experienced users of FORUMHOUSE believe that if the wood has a marketable appearance, if its humidity is not prohibitive, then it is better to use it for the construction of the frame in the form in which it was purchased. And drying boards or timber at home will do more harm than good.
Kedruchu FORUMHOUSE user
The timber must be dried in a special chamber, and not behind a barn or under a film. They build the frame immediately after purchasing the wood, and it dries inside the building structure. Everything that had time to sit before construction is then only good for firewood, alas.
This advice is for those who do not want to end up with timber twisted in all possible directions after inept drying.
Technology of work execution
Fastening strapping elements
Professionals in the construction field recommend using a combination of two fastening devices when installing a foundation grillage on screw piles - a threaded connection and clamps. The presented method of fastening all connecting elements of the harness will ensure reliable contact and durability of the structure.
The only nuance when laying wooden beams is their preliminary treatment with antiseptic compounds, which helps prevent premature rotting of the wood and its subsequent destruction. Before carrying out work, it is more advisable to draw up a diagram of the placement of all connecting elements indicating the necessary measurements.
Fitting on a threaded connection
It is more rational to use the presented method in the case of placing U-shaped screw piles. To install the foundation piping with your own hands, you must perform the following steps:
- Install the grillage beam into the opening between the pile posts. Before laying the beam element in the U-shaped flange, we lay an insulating layer of roofing material treated with drying oil.
- We fix the connecting elements. From the sides we fasten the beam to the head using self-tapping screws, and directly to the pile - with anchors or through pins.
We recommend watching a video of how timber is fastened using fasteners.
To ensure a reliable connection, the screwed-in fasteners must be hammered so that the heads of the screws or anchors are slightly recessed into the wood. If the load on the foundation is increased, it would be a good idea to secure the corner joints with small metal corners. The selection of corners should be carried out depending on the weight and width of the timber being placed.
Fastening with clamps
If it is not possible to secure the beams using self-tapping screws and anchors, it is more advisable to fasten the component elements using clamps.
The installation procedure includes:
- Rectangular bars are laid on the heads of the pile elements. When using wooden beams, fastening is done using self-tapping screws, and in the case of metal products - by welding. During fastening, it is important to control the verticals of the elements being placed at the building level.
- After installing the guide beams along the entire perimeter, we lay a U-shaped board (in this case, it plays the role of a “clamp” or a special casing that ultimately secures the guides). The ends of the U-shaped element after placement should be directed downward, while it is advisable to remove excess material protruding beyond the head.
- fastening the components of the grillage (using a similar method to the presented method, we fix the sides of the head of the pile support and its central part by using screws and anchors, respectively).
Watch the video on how the elements of the strapping structure are fastened together.
Sequence of construction and fastening of the harness
First of all, the timber, impregnated with an antiseptic and cut in accordance with pre-designed markings, is laid out on the pile heads. The cuts and grooves in the wood are also made in advance.
After this, you can proceed to the most important stage - aligning the strapping along the diagonals and along the length of the beam.
Remember: errors made while screwing piles are normal. The pile heads can be shifted 1-2 cm away from the straight line, but the piping that is installed on them must have a perfectly even geometry.
If you end up with a diamond shape at the base of the house (instead of a clear rectangle or square), then you will never be able to align the walls and roof of the house. It is for this reason that you should concentrate your attention on the geometry of the harness, and not on the alignment of the heads.
The diagonals of the strapping, laid but not yet secured on the piles, must be checked and aligned several times. Only after this can the timber be secured at the corner points of the pile foundation.
Having secured the corners, you should check the geometry of the side and internal beams. To do this, use a rope stretched between the corners along each side of the harness.
The side and internal beams should be fully secured to the pile heads one at a time, checking them for displacements away from the straight line.
To prevent the strapping from coming apart during operation, the side and corner connections of the timber must be additionally secured with staples and special corners.
Subtleties of installing logs
The bottom frame of the frame house also serves as the basis for the subfloor joists. As a rule, boards of 50x200 or 250 mm format are used as logs. They are mounted edgewise between the strapping bars at a certain distance from each other. It is assumed that the presence of this element makes installation of the logs much easier. They hold more securely, and the service life of such a floor increases. Installation of logs can be carried out in several ways:
Supported by a block. A block is mounted at the bottom of the trim, on which the edges of the joists rest. Although the block acts as a support, the logs must be attached directly to the strapping block.
Using metal corners and plates. In this case, the entire load goes to the metal connections themselves. Support for the logs is not implied, but their edges are connected to the strapping bar using connecting elements.
Installation on the harness and use it as a support. This method is best suited if the walls will be assembled using platform technology (the walls are mounted horizontally and then installed on a base). The logs are mounted on top of the strapping, which guarantees their reliable fixation. After this, an additional bundle is mounted on top of the logs, which will serve as the basis for the walls of the future house.
The third method of installing lags is the most common in construction practice, and the first two are used only in a combined version (both the base bar and metal connections are used). This is how you can achieve maximum structural strength. In addition, this technique allows you to monitor the level of the laid subfloor and guarantees ease of installation.
The distance between the lags is calculated individually for each room. The step length depends on the expected load on the floor of a given room and on the size of the rooms: the larger the span of the joists (the distance between the walls), the smaller the distance between the floor joists. If edged timber is used for the logs, then the distance between them will be equal to:
- 80 cm if the distance between the walls is 2 m;
- 60 cm if the distance between the walls is 2.5 m;
- 40 cm if the distance between the walls is 3 m or more.
In order not to waste unnecessary insulation and waterproofing materials, their parameters should also be taken into account when calculating the spacing between joists. This distance should be equal to the width of the insulation, minus 1-2 cm, so that it lies tightly between the beams. This will save you from unnecessary cutting and adjusting of the material.
Important! If the width of the room is too large, then double logs are used. More precisely, two boards connected to each other are used. This solution can be equated to using one strong beam with a wide cross-section.