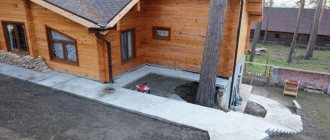
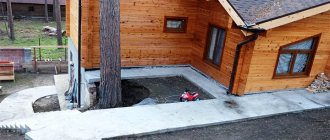
The blind area is a waterproof tape that runs around the perimeter of the entire house. It is made at a slight slope from the building for better drainage and drainage of rainwater. With a creative approach to design, it will become an additional decor for the yard, a convenient path around the building.
This article will help you understand the types, suitable materials, and the procedure for arranging a blind area around the house.
Purpose of the blind area
The main purpose of the blind area is to protect the foundation from high humidity after precipitation, from freezing and to prevent its subsidence.
A continuous strip prevents the soil around the residential building from getting wet and the base of the structure being saturated with moisture. If water penetrates into a foundation with poor or damaged waterproofing, then during severe frosts the concrete begins to break and over time, individual sections will sag. Cracks will appear on the base and walls of the house.
To avoid such problems, it is recommended to equip a high-quality blind area at the stage of building a house.
A monolithic tape with a layer of insulation will ensure reliable thermal insulation of the foundation, the floor in the house will not be cold, and heating costs in winter will be reduced.
If you finish the blind area beautifully, it will become part of the decor of the facade or yard, and if you lay it out with paving slabs, it will serve as a practical path between the house and other buildings on the site (garage, gazebo).
Laying it on a slope turns it into a low tide, so that rain and melted snow do not accumulate near the house, but flow away from it.
Features when making a blind area on a slope
The slope of the site does not require changing the construction technology of the structure, but it is important to strictly follow the algorithm and perform actions in a clear sequence.
The main feature is the construction time of the blind area. It is better to do it immediately after the foundation is built. The types of foundation differ, which affects the type of path around the house and the technology for its arrangement. Preparing the structure earlier will allow you to protect the foundation already at the stage of building the house. The blind area around the house on a site with a slope is erected in compliance with three key conditions:
- Insulating the structure will prevent freezing of the base of the house.
- Arranging a drainage system around the perimeter of the blind area will prevent moisture from seeping under the foundation of the house.
- The correct width, which should be 20 cm greater than the roof overhang, with the minimum value being at least 1 m.
A properly equipped structure will last a long time without the need for repairs and will provide reliable protection to the foundation of the house.
SNiP requirements
The blind area of the house, its size and arrangement are regulated by a number of regulations. Their list includes:
- GOST 9128-97. Contains the basic requirements for the composition and use of asphalt concrete, the procedure for determining the angle of inclination of a blind area made of this material.
- GOST 7473-94. Describes the requirements and quality criteria for concrete mixtures for blind areas. Recommendations for use.
- SNiP 2.04.02-84. This standard regulates the construction of a blind area around a well. Indicates how to calculate the tape angle.
- SNiP III-10-75. On the improvement of personal gardens. Contains recommendations on where to lay the blind area.
- SP 22.13330.2016. Foundations of buildings and structures. Updated edition of SNiP 2.02.01-83* (with Amendments No. 1, 2, 3). Foundations of buildings and structures. Here are recommendations regarding the size of the blind area on different soils. Formulas for calculating the depth of foundations are given. You can view the full version of the official document at the link: https://docs.cntd.ru/document/456054206.
According to the current set of rules and regulations, on normal soil the width of the blind area should be made from 60 cm, on sagging soil - from 1 m. It is recommended to retreat at least 20 cm from the roof overhang.
The last requirement is not necessary to follow if a full-fledged drainage system is installed on the roof to collect precipitation.
Blind area device
It is important to lay the blind area on time. The optimal period is after finishing the walls outside the house, but before finishing the basement. In this case, rain will not get inside the foundation.
The blind area has two layers: underlying and protective.
The purpose of the underlying layer is to create an even base for the formation of a protective layer.
The average thickness of the underlying layer does not exceed 20 cm. The materials used are:
- sand;
- crushed stone, gravel;
- native soil;
- clay.
On ground with good drainage, first lay a layer of sand, compact it, and moisten it with water. Then there is a layer of crushed stone followed by compaction.
On loamy, clayey soil, it is better to use the same soil as the underlying layer. If you simply lay sand and crushed stone on top, water will begin to accumulate around the building. Installing a drainage pipe around the perimeter of the blind area will solve the problem. But the cost of work will be higher.
There are a number of requirements for the protective layer. He must:
- Be waterproof.
- Be frost resistant.
- Be wear-resistant.
- Do not collapse under the influence of water and moisture.
Perfect for this:
- natural, artificial stone;
- paving stones;
- paving slabs.
The color and shape are selected based on the design style of adjacent buildings to create a harmonious architectural ensemble.
It is worth laying out the blind area of a private house yourself, taking into account the following nuances:
- The average slope from the building is 3 cm per 1 meter.
- It is necessary to have an expansion joint of 1-2 cm between the protective layer and the foundation. A layer of waterproofing and insulation is laid, and the seams are sealed.
- The base should be made overhanging the expansion joint, but not at the junction with the protective layer.
The recommended thickness of the protective coating is from 6 cm. Then the tape will withstand even heavy loads.
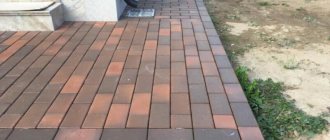
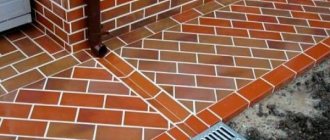
Blind area made of tiles around the house: paving, ceramic
Using tiles it is possible to construct semi-rigid structures. The resulting surface is not monolithic, multiple seams remain between the tiles, and effective drainage will be required. More durable ceramic tiles require a solid, level base. Surpasses paving slab samples in terms of decorative options. Vibropressed paving slabs are laid on any prepared cushion - sand, concrete, sand-cement.
Laying paving slabs
Key points in the construction of a blind area
Requirements, recommendations:
- The width of the future path is at least 0.6 m
- It should protrude beyond the roof eaves line by at least 0.2 m.
- It is necessary to maintain a slope for water drainage of 3°-5° (30-50 mm per meter of track width).
- The thickness of the bookmark is calculated as half the soil freezing depth for a particular region.
- Installation of the blind area is made easier by installing a curb. Acts as formwork and becomes a barrier for the roots of shrubs and trees growing nearby.
- Raising the path above ground level (at least 50 mm) eliminates puddles on the surface after heavy rainfall.
To compensate for thermal expansion, a 2 cm seam is left between the blind area and the foundation, which is filled with sealant, an elastic material (for example, extruded polystyrene foam). The cladding of the base completed later should cover the seam without touching the surface of the blind area (hanging above it at a height of 1-2 cm).
Overhang of the basement trim over the expansion joint
Covering the blind area with paving and ceramic tiles
The work is preceded by the preparation of tools, materials, calculation (with a small margin) of the number of tiles, determination of the width of the path (preferably a multiple of the size of the cladding). Then they work in this order:
- Marking, removing turf, digging a trench. The depth should exceed the thickness of the tile used by 15-20 cm.
- Tamping the bottom of the trench, with a slope towards the distance from the foundation.
- Preparation of the base from two (clay-sand), three (crushed stone-clay-sand) layers. Each layer is carefully compacted.
- Laying tiles on a sand bed. Another option is laying on a sand-cement mixture, which is poured on top of the sand base. In the second case, water will pass more slowly to the clay waterproofing; in winter, the likelihood of ice appearing on the surface of the path increases. The tiles are laid tightly, with bandaged seams, small (up to 1 mm) temperature gaps between the elements. The tiles are leveled in place and fixed with a rubber hammer, taking into account the slope of the surface.
- Sealing of joints by backfilling with sand, cement-sand mixture. Using a broom, the material is distributed into the seams, and the excess is swept away.
- Final formation of the structure. Water the tiles with water and do not load the surface for several days.
A simple tool for laying tiles
Optimal sizes
The size requirements are as follows:
- Height. The tape should not be at the same level with the ground, but be at least 5 cm above it. If this is a pedestrian path, then the height is increased by increasing the layer of sand cushion.
- Width. For sandy soils - 70 cm, for clay soils - 1 m. For looser (subsidence) soils - 1.5-2 m.
- Thickness. The most optimal thickness is 7 cm. This refers to the thickness of the concrete part. In this case, the compacted soil cushion should be 15 cm or more. The total depth should not exceed 20 cm.
- Tilt angle. According to SNiP III-10-75, the strip should go close to the base at an angle. The exact figure is within 1-10% in the opposite direction from the load-bearing wall. For heaving loose soil -3%. An online construction calculator will simplify the calculations.
On the roof of country houses with several floors, it is important to consider a drainage system. If this is not provided, then it is recommended to make the roof overhang wider than the blind area by 20 cm.
Reasons for the need to protect the blind area
Concrete is an artificial stone that has a long service life, but it also has “enemies”. The worst of them is the omnipresent moisture that penetrates the pores of the material. In winter it freezes, causing micro-fractures in concrete. Over time, the defects increase. There are several reasons for the gradual destruction. All of them, one way or another, relate to violations of technology at some stage of construction.
- Serious omissions include incorrect choice of depth and/or width of the blind area, lack of sand and gravel cushion or reinforcement, uneven filling, insufficient compaction or poorly made waterproofing.
- Technological errors include an incorrectly prepared solution - failure to comply with the proportions of the components. Insufficient amount of cement causes the concrete to begin to crumble. Excess binder causes cracking of the surface of the strip.
- No slope towards the street. This mistake leads to the most unpleasant consequences. Moisture will not be able to be removed, and its constant contact with the concrete surface inevitably leads to small cracks, which in winter turn into wide and deep tears.
The last reason is the lack of damping seams: longitudinal and transverse. They make it possible to reduce loads caused by temperature fluctuations in linear dimensions. If expansion joints were not provided, then the risk of defects in the blind area increases many times over.
In most cases, if there have been no serious violations, the structure can be protected from the harmful influences of the external environment. Therefore, it would not hurt the owners of a “belted house” to find out how to cover the concrete blind area around the house, what options are possible, and what materials are used.
Types of blind area
Depending on the installation technology and purpose, there are three types.
Tough
A rigid blind area will be called a continuous strip along the perimeter of a building made of concrete or asphalt concrete.
Both types of raw materials have a high moisture resistance and reliably protect the soil around the building from getting wet. It is necessary to ensure that the coating does not have cracks. In case of thermal expansion of the material, a deformation gap is left between the rigid blind area and the house. It is then sealed with any elastic raw material and masked with finishing material.
It is important to take into account that asphalt concrete is plastic and copes well with loads, so reinforcement is not necessary. The same cannot be said about concrete. When concreting a blind area, a reinforcing layer will be required.
The laying principle is the same as when forming garden paths from paving slabs.
The rigid type is perfect for forming a car zone near the house. The strong base will withstand any load.
Semi-rigid
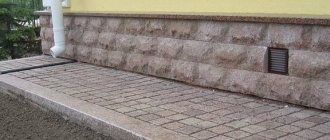
You can build it on dry sand or a pre-prepared concrete base. A layer of waterproofing film, membrane or fabric is required. The protective coating is formed from clinker bricks, porcelain stoneware, paving slabs (optional).
Soft
The soft type of blind area is formed from ordinary or bentonite clay. A layer of clay is laid out with a tape around the house and carefully compacted. For the purpose of waterproofing, a geofabric, membrane or film is laid on top. Then crushed stone, pebbles, and marble chips are poured for decoration.
This is an inexpensive option for a summer house or a small private house.
Decorative finishing
Performing technical functions, the blind area is an element of decorative finishing. From the street, attention is drawn to the windows and the façade of the house; in the courtyard, first impressions are influenced by the quality and artistic taste with which the foundation area and basement were decorated.
Decor
Finishing options help in achieving a combination of the structure with the facade of the building and the overall design idea for the design of the adjacent area. For example, natural stone is indispensable in organizing a single ensemble with buildings in the strict style of the ever-young classics, in the country style.
The Art Nouveau style is combined with a blind area made of paving slabs, the sizes, shapes, and colors of which will help create the desired mood. You can approach the design of the blind area with creativity: perform decorative filling; arrange a flower bed with flowers and ornamental plants on top; use boulders and river stones in gabions as a border.
Decorative flower bed on top of foundation protection
Materials for production
Let's take a closer look at what raw materials it is permissible to lay out the blind area from in order to obtain not only beautiful, but also reliable protection for the foundation.
Cobblestones
Cobblestones are rarely used for arranging blind areas due to their high cost. In addition, a number of difficulties will arise with a stone blind area:
- It is inconvenient to compact it. It will take a lot of effort.
- In the absence of an organized drainage system, sand will gradually be washed out of the coating by precipitation.
- Weeds can grow through the cracks.
- In winter, such a surface is slippery and very dangerous, so it is better not to use it as a path in the cold or after rain.
The main and only advantage is that the stone path looks beautiful and matches the house, whose base is made of stone.
Prices for materials and services for laying cobblestones are several times higher than for simple paving slabs.
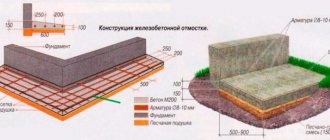
Concrete
The most popular, inexpensive design of the blind area is made of concrete.
The pie consists of a layer of sand up to 10 cm thick and crushed stone up to 10 cm. Reinforcement with mesh or metal wire is required. It is customary to pour liquid concrete mortar on top, then leveling screed.
The material is suitable for draining soils. For areas on a slope, near a pond, a river with a high groundwater level, this type is not suitable.
Asphalt concrete
Asphalt concrete is obtained by mixing mineral raw materials (fine crushed stone, sand), a mixture of ABS and bitumen in the required proportions.
When applied, the finished material is thoroughly compacted. It is quite flexible. It’s easy to form a blind area from it. Reinforcement is not necessary.
Often used when preparing a site for a car in the yard, driveways. Serves as the main road surface. Asphalt concrete is used to repair roads. They are convenient for filling small holes.
Clay
This type of blind area will be cheap. You can do it yourself.
A few decades ago, people used clay to protect the foundation of their houses from moisture and rainfall. Clay retains moisture and prevents the soil and base from becoming damp; it is suitable for soils with good drainage.
In short, the procedure for forming a blind area is as follows:
- The grass layer is removed and plant roots are removed.
- A trench is dug around the house up to 30 cm deep and up to 80 cm wide.
- The bottom is compacted. A sand and gravel cushion (up to 10 cm) is poured. Compacts with water.
- A layer of clay up to 15 cm is laid on top.
You can strengthen the coating with stones by laying them on top.
Paving slabs, paving stones
A type of rigid blind area. The tiles are laid on top of the concrete mortar.
Clinker is considered the most wear-resistant. The coating will look beautiful. But the prices indicated in the companies’ price lists are quite high. A budget alternative is colored concrete paving slabs.
It is important to take into account that to arrange a site for a car, you need to take vibropressed tiles. It is much stronger than vibrocast.
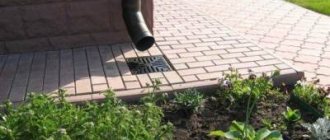
When forming a blind area, attention is paid to drainage and waterproofing. Water should move away from the foundation, and not accumulate in the layers of soil near it. This is especially true for clayey and heaving soils. You can't do without drainage here.
Geotextile membranes are good as a waterproofing coating:
- TechnoNIKOL Planter;
- Isostud;
- Tefond.
Price – from 150 to 250 rubles. for 1 sq. m.
The same applies to laying paving stones. It would be correct to lay a membrane at the bottom of the trench with a good overlap to the ground level. For fastening to the wall of the house, special clamping strips are used. Then comes a sand cushion, another layer of sand and paving stones. This is a good option for uneven soils with good drainage and low groundwater levels.
Crushed stone
It is considered one of the types of soft blind area. Not suitable for clay, loamy soils without drainage. It won't cost much.
The step-by-step installation of a crushed stone blind area looks like this:
- The plant layer is removed. A trench is dug out. The bottom is compacted.
- Geotextiles are laid on the bottom. Thanks to its elasticity, it will not allow the crushed stone layer to be pressed in and the tape will not sag.
- A layer of crushed stone up to 15 cm thick is poured. The material fraction is from 10 to 80 mm.
- If desired, such a blind area can be insulated. To do this, first lay sheets of 50 mm extruded polystyrene foam at the bottom of the trench, then a geomembrane and crushed stone on top.
The disadvantage of a soft blind area is that you cannot walk on it.
Types of blind areas or what is best to use to make a blind area around the house
We have decided that it is necessary to make a blind area around the house. Let's look at what types of blind areas there are and what is best to make a blind area around the house from. You can make a classic concrete blind area followed by surface cladding or a soft blind area. Their differences are visible even from the terminology. But the principle of performing its functions is the same. The classic concrete blind area can then be lined with porcelain stoneware, paving slabs, clinker bricks, natural stone and other finishing materials.
Advice! A modern architectural solution, with a certain design idea, would be a polished concrete blind area with iron plating or topping of the top layer. This work can be done immediately after pouring the blind area, saving on subsequent cladding, following the technology.
An excellent low-cost solution for a blind area around the house would be to organize a soft blind area made of crushed stone or natural lawn. This method is supported by the lower cost of materials and work, the possibility of independent execution, as well as an excellent aesthetic appearance. Such a blind area is little susceptible to the forces of frost heaving and is not destroyed. I will say more, in many countries today this is the method most often used.
New type of blind area
A new material that has begun to be supplied to the market is a profiled membrane. On its basis, a hidden type of blind area is created.
The step-by-step process looks like this:
- A trench up to 30 cm deep is dug along the perimeter of the house. The bottom is compacted at a slope.
- The membrane is laid with a good overlap on the foundation.
- A layer of sand and crushed stone is poured.
- Then the original soil is filled back in.
It is convenient to disguise such a blind area as the surrounding landscape by planting a lawn on top. A flower garden on the sides of the porch or along the perimeter of the terrace looks beautiful.
The downside is that it cannot be used as a passage or path between buildings.
How to make a blind area with your own hands: step-by-step instructions
When this happens simultaneously with the construction of a house, the materials and dimensions of the protective tape must be taken into account when developing the project, drawing up a general drawing, and cost estimates.
If it is necessary to repair the old blind area, then its arrangement diagram is created separately. With the exception of dismantling, the pouring procedure is similar in both cases.
Preparatory work
Consists of purchasing the necessary materials and tools.
Materials for pouring a concrete strip base will need:
- Cement grades 400, 500. Taking a smaller grade is risky - you may end up with a low-quality product.
- Sand. Must be clean, without inclusions. If possible, it is sifted.
- Crushed stone, gravel. The fraction is taken up to 40 mm.
- For insulation, it is worth buying sheets of extruded polystyrene foam.
- Wooden edged boards 25 mm thick. Will be needed for formwork.
- Reinforcement, steel mesh (optional). For reinforcement.
The tools you will need are:
- concrete mixer;
- shovel, bayonet shovel;
- container for ready-mixed concrete;
- building level;
- usually a trowel;
- hammer, nails;
- hacksaw;
- vibrating plate.
If you don’t have a concrete mixer, you can mix the concrete in small portions by hand.
Marking, excavation
First you will have to establish clear boundaries of the future blind area. Rope and wooden pegs are used for marking. Pegs are driven into the ground along the perimeter of the tape every 1.5-2 m and a rope is pulled between them.
A trench is being dug. The optimal depth is 25-30 cm. Plant roots and stones are removed. The bottom should be smooth and free of debris and vegetation. A slight slope is made in the direction opposite to the house.
All excess soil is removed outside the yard.
Sand layer, tamping
Sand is poured onto the prepared bottom and leveled. To simplify the compaction process, the sand is thoroughly moistened with water. With good watering, areas of subsidence that need to be eliminated will immediately be visible. After compacting the sand, the slope should be maintained. If this moment is missed, you will have to pour another layer on top and compact it at an angle.
At this stage, you can already knock down the formwork or you can do this before reinforcement. This does not affect the quality of the blind area in any way.
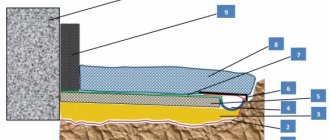
Waterproofing, insulation
You should not assume that a concrete strip will always be able to protect the foundation from moisture. The slightest crack in the coating can begin to let water through. To avoid such a situation, waterproofing will provide additional protection.
It is better to lay the film or membrane overlapping. Coat the joints with mastic to seal.
Insulation is also carried out at the discretion of the owners. You can build an inexpensive blind area without thermal insulation or increase costs slightly, but get a thoroughly insulated foundation. In the latter case, home heating costs in winter will decrease. The rooms will always be a couple of degrees warmer than usual. The difference will be especially noticeable before and after insulation in frame, log houses and in houses with basements.
Expanded polystyrene slabs are laid close to each other. If necessary, cut to the required length. There are gaps at the joints that will turn into cold bridges in winter. They are sealed by injecting polyurethane foam with a construction syringe.
Formwork assembly, reinforcement
If the formwork has not been assembled earlier, then at this stage it’s time. The boards are connected to each other with nails. To maintain the correct shape, they are secured with stakes driven into the ground.
To prevent the wood from becoming saturated with moisture, the inside of the panel frame is coated with bitumen or a plastic film is stapled.
The mesh or reinforcement welded together is laid on top of the insulation layer. If possible, it is recommended to raise the mesh slightly by 1-2 cm using special clamps. There should be no empty spaces; on the contrary, the mesh at the joints should overlap.
Installation of partitions under expansion joints
There are several methods for arranging expansion joints:
- Divide the tape transversely into sections using wooden partitions. The distance between sections is up to 2 m. They should not touch the bottom of the base, since concrete should be freely poured under them. The downside is that after pouring it is difficult to carefully remove these boards.
- Immediately after pouring the concrete, make cuts in several places.
- Assemble permanent formwork from insulation sheets of only small thickness (up to 2 cm). The top of the partitions is set so that, together with the formwork, the required angle of inclination is formed.
The creation of expansion joints strengthens the design of the blind area and prevents the formation of cracks.
Fill
Concrete is mixed in the following proportions: take 4 parts crushed stone, take 3 parts sand and add 1 part cement. Water must be added gradually so that the finished mixture is liquid, but not flowing.
Filling in progress. For large volumes, you cannot do without a concrete mixer. To ensure that the tape hardens evenly in all areas, it is better to fill the blind area in one day.
The solution is smoothed with a trowel and a rule. An excellent option is to use a vibrating plate. It will give the mixture the necessary shrinkage and density.
To enhance the properties, craftsmen recommend ironing the concrete surface.
A layer of dry cement is poured on top and leveled.
Care
Within 1-2 weeks after pouring, the blind area needs to be looked after. As the surface dries, moisten it with water to prevent cracking. In extreme heat, it is recommended to cover with plastic wrap - this will prevent the material from hardening unevenly.
DIY blind area
- Marking
The first step in building a blind area is marking the area in front of the building. To do this, you need to drive pegs into the ground around the perimeter of the building at the required distance from the wall and connect them with twine.
2. Digging a trench for the blind area
After this operation, you need to dig a trench between the stretched twine and the wall of the house, the depth of which will be determined by the selected material. As a rule, the thickness of a concrete blind area is 0.25 meters. In this case, the thickness of the surface finish is not taken into account.
After the trench for the blind area is ready, it is necessary to prevent unwanted growth of plants in it, the roots of which could have a destructive effect on the structure in the future. To do this, the soil in the trench and near it is treated with special herbicides. If trees grow not far from the future blind area, their roots should be cut off.
You can also lay geotextiles, but this is more expensive.
Digging a trench is not always a necessary procedure. If the soil around the house is soft enough, then it will be enough to compact it to the appropriate depth.
3. Installation of formwork
The next step is to assemble the formwork. For this, you can use uncut boards with a thickness of at least 20 millimeters. The boards are installed along the outer border of the pit. Wooden blocks can be used as supports.
4. Creation of the underlying layer
After installing the formwork, it is necessary to compact the bottom of the trench and fill it with clay so that the layer thickness is 50 millimeters. The clay must be compacted tightly, and then a sand layer 100 millimeters thick must be poured onto it, which should also be compacted. To ensure good compaction of the sand layer, the sand should be moistened. The final step of this stage of work is laying crushed stone on top of the sand layer.
Compacting the soil at the bottom of the pit is a necessary step in the construction of the blind area. If this is not done, then the blind area may sag in the future under its own weight. In order to completely eliminate water seepage through the blind area, the clay layer can be separated from subsequent layers with a waterproofing material, for example, a film of polyvinyl chloride or polyethylene.
5. Installation of reinforcing mesh
After the preparation of the cushion is completed, reinforcement is laid on the surface of the crushed stone layer to form a reinforcing mesh. In this case, the distance between the rods should be from 100 to 150 millimeters. The intersections of the rods must be tied with steel wire. The presence of a reinforcing mesh ensures the strength of the blind area and its ability to withstand various loads.
Instead of reinforcing bars, you can use ready-made reinforcing mesh.
IT IS IMPORTANT TO KNOW
An important nuance when reinforcing is to ensure complete envelopment of the reinforcement with cement mortar. To do this, you can lay the mesh on wooden blocks, which are gradually removed during the concreting process.
6. Creating an expansion joint
Where the blind area comes into contact with the wall of the building, an expansion joint must be created, the width of which should be approximately 15 millimeters. To fill the joint space, sand mixed with gravel or bitumen is used.
To create a heat-insulating layer between the blind area and the wall of the house, you can also use slabs of extruded polystyrene foam or polystyrene foam. It is important to ensure a tight fit of the insulation boards to each other.
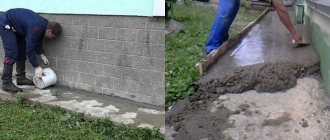
7. Pouring concrete
The next stage of work is pouring the concrete solution. To do this, you must first lay wooden slats across the trench so that the distance between them is 2.3-2.5 meters. The purpose of these slats is to create expansion joints that ensure normal operational characteristics of the structure. The width of the slats should be such that their edges coincide with the surface level of the concrete layer. To prevent the destruction of the slats by bacteria and fungus, the wood must be treated with an antiseptic solution and covered with a layer of bitumen.
Standard concrete mortar is prepared from cement (one part), sand (two parts) and small crushed stone (three parts). It is advisable to use river or sea sand. If you use regular sand from a quarry, you must first wash it to remove various impurities.
Sand is washed twice or three times. You can use a concrete mixer for this. When washing, sand is poured into a concrete mixer, filled with water and mixed for several minutes. After this, the concrete mixer is turned off and the water is drained. If this procedure is neglected, then in the future it is possible that the blind area will be washed away by water.
Concrete is poured in one layer at once. Otherwise, cracks may appear in the future between areas filled at different times. Therefore, even if it is impossible to pour all the concrete within one day for some reason, then the next day the work should be completely completed.
To prevent the formation of cracks and defects in the future, it is important to ensure high quality cement mortar. Therefore, it is best to prepare it in a concrete mixer.
If the weather is hot during the construction of the formwork, then the best time to carry out the work is early morning or evening.
8. Leveling the concrete surface
After the concrete layer has been poured and has not yet hardened, its surface must be leveled and the required slope created. A rule is applied to perform this procedure. If you don’t have this tool, you can use a regular wooden strip with a smooth and even surface. To ensure evenness, smoothness and correct slope of the surface, special beacons should be used as guides.
Upon completion of the creation of the covering layer, the surface of the concrete must be covered with burlap moistened with water. This fabric must be moistened regularly to prevent it from drying out. This will ensure that cracks do not appear in the concrete as it gradually hardens.
9. Finishing and decorative works
The concrete curing process lasts two to three weeks. After this time period has passed and the concrete has acquired the necessary strength, you can remove the formwork and begin finishing and decorating its surface. To do this, you can use sheets of porcelain stoneware, sidewalk tiles, or anything else.
Common Mistakes
Without sufficient experience, owners often make the following mistakes when filling themselves:
- The soil is lightly compacted provided that it is backfilled into the pit. Over time, the soil will begin to shrink, which will cause damage to the waterproofing layer and the formation of deep cracks in the blind area. Some areas will have to be repaired or the tape around the building will have to be completely re-filled.
- The bottom of the trench is not level. If in some places the bottom has differences, then the layers of sand and crushed stone will be uneven. The base will be of different densities and will have unequal load-bearing capacity in individual areas.
- The angle of inclination is not controlled. An incorrectly chosen angle or its absence will cause precipitation to flow under the house, and not away from it. There will be no benefit from such a blind area.
- mixing bad concrete. To mix concrete, you need to take clean sand without any impurities of soil or clay. This also applies to water purity. Otherwise, the working properties of concrete are reduced.
- They forget about expansion joints. They should be. Their absence threatens to rupture the concrete surface. When heated, the raw material begins to expand, and internal stress increases. Seams should be provided not only between the blind area and the house, but also across the tape.
The roof drainage system must be properly designed so that rainfall collects and flows down the gutters rather than under the foundation.
Proper arrangement of the blind area allows you to protect the foundation of the house, garage and other buildings from moisture penetration. It can become a beautiful path between buildings or even the basis for a flower garden.
Operation and repair of the blind area
Over time, the surface of the concrete pavement may develop cracks or other damage. This happens most often as a result of soil subsidence, incorrectly selected width of expansion joints, the use of low-quality materials and other reasons. Repair of such damage can be done using a mixture of bitumen primer, asbestos and sand.
Market cost of blind area installation services.
Initially, the crack expands somewhat and is cleaned of debris and dirt using a water jet. Then you need to let it dry and fill it with the prepared mixture.
Excessive damage must be expanded to the correct size, soaked with water and repaired by pouring new concrete. If necessary, the damage volume is reinforced with steel wire or rod. After the concrete mixture has hardened, the restored areas must be treated with a primer.