The base of floors is almost never ideal. You can always find various kinds of cracks and depressions, pits and sagging. In order to level the floor surface with the subsequent laying of any covering on it, special landmarks are needed. They are the ones who determine the height of the screed that is going to be made in the room.
Leveling the floor according to beacons
With the help of beacons it is easy to create such a plane, thanks to which the thickness of the fill will be controlled in any place. They help the master to direct the rule in the right direction and correctly distribute the backfill or poured mixture. In many ways, the installation of beacons depends on the quality and properties of the base and leveling materials, on the expected thickness and professional qualities of the work performer. In order to begin installing the beacons, you need to prepare the work surface.
It is ready if:
- all significant gaps are filled with mortar;
- no dust;
- priming has been carried out;
- peelings have been cleaned;
- Waterproofing and sound insulation have been completed.
Surface preparation
After preparing the base, work begins on placing beacons to level the surface.
- 4.1 What materials can be used
How to find the highest point on the surface of the base?
The normal level breaks through the horizontal. Markers are made on the walls of the room at a suitable height. A noticeable line is drawn along the points. You can use regular dyeing thread for this. Then there is the lowest and highest point of the genital surface. It's easy enough to do. From the marked horizontal line with a level and a tape measure, you need to measure the distance to the floor in many places. In the place where it is smallest there is the highest point, so here the thickness of the screed should be minimal (3 cm). Using methodical measurements, the required level of screed is determined.
The normal level breaks through the horizontal
The highest current point can also be located in the central part of the floor of the room. This can be checked just as easily using a paint cord. It is enough to stretch it across the width of the room and view it along the length of the stretch. If a new maximum high place is found, another zero level is drawn. If the area of the detected point is small, it is better to simply remove the protruding area. A hammer drill will be just right here.
In order for the floor to become as level as possible, beacons are necessary for anyone who is involved in leveling work, regardless of whether an experienced master takes up the task or an amateur.
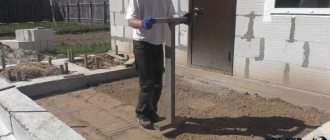
We place beacons
Set to the zero level, they guide the rule and serve as a kind of guideline. Such work may seem tedious and drawn-out, but the final result will depend on the correctness of its implementation.
Installation of beacons
Installation of beacons
Even the most knowledgeable craftsman, in order to obtain a surface without flaws, requires pointers, which are actually guides set at the initial (0) level. By advancing the rule along these peculiar signs, you can level the entire solution to an ideal surface.
It is much more convenient to move the rule according to beacons
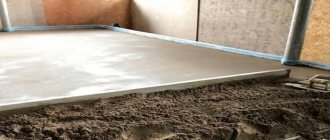
Filling the screed along the beacons
To create a leveling layer, as a rule, a cement-sand mortar or a dry mixture is used. Moreover, the latter option is more preferable, since it contains polymer components that improve the properties of the composition, however, the cost of such a screed is noticeably higher.
It is best to purchase washed sand for such work, since clay can weaken the quality of the screed. To make the leveling layer strong enough and able to withstand heavy loads, 1 part of sand should be used, and 3 parts of cement. If the requirements for the base are not so strict, then the proportion of bulk material can be slightly increased.
When preparing the screed mixture, it is recommended to use plasticizers to reduce the proportion of water, increase the properties of the solution and make it mobile. In addition, such compositions dry out much faster.
If the screed is made under a warm floor, in addition to the plasticizer, it is necessary to add fiber fiber to the solution: basalt or polypropylene. With it, the leveling layer will be able to withstand strong temperature changes.
To perform the screed you will need the following tool:
- Trowel, spatula, grater and construction rule to level the leveling layer.
- Construction mixer or concrete mixer. In these devices you can prepare a high-quality solution. If there is no such equipment, then you can knead the mixture manually with a shovel in a special container.
- Dental spatula to create a contact layer used in bonded screeds.
- Wheelbarrow for transporting mortar to the place of work.
When mixing the mixture by hand, you need to mix the dry ingredients in the required proportions in any deep trough; it is advisable to immediately add fiberglass to it. But it is better to dissolve the plasticizer in water. Then liquid is poured into the solution at the rate of no more than 15 liters per 50 kg of cement mixture . Everything is mixed well with a shovel. If the solution is made using a mechanized method, its quality is much better.
Then the finished screed mixture must be transferred to the work site. You should start pouring from the far corner of the room, moving towards the doorway. Pour the solution between the guide rails. First, one strip is created between the lines of beacons, and then they move to another.
When the entire mixture has been poured out, it must be distributed evenly. For such purposes, use a shovel or trowel, and the level of the screed should be slightly higher than the beacon.
Then, using the sharp edge of the rule, holding the tool perpendicular to the guide bars, starting from the farthest point, the mixture is pulled towards itself. To make it easier to move, swing it to the right and then to the left. If it doesn’t work, watch the video to see how to do it correctly. Excess mixture is removed, and its deficiency is compensated with a trowel , placing the required amount into the recesses. After these procedures, the floor becomes smooth without holes and bumps. The screed continues to be done on all strips between the slats, completing the work at the door.
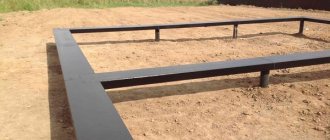
Calculation of the number of beacons for a room
It is customary to place beacons in parallel, the beginning of their path is the front door, and their movement leads to the wall opposite. The distance between parallels should be 10 cm or a little more less than the rule itself. The extreme lines are drawn at a distance of 3-4 decimeters from the walls. First you need to calculate where beacon No. 1 will be.
Lighthouses
For example: S (distance) between supposed parallel ones is 6.55 m. The rule is 1.5 m. Reaching the wall, it should be with a margin of 15 cm, which means 1.35 m from the wall. The row next to the first from the edge there will be somewhere S = 1 m, and between the extreme ones there remains 3.85 m. With a maximum S between the beacons of 1.2 meters, there will be 3.85 m: 1.2 m = 3.2 (beacons). It is clear that in this case, in addition to the extreme ones, 2 more will be enough.
(6.55 – 0.7) / 5 = 1.17 m.
0.7 – S from the side beacons to the walls.
5 – number of spaces between beacons.
How to pour concrete on a floor with your own hands?
An ordinary concrete floor is a kind of “layer cake” consisting of waterproofing, insulation, reinforcement, a layer of concrete and a layer of iron. As an example, consider the question: how to fill the floor of a house with concrete in a room of certain dimensions. The technology discussed below is suitable for constructing a concrete floor in a barn, garage, basement, bathhouse, bathroom, restroom and veranda.
The following materials and tools will be required:
- Portland cement CEM I 32.5N PC (M400) or CEM I 42.5N PC (M500), quarry sand and water for making mortar.
- Polyethylene film or roofing felt for waterproofing.
- Expanded clay with a fraction size of 10-20 mm (preferably).
- Welded steel reinforcing mesh with cell size 100x100 mm.
- Water level, pencil, ruler.
- A building rule or a long, flat wooden strip for marking boundaries and leveling the surface.
- Trowel and spatula for ironing.
- Steel buckets, shovel, concrete mixer.
Before starting preparatory work, it is advisable to determine the required consumption of building materials: cement, sand, water, expanded clay, mesh and polyethylene. To make the calculation, we will set the dimensions of the room, the recommended thicknesses of layers of materials and the brand of recommended concrete mortar:
- A room, garage, bathhouse or veranda measuring 4x3 meters.
- The thickness of the expanded clay layer is 100 mm.
- The thickness of the concrete layer is 40-70 mm.
- Construction cement-sand mortar M150.
There are different opinions about what brand of concrete to fill the floor in a garage, bathhouse, veranda, basement, and what brand to pour the floor in residential premises. Some sources recommend the M150 brand of solution, while others recommend the M200 brand.
Taking into account the small difference in the consumption of cement, which determines strength, we take for calculation the M150 solution, suitable for all flooring options in a private house and outbuildings.
How to install beacons on self-tapping screws
The first beacon is placed so that it covers the highest point of the base. A hole is made in the concrete base at this point using a drill; its diameter should be 6-10 mm. A wooden chopper is driven into it, and a self-tapping screw is driven into the chopper. The next one is at the opposite end. The rule is placed on the tops of the screws, a level is placed on it, the next screw must be on the same horizontal plane as the first. A fishing line or cord is pulled from one self-tapping screw to the other.
Installation of beacons
On the line of the fishing line, or rather directly under it, holes are made 50, 60 cm from each other. Plugs are plugged into all holes and self-tapping screws are screwed in. All of them should be flush with the thread or fishing line.
Installation of floor beacons
The next beacon is placed parallel to sign No. 1. The same steps are performed as at the beginning. Both parallels must also be on the same horizontal line. This is checked using a level. You can stretch the fishing line (cord) across the already stretched ones at the same height. Alignment must be carried out:
- along the length of the lighthouse;
- in level between all beacons.
To make it easier to monitor the floor level, you can attach pieces of punched paper tape to the self-tapping screws. Later they are unscrewed.
Video - How to install beacons on self-tapping screws
Video - Installing beacons under the screed using self-tapping screws yourself
Efficiency of beacons
Without installing guides, the evenness of the screed will be a big question. You shouldn’t neglect lighthouses, since there are plenty to choose from. The easiest to use are benchmarks. You just need to learn how to use them. But if you don’t want to spend money on them, then you can use the option with a profile for drywall, laid with the ribs down. It is then easily removed from the concrete, and the resulting cracks can be smoothed over without any problems.
See also video about
Read about our other materials:
Profiled timber: pros and cons, types and sizes
Room thermostat for gas boiler (thermostat)
How to install beacons on a solution
You can choose another layout method. Here you will need gypsum or cement. Slides are made from the thick composition. They should be located along the intended stripes. The beacons are placed in the solution so that their upper parts touch the stretched rope. With the addition of alabaster, things can go much faster. Everything sets in about 15 minutes on average.
How to install beacons on a solution
It is strictly unacceptable to use materials that quickly absorb moisture as linings. They will very quickly lose their original shape and ultimately lead to the formation of unnecessary cracks and dips in the screed.
What materials can be used
To level floors, you can use different types of beacons. Firstly, just use ready-made purchased ones, specifically designed for floor screed. Secondly, often, instead of them they take a plasterboard profile Pn 27*28. To prevent it from bending, you need to insert one into the other. This will result in a cross-section in the form of a square. The rule is that it will be easier to move along such a beacon.
Plasterboard profile
Thirdly, wooden blocks (height - 3 cm, width - 3 cm) would be a good alternative. Before use, they must be moistened with water so that the bars do not immediately absorb moisture from the cement.
Beacons made of bars
Fourthly, in extreme cases, beacons are laid out from a solution mixed from 1 part cement and 1 part lime.
Lighthouses from solution
Tools and materials:
- perforator;
- drill, screwdriver;
- hammer, chisel;
- rule;
- polyethylene film;
- self-tapping screws;
- cement;
- plaster or alabaster;
- twine, dyeing thread, cord;
- containers for solution;
- stirrer, mixer;
- roller;
- level.
Video - Installing beacons on the solution yourself
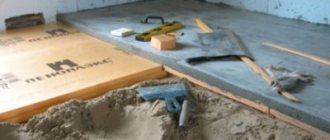
Preparing the base before screeding
First of all, you will have to remove the flooring, baseboards and old screed, for the dismantling of which it is advisable to use an electric jackhammer. This tool is more powerful, and it will get the job done faster. A hammer drill is also suitable for breaking screeds. Then you need to remove all garbage.
It is best to level the floor for each room separately, and mask possible differences with door thresholds .
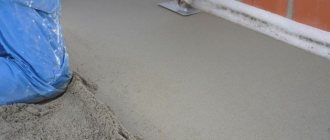
How to lay and level the screed
After the beacons are ready and the solution has become solid, you can start working on the screed itself. However, it is better to do this on a wet surface, so the base is either primed or, in order to save money, simply moistened with plain water.
As a result, grip will improve. To avoid “wet surprises” for the neighbors below, the joints between the wall and the floor are visible. If there are cracks, it is better to foam them.
How to lay and level the screed
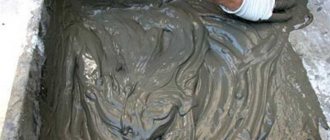
It is better to make the solution in the following way: cement and sand are poured into the first container and mixed thoroughly. Water is poured into the second, then the dry mixture from the first is poured there. (2 l./10 kg.). All this is mixed until smooth, left for a couple of minutes and mixed again.
Screed mortar
Take the prepared solution. Laying out and leveling should begin from the far edge. The solution is laid out between the beacons and, using the rule, is driven towards itself. In this case, you need to act smoothly, without sudden movements, slightly leading from side to side. The rule cannot be torn away from adjacent slats. The “excess” mass is driven down along the screed to the place where the next solution is poured.
Laying out and leveling should begin from the far edge
It is advisable to mix the solution in small batches. For tightening, it is better to take the trapezoidal rule. It is advisable that this be done continuously. Convenient when two people are working. One draws the solution, the other prepares and pours the mixture into buckets.
Filling the screed along the beacons
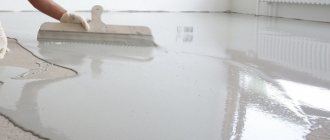
After a good setting, when it becomes possible to walk on the surface without damaging it, the plates are pulled out, and the holes from them are filled with a spatula with the same mixture that was used to fill. It is necessary to observe the correct proportions when kneading, usually 1/3. If troubles do appear on the surface in the form of puddles, you must get rid of them immediately, as this is fraught with the formation of depressions. Use a rule to remove them. If profiles were installed as beacons, then after the screed has set, the profiles are removed. The resulting irregularities are repaired in the same way as holes. Beacons specially designed for such work are not removed.
Screed
When pouring the floor in a small area, be it a bathroom or toilet, you can use a needle roller to distribute the screed over the surface.
The screed matures in about a month. It is covered with polyethylene and sprayed with water from time to time or moistened with a roller. For those who do not want to engage in the moisturizing procedure, a plasticizer is suitable, which is initially added to the solution. This will solve the problem of cracks forming on the surface of the screed.
The screed matures in about a month
Drying should take place under natural conditions. It is not allowed to dry the surface using any heating devices. Failure to comply with this rule can lead to the rapid formation of cracks and subsequent destruction of the screed.
If all the specified points are observed, work on leveling the floor along the beacons will yield pleasant results.
Leveling the floor using beacons: result
The room will have a flat surface for any finishing coating, which, thanks to its ideal flatness, will serve for a long time to more than one generation of residents.
Installation of beacons for leveling the floor
Before installation, the beacons are laid out along the intended lines and the places of their joints on the floor are marked, in which holes are drilled using a hammer drill and dowels are inserted. Self-tapping screws are screwed into the dowels, the upper part of the head of which should be in the same plane. To do this, use a hydraulic level and a screwdriver to align the line of the future floor on the wall and the heads of the screws in one plane.
Between the screws , cakes of tile adhesive are laid out at intervals of 10 cm. The lighthouse is placed on the cakes and pressed with a rule, which should rest on the screws. The entire working surface of the beacon should be in contact with the rule, and the rule itself should rest on the caps. This is how all beacons are displayed.
After the tile adhesive has dried, you can begin work on the screed.
And here is a video on how to make a beacon screed with your own hands.
Requirements for arranging a floor on the ground
It’s not difficult to make such a floor with your own hands, but before you begin the work, you need to know the requirements that apply to a concrete surface made on the ground:
- the soil should be dry, dense and motionless;
- before creating a floor, it is necessary to determine the loads that it will withstand;
- the occurrence of groundwater should be no closer than 4-5 m to the surface;
- the floor must be waterproofed and insulated.
If groundwater lies closer than 2 m to the surface, a cushion of crushed stone and sand must be made.
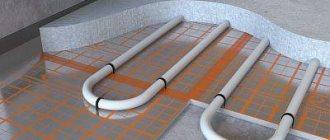
If you plan to install a heated floor system, when installing a concrete surface, be sure to leave a gap between it and the wall, which should be 15-20 mm , otherwise the concrete base will be damaged during operation.
Experts recommend installing a concrete floor on the ground only if the house is permanently lived in and is heated. In an unheated room in winter, the soil may freeze and heaving forces will begin to act on the structure, which can lead to its destruction.
During the construction of a house, it is recommended to move on to arranging the floor only after constructing the walls and roof.
The main advantages of a concrete floor on the ground:
- simple and easy to install;
- high levels of strength, reliability and wear resistance;
- high frost resistance;
- suitable for installing heated floors;
- low cost.