Often, future developers believe that waterproofing for the foundation is needed only when the groundwater level in the area is high enough. And this is true, but not completely. Of course, the main enemy of the foundation of a house is precisely groundwater, from which many protect themselves by installing a drainage system and organizing water reduction measures.
But even in these cases, there is a threat from flood waters, especially when the house is located on a slope, as well as from normal precipitation, since many materials, including concrete, used in the construction of the foundation, have a fairly high moisture-absorbing capacity.
And as a result, the water not only “wears away the stone” of the foundation, but also gradually rises up to the walls, which leads to the appearance of dampness, and in the most critical case, to the destruction of both the foundation and the house.
Therefore, waterproofing work should be considered a separate type of construction work and carried out with special care.
Reconstruction of facades, formats
Necessary tools for creating waterproofing
To carry out the work you will need:
- waterproofing film;
- knife for cutting material;
- stitching roller;
- measuring device;
- pencil;
- protective gloves;
- building level;
- bath for diluting building compounds;
- roller;
- bitumen primer and brush for applying it;
- brush for cleaning the base;
- gun with sealant;
- edge strip for fixing the material on the vertical part of the foundation.
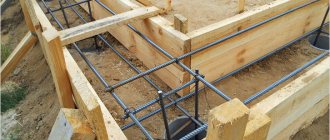
Installation of material on the horizontal part of the foundation
Step by step steps:
- Use a brush to remove dust from the base on which the foundation will be built.
- Treat it with bitumen primer. This will ensure better adhesion of the waterproofing material to the base.
- It takes approximately 24 hours for the bitumen primer to dry. After the specified time has elapsed, check it by pressing it with a dry cloth folded several times. If it remains clean, you can begin installing the waterproofing material.
- Take measurements of the base under the foundation, and cut waterproofing material based on them.
- Trim and carefully remove the protective film on the waterproofing, retreating 10-15 cm from the edge.
- Glue the waterproofing sheet to the base, making sure that no voids or air bubbles form.
- Use a stitching roller to smooth the material.
- Lay the next sheet in the same way. For better adhesion, clean the joint area from dust. After placing the material, roll this area with a rolling roller. The longitudinal overlap between the canvases should be 10 cm, and the transverse overlap should be 15 cm.
It is important to know!
Before proceeding with further construction of the foundation, it is recommended to protect the foundation from mechanical damage. To do this, you can use cement-sand, asbestos-cement particle boards or fill it with a protective screed.
Protecting the foundation of a residential building from moisture is really necessary!
The foundation of any residential building is considered the most important part of its structure. It is this that bears heavy loads during operation. This means that the foundation of the house must be reliable. After all, when it is destroyed (even partially), other elements of the structure will also begin to deform.
Let's see what happens to the concrete foundation of a residential building when it is not protected from moisture. During the warm season, the surface of the foundation is constantly moistened. A certain amount of moisture collects on it, which is absorbed into the concrete. When winter comes, the water that gets into the foundation freezes. It expands, which causes destruction (at first very minor) of the concrete structure.
Waterproofing protects the foundation from water
In spring, frozen moisture thaws. After it, cracks and numerous pores remain in the concrete. The next year the situation repeats itself. After a couple of years, the cracks in the foundation will already be large enough and moisture will begin to penetrate into the reinforcement frame. From this time on, the process of destruction of the foundation will become irreversible.
Careless builders claim that in a number of situations (low groundwater levels, minimal precipitation throughout the year in a particular area, and so on) it is possible not to waterproof the foundation of the house. It is better not to pay attention to the words of such would-be advisers.
At any moment, soil movements may begin on your land plot. They will lead to changes in the position of underground aquifers. The water from them may well go to the foundation of your house. We have already described what will happen in a few years.
Therefore, waterproofing the foundation - either with your own hands or with the help of hired professionals - should always be done. And here it is important to choose the right material that will reliably protect the foundation of the home from moisture.
Installation of waterproofing on a vertical base
To avoid various irregularities, swelling and bubbles, it is recommended to divide the waterproofing material into several parts.
Step-by-step installation:
- Removing the film as you stick it, place the canvas on a vertical base, avoiding the formation of voids and bubbles.
- After making sure that the material is positioned evenly, remove the protective film and go over it with a stitching roller.
- Glue the next sheet in the same way. The longitudinal overlap is 10 cm.
- Remove dust from the overlap area and roll this area with a rolling roller.
- If a transverse overlap occurs, remove dust from it. In this case, the lower panel is mounted first, and the upper one is glued onto it. The overlap width is 15 cm.
- Additionally roll the overlap area with a rolling roller.
The installation of waterproofing is now complete. If the groundwater is low, one layer will be sufficient. When they are high, it is recommended to waterproof them in two layers.
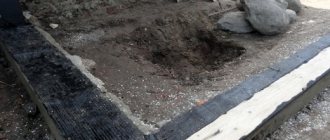
Horizontal waterproofing - how to do it yourself?
Moisture protection of the foundations of residential buildings can be horizontal or vertical. The first of them is installed at the stage of foundation construction, and the second can be carried out in an already built house. Horizontal insulation is usually done with roofing felt. Another type of it is the installation of a special drainage system (it is required when the groundwater on the site is close to the surface).
Horizontal waterproofing
Do-it-yourself waterproofing of the foundation with roofing felt is done as follows:
- You dig a pit for the foundation of the house, pour clay into its bottom in a layer of about 0.25–0.3 m and compact the material very carefully. Construction sand can be used instead of clay. They make a so-called pillow from it.
- Make a 6-8 cm concrete screed (one part cement to five parts sand plus water until a thick consistency is obtained) on top of a sand cushion or clay layer.
- Wait 10–12 days until the concrete hardens. After this, bitumen mastic is used. The screed should be treated with this mixture and then roofing material should be laid on it.
- Apply the mastic again and cover it with a second layer of roofing material.
- Make another screed from the concrete mixture (the thickness is similar to the previous layer).
This completes the work. Do-it-yourself horizontal waterproofing of the foundation! But remember that then it is advisable to carry out vertical moisture protection of the base using one of the methods that we will describe in the next section.
Now let's figure out how the drainage system, a subtype of horizontal waterproofing, is installed. It is built in two situations:
- when water accumulates under a building (does not absorb into the soil);
- when soil water flows at the same level as the depth of the foundation.
The procedure for performing work on drainage arrangement is as follows:
- Dig a small ditch 0.3 m wide around the perimeter of the house (step back from the building by about 0.8–1 m). The depth of the groove is taken 0.25 m below the level of pouring the concrete base. Note! The ditch is made with a slope (very slight) towards the well in which water is collected.
- Lay geotextiles at the bottom of the ditch (the material overlaps the walls by about 0.7 m), pour gravel (5 cm) on top and install a drainage pipe on it. For each meter of pipe product, provide a slope of about 5 mm.
- Fill the pipe with a 25-centimeter layer of gravel, and then wrap the entire completed structure in geotextiles (simply lower the overlap left earlier).
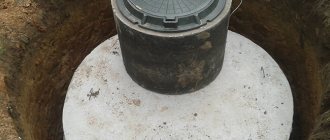
The last step is filling the trench with soil. Don't forget to build a separate drainage basin where the drainage pipe will remove excess moisture.
Installation of the edge strip
Step by step steps:
- Install the bar at the top of the vertical base and secure it with fasteners.
- Its upper part is additionally sealed using polyurethane sealant.
Vertical
This foundation protection system is applied from the base of the foundation. Liquid bitumen can be used for waterproofing. When working with this material, you just need to remember that it emits harmful fumes when heated. Therefore, you should protect yourself.
Vertical protection can be:
- painting;
- pasting;
- mixed.
When applying vertical waterproofing, pay due attention to the treatment of material joints, which are often vulnerable points for moisture penetration.
Painted waterproofing is done using bitumen, which is applied to the surface. Roofing felt can also be used in vertical waterproofing.
If the foundation is not insulated
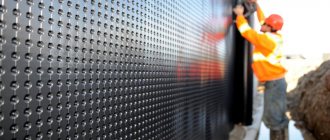
If the foundation is not insulated, a profiled membrane will be installed on the waterproofing material. Let's look at the work using Planter Standard as an example. This is a dense polyethylene canvas with special protrusions 8.5 mm high.
The membrane will protect the waterproofing layer from local mechanical damage when backfilling the foundation during the operation of the building. To install it, you will need a double-sided bitumen-polymer tape 5 cm wide.
Step-by-step installation:
- Cut the ribbon into pieces 5-7 cm long.
- Remove the protective film from them and fix the Planter Standard membrane on top. The protrusions on it should be directed towards the waterproofing material.
- Install the adjacent membrane sheet in the same way. The overlap should be 4 projections.
- Tape the seams on top with bitumen-polymer tape.
- Secure the membrane above the level of the waterproofing material using the Planter profile strip.
Drainage
Waterproofing is not limited to treating the base of the foundation and basement. In order to protect the house from moisture, it is necessary to install high-quality drainage next to the house itself. To do this, you need to set up one simple system.
- It is necessary to dig a trench along the entire perimeter of the foundation at a distance of about 3 - 4 meters. The depth of such a trench can be more than a meter. The nature of the drainage ditch differs from other types of trenches and pits in that such a ditch goes downhill. Moreover, the slope leads away from the house.
- Plastic tubes are laid in the trenches. The ends of the tubes must be wrapped so that they drain water well and do not become clogged.
- The entire system is covered with sand and gravel. It is covered with soil on top.
After installing the drainage system, you don’t have to worry that the basement will be flooded after the snow melts on the site. When setting up such a system, you need to be careful. If an error occurs, water may begin to flow directly onto the foundation. In difficult cases, it is better to invite a specialist for such work.
An additional protective measure is an external drainage system. These are various trays and water collectors. This method was known in ancient times. It still works effectively today. Before waterproofing the foundation of a house, it is necessary to consider the drainage of the area.
Insulation of the foundation with waterproofing
The optimal material for insulating the foundation is polystyrene foam. In addition to thermal insulation, it will provide protection from mechanical damage during backfilling of soil, aggressive influence of moisture, and fungus.
Let's look at the step-by-step installation of insulation using XPS CARBON polystyrene foam as an example. The work will require bitumen mastic to place the material below ground level and XPS adhesive foam to fix it above the surface.
Step-by-step installation of insulation on a base below ground level:
- Apply the pre-prepared mastic onto the heat-insulating boards in strips. In this case, the consumption of the composition will be 0.5-1 kg per 1 sq. m. m.
- Install the slabs on a base covered with waterproofing material.
Step-by-step installation of insulation on a base above ground level:
- Remove the gloss from one side of the insulation using a fine-toothed saw.
- Apply foam adhesive in strips of 2-3 cm along the perimeter of the slabs, after shaking the can, keeping a distance of 2 cm from the edge. Make an additional strip in the center.
- After applying the adhesive foam, wait 5-7 minutes for polymerization. After this, install the slab on the base. The individual insulation elements are combined with each other according to the tenon and groove principle. For this purpose, the plates have a special L-edge.
- After the adhesive foam has dried (after about 24 hours), apply additional fixation to plastic facade dowels. It is enough to use 2-3 fasteners per slab.
Waterproofing work for different types of foundations
But, of course, when choosing a waterproofing method, as well as a material for it, first of all, the type of base and/or its design features are taken into account. Be sure to take into account the presence of a basement and its functional purpose.
We must not forget about the above-ground part of the foundation, namely the base of the house, which must also have adequate protection from moisture.
How should a strip foundation be waterproofed?
Almost all methods of waterproofing are suitable for this type of foundation, so when choosing, you should take into account the geological features of the site on which the house is being built.
If the conditions are quite favorable, then there is no need for expensive options - it is enough to choose the simplest and most inexpensive coating method using various bitumen mastics.
But when making a choice in its favor, it is necessary to take into account that it is not reliable enough and is easily susceptible to damage, for example, when backfilling or during any movement of the base.
Before starting work, it is necessary to properly prepare the surface on which bitumen mastic will be applied to waterproof the foundation: it must be clean, level and always dry.
And for greater reliability, it is recommended to use additional protection, for example, geotextile fabric or insulation boards, if thermal insulation measures are also planned.
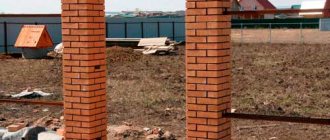
Pressure walls made of ceramic bricks are also recommended, but this option is quite labor-intensive and expensive, so it is rarely used. Particular attention should be paid to the corners that are the most vulnerable - sometimes rounding them saves the day.
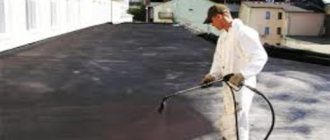
A type of coating waterproofing is the spraying of a special protective composition using a special sprayer. But this option is much more expensive and, in addition, requires the use of special compounds. Thus, the consumption of bitumen mastic for waterproofing the foundation with the conventional coating method is, although somewhat higher, but at a lower price.
It makes sense to use the spraying method only in cases where there is no free access to the surface, for example, in dense buildings, or if the foundation has any complex shape.
For a monolithic strip foundation, traditional protection is waterproofing using rolled materials and, most often, roofing felt.
It is quite possible to carry out such work independently, but the participation of an assistant will be required, since it is necessary to simultaneously apply hot bitumen to the surface and glue overlapping sheets of roofing material onto it before it cools down.
The following methods of protecting the foundation are also quite popular:
- plastering the surface with cement-sand mortar with the addition of hydrophobic components;
- the use of penetrating compounds, the use of which is justified in the presence of ground or surface water that is sufficiently aggressive in its composition for concrete.
Features of waterproofing work to protect prefabricated strip foundations
If the strip foundation is not a monolithic structure, but is built from brick or FBS blocks, then it must also have adequate protection from the negative effects of moisture.
In principle, there are no special differences in performing this type of work compared to the monolithic type, but the presence of connecting seams should be taken into account. Therefore, in addition to fairly accessible options using bitumen mastic and roofing felt, it is recommended to use polymer-based compounds and, above all, the so-called “liquid rubber”, which, due to its elasticity, has the ability to envelop all cracks and irregularities.
In addition, due to the less stability of such a base and the tendency to subsidence, the waterproofing layer will not collapse and will be able to cope with its tasks.
A good option would be preliminary double-sided plastering of the surface of the foundation walls using hydrophobic additives or subsequent application of penetrating compounds.
Methods for waterproofing other types of foundations and the basement of a house
Reliable waterproofing of the foundation slab is carried out using ordinary roofing felt, which is laid directly on the base, both with and without mastics. But an additional screed must be made on top.
Often waterproofing work for a monolithic slab is carried out simultaneously with thermal insulation. In this case, a kind of “layer cake” is created: slab-waterproofing-insulation-screed, and after that you can start installing the floor.
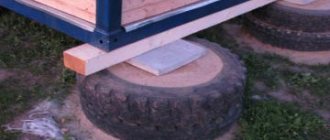
If the house stands on a pile or columnar foundation, then waterproofing measures are carried out for the grillage. Also, when pouring a columnar foundation, roofing felt should be used as lining waterproofing for permanent formwork.
Basement waterproofing is carried out to protect the walls of the house from surface water and, above all, precipitation. The same function is also pursued by the installation of a blind area around the perimeter of the building.
The most effective is the use of penetrating compounds, which additionally increase the frost resistance of the upper part of the foundation and mastics. And for cladding this part of the house, it is recommended to use waterproof materials, for example, natural or artificial stone, ceramic tiles or clinker.
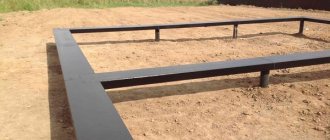
Reliable protection against the penetration of capillary moisture to the walls of the building will be provided by horizontal waterproofing of the concrete foundation, which is most often laid on the upper edge of the plinth.
Installation of cut-off waterproofing
Cut-off waterproofing is necessary to protect the building from capillary rise of moisture. A special material is used for this. Cut-off waterproofing has a durable, non-rotting base made of fiberglass impregnated with modified bitumen. It is protected on all sides by non-woven polypropylene.
Step-by-step installation:
- Apply a thin layer of bitumen mastic using a brush to a leveled and dust-free foundation surface using a brush (as an alternative, it is fashionable to use a cement-sand mortar).
- Carefully lay the waterproofing material, rolling it over the entire area of the foundation.
To summarize, we can conclude that waterproofing must be done at the stage of foundation construction. If you follow the stages of work and install materials exactly according to technology, the foundation of the building will not be afraid of high humidity. This will significantly extend its service life. After high-quality waterproofing, you can begin building walls.
Upper hydraulic protection of the foundation (blind area)
The screed around the building protects the underlying foundation surface from excess moisture during heavy rains or when snow melts. The ideal option is when a clay castle is created under the blind area to the depth of the building’s foundation. However, clay tends to compact for a very long time, which can take 2-3 years. Therefore, now few people want to make a clay belt.
Important! Before pouring the blind area, you should make sure that the soil poured around the base of the building is completely compacted. If this does not happen, the screed around the perimeter of the house will crack and eventually collapse completely.