Sometimes for a summer resident, long-awaited rain at the height of the season becomes a real natural disaster. As a result of a prolonged summer rain, as well as during a spring flood, a real lake may form on the site.
In order to avoid stagnation of water, a system for collecting and draining it from the territory is needed. If you build a storm drain with your own hands, then the costs of its construction will be minimal.
The article presented for review describes in detail the principle of constructing an atmospheric water drainage system and describes the components of the structure. We will tell you how best to build it and how to maintain it. Taking into account our advice, organizing a storm drain will not cause the slightest difficulty.
Storm drain options
Storm drainage is a specific design. The water discharged through this system contains both small and large debris. Therefore, there must be primary cleaning in the storm drain.
The system may differ in the volume of water it is able to accept, design, and duration of effective operation.
Image gallery
Photo from
Point storm water inlet
Construction of canals and installation of storm water inlets
Protecting the foundation from weakening
Components for assembling a storm system
Based on the design of the system, 3 types of storm drains can be distinguished:
- Open . It has the simplest design, is easy to implement, and is inexpensive.
- Closed. This option is more complex. Here you will have to deal with underground pipes and storm water inlets. The system needs to be planned in advance, and installation is best done by a specialist.
- Mixed. They are chosen when there is not enough finance to implement option 2, and also if you need to cover a large area. It is something in between the first two.
Storm drainage of the first type is made in the form of drainage trays built into the coating. Through them, water flows to a specially designated place or is simply drained into the garden. The second type of system is located below the zero point, which requires significant excavation work and corresponding financial investments.
Surface drainage can fit perfectly into the landscape design of a dacha, and even become its decoration. Use the system in small areas
Such a storm drain is installed mainly during the development of a site, since it is a freezing option that is easier to implement. The system is not buried very deeply - up to a meter maximum, but both in winter and in early spring it is not involved in work.
To prevent the sewage system from freezing, the pipes are buried below the freezing point. With the third type of storm drainage, the sewerage elements are partially located both on top and in the soil.
Experts say that the choice of such an expensive option as a closed storm drain must be justified. This decision can be justified by high requirements for territory design
Storm drain design is always individual. It is unlikely that there will be areas with absolutely similar conditions. They will always differ, if not in relief, then in layout, soil properties, and the number of outbuildings.
Storm drains are needed both at enterprises and in private properties. The difference in their design is that large-scale systems are combined with the discharge of treated water, which is used for the needs of the enterprise
How to do it right?
Installation of the outer part of the storm drain begins with its installation on the facade of the building and the roof. First of all, it is necessary to carry out preparatory work for installing the gutter. To do this, you need to secure the hook.
Advice! Experts recommend using a short hook - one that does not need to be placed under the roofing material. This is explained by the fact that if dismantling is necessary, it will be difficult to remove the long one, since the roofing material also needs to be dismantled.
The gutter should be laid at a slope in one direction. On average, for 6 meters it is enough to make a slope of 25–30 mm. This will be enough for the water to fall well. Plus, the fastening hook should not interfere with the free flow of snow. Therefore, in the direction of the roof slope, the edge of the hook should be lower.
A connector must be used to connect the gutter. It has a special latch and a rubber seal. A plug is installed at the highest point at the end. All water flowing down the gutter should fall into the canadian and funnel. Through them, all precipitation enters the pipeline.
Based on the projection of the roof from the facade, elbows are used to connect the funnel to the vertical pipe. If the roof is hipped, then a tee is installed at the corners to connect the gutter.
As for the wall part of the drain, a bracket and holder are used to secure the pipe. The drain should be located about 50 mm from the wall. An elbow is also installed at the top of the pipe at an angle of 45 degrees and do not forget about the funnel. When the pipe is fixed to the wall, it is necessary to measure the distance from one elbow to the other. Also note that it must fit 80 mm into both links. This means that 160 mm must be added to the actual distance between the knees.
It is necessary to organize drainage from the building. The outlet of the lower elbow should be located at some distance from the foundation. A pipe branch from the building is laid in the ground. This is where all waste should go. For this purpose, a receiver is installed.
Advice! It is recommended to use roofing sealant when connecting the gutter and tees. This is important even if there is a rubber seal.
All above-ground exterior work begins with digging trenches. In the process of digging a pit, it is necessary to immediately organize a slope. The slope of the line should be 10 mm per linear meter, this is the maximum. This will be enough to prevent the pipeline from silting. It is equally important to determine the depth of pipe installation. The peculiarity of such a system is that the water inside does not stagnate, but drains. Therefore, you should not be afraid of freezing. However, it is important to think about the mechanical impact. For example, if the drain will pass in a place where vehicles move, then the depth must be appropriate. Therefore, you can focus on a depth of 70 cm.
Basic elements of classic sewerage
Storm drainage can be point or linear. The first option involves collecting water from surfaces that do not absorb moisture, such as the roof, hard surface areas. The wastewater then flows into receiving tanks, and then enters the drainage system.
With the linear method of drainage, water is drained into trays located near paths and platforms. A simplified version of a storm drain consists of the following elements:
- a central pipe laid under a layer of earth and finishing coating and carrying collected water to the extreme point of the scheme;
- trays - the main part of the system that transports excess water to sand traps; the efficiency of drainage largely depends on them;
- a storm inlet located under a pipe or low point in the yard to collect liquid;
- filters and distributors - invisible, but extremely important components.
All elements included in the system are equally important. If any of them fails, the efficiency of the entire structure decreases.
Image gallery
Photo from
Point type storm water inlet
Connection to drainage system
The principle of point sewerage
Paving a storm drain area
Types of storm water inlets for sewerage
The purpose of a rainwater inlet is to collect moisture coming from pipes and yard coverings. This element is the first to absorb the entire volume of water coming from the drainpipes. When choosing a rainwater inlet, we are guided by such data as the average volume of precipitation, its intensity, topography, and the area occupied by the storm drain.
Image gallery
Photo from
Storm drain with linear water inlet
Point rainwater system
Installation of storm drainage trays
Protective decorative grille
You can buy a cast iron or plastic storm inlet. The former are preferable in case of heavy loads, while the latter are attractive due to their moderate cost, low weight, simplifying installation. A cheaper option is to make a rainwater well for storm drainage at your dacha yourself from brick.
The walls of the pit are lined with brick, leaving a hole for the pipe, then plastered from the inside. Better yet, leave a gap between the soil wall and the cover and fill it with concrete. The bottom of the rainwater inlet must be concreted.
No storm drain can do without a rainwater inlet. It preserves both the foundation of the building and the covering around it. If you try to save money on its installation, then water falling on the foundation will lead to shrinkage and cracks on the walls of the building
This important element is also made from concrete rings. Then the bottom ring can be purchased with a finished bottom and you won’t have to fill the slab. Sometimes factory rain inlets go on sale complete with a basket, siphon, and decorative grille.
Most often used for private construction, rainwater inlets made of plastic or composite materials are produced in the shape of a cube, each side of which is 30-40 cm. There are adapters for inserting pipes from below and on all sides of the product.
Storm drain grates vary in quality and cost. You should always take into account the expected loads on them during operation
In order not to clog the pipes with debris falling through the grid cells, rainwater inlets are equipped with baskets. Once they are full, they are removed and cleaned, then returned to their place.
The design of the factory rainwater inlet includes partitions that divide its internal space into compartments and create a water seal. As a result, the unpleasant odor from decaying organic matter does not penetrate outside.
The efficiency of a point storm drain depends not only on its volume, but also on the installation location. It should be located under a drain or in a place where moisture constantly collects. If it is installed under a pipe, then the jets must accurately hit the center of the grate, otherwise some of the water will fall on the foundation or yard surface in the form of splashes.
Why are sand traps needed?
Rain and melt water in any case contains a certain percentage of insoluble particles. If sand traps are not included in the scheme, dirt will settle in the sewer and it will cease to function fully. Flushing the system is expensive.
A sand trap is a chamber installed behind point receivers in places where water is discharged into underground pipes. It is designed in such a way that the flow of water entering it reduces its speed.
As a result, under the influence of gravity, suspended particles sink to the bottom, and the liquid released from them leaves through a special hole. The shape of the sand catcher is a trap with many chambers located horizontally or a chamber in a vertical design.
Image gallery
Photo from
The sand trap is built into the rain inlet
Sand traps in combined systems
Sand catcher for public storm drainage
Trap device for household system
What are drainage channels?
If the blind area around the house has already been completed, but the drainage system has not been taken care of, drainage gutters, which are also called linear rainwater inlets, can be used as a way out of the situation. Channels made of concrete or plastic are laid outside the blind area parallel to the paths and roof overhangs with a certain slope.
Linear drainage channels receive water from roof gutters and from the entire yard covered with asphalt or slabs. Such a sewer can cover much more objects than a point one. When purchasing ready-made trays, you need to pay attention to such important parameters as permissible load class and mechanical strength limit.
The tray, at first glance, is a very simple product, but if the calculation is done incorrectly, the system will not work fully. It is necessary to take into account the throughput of the storm drain, the type of coating, and the degree of contamination of the drained water.
The weakest products are marked A15. This means that their use is permissible with a maximum load of up to 1.5 tons. They are installed around the perimeter of the house, in pedestrian and bicycle areas. Trays of class B125 can handle loads of up to 12.5 tons without compromising their integrity. They will not be damaged under the weight of a passenger car, so they are appropriate in the garage area.
For private construction, you should not buy massive concrete gutters; plastic trays are quite suitable here. They have strength classes A, B, C. The material for their manufacture is polyethylene or polypropylene.
An important parameter when selecting trays is the hydraulic section, denoted by the abbreviation DN. It must correspond to the diameter of the pipes supplied to these elements. For plastic gutters, the DN value ranges from 70 to 300.
The length of a standard tray is 1 m. The products are equipped with a locking system, with its help the gutters can be lined up in one line, connected to pipes or branches can be made. A rational choice for a summer house, private home - models from DN100 to DN200.
Image gallery
Photo from
Trays with different capacities
Construction of a storm drain from steel parts
Concrete gutters
Practical plastic option
How to choose pipes?
For storm sewerage, according to SNiP, pipes made of metal, asbestos or plastic can be used. Most often, for private homes and cottages, the choice is made of plastic pipes. They are lightweight, decorative, do not corrode, their installation is simple, but the mechanical strength of the material is low compared to metal.
Having chosen the material, you need to decide on the diameter of the pipes.
The initial value is the largest volume of drained rain and melt water. This parameter is determined by the formula:
Q=q20×F×Ψ
Here: Q is the required volume, q20 is the coefficient characterizing the intensity of precipitation within 20 seconds. (l per second per 1 ha). F is the area of the farmstead in hectares, if the roof is pitched, the area is calculated on the horizontal plane. Ψ is the absorption coefficient.
Different surfaces have their own absorption coefficient. To perform independent calculations, its value can be taken from the table
Based on the calculated value and using the Lukin tables, not only the diameter but also the slope of the system is found.
Most often, home storm drainage is performed using pipes with a diameter of 100 mm. The optimal slope of the drains can be taken from this table
With the correct selection of pipe diameters, storm sewers will cope with the task even during moments of the heaviest rainfall. If flows from several gutters enter the pipe, they are all summed up. Professional practitioners for pipes with a cross-section of 110 mm and gutters of the same diameter usually use a slope of 20 mm/linear. M.
If the pipe is connected to a storm inlet, the slope value is slightly increased to avoid stagnation of liquid, and when entering the sand trap, the slope is reduced. This slows down the flow of water, and suspended particles settle to the bottom in greater quantities.
Water in a sewer system of this type drains by gravity, which occurs due to the formed slope of the drainage pipe. There are no pressure pumps here, so you don’t have to look for a team of professionals to install a storm drain at your dacha or country yard.
The owner can do all the work himself. Details about the calculations for organizing storm drainage are written in the article, the contents of which we recommend that you familiarize yourself with.
Where do you need a well and a collector?
As in any system consisting of underground pipes, there must be a well in the storm sewer.
Its installation is advisable in the following circumstances:
- if 2 or more flows converge;
- when it is necessary to radically change the height, direction of the pipeline or its slope;
- if there is a need to switch to a larger pipe diameter.
Wells are also provided at established intervals of straight sections of the system. If the diameter of the well does not exceed 150 mm, then the next one is located at a distance of 30 to 35 m. With a diameter of 200 mm - from 45 to 50 m, and if the diameter is 0.5 m, the interval is increased to 70-75 m.
The diameter of a well in a private house does not exceed 1 m. The deeper the well, the larger its diameter should be.
Some owners lay out wells the old fashioned way from brick or reinforced concrete rings. Others prefer more advanced materials - plastic and fiberglass. According to their design, wells are either collapsible or solid.
They have the shape of a cylinder with a completely sealed bottom and a hole at the top. There are nozzles for connecting pipes. Several assembled storm water inlets are also used as wells.
All fluid flows are redirected to the collector after combining them into one. The choice of material for this storm drainage element is individual and depends on the preferences and capabilities of the owner
To redirect the collected water to ground treatment facilities or to a sewer, a collector is included in the system. Sometimes its role is played by a large plastic well. It is converted into a storage tank by hermetically sealing the outlet pipes. To use water, a submersible pump is used.
Large cross-section pipes are also used for the collector - reinforced concrete or plastic with all pipelines connected to them. On the construction market you can also purchase ready-made containers for underground use. There are multi-chamber tanks where rain and melt water are treated according to the same principle as in septic tanks.
Image gallery
Photo from
Collector well for redirecting water
Absorption well made of perforated rings
Budget option for an absorption well
Discharging rainwater into a drain
Calculation of volume, depth and slope
If you want your house and site to be reliably protected from flooding, siltation and flows of dirty rainwater, you need to correctly calculate and install storm drainage into the project. The main calculation of storm drainage comes down to ensuring that all water entering the territory equipped with storm drains goes without residue to the places allocated for it and is regulated by SNiP 2.04.03-85.
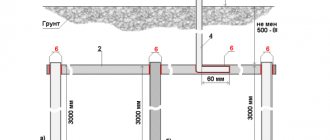
Calculation of channel laying depth
If the cross-section of underground pipelines does not exceed 0.5 m, then they are buried to a level of 30 cm. With large channel diameters, the depth of storm drainage in a private house increases up to 70 cm.
If a drainage system has already been laid on the site, then the storm drainage system in a private house is located above this system.
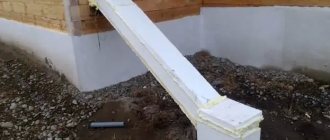
Advice: It is recommended to deepen all elements to the level of soil freezing, but in practice you can place them closer to the surface, providing them with insulation by backfilling with a layer of crushed stone and laying geotextiles. This will reduce the cost and labor intensity of excavation work.
Insulation of pipes using crushed stone and geotextiles
Calculation of the volume of wastewater discharged from the site
To calculate the volume of wastewater, you must use the following formula: Q=q20 x F x ¥, where:
- Q is the volume that needs to be removed from the site;
- q20 is the amount of precipitation. This data can be obtained from the weather service or taken from the same SNiP 2.04.03-85;
- F is the area from which water will be drained. With a point system, a projection of the roof area onto a horizontal plane is taken. In the case of linear system equipment, all areas involved in drainage are taken into account;
- ¥ - coefficient taking into account the covering material with which the site is equipped or the house is covered:
— 0.4 — crushed stone or gravel;
— 0.85 — concrete;
— 0.95 — asphalt;
— 1 — roof.
Calculation of the required channel slope
A correctly selected slope guarantees the free flow of water through pipelines under the influence of physical laws. The required slope of the storm drain is determined depending on the diameter of the pipes used. If the pipes have a diameter of 20 cm, then a coefficient of 0.007 is taken into account. That is, 7 mm per linear meter of pipe. With a diameter of 15 cm, the coefficient will be 0.008.
The slope of the channels in an open system ranges from 0.003-0.005 (this is 3-5 mm). But the pipes connected to storm water inlets and storm wells must have a slope of 2 cm for each linear meter.
To install drainage systems you will need geotextiles. Read about how to choose geotextiles for drainage in a separate article on the site.
We described in another article what pipes exist for drainage of a site.
There is information about the types of drainage wells made of polymers here.
Prevention of storm sewer malfunctions
Having installed the storm drainage system of a private house or cottage yourself, you should not forget that it needs constant care. Preventive measures include cleaning trays and point storm water inlets from debris settled in them.
If you neglect this procedure, the system will definitely fail. The ideal option is to use the system all year round.
A self-regulating cable can heat a large area. The basis of its design is a semiconductor matrix located between two copper cores. This cable will prevent any pipes from freezing during periods of low temperatures.
During the cold season, thaws occur, during which water from the drainage system enters the channels and pipes. Then it moves into the storm drain,
where it freezes and turns into ice.
To prevent the formation of ice plugs in the storm drain, a self-regulating heating cable is inserted into storm water inlets located under the drain risers. This way, ice jams will not form in the heated system, and if they form, you can quickly get rid of them.
Combined drainage systems for a country house
It is logical that it is irrational to build branches from various branches of the system for each circuit. Therefore, the outlets are arranged in common, into one collector.
Watch the video
Installation of storm drainage and drainage of the site and foundation
The combination of individual drainage schemes is carried out in collector wells, while joining is allowed at any height of the collector, depending on the type of circuit, which are:
- surface, for storm drainage schemes around a country house;
- shallow contours of the drainage system under the surface of the site at a depth of up to half a meter;
- deep drainages for drainage of groundwater in heavily watered areas of a country house.
Any of the listed types can be combined into a common system with a common storage device.
It is not recommended to include fecal wastewater into the general drainage system. In this case, reusing the accumulated water becomes impossible.
Construction order
In general, first you need to create a project. If there is no opportunity or desire to use the services of professionals, draw it to scale (on a piece of paper or in one of the programs). This way you can decide quite accurately what you need and how much. Having purchased the necessary materials, you can begin work.
First, a drainage system is installed. Then the installation of storm drainage begins. It makes sense to carry out this work simultaneously with the laying of drainage and sewer systems, as well as to carry out preparation work for laying paths and blind areas. All of these jobs require soil removal, so why not do it all at once?
If other systems are already ready or they are simply not needed, you can dig trenches. They should be 10-15 cm greater than the required depth. Crushed stone is poured into the bottom of the trenches, and pipes are laid in it and devices are installed. Crushed stone will neutralize heaving forces: it always remains mobile, so that under load it simply moves from place to place. The devices installed in it hardly feel the load.
Installing a rainwater inlet - fill it with concrete and “weight it down” with something heavy so that it doesn’t squeeze out
When installing rainwater inlets, they are concreted. They put formwork around it and fill it with a 15-20 cm layer of concrete. It must be calculated so that the finishing coating that you are going to lay fits normally.
The best posts
- [Creativity at home] Interior decor from wood cuts
- Using blue wallpaper in the kitchen
- How and from what to make a coffee table with your own hands (50 photos)
- Do-it-yourself installation of wooden partitions
- Knitting a tunic for women: diagram with description
- Decorate a baby crib with your own hands: valance and canopy
- Is it possible to glue wallpaper onto wallpaper: how to glue non-woven wallpaper, will wallpaper stick to paintable wallpaper, water-based paint, vinyl, liquid, video
- How long does it take for floor tiles to dry after installation: walk on floor tiles, how long should floor tiles dry?
Related article: How to paint walls correctly: using a roller and brushes
Tips for installing storm drains on site
There are several tips that will simplify the installation of storm drains. The amount of excavation work can be reduced by laying the drainage and stormwater systems in one trench (without combining them). The need for separate installation of systems was mentioned above: this is done to prevent overloading of the structure during floods or rainstorms.
The drainage trench must be deep enough to take into account the depth of soil freezing. In addition, when constructing a trench, it is important to take into account the thickness of the sand or gravel layer. The slope of the drainage trench is usually about 2 degrees.
Laying pipes for storm drainage must also be done at a sufficient depth, and when arranging two systems in one trench, this nuance must be taken into account.
All pipelines that transport water must ultimately be connected to a collector, which will provide temporary storage and further drainage of water to the reservoir. When a storm drain is built around a house, it is necessary to test it. To do this, you need to pour at least a bucket of water into each funnel and watch how the water passes through the system to make sure that it reaches its final destination.
Conclusion
The installation of a storm drain around a house is not difficult; it can be created even in the absence of deep knowledge in construction. It is enough just to accurately follow the algorithm for constructing the system, design it efficiently and carefully carry out all the work. As a result of all these actions, the storm sewer will ensure the removal of water from the territory of the site, and the objects located on it will not be in danger of flooding, and it will be much easier for the residents of the house to move around the area that is not flooded with numerous puddles.
The principle of operation of a storm drain in a private house
To create a high-quality storm drain, you need to understand how concrete, plastic or cast iron storm drains work. Basic principle: all wastewater is collected in one channel and sent to a common collector. Each structural element must be connected to the overall system.
Proper storm drainage on a site works like this: first, precipitation is collected from the roof of the building and sent to the gutters, then it moves by gravity to the storm inlet, and from there all the water moves through the pipes to the collector.
An important part of the design is linear drainage. To equip it, it is necessary to install trays at ground level where water will collect in the maximum volume (read: “Trays for storm sewers - types of concrete, plastic and metal structures”). Each storm drainage tray is connected to the system and drains water further through it, but there are also schemes that allow water to be drained not underground through a pipeline, but on the earth’s surface.