When do you need to adjust plastic windows?
Adjustment of windows is required in case of any violations of their normal operation. The following signs may indicate the need for its implementation:
- Tight movement of the valves;
- Visible subsidence or distortion of the sashes;
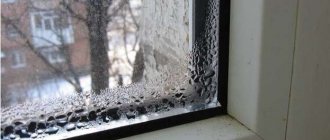
- Violations of the tightness of the closure - cracks appear, blowing from the window;
- Switching modes is difficult;
- Loose or jammed handles;
If such signs are detected, it is not recommended to delay taking action. In most cases, you can adjust the plastic windows yourself and quickly restore their normal operation. If you do not make adjustments in a timely manner, soon enough you may encounter a serious malfunction of the window structure, which will cause a lot of inconvenience and require significant repair costs.
The plastic window closes tightly
This problem often occurs due to mechanical misalignment of the sash. To fix this, you need to adjust the window vertically or horizontally. You can do this as follows:
- carefully examine the window itself and determine where the distortion occurred: usually it happens from the bottom or side of the side that is located directly opposite the hinge;
- in the case when the sash is in contact with the window frame from below, you need to move it upward, and then towards the corner that aligns with the upper hinge;
- open the sash and turn the top hinge screw clockwise once;
- then you need to close it, remove the cap and insert the hexagon into the lower loop, namely into the adjustment hole;
- turn clockwise several times;
- check whether the sash works or whether its functioning is still problematic.
For additional adjustments, you may need pliers to separate some parts of the plastic frame and a screwdriver to help tighten the elements. Therefore, it is advisable to have the entire set of tools at hand.
Types of regime regulation mechanisms
The degree of clamping is determined by how the clamping mechanisms are located. Most manufacturers equip profiles with trunnions, which are located on the end of the window. Before switching the structure to winter mode, you need to find out what specific setting is applied. On the round eccentric of the trunnion there is a mark in the form of a dot or line. In the neutral position, the mark is directed upward. When set to summer, it “looks” outside, and when set to winter, it looks inside.
Eccentrics can be not only round. Other varieties:
- Oval.
There are usually no risks anymore. Switching is done according to the orientation of the oval. The vertical position corresponds to “summer”, the horizontal position corresponds to “winter”, and the diagonal position corresponds to “neutral”.
- Capfa for the key.
When adjusting for the winter in this situation, you need to look at where the eccentric is shifted. If it is offset towards the room, the winter setting is set. If the displacement goes outward, the plastic window is adjusted to the summer position. A strictly central position corresponds to a neutral setting. These eccentrics are adjusted with a key; therefore, to carry out the work yourself, you need a special tool. When installing profiles from Rehau or any other manufacturer, I advise you to ask the installer to show you how to use such a key correctly.
The number of trunnions may differ in profiles from different manufacturers. The larger the frame, the greater their number. Everything needs to be regulated.
The importance of winter-summer modes
Despite the fact that in warm weather the windows are opened for ventilation, adjustment of the sash in summer mode is required to create a good microclimate in the room. It is also effective when there is a need to leave for a certain period of time. Then there will be no musty smell in the house due to a small draft through the cracks of the sash. When setting modes, you should lubricate the mechanisms with machine oil or Vaseline so that their operation is smooth and of high quality.
Experts recommend adjusting the pressure density to the winter position gradually to reduce the load on the seal and not deform it. Before this, you should thoroughly clean the window frame from dust and debris, which can form a draft due to the loose fit of the sash. In winter, blowing is excluded, so the tightness of the closure is checked with a lit match. Its attenuation or fluctuation of fire indicates the presence of cold bridges.
If the adjustments don't work
A situation may arise when the sashes are adjusted correctly, the plastic windows are switched to the desired season mode and all the mechanisms close well, but problems still arise:
- draft;
- condensate;
- freezing.
Such nuances can arise in several cases:
- Defective windows. This happens quite rarely and only when ordering from dubious companies.
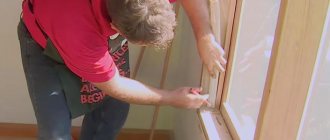
- Incorrect installation. During installation work, the correct technology must be followed: maintaining the gaps between the frame and the opening, high-quality fastening and mandatory sealing with construction foam.
- There is no finishing on the slopes. Polyurethane foam without protection quickly collapses under the influence of ultraviolet radiation and moisture.
- Seal wear. Possible due to prolonged or improper use of double-glazed windows.
When a malfunction is identified, it is eliminated. The windows should now function correctly and provide a sufficient seal.
Self-adjustment of windows for winter HomeNews on the market
Despite the fact that window frames made of metal-plastic, unlike old wooden ones, are considered one of the most durable and wear-resistant, every year, on the eve of frost, they need protection and adjustment and replacement of the so-called gaskets. We will tell you in this review how you can adjust your windows for winter yourself so that you don’t have to listen to the howling of the wind through the cracks in winter.
Plastic frames were conceived in order to simplify the process of preparing for seasonal changes as much as possible. They do not need to be insulated, it is enough to put them in a mode corresponding to the cold season
Seasonal Maintenance
The main feature of opening windows is that they do not have vents. For better ventilation of the room, the system provides rotary doors. During the operation of plastic double-glazed windows, you may notice that a draft appears in winter. Don't panic - this is not a manufacturing defect, but simply the seasonal mode is set incorrectly. Switching plastic windows to winter and summer modes is a mandatory maintenance procedure.
The tilt and turn mechanism of the glass unit must be adjusted depending on the season of the year
During long-term use, drafts may also appear. This occurs due to the loosening of the hinge screws of the rotary-locking mechanisms. By independently adjusting the windows for the winter, you can easily save 3-7 thousand rubles on calling specialists.
Leak test
How to prepare plastic windows for winter? With the onset of cold weather, it is necessary to carry out a preventive inspection of the state of normal locking of the sashes in winter mode. Leak tightness can be checked in several ways:
- Tactile. By running your hand along the frame, you can determine the presence of serious drafts.
- Fire with a match or lighter. Deviation of the flame from the vertical indicates the presence of blowing.
- A sheet of paper. They leave him in the closed door and try to pull him out. If the leaf comes out easily, the sash does not close tightly.
If the paper sheet is easy to pull out through the sash, then the window is not airtight.
Having identified problem areas, we begin to adjust the system to optimal requirements.
Leak test
In fact, initially, when installing double-glazed windows, installers set the so-called neutral mode for locking the sashes. This happens so that the apartment owner himself decides during operation whether or not it is necessary to reconfigure the modes. By all standards, window adjustments should be carried out with each change of season, i.e. optimally – twice a year.
It is necessary to switch windows to winter mode with the onset of the first frosts
You just need to understand the adjustment algorithm and purchase several tools that will cost several times less than paid window adjustments. In our publication we will analyze in detail all stages of work and possible difficulties that may arise during this work.
Before deciding to reconfigure the windows, they must be checked for leaks. It is important to understand how critical the blowing is and in what places in order to determine another important point - whether it will be necessary to replace the rubber seals or not.
For your information! Rubber gaskets must be changed every three years. It is better to do this in the warm season, since with the onset of cold weather the insulation will be more difficult to install - the rubber will begin to harden from the cold. That is why by winter the cost of such work doubles on average. If in the warm season, setting up and replacing sealing rubber on average costs 500 rubles per frame, with the onset of cold weather, prices will already be 1000 rubles for the same volume.
How to properly check windows for leaks:
- after you have tightly closed the windows, draw a river along the junction of the frame and the sash;
- a subtle draft can be detected using an ordinary candle;
- The tightness of the seal to the frame can also be checked using a sheet. To do this, you need to open the window, insert the sheet into the gap between the sash and the frame and close it tightly. If the sheet was easily pulled out, then the window needs additional adjustment.
The degree of fit of the sash to the frame is adjusted using locking mechanisms (trunnions) located on the side and upper ends of the sash
Switching winter/summer modes
When installing double-glazed windows, installers set the initial neutral parameters for locking the sashes. All positions will be adjusted for optimal functionality. However, then it is necessary to adjust the settings - ideally twice a year.
Why is this necessary?
Seasonal adjustment is often forgotten, leaving the sash pressure in a neutral position. As with any violation of operating rules, consequences arise over time:
- drafts from under the sash even with correct installation adjustments;
- if the summer mode is set, then in winter this will not provide sufficient pressure on the locking mechanism, which will cause heat loss from the room;
- if you leave the winter position, then due to the constant strong pressure of the sash on the seal, the latter will quickly become unusable;
- in the absence of seasonal adjustment, the normal microclimate of the room is disrupted, including an increase in humidity levels (there is a risk of condensation and mold).
Incorrect operating mode can lead to the formation of condensation on the glass.
To do this, you need to correctly set the winter and summer modes of plastic windows in the sash settings.
What tools will you need?
To adjust plastic windows yourself, you will need a fairly simple kit, including:
- Hex wrench No. 4;
- Pliers;
- Phillips and flat screwdrivers;
- A screwdriver with a set of bits of different shapes.
The tools from this set are usually always available at home. An exception may be a hexagon, without which the work cannot be completed - this is the main regulatory tool. If you don’t know what key is needed to adjust plastic windows and where you can find it, then contact any furniture hardware store. 4 mm hexagons are used when assembling any modern cabinet furniture, so finding such a key will not be a problem.
A screwdriver and screwdrivers will be needed to work with the screw connections with which the hardware elements are attached to the profile. Pliers are needed as an auxiliary tool.
It is recommended to additionally prepare silicone grease for the fittings. You can also use WD-40 or other similar spray lubricants.
Adjustment mechanisms
Before you begin changing the mode, you need to determine the locations where the adjustment devices are located. In most cases, the system provides for the presence of special mechanisms - trunnions, which, depending on their position, determine the degree of pressing of the sash required for the season.
They are located at the ends of a metal-plastic window or door. The number of such mechanisms may vary depending on the size and manufacturer of the glass unit (from two or more).
Possible locations of eccentrics - different manufacturers have them in different places
The trunnions may differ in appearance, but they perform the same adjusting function.
Options for the appearance of eccentrics
At the edge of the eccentric there is a mark, which serves as an indicator of the desired mode. By default, it is set up - this is a neutral position, which needs to be changed in accordance with the season.
Risk indicating the selected mode
How to switch
The process itself is quite simple, you only need one tool - a simple hexagon (usually 4 mm), or less often an asterisk.
You need to set plastic windows to cold season mode before the onset of frost, when the temperature is still plus 5–10°.
Open the glass unit and inspect the ends. Usually there is one eccentric on the side, the second on top.
Mark indicating adjustment mode
Most likely, the regimes will be in a neutral position, and the risks will point upward. Having selected the desired tool, change the position of the marker.
To set a plastic window for the winter, turn the notch on the regulator towards the outside of the room. With the onset of the warm season, the position of the marker should be moved by the mark inside the room. Accordingly, if there are several such regulators, then the modes are transferred by turning all available eccentrics to one position.
You need to constantly switch modes according to the season - this is what will ensure normal functionality, balance of ventilation and sufficient energy saving in your home.
Elimination of sash distortion
When the hinges weaken or the building shrinks, arbitrary friction of the sash against the frame occurs due to the resulting deformations. The adjustment begins by influencing the top hinge of the plastic window sash using a hexagon. It is inserted into the hinge screw, which is located under the protective cover, and turned clockwise. Thus, the opposite bottom will rise. When rotated counterclockwise, it will lower.
By acting on the lower loop, you can adjust the vertical position, and the procedure can be carried out both in the closed and open positions. After removing the protective casing, the hexagon is inserted into the corresponding screw and scrolled to the right to lift the entire sash. When rotated to the left, it will drop to the desired mark, which can be set with a pencil.
As a rule, misalignment occurs when the sash width is more than 80 cm, since during use it sags under its own weight. In this case, plastic windows need to be adjusted every 4-6 months.
Adjusting the pressure of a plastic window
Most often you have to adjust the pressure on the sash of a plastic window. This parameter characterizes the force with which the sash is pressed against the frame when closed. Pressing of the sash is ensured by locking trunnions located at its end part. When the handle is turned, the trunnions move vertically, entering or leaving the mating part located in the frame opening. When the axle completely extends beyond the mate, the sash is pressed against the frame with maximum force. The magnitude of this force is subject to adjustment.
It is recommended to adjust the pressure of plastic windows at least twice a year to switch to winter and summer mode. The maximum pressure is set for the winter. It provides increased tightness and prevents cold air from entering the room due to insufficient sash cover. However, strong pressure accelerates the wear of rubber seals, so it is recommended to loosen it in summer.
It is also necessary to adjust the pressure of the plastic window if there is a blow from the area where the sash adjoins the frame. The reason for this may be incorrectly adjusted pressure or wear of the seals. You can check the presence of draft using the flame of a match or a lighter brought to the window. If the flame fluctuates, adjustment is necessary.
How to adjust a plastic window so it doesn't blow
In some cases, adjusting the window trunnion does not allow achieving the tightest possible pressure, and the closed sash continues to blow. This occurs when the sash moves vertically or horizontally. As a result, part of the trunnions may not completely extend beyond the mating part.
To determine the place where incomplete pressure is created, you need to remember the locations of the trunnions or make corresponding marks on the inside of the sash profile. After this, you need to close the window and, in the marked places, try to press the sash away from the frame with your hands. If it remains motionless, then the trunnion is working properly. If the sash moves, and a gap appears at the point where the force is applied, then the trunnion does not completely fit into the mating part. In such cases, additional adjustment of the plastic window sash horizontally and/or vertically is required.
Clamp on windows with eccentrics
Adjustment of the pressure of the plastic window is carried out according to the following instructions:
- The first adjustment is carried out with slight pressure. If you do it too hard, the shelf life of the seal will be significantly reduced and it will have to be replaced.
- At the end of the window there is a system of eccentrics, which is adjusted using a hex wrench or pliers. External design may differ, but the principle of operation is the same in all variations.
- When you turn the key to the right, the mechanism loosens, and when you turn to the left, it presses. In summer it is recommended to weaken it with a gradual increase in downforce closer to winter.
- For uniform pressure along the entire perimeter, the mechanisms are adjusted equally.
Pressure from hinge side
If pressing should be carried out in an area with hinges, then the screw at the bottom of the sash is adjusted. Tilt-and-turn models also require adjustment at the top for high-quality protection from blowing. The window must be opened, the handle must be placed for ventilation and pressure on the locking tab. Then it will be possible to easily reach the adjusting bolt in the scissor mechanism. When the bolt is rotated clockwise, the pressure is strengthened, and counterclockwise, it is weakened.
Clamp on windows with plates
In some products, the pressing is carried out using plates, and the question arises: how to adjust the plastic windows to the pressing yourself? If the tongue of the pressing mechanism is pulled out, this indicates that the sash is too tight. To prevent blowing, there are hinges at the end of the window that, when turned with the key to the left, press the sash more tightly. If they are located on the right side, then the key should be turned clockwise.
Other types of fittings adjustment
In addition to switching the fittings to winter or summer mode, they may require finer adjustments. Manufacturers of plastic windows leave the opportunity to change the pressing force, remove broken mechanisms, eliminate sagging sashes and drafts without completely replacing the entire window system.
These additional steps are needed if:
- when opening or closing, the sash grinds, hitting the profile on the sides or bottom;
- during cold weather, there is a draft, heat loss, despite a change in regime;
- the handle does not turn or close;
- the fittings become loose;
- there is sagging of the structure, which especially often happens with balcony doors.
To return window geometry to its original form, the following procedures are provided:
- shifting horizontally or vertically;
- adjusting the position of the upper corner;
- strengthening or weakening the pressure against the frame.
Some work may be related to handle problems.
Vertical-horizontal shift
You can adjust the vertical position of the sash by adjusting the bottom hinge.
It is often equipped with a protective cap or plug. There are two points under the protection. One adjusts the position vertically, the other adjusts the horizontal position. To make vertical adjustments, you need to turn the screw located at the top of the hinge. To raise the sash, turn the screw to the right. For lowering - vice versa. To adjust the horizontal position of the structure, you need to adjust both hinges, top and bottom. The second hinge screw located on the side is responsible for changing the horizontal. If you turn it from left to right, the sash will move closer to the fastener, and vice versa, if you turn it from right to left, it will move away.
By adjusting the vertical and horizontal, you can eliminate drafts caused by the fact that the sash is not installed quite correctly. Blowing is also possible if the upper corner of the window is not locked. The degree of its pressure is adjusted by turning the adjusting screw on the side of the upper hinge until the sash fits evenly and tightly.
If the profile is equipped with a slot ventilation function, then when changing the horizontal position you need to leave a gap of a couple of millimeters between the door and the hinge fasteners.
Upper corner adjustment
There is another method to adjust the top corner pressure. To gain access to the adjusting screw, the sash opens in two positions simultaneously.
To do this you will need:
- press the lock, which looks like a locking loop and tongue, located on the end side;
- pull the blocker all the way;
- turn the handle to ventilate;
- pull the top side of the door towards you.
Sometimes it is enough to open the window using the swing method, then turn the handle for ventilation and pull it towards you. This will open the clamping mechanism. Now all that remains is to find a place for the hexagon on one of the plates. Turning it changes the adhesive force of the upper corner.
Increase or decrease pressure
Often profiles from Rehau (or other manufacturers) are equipped with anti-burglary protection. To do this, a pressing mechanism is installed that does not allow the sash to be pressed out of the street. The device takes the form of a plate. The adjustment is similar to changing the “winter-summer” mode. It is enough to turn the mechanism clockwise so that the tongue extends, helping the window to close more tightly.
Pen problems
The following problems are often associated with the handle:
- it jams and does not rotate to the desired position;
- she was blocked;
- it's broken.
If the handle jams and does not turn as it should, there are two possible options:
- Needs cleaning. The handle is removed, all mechanisms are cleaned with a special brush. Then the mechanics are lubricated and the handle returns to its place.
- If the handle does not rotate to the desired position because its movement is too tight, it seems to get stuck, requiring a lot of effort, you need to slightly reduce the pressing force of the sash. To do this, adjust the eccentrics located closest to the handle. It is also necessary to adjust the hinge bolts on the reverse side.
Sometimes the handle becomes blocked, making it impossible to turn. Often the essence of the problem is the blocker that fixes it. The setting depends on what fittings are installed. If there is an inscription AUBI on the shutter, then you need to direct the door to a vertical position, press the plate with the spring and turn the handle in the required direction. If the inscription is different (the company is different), you will need to adjust the tongue. It is located under the handle. You need to press it and turn it towards the elastic band.
If the handle breaks, you can simply replace it. To do this, you need to buy the model you like, remove the old one and install the new one. To remove a broken part, you will need to rotate the cover on the handle ninety degrees. This will open the mounting bolts. After unscrewing them, the handle is removed by carefully shaking it while pulling it out. Installation is done in reverse order.
Do you have any questions or need clarification? Ask
Features of adjusting plastic windows of different types
How to adjust plastic windows of different models? Typically, all designs have a number of similar features, based on which any trouble that may arise can be corrected.
Experts note several types of adjustments that are universal:
- Impact on hinges located at the top or bottom.
- Adjustment of the casement mode by acting on the eccentric located on the perimeter of the window.
- Setting up loop mode by influencing one or both devices.
- Correction of the hinge located at the top of the tilting windows.
Adjustment depending on brand
Manufacturers of double-glazed windows complete their products with different types of fittings from different brands, the adjustment of which may have some distinctive features:
- "Maso." The trunnions of this brand are quite large and oval-shaped, which allows adjustment with ordinary pliers or a wrench.
- "Torx". Produces the most reliable and durable locking fittings. Adjustment is carried out using a hex wrench or slotted screwdriver.
- "Roto". The locking mechanisms of this company have round heads. To turn them you need a special key of the appropriate shape.
Adjusting fittings
Before proceeding with the basic settings, it is necessary to inspect all elements of the fittings and, if necessary, correct problems.
Most often the problem occurs due to loose grip on the handle.
To eliminate this malfunction, it is necessary to move the upper platform of the handle itself at an angle of 90 degrees. Underneath there are bolts that need to be tightened with a Phillips screwdriver.
How to repair a sticky knob that won't turn to the desired position
Such a malfunction is more significant and can have several causes.
- Perhaps the mechanism needs cleaning and lubrication. In this case, the solution to the problem may be to dismantle the handle and clean all its mechanisms with a special brush. After cleaning, it is necessary to lubricate the mechanism.
- If the handle does not turn completely to the position or turns, but with great difficulty, just try to slightly loosen the pressure on the sash itself. Here you need to adjust the eccentrics, which are located at the ends of the sashes in close proximity to the handles. In addition, it is necessary to adjust the bolts located on the hinges on the opposite side.
Window adjustment options
Adjusting the handle that is blocked
If the window handle is blocked, it makes no sense to replace it. You don't even have to dismantle it completely. The occurrence of a malfunction is associated with incorrect operation of the locking mechanism: it prevents the sash from changing its state when it is open. It is necessary to turn the locking lever to allow the handle to move freely.
Locking mechanism diagram
There are two ways to eliminate this malfunction, depending on the type of design of the window mechanism and fittings. In one embodiment, the locking lever can be in the form of a tongue located at an angle to the seal and screwed to the end of the sash when the window is open. In another embodiment, the lever can be in the form of a clamp that fits onto the seal and serves as a gasket.
The window handle is broken
If the handle breaks, the only solution is to replace it. Using the same principle that we have already discussed, we open access to the bolts by turning the cover on the handle by 90%. The handle is removed by slightly shaking and pulling. After purchasing the accessories, the entire process is carried out in reverse order.
Components and accessories can be easily purchased at any specialized store
Adjustment depending on brand
Manufacturers of double-glazed windows complete their products with different types of fittings, and the adjustment of each may have some distinctive features.
Each manufacturer uses its own options for implementing circuits and fastenings, but the operating principle remains the same
Let's look at the features of adjusting windows of different brands:
- "Maso." The advantages of double-glazed windows from this company are that settings and adjustments can be made using ordinary pliers or a wrench;
- "Torx". One of the most reliable fittings and designs. The locking hardware from this company is easy to adjust. It is enough to have a hex wrench or slotted screwdriver on hand;
- "Roto". But the fittings and mechanisms of this company cannot be adjusted without a special key. The locking mechanisms of this company have round heads.
Errors during adjustment
You should not put a newly installed double-glazed window into the “winter” position. Sudden pressure on a new rubber seal can cause it to become irreversibly deformed; once the load is released, it will not return to its original shape.
Uneven pressure. After all the work has been completed, you need to check the degree of fit of the window around the entire perimeter using the same sheet of paper or visually. Uneven load in different areas will also lead to deformation of the gasket and the appearance of drafts.
With the onset of summer, it is necessary to loosen the seal, since all materials expand at higher temperatures, and, accordingly, the pressure between the parts of the glass unit increases.
As you can see, adjusting the seasonal position of the window does not present any difficulties. Any person without preparation can cope with the task. You will need the simplest tools that are found in any home. Changing modes allows you to provide the most comfortable microclimate in the room and reduce the degree of wear of the seal and fasteners, thus significantly extending the service life of window structures.
In addition to the described adjustments to the position of the window, do not forget about the basic rules of care and operation: lubricate the hinges with machine oil, the seal with special silicone grease, do not load the open sashes, and turn the handle all the way when opening. This will help prevent major damage to the fittings and the entire structure.
Useful video on caring for fittings:
How and how to adjust a plastic window for various malfunctions
To properly regulate plastic windows, correcting those arising due to various circumstances, you should use some tools:
- pliers;
- screwdrivers with hex, flat, and Phillips heads;
- set with star attachments.
To obtain the correct position of the sashes on the frame, you need to adjust the degree of pressure of the sealing material. For this purpose, adjustment can be made in three planes.
Despite the fact that specific window models differ in the mechanisms for accessing the regulatory elements, the general rules for all types of work (as well as the location of these structures) do not differ.
When closing, the sash touches the frame from below
Adjusting the trunnions on plastic windows may not produce results when the sash catches the frame during the closing procedure. How to fix:
- open the sash;
- Use a hexagon to rotate the adjustment screw clockwise (located at the top end, near the hinge);
- close a window;
- remove the cap covering the bottom loop;
- use the same key to make several turns in the same direction;
- check the operation of the window system;
- repeat until the desired result is achieved.
When closing, the sash touches the frame on the side
If there is such a violation, the process of adjusting plastic windows is carried out as follows:
- find the screw under the bottom hinge and move the sash in its direction;
- if the entire frame touches the sash, carry out the same actions with the top hinge.
Wear of striker plates
To check the bars that perform the locking function, you need to open the structure and inspect it. The planks are located along the perimeter on each side. If one of them is worn, the frame will not sit evenly.
The situation is brought back to normal like this:
- open the structure;
- remove the plugs from the adjustment bolts (upper, lower);
- use a hexagon to loosen the bolts;
- adjust the system from above (left and right) by operating the adjusting screw;
- adjust the bottom (up and down);
- check how the sash fits into the frame.
The sash does not fit tightly enough to the frame
It’s easy to fix the fit of the sashes to the frame with your own hands:
- act on the eccentrics (they are located at the end) using a hex wrench;
- move the adjusting screw to increase the pressure on the hinges;
- adjust the pressure of the upper hinge when the mechanism is tilt-and-turn;
- press the response system (some types of fittings are equipped with it).
The handle is blocked when the sash is open in the “closed” mode, the window does not close
To protect the handle from breakage, it is allowed to turn it when the sash is closed. To avoid the accidental occurrence of such a situation, there are blockers (they are located at the end of the sash, directly under the handle).
Each manufacturer produces different types of such systems. To remove the handle from the locking mode, act on this element.
The sash is closed, but the window does not close - the handle does not turn
It’s not difficult to solve the problem with your own hands when the sash is not yet open, but the handle does not want to give in to pressure.
You can try one of two ways:
- Act on the adjustment screw (it is located under the lower hinge), try to move the sash to where the locking response mechanism is located.
- Reduce the force of the fastenings by inserting a thin plate made of hard material into the groove between the mating elements and the frame.
The handle is broken
Problems with adjusting plastic windows, even if the opening device breaks down, can be solved independently. To replace the handle, you should pull the cover that covers this element towards you, while turning it at a right angle.
There will be bolts underneath that need to be unscrewed. The old device is removed, a new one is installed in its place, fixed in the same way and covered with a decorative plate.
The handle is very difficult to turn
The opening mechanism can work very hard, requiring effort to open the window. Most often, this is due to a lack of lubricant coating. To prevent such a situation from arising, you should lubricate the fittings with machine oil at least once every 6 months; aerosol formulations are also suitable.
Important! The technical condition, as well as the lubrication level of any of the window mechanisms, should be monitored annually to prevent this composition from drying out and changing the technical properties of the elements.
Window systems will not cause problems to the owner if he periodically pays them his own attention:
- Checking the condition of rubber seals, changing them in a timely manner as the materials wear out.
- If it is necessary to remove decorative plugs, act with extreme care and precision; they, as well as surrounding elements, are easily broken and deformed.
- If the frame base is deformed, or serious problems arise, you should not try to solve them yourself. It is better to contact a qualified specialist who will quickly and efficiently adjust the operation of the windows.
Is there a difference with adjusting PVC balcony doors?
The principle of operation of the fittings for a metal-plastic door leading to the balcony is the same as for a PVC window. Therefore, the adjustments are almost identical:
- Horizontal movement of the door to the right or left is carried out by tightening the adjusting screw located in each hinge under the decorative trim. If the door leaf clings to the doorway along its entire length from the handle side, you need to tighten the screw 1-2 turns clockwise in each hinge (top, middle, bottom). If the door at the corner farthest from the hinges catches the threshold, the screws are adjusted at the top and in the middle;
- Vertical adjustment changes the position of the door in relation to the opening in height. To do this, tighten the vertical adjusting screw in the lower loop. Turning the furniture key counterclockwise moves the door down, clockwise moves it up. Unlike the window, you need a “furniture key” with a diameter of 5 mm. After lifting the door two full turns, it is necessary to lift all the strikers on the sides of the door frame (you need a “furniture key” with a diameter of 2.5 mm). After this, you will have to lift the main and additional locking bars;
- Front adjustment is responsible for the force of pressing the door against the door frame. For these purposes, the trunnions are rotated, as in a plastic window. However, there are also differences. In some types of fittings, the clamping force is changed by the strike plate - for this, an adjustable screw with a hexagon head is placed under it (option “A” in the photo “Types of strike plates”).
Types of strikers.
Window adjustment points
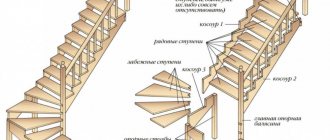
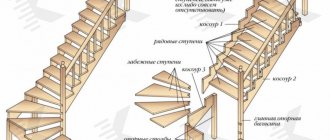
Adjusting the window itself is simple. But if you start twisting and turning in the wrong place, you can come to a sad ending. Therefore, we will briefly describe which units (parts) in the fittings and tilt-and-turn mechanism are responsible for what. But first, let's give a diagram of their location (see figure below).
Layout of fittings and tilt-and-turn mechanism for a metal-plastic window.
As can be seen from the figure, a metal-plastic window is a complex engineering structure, although you cannot tell this by looking at the sash. It has many adjustment points, allowing you to shift the position of the plane alternately in any direction. In addition, you can adjust the clamping force.
1. Adjustment screw in the strike plate (Roto Contro fittings). Allows you to raise and lower the bar by 1 mm. Turn it after adjusting the sash in height if it begins to close poorly.
Attention: almost all materials devoted to window settings say that this screw adjusts the clamping force. This is wrong. By tightening the screw on the striker to change the distance between the frame and the sash, you can ensure that the window stops closing altogether. Then it will take a long time to look for the reason.
2. Adjustment screw in scissors. Makes it possible to attract or move away from the frame the upper corner of the sash in the hinge area by 1 mm.
3. Trunnion. Changes the clamping force. The adjustment amplitude is approximately ±0.8 mm.
4.Bottom loop:
- vertical screw. Moves the sash up/down: raises the height by 2.5 mm, lowers it by 2.0 mm;
- horizontal screw. Moves the window plane to the right/left by ±2.0 mm.
5. Top loop. Attracts or removes the upper corner of the sash to the frame horizontally by +3 mm –2 mm.
Attention: with Roto fittings, the adjusting screw for the top hinge is sometimes located not at the back of the sash, but on it. In this case, it can be screwed both towards the frame and towards the impost. Therefore, before setting up, you need to understand how to turn it: clockwise or counterclockwise.
We showed the locations of the adjusting screws. But not everything is as simple as it might seem. It must be taken into account that the double-glazed window is held on two hinges. And if you carry out any manipulations on one of them, the position of the sash as a whole, each of its corners in relation to the frame and hinges, changes (the exception is the height adjustment of the glass unit using the lower hinge adjusting screw).
Only one corner moves in a large arc, the rest in a small one. Therefore, all control units are activated simultaneously. Otherwise, the center of gravity will not be restored to its original position, which leads to a high risk of critical deformations, which will require not adjustment and repair, but replacement of the window.
Horizontal and vertical adjustment: instructions for dummies
The design of most plastic windows is tilt-and-turn: the sash can be opened or set to ventilation mode. Such models require regular horizontal or vertical adjustment.
You will need to do the following:
- In the case of horizontal debugging, you need to insert the hexagon into the upper hinge and rotate clockwise until the sash is in the required place. Typically, this work is performed when the frame is skewed or the hinges are loosened.
- Vertical adjustment requires adjustment of the lower hinge: to raise the sash, the hexagon is rotated to the right, and to lower it, to the left. The method allows you to cope with distortion up to 2-2.5 mm. Larger deformations require specialist intervention.
Adjustment vertically or horizontally may also be necessary if the sealing element has already partially worn out, but is still suitable for use for 2-3 years. The clamp allows you to ensure the tightness of the structure without changing the elastic band too often.
Other adjustment methods
If, after changing the sash pressure mode according to the season, the wind still blows, the reason may be a violation of its position relative to the frame. Typically, sagging or distortion occurs on long-installed double-glazed windows. This can often be noticed visually or by a characteristic sound.
Adjustment of the position of modern windows can be carried out in several planes, the main thing is to know where the corresponding adjustment screws are located
The tools you will need are a hex wrench and possibly a flathead screwdriver. First you need to remove the covers covering the hinges - it is convenient to do this when the sash is open in the “ventilation” mode.
Most double-glazed windows have the following types of adjustment.
- Vertically. Pay attention to the position of the top screw of the bottom hinge. To raise the sash up, turn it clockwise, to lower it, turn it counterclockwise.
- Horizontally. Here, notice the bottom end screw on the bottom hinge. Turning clockwise tightens the frame to the hinges, respectively, at the top or bottom.
- Adjustment of the fit of the lower corner. The bottom screw of the bottom hinge is responsible for this setting. It is not available on all double-glazed windows! Do not confuse this with the lower side windage adjustment screw!
- Adjustment of the fit of the upper corner. You need to gain access to the eccentric in the upper scissors. To do this, the sash must be simultaneously open in two positions: rotary and tilting. First you need to open the window to the side, then turn the handle up and tilt the frame. The maximum pressure is set when the mark (mark) is facing towards the sash, the minimum - vice versa.
- Adjustment of strikers. These parts may become loose during use. They need to be inspected visually and, if necessary, lowered or raised.
Schemes for adjusting the position of the window sash
How to adjust plastic windows yourself for the winter: step by step photos
Step 1 : Open the window sash and find the eccentric (trunnion), the fittings come with round and oval trunnions.
plastic windows winter summer photo mode
Step 2 : Take a tool: for a round pin – hexagon number 4, for an oval pin – pliers.
Step 3 : Move the trunnion to winter, summer or neutral position
adjusting plastic windows yourself for the winter, instructions and photos
How to switch plastic windows to winter mode?
In summer, the doors can be adjusted so that the degree of pressure is less; in the winter season, on the contrary, it is increased. Before you adjust plastic windows yourself for the winter, you need to check the condition of the fittings and seals: they must be in full working order.
To make the adjustment, you need to change the fit by tightening the sash pins; for this, a hex wrench is most often used. Windows from some manufacturers, for example, Maco (Mako), can be adjusted to the winter position using ordinary pliers. To properly adjust the mechanism, it is necessary to pay attention to all types of trunnions. They need to be tightened clockwise, usually 1-2 full turns are enough.
Experts recommend that at the end of the winter period, loosen the degree of pressure, since when performed, the mechanical pressure on the seal will be higher and it will wear out faster. If it is necessary to reduce the position of the eccentric, change it by turning it counterclockwise and set it to summer mode. Usually this procedure takes no more than 10-15 minutes.
Video - Adjusting the top hinge of a plastic window
When moving the sash, turning the key one or half a turn of the screw, you need to close and open the window frame each time, checking its operation. If necessary, turn the screw back a little. It is recommended to move it gradually by one or two millimeters, so as not to accidentally damage one of the system’s mechanisms.
In addition, the fastenings, which are held on bolts with cross-shaped slots, are also subject to adjustment. Therefore, for this process you will need an appropriate screwdriver, which is sometimes used in conjunction with a hexagon. Tools will help you tighten or loosen, or slightly move one of the elements. For example, this is how they regulate:
Scheme for adjusting the window pressure level
- Trunnions, the shift of which will help strengthen or weaken the pressing force of the sash. This process is carried out by switching the double-glazed window to winter or summer mode.
How to switch modes
In order to adjust the window and switch the clamping mechanisms to winter mode, just pay attention to the eccentrics on the frame on the handle side. Their position can be adjusted using a hex key. Each trunnion is adjusted separately.
An example of the trunnion position in one of the modes
The main thing is to understand which position of the risks or fasteners belongs to which mode. Most often, adjustments can be made with a hex wrench.
Adjustment of the clamping mechanism: due to cracks or according to the season
Sometimes the causes of blowing or “howling” of the frame can be wear of the seals. These are special rubber bands that are attached around the perimeter of the window frame and sash. It is very important to monitor the condition of the seal. Correct adjustment of modes is very important. Since in winter the rubber compresses, allowing cold air to pass through. That is why in winter it is necessary to strengthen the pressure so that cold wind does not blow through the sealing joint.
Advice! Winter adjustments in summer can damage the seals, as the gasket will experience excessive pressure. Ultimately, this can lead to the sash breaking.
The sash touches the window frame
This problem occurs quite often. It is also not critical; you can deal with it yourself without replacing hardware parts and without repair costs.
The sash may touch the edge of the frame in cases where the fittings become loose or deformed. This can happen if the window is constantly open. In this case, the fittings are damaged under the weight of the sash.
The second reason for the malfunction is opening or closing the window too sharply and quickly, which leads to deformation of the parts, as well as to loosening of their fastening.
To carry out the setup without problems, it is advisable to seek help from the hardware manufacturer, whose logo is visible on the parts. By visiting the manufacturer's website and reading the adjustment instructions, you can quickly and accurately make the adjustment.
There are general tips for changing the position of the sash if the closure is broken:
- The sash touches the frame with its upper end: the sash must be turned towards the lower canopy or the entire structure must be lowered down.
- The sash touches the frame with its lower end closer to the handle: the sash is lifted and turned towards the upper hinge.
- The sash touches the frame in the middle of the end part (where the handle is): the structure is shifted towards the hinges. Sometimes it is necessary to slightly rotate the sash towards the lower or upper canopy.
To make the adjustment, you will need to use a hexagon to turn the bolts located on the scissor system on top of the window, as well as on the lower canopy.
Let's look at how to adjust the sash for the most common violations of its position.
- If the sash has dropped, or you need to slightly turn it from below, you need to adjust the bolt located on the lower canopy. Once you remove the trim, you will see a hole at the top of the canopy. By inserting a hexagon into it and turning it, you will adjust the height of the sash. Turning clockwise raises the sash, counterclockwise lowers it.
- If you need to move the sash to the left or right, you need a bolt located at the bottom of the hinged mechanism parallel to the plane of the window. There are two accesses to the bolt: from the window and from the slope; adjustment can be made from either side. By turning the bolt clockwise, you will move the sash to the right, counterclockwise - to the left. It is imperative to check how the window closes after each turn of the bolt. Manipulations are carried out until the desired result is achieved.
- To adjust the sash at the top, it is necessary to adjust the scissor mechanism. To move the sash in the upper part, you need to find the hexagon head, which is located on the side of the mechanism. It will be accessible if the window is fully opened.
If you need to adjust a heavy metal-plastic sash or door, then you need to configure special closers, whose task is to lift the sash when opening and closing.
One of the advantages of modern plastic window systems is that their fittings are subject to comprehensive self-adjustment. In key places there are adjustment bolts, the adjustment of which is carried out using hex keys with a diameter of 4 mm. With a minimum of effort, you can independently adjust the window to suit you, adjust the heat exchange in the room, protect the window from cold air in winter, and also correct minor deficiencies that have arisen during operation.
Other adjustment methods
If, after setting the “winter” position, cold air still enters the room, then the problem may be due to incorrect sash geometry. Typically, sagging or distortion occurs on long-installed double-glazed windows. This can often be noticed visually or by a characteristic sound.
Adjustment of the position of modern windows can be carried out in several planes - the main thing is to know where the corresponding adjustment screws are located.
The tools you will need are a hex wrench and possibly a flathead screwdriver. First you need to remove the covers covering the hinges - it is convenient to do this when the sash is open in the “ventilation” mode.
Remove the plug from the bottom hinge
Most double-glazed windows have the following adjustments:
- Winter mode of plastic windows: additional settings and correct adjustment, video
- Vertically. This is done by rotating the top screw of the bottom hinge. To raise the sash up, turn it clockwise, to lower it - counterclockwise.
Raises or lowers - Horizontally. Adjustable with a bottom end screw on the bottom hinge. Turning clockwise tightens the frame to the hinges at the top or bottom, respectively. It is often difficult to access due to its close proximity to the slope. In this case, you need to open the frame and make adjustments from the inside of the sash - this screw is double-sided.
- Adjustment of the fit of the lower corner. The bottom screw of the bottom hinge is responsible for this setting. It is not available on all double-glazed windows! Do not confuse it with the lower side horizontal adjustment screw!
If it blows from the direction of the loop itself - Adjustment of the fit of the upper corner. You need to gain access to the eccentric in the upper scissors. To do this, the sash must be simultaneously open in two positions: rotary and tilting. First open the window to the side, then turn the handle up and tilt the frame. The maximum pressure is set when the mark (mark) is facing towards the sash, the minimum - vice versa.
- Adjustment of strikers. These parts may become loose during use. They need to be inspected visually and, if necessary, lowered or raised.
It is recommended to check the position of the sash after every two turns of the screw so as not to overtighten it in the opposite direction, especially if you do not have similar experience in adjusting the pressure and position of the window. When raising and lowering, periodically open and close the sash in the “ventilation” mode and make sure that it does not catch the frame. When making left-right adjustments, open and close the frame in a rotating mode and watch how it fits into the frame.
Adjusting and replacing handles
How to adjust the window system when the handle refuses to work, which element to influence? To prevent such problems from arising, this mechanism must be regularly lubricated with machine oil, after removing dust or accumulated dirt.
When the handle stops functioning, it is first cleaned and lubricated. If the method does not produce results, you need to begin detailed adjustments. For example, check whether the blocker has moved from its level. They move the sash, checking the entrance of the blocker into the counterpart; if it is moved, return it to its place. Check the operation of the mechanism.
Sometimes it becomes necessary to replace this device. This procedure is quite simple: remove the pad by slightly turning it towards you. Then unscrew the two bolts hidden under it. The handle is removed and replaced with a new one, fixing it in the same way.