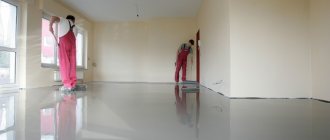
Self-leveling floors are a group of special materials that are applied to the surface by pouring. They are used to level the base and also to protect it. Self-leveling floors have unique strength characteristics and excellent appearance. When pouring such floors, many different factors are taken into account. The thickness of the self-leveling floor is one of them. To create such floors, there are several types of compositions. They differ from each other also in thickness.
Sex classification
Based on the thickness of the coating, self-leveling floors can be divided into:
- Thin-layer mixtures - here the layer thickness is less than 1 mm;
- Mixtures with a middle layer - up to 5 mm;
- Highly filled coatings – the layer is up to 8 mm.
Mixtures for application in a thin layer are used mainly in industrial premises. In this case, the load on the coating should be below average. Such finishing floor coverings are chosen for their efficiency and practicality. In addition, thin-layer bulk mixtures look great and are used to solve design problems. Despite all the advantages and high efficiency, such coatings do not have adequate wear resistance to abrasion. The coating wears off very quickly.
The average thickness of the self-leveling floor implies higher characteristics. Such mixtures can be poured in conditions where mechanical loads are expected to be above an average level, but below a high level. Advantages include cost-effectiveness, high resistance to mechanical damage, and excellent maintainability. These coatings are highly durable. The surface can be matte or have a glossy sheen - this is an excellent choice for apartments or residential private houses.
High fill coatings are designed for the most severe operating conditions. These mixtures, after hardening and polymerization, can withstand even very high shock and mechanical loads. Increased wear resistance makes such floors ideal for use in industrial workshops and production facilities. The floor is very resistant to abrasive loads.
Classification of mixtures
Quick-hardening solutions for self-leveling floors are made on the basis of mineral binders or polymer resins. Fine sand, crushed stone, and expanded clay are used as fillers. The compositions are modified with various additives to increase plasticity, strength, frost resistance, water resistance and other desired qualities.
Mixtures according to their intended purpose are:
- starting ones - for leveling bases with cracks, depressions and other gross defects;
- finishing - for final finishing of floors.
The thickness of the self-leveling floor for each specific case is determined individually and can be in the range of 1-100 mm.
Rough leveling screeds
Mixtures are made using mineral binders - cement, gypsum, anhydrite. Thanks to the fairly large filler (up to 2.5 mm) and thick consistency, this product smoothes out large defects well. It is applied in a layer of 5-100 mm.
The thickness of the starting self-leveling floor is selected taking into account the condition of the base surface and the current loads. The greater the mechanical impact on the coating and the lower the initial strength of the base, the thicker the leveling layer should be.
Self-leveling floors for preliminary leveling
If you need to make a self-leveling screed of very large thickness - from 100 to 200 mm, you can proceed as follows:
- Apply the solution to the desired mark in one go. Disadvantages: long hardening time, heavy weight.
- Consistently apply 2 thin layers to the required height. The drying time will be reduced, but the load will be greater.
- Raise the floor level using a dry screed with expanded clay, vermiculite, sand and fill the solution to the subfloor level.
In the latter case, the load on the base is reduced, its thermal insulation properties are increased, and materials are saved.
Final alignment
Finishing of floors is carried out using finishing mixtures. The liquid solution with finely ground fillers spreads well and, when hardened, forms a durable and wear-resistant coating with a thickness of 2 to 30 mm.
Self-leveling floors made from mixtures with mineral binders cannot be used without additional protective and decorative finishing. After hardening and drying, laminate, tile, linoleum, and parquet can be easily laid on a perfectly flat surface.
A separate group of finishing coatings is polymer self-leveling floors. These are single- or multi-component compositions that harden in air due to a polymerization reaction. When using them, the final leveling and protective and decorative finishing of the floor are combined, which makes it possible to obtain finished floors very quickly.
Epoxy, acrylic or polyurethane resin is used as a binder. When preparing the working mixture, a hardener is added to the base component, which starts the polymerization reaction. The lifetime of the compound is no more than 40 minutes, during which it must be quickly and evenly distributed over the surface.
Thin-layer self-leveling floors.
The hardened polymer film is elastic, resistant to wear, water and chemicals. Appropriate additives provide antistatic and anti-slip properties.
Polymer coatings are used in the finishing of industrial, public and administrative buildings, as well as in everyday life. Interior designers use the unique capabilities of self-leveling floors to realize original ideas using techniques:
- addition of colored pigments, sand, marble chips;
- filling the still uncured surface with flocks, chips or glitter;
- pouring multi-layer floors, where banners with a pattern are laid as an intermediate layer, thereby creating a 3D effect.
Polymer floor coverings are beautiful, easy to clean, and last 20 years or more.
Layer thickness for high loads
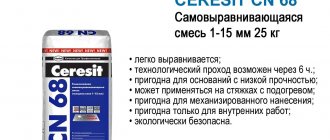
Often, self-leveling floors are used in warehouses, underground parking lots, garages, and industrial enterprises. These floors are relevant wherever vibration or mechanical loads are placed on the floor. Also, in such conditions, temperature changes are not uncommon. There are many different mixtures for constructing self-leveling floors. For industrial premises, coatings based on methyl methacrylic resin are used.
The coating that appears as a result is highly resistant to moisture and ultraviolet radiation. After application, this floor will dry in 2 hours. In this case, there will be no seams on the floor. These compositions allow you to create decorative colored surfaces. The coating is highly repairable. The load that the floor can withstand is at least 15 tons. This self-leveling floor is not afraid of low temperatures, and the layer thickness is from 4 to 6 mm.
Floor thickness at low temperatures
Frost-resistant self-leveling floors are used for unheated buildings, refrigerators, car parks, stadiums, and warehouses. In housing construction, they have become widespread as covering paths, terraces, and gazebos. The thickness of the floor at low temperatures is from 3 mm to 10 cm, depending on the initial state of the base base and the materials used.
Mixtures for frost-resistant floors are made with special additives that allow them to withstand numerous cycles of freezing and thawing without destructive deformations. In addition, the materials must be waterproof, so the composition contains water repellents - water-repellent reagents.
Thin-layer mixtures are made on the basis of polyurethane, methyl acrylate, and epoxy resin. They are laid in a layer of 3-5 mm. The most frost-resistant are methyl acrylate. They are not afraid of ultraviolet radiation, unlike other polymers, do not interact with acids and alkalis, and polymerize in 1-2 hours. At the same time, the coatings are very wear-resistant, retain technical characteristics for up to 25 years, and their service life is up to 40 years.
To create a leveling layer with a thickness of 5 mm, polymer-cement is used. Such screeds are not inferior in strength to concrete, but are more elastic and frost-resistant.
Acrylic-cement bulk mixtures
Having already become a classic, the mixture is suitable for those areas where the loads are extremely high. The coating is relevant for wet industries, various warehouses, and garages. As for thickness, to obtain high wear resistance characteristics, the layer is made from 10 to 20 mm. The material has excellent resistance to various types of chemicals, and is also durable, but subject to a minimum thickness.
Self-leveling floor in the apartment
Sometimes, when pouring self-leveling coatings in residential premises, you may encounter crooked foundations and low budgets. But the volume of material and financial expenditure completely depend on how thick the coating will be. If you know what thickness the self-leveling floor should be in different cases, you can make the perfect coating at minimal cost.
Minimum thickness or thin technology
In the technology of creating self-leveling floors, every millimeter is important. For example, coatings based on polymer mixtures are highly durable. In an apartment or house, a layer of 1 mm will be enough to forget about repairs for a very, very long time. But in order for the floor to turn out exactly like this, it must be done by real professionals. A small layer means low costs for materials, but in the screed you can often find various sinks, potholes, and depressions. This will entail increased consumption of solution and funds. In this case, the finishing layer must be kept minimal.
Minimum thickness of self-leveling floor
In order for floor coverings to be of minimal thickness, it is necessary to pay attention to every millimeter of floor thickness. Despite the fact that the layer of self-leveling floor is thin, the strength is unchanged.
Note! Even the minimum thickness of the self-leveling coating will last a long time. But to achieve a good result, you should take the installation of the screed seriously. Therefore, the best option would be to seek help from professionals.
Installation of quickly hardening floor coverings, including methyl methacrylate, is carried out at a thickness that is not considered large. But this is not due to savings, but to the fact that high-quality materials are capable of creating a layer of at least 8 mm.
If an epoxy-based composition is used to fill the floor, the layer thickness will be the same as for polymer materials - 2.5 mm. The result is a durable coating.
It takes significantly less money to pour a thin layer of flooring than for mixtures that require a thicker layer. But a common problem can be the formation of potholes and depressions in the screed. To eliminate them you will have to spend money. But in the finishing layer we will get a minimum coating thickness.
Saving mixture for self-leveling floor
There is no point in making a thick floor if a topcoat is used, and this is often the option that is used.
The base is prepared using basic and medium compositions. Such mixtures are not expensive - they contain gypsum, cement, sand, and various plasticizers. There are no polymer substances, so the thickness of this layer can be maximum. These mixtures are used primarily to level out serious unevenness. So, using such a base mixture, you can create layers up to 8 cm. And the minimum thickness of the self-leveling floor is 1 cm.
How are mixtures classified?
The modern market offers self-leveling floors with a variety of basic binding components. This can be a polymer mixture, epoxy resin group, classic gypsum and concrete, acrylic, methyl methacrylate.
Choosing a specific type of self-leveling floor is quite difficult, since each class of compositions shows noticeably better results under certain conditions. This could be, for example, operating the coating at low temperatures, applying it to old ceramic tiles, or a weak or loose base.
The main division for a user who needs a minimum thickness of self-leveling floor in an apartment is the class of the mixture in terms of the recommended compensation height. The compositions are divided into:
- mixtures for rough leveling of the coating. The main advantage of such compositions is the ability to create thick layers to compensate for large unevenness of the base. They are also useful in areas where significant forces are applied to the floor. For example, the maximum thickness of the self-leveling floor should be created in enterprises, garages, where cars or other heavy equipment move;
- Pre-leveling compounds can be applied quite thinly. The minimum layer thickness is 1 mm. At the same time, the mixture has good stability and, when hardened, forms a uniformly stressed structure. This allows you to apply a maximum layer of pre-leveling self-leveling floor up to 10 cm;
- finishing mixtures. Exactly suited for their purpose. The minimum layer of a self-leveling floor of this class can be 1 mm. At the same time, the maximum layer thickness, according to the manufacturer’s recommendations, rarely exceeds 20-30 mm. This indicator is achieved only in the case of creating decorative coatings.
Optimal layer thickness for self-leveling compounds
Polymer floors are quite expensive. At the same time, the thickness of the coating can be very small. Thus, polyurethane-based compositions make it possible to make layers up to 2.5 mm thick, which is optimal. If it is necessary to give the floor a gloss or paint the surface in different colors, apply only 0.3 mm of the composition. The maximum for this coating is 5 mm. You can do more, but it’s more expensive and doesn’t make much sense.
As for epoxy-based compounds, the optimal value here is also 2.5 mm. This thickness allows you to obtain sufficient strength characteristics without the floor being fragile.
Methyl methacrylate or quick-hardening mixtures can also be used with small thicknesses. But it's not worth saving here. For a high-quality coating, the layer must be at least 8 mm.
Rough leveling screeds
Starter bulk mixtures have mechanical strength, heat resistance, heat and sound insulation properties. For their manufacture, filler with grain sizes up to 2.5 mm is used. Due to its thick consistency, the solution can be applied to the surface in a fairly thick layer.
The thickness of the self-leveling floor made from rough levelers depends on the condition of the surface and the intensity of the load. The looser and more unstable the base coat, the higher the operating forces, the more powerful the layer should be. The recommended height of the starting self-leveling screed is 5-100 mm. If you need to repair large defects or raise the level by 15-20 cm, it is more economical to arrange concrete or expanded clay concrete preparation, pour and compact sand or magnesite. A coating of small thickness is laid over the underlying layer. Separately, we previously wrote how long it takes for a self-leveling floor to dry, read it, the article is very interesting.
Important. An additional bonus of this technology is a reduction in the weight of the floor and an increase in its heat-shielding properties.
To install screeds on expanded clay, soil, crushed stone, wooden flooring or old coatings, manufacturers produce special thick-layer levelers with a maximum application thickness of up to 200 mm. With a high solution height, hardening occurs slowly; it is more rational to split one thick layer into 2 thin ones.
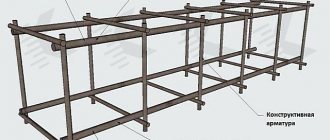
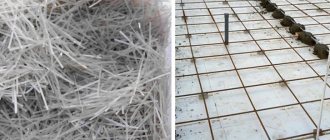
Special mixtures have been developed for high-strength floors with a tensile strength of up to 35 MPa. They are used in places with extreme loads. The composition includes reinforcing fibers to strengthen the coating. Even with a thickness of up to 70 mm, it resists compression, fracture, and separation from the base well.
Advised by professionals
In order to obtain the highest quality surface at an affordable price, experts use some techniques.
So, if the base base is not too crooked to purchase medium or basic bulk compositions, but not so smooth as to get away with just a finishing coating, the situation can be corrected. You just need to sand the surface using a sanding machine. This will smooth out unevenness and save on materials.
In order not to purchase primer compounds, you can make them yourself from a small amount of dry compounds for self-leveling floors. The mixture is diluted and then applied to the base with a roller. When the product has dried, you can pour the finishing floor.
Floor leveling from 0-3 cm
Leveling the concrete floor from 0-3 cm.
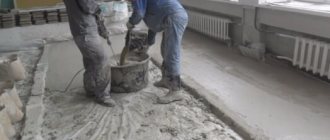
1. The first thing to do, regardless of the coating, is to prepare. Remove all debris, dust, etc., and prime the floor.
2. Having decided on the coating and finances, we decide how to prepare the floor. If we level the floor to one level throughout the entire apartment, then using a level, laser level or hydro-level we measure the difference in the floor throughout the apartment; if in one room, then we measure the difference only in this room.
3. To find out the difference in the floor in the apartment you need:
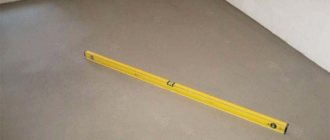
using a level.
We mark a line on the wall, at one end we substitute a level to this line, aligning it, and with a pencil we draw a line from one end of the level to the other, move the level to the end of the line, level it and draw further, and so on, around the entire perimeter of the room or apartment. After this, we take a tape measure and measure the height from the floor to the line, the place where the distance will be the smallest and will be the highest point.
using a laser level.
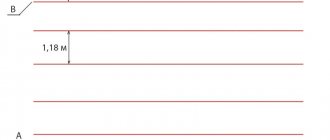
Drawing a line using a laser level
We mark a line on the wall, turn on the laser level, set the laser beam to the line and gradually turn the level 360 degrees to draw lines along the beam, then turn off the laser, take the rule and placing it exactly from line to line, draw a line along the entire perimeter. After this, we take a tape measure and measure the height from the floor to the line, the place where the distance will be the smallest and will be the highest point. They measure it using the hydro level in approximately the same way.
To main
If there is a difference of up to 5 -10 mm, leveling is carried out using
self-leveling or self-leveling floor. For an apartment of 40 square meters it takes an average of 15-20 bags (25 kg), with a price per bag of 220 rubles it comes out to +-4000-6000 rubles. The process of pouring such compositions is very simple: mix the composition with water using a drill in the amount indicated on the bag, and pour it onto the floor so that the mixture is distributed over the floor in approximately equal proportions. After this, we roll the filled part with a needle roller, mix the next solution and pour it further, rolling it again with a needle roller, repeat until the floor is completely filled. When working, you need to maintain uniform mixing proportions, since with different densities the solution will spread differently and differences may appear after drying. A needle roller is exactly what is needed to ensure that the mixture is distributed evenly over the floor. Setting occurs on average within a day, in damp rooms up to 2-3 days. After drying, as a rule, there are small differences of 1-2 mm here and there, which are tightened using the rule. At the place of difference, pour a little solution and, using the rule, pull the solution along the floor until completely leveled; if necessary, remove the remainder of the solution using a spatula.
With a floor difference of 1-3 cm
Leveling is done using floor leveler , floor screed, or tile adhesive , using beacons . The leveler, glue and screed are sold in any hardware store, the weight of the bags is 25 kg, the screed is a little cheaper around 150 rubles, the leveler is 160-170 rubles. The screed fraction is a little larger, but, to be honest, this has virtually no effect on the work. If the floor is reinforced with mesh, then the mesh must be laid out in front of the beacons, the beacons are placed on top of the mesh. Beacons come in 6 and 10 mm wide and 3 m long. We set beacons :
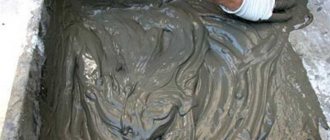
1. Find the highest point in the room and set the first beacon based on this height. The mixture that I use to place the beacon is 50% of any tile adhesive + 50% of any plaster (usually rotgypsum). This composition sets within 15-30 minutes, this is enough to set up 2-3 beacons. For longer setting, I use rotgypsum or a similar plaster composition, here the setting time of the solution is about 40 minutes. Glue and plaster are added to a container with water and mixed with a mixer until a thick, homogeneous composition (very thick sour cream).
Checking the displayed beacon
2. Apply the mixture to the floor, with splashes, after 20-40 cm, along the length of the beacon, place the beacon on the splashes and press it to the floor, leveling it at the same time. Considering that at the top point of the floor the beacon should lie almost completely on the floor, this will avoid an extra layer and, as a result, unnecessary costs for material and work. The first lighthouse is usually placed 15-20 cm from the wall along the length of the room. Next, if necessary, they place a second and third beacon, and so on until the end of the room. It turns out to be such a straight line of beacons.
Having set the beacons, we also check the level.
The bubble should be in the center
3. Parallel to it, by the width of the level or rule, we retreat the distance, and set the next line of beacons, while also checking all the beacons according to the level. When the second line is finished, we set up the third, and so on.
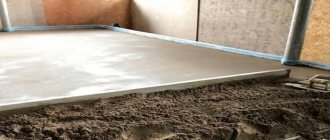
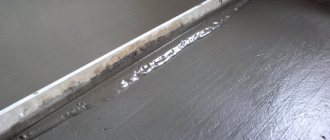
4. When the beacons are set, we begin to fill the floor. We begin to fill the floor from the far end of the room to the exit. Pour the leveler or screed into a bucket of water in the ratio indicated on the bag, since the ratio is different for each solution. Mix with a mixer, after which the solution is poured between the beacons, the rule is placed on the beacons, and the solution is leveled, pulling it towards you. So gradually fill the entire floor. The next day, when the screed has set, we stretch it with a rule along the screed (with its sharp edge), removing all irregularities, protrusions, etc. After which we again remove all the debris and prime it.
Filling the floor with tile adhesive
5. If necessary, for perfect leveling, the floor is stretched once again (possibly twice) with a self-leveling floor, as a rule. That is, a solution leveling , self-leveling floor, possibly also liquid tile adhesive, is poured onto the floor in small portions and drawn along it as a rule. In this way, you can achieve a perfectly flat surface.
6. The floor dries within 5-10 days. It is recommended to spill it with water or cover it with polyethylene.
Another way, little known to many, is how to place plaster beacons. It is suitable for both floors and walls.
Plaster beacons are good because they allow you to save a lot on material and, accordingly, time spent on work. The fact is that shop beacons (galvanized) are at least 6 mm wide, that is, when you install them, your floor fill height is already at least 6 mm, and a plaster beacon can be made up to 2-3 mm. They do it like this;
we find the top point of the floor, mix the plaster to the consistency of sour cream (Perfix assembly adhesive is better suited, it is used to seal seams in drywall, but other plasters can be used), apply the plaster to the floor in a straight line, about 5 cm wide, starting from the top point, We apply the 27*28 profile with the stiffening ribs up and press it into the plaster line along the level so that the profile at the top point practically touches the floor, remove the mortar that has come out from under the profile with a spatula. If the lighthouse needs to be extended, then the mixture is applied further, the next profile is laid, pressed in level, etc. The result should be a straight line of profiles at one level. Now, parallel to this line and a width slightly less than the rule, we make the next line at the same level as the first, etc. After the plaster has set, the profile is removed, leaving plaster beacons along which the floor is poured. In order for the solution to set faster, you can add a little tile glue (setting occurs in 10-20 minutes, depending on how much glue is added).
I also recommend reading:
How to inexpensively fill a floor with a difference of more than 3 cm
What you need to know when doing a major floor renovation
Thick layer
When making thick layers, experts also recommend using special mixtures to level out differences rather than self-leveling floors. It should be noted that depending on the manufacturer, certain compositions have different qualities. Thus, one company produces products where the maximum thickness of the self-leveling floor is 80 mm, while another offers a layer of 100 mm. If possible, it is recommended to use concrete solutions to level out large differences. Leveling compounds are not suitable for finishing coats.
Experts do not advise making coatings as thick as possible - the floors will take a very long time to harden, and for a high-quality surface it is necessary to withstand a constant regime of humidity and temperature.
Application of layers of different thicknesses
The high cost of dry mixtures for leveling (compared to the cost of cement-sand compositions) requires careful attention to the choice of the height of the self-leveling floor. In this case, height does not mean the thickness of one layer, but the combined thickness of all layers. Single-layer filling options are used relatively rarely - in cases where the base is sufficiently flat and smooth, all that is required is to remove dust, make it seamless and ensure resistance to chemical and mechanical influences.
Self-leveling floors are conventionally divided according to the permissible maximum pouring height into:
- thin-layer (for final leveling for decorative finishing) - the total filling height is 1...5 mm, polymer or mineral compositions with a minimum particle fraction are used. With high aesthetic values, such floors have little resistance to mechanical loads, including abrasion. If the thickness of the fill is not the same, in places where it is thinner there is a high risk of coloring the poured mixture;
- medium (for preliminary leveling). Polymer compositions are almost never used here; cement, cement-gypsum and gypsum mixtures are used, homogeneous or with fillers up to 1.5 mm in size. Depending on the purpose of the object (domestic, commercial, industrial), the layer of self-leveling floor can reach 30...100 mm; such a volume is poured at once or divided into two or three thinner layers;
- thick ones (for rough leveling) are usually prepared on a cement basis, have a thicker consistency and require distribution with a spatula or squeegee. Due to the permissible maximum thickness of this type of self-leveling floor of 100...150 mm, the process of applying the composition using beacons is more rational. The technology is described in the article “Installing beacons for plaster.” In addition to cement, plasticizers and modifiers, such compositions use coarse (up to 2 mm) sand or mineral chips, which reduces the consumption of the composition and increases the strength of the base for pouring the finishing layers. The most rational use of mixtures for rough leveling is in industrial and commercial facilities with increased load on the surface to be leveled.
Important: when installing self-leveling floors in rooms operated at low temperatures, the use of thick-layer mineral fills is undesirable. In this case, methyl methacrylate (polymer) mixtures are used, which have special installation requirements.
With regard to the minimum thickness of the self-leveling floor, the decision is simpler: it is not worth using a fill with a height lower than that recommended by the manufacturer. This is due to the danger of violating the strength and performance properties of the material. Therefore, the lower limit of the recommended thickness range is taken as the minimum acceptable value.
Thin floor
Such mixtures are not used for leveling. They serve as a finishing coating. The minimum layer of finishing self-leveling floor is 1 mm, the maximum is up to 10 mm. When pouring the floor and working with finishing layers, be sure to take into account the fast drying speed.
In general, the quality of the floor does not depend on the thickness. For different compositions it is necessary to pour layers of different thicknesses. To obtain a high-quality surface at minimal cost, it is necessary to prepare the base. It is recommended to select the composition based on the conditions under which the floor will be used in the future.
Self-leveling floor - features and stages of pouring
Self-leveling floor - features and stages of pouring
Self-leveling flooring is a technology that allows you to obtain a perfectly flat, monolithic, high-strength surface that is easy to install and easy to maintain. According to its purpose, it is divided into two categories - leveling base and finishing decorative coating. The leveler is produced in the form of dry mixtures mixed with water. The presence of fine-grained fillers (up to 250 microns), mineral binders and modifiers in the composition ensures plasticity and uniformity of the solution. Depending on the manufacturer and scope of application, sub-level self-leveling floors may have a cement or gypsum base. Decorative self-leveling floors have all the advantages of levelers - they provide a strong, durable, wear-resistant and perfectly smooth coating. But at the same time, in addition to an impressive set of characteristics, they also have an attractive appearance - imitation marble, ornate patterns, combinations of contrasting tones, fancy multi-colored mixes, seabed, with a three-dimensional effect (3D) and many others.
If you decide to use the self-leveling floor method for a house or apartment, the first thing you need to do is prime the surface. In other words, this method is called dipping and pore filling - this is the initial stage of creating a floor and should be done on a dry and clean surface. If necessary, this process can be repeated several times.
Under self-leveling floors and other similar paints, the floor primer should be primed until all holes are filled and the surface has a sheen. The problem is that only with this use of priming can we hope to get quality results. But even such a primer cannot guarantee an ideal result, because the number of layers and the amount of material consumed directly depend on the quality of the primer surface.
The primer can be applied with a roller, brush or squeegee. In this case, only when the coating is one layer, the primer consumption is about 100-200 grams per square meter.
If the primer changes color, such as becoming white or foamy, then you should stop working immediately and find out why this is happening. After many years of research using such materials, it was found that in most cases the side effects are caused by excessive humidity in the room. It is recommended to apply other materials to the primer after about 4-6 hours at a temperature of about 20 degrees, but if more than one day has passed, you cannot apply materials to the primer. Primers are highly viscous and solvent-free, so they can completely fill the pores of the substrate without actually penetrating the surface structure. This type of primer must be applied using a roller or brush, or it can be achieved by spraying water and then applying the primer using a rubber spatula.
Primer consumption depends only on the porosity and roughness of the surface. Keeping the room clean is very important because dust should not settle on the primed surface. When the primer is weak, you can use a combination of different primers for the primer.
You can use various materials to create self-leveling floors. Before you start mixing materials, you must make sure that the temperature of the components is in the range of 15-25 degrees. It should also be taken into account that the mixed material cannot be used for a long time, so it is necessary to prepare the light before mixing, prepare the right tool and check the quality of the primer surface. If there are holes in the surface, perfect coverage may not be obtained.
Floor Grouting Tools
Before starting all work, the equipment must be fully prepared. You will need:
- Containers and barrels are clean, they are necessary for mixing ingredients;
- Construction mixer for mixing;
- Scrapers or spatulas, these can be used to spread materials into hard-to-reach places (for example, under a radiator or in corners);
- Fixed gap mops should distribute material evenly over the surface;
- Needle roller which should remove air bubbles, one roller is enough to meet the requirement of 40-50 sq.
- A special sole with a spike is necessary for moving on the newly applied coating;
- Solvents and rags that are easy to use when cleaning instruments.
- Level for measuring floor evenness
Floor pouring stages
During work, it is necessary to maintain absolute cleanliness of the surface and completely exclude the possibility of foreign objects entering. Shoes and tools must be dry and clean. The contents of the package must be carefully poured and mixed in two stages. As a first step, you might consider opening the barrel of ingredients and mixing thoroughly until the material is homogeneous. When mixing, it is necessary to allow the pigment to settle from below. Particular attention should be paid to the bottom and walls, because all materials must be mixed until homogeneous.
The second step is to pour the resulting mixture into another container and mix thoroughly again. Once fully prepared, the material must be used immediately. Likewise, all two material components are required.
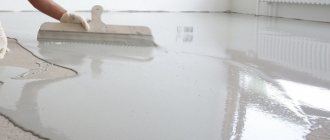
Once prepared, the material is poured onto the surface and spread evenly over the substrate using a notched trowel or squeegee to obtain the desired coating thickness. The width of the tool must be selected taking into account the characteristics of the surface to be coated. When using a wider tool, uneven floors may affect the thickness of the layer. To create the most perfect surface, you must use a rolling pin to remove any air bubbles.
After pouring, close the doors - so that there are no drafts - and wait the required time. It's very different. Mixtures with cement take longer to set, with plaster - faster, but usually you can walk on the surface after 12-24 hours.