How to make a foundation for brick fence posts?
- Strip foundation for brick pillars Stages of work on installing a concrete strip for fence posts
- Columnar foundation: stages of work
Brick posts are often used as fence posts. If they are correctly and beautifully folded, then they are so aesthetically pleasing that they decorate the site, gates and fences. Such pillars are erected for canopies and used to decorate the entrance area. In order for all these structures to be durable and not warp due to ground movements, the foundation for a brick pillar must be done correctly.
If you do not know the nuances of this work, you can make serious mistakes that will affect both the appearance of the support and its strength.
Construction of a foundation for a fence with brick pillars.
If the depth of soil freezing is 80 cm, then the foundation should be laid at least 1 m.
A fence with brick pillars looks presentable, especially if the masonry is smooth and with patterns. Therefore, it is often located along the facade of the building. As a rule, the same supports are built for metal gates. And this is not surprising: such pillars can withstand any load. If you invite professionals to build them, this pleasure will cost a pretty penny. Therefore, many private owners try to do most of the work themselves. Therefore, information on how to build fence posts with your own hands is in great demand.
Which foundation to choose for a brick fence?
There are only two options here: the pillars can be installed either on a concrete strip or on a block support.
Both of these bases are reliable and durable. Which one to choose, each developer decides for himself, based on his preferences and capabilities. Brick laying can also be different. If you take materials of different colors (white and red), then with due diligence you can build real masterpieces.
Installation stages
The process consists of preparatory work, reinforcement and pouring concrete. Working with a tape and a columnar base is somewhat different. In order to install a columnar foundation under a brick pillar, much less construction materials and time will be required. Therefore, the number of processes is reduced.
Stages of creating a strip base
Base installation diagram:
- The correct level is fixed by breaking down the structure. The twine is pulled through the pegs hammered into the corners.
- Determine the lowest point of the uneven surface from which they begin to dig a trench. The depth of the foundation is 40 cm. The indicator varies, taking into account the degree of soil freezing, its moisture and density. It is important to achieve the most even walls and bottom of the recess.
- They make holes for supports. The degree of immersion of the pillars depends on the height of the structure. A third of the length is fixed in the hole.
- Waterproofing is installed at the bottom of the recess. Can be made from polyethylene or roofing felt. Waterproofing prevents excessive wetting of the foundation.
- Next, a drainage layer is laid, which will prevent the structure from collapsing during frosts. Sand watered with water is compacted, covered with gravel, and the pits for supports are filled with a layer of crushed stone.
- Formwork is assembled from sheet materials, which should exceed the height of the tape. Subsequently, the formwork is dismantled, so at this stage it is advisable to drive nails from the outside.
- Reinforcing rods are laid in several rows in the form of cells in the formwork. Their intersection is fixed with a special wire.
- The pillars are being installed. They start with corners and turns, as well as points where the surface difference exceeds 30 cm. Keeping a distance of 2-3 meters, install the remaining supports.
- Concrete is poured into the formwork. If the weather is favorable, the formwork is dismantled after 10 days. The filling becomes stable after a few weeks.
Stages of creating a columnar base
The device is divided into processes:
- Pegs mark the location of the supports, observing the step. The marks are connected with wire. The breakdown determines the exact level of the structure.
- Holes for supports are made in the marked places. The drilling depth is determined, taking into account the height of the future structure. The hole should widen at the bottom.
- A drainage layer is formed. Unlike the previous option, sand and gravel need to be alternated, then watered and compacted.
- Install the formwork in the widened hole. The reinforcing bars are fixed and concrete is poured. It is better to give preference to reinforced bases with high stability. The foundation for brick pillars becomes strong due to the core.
- Install metal supports, having previously coated them with a protective substance to prevent corrosion. The posts should go deep into the drainage level.
- Fill the pillars with mortar. It is recommended to support the pillars until drying.
When choosing a fence, they are often guided by aesthetic preference and the price component. At the same time, the design must be reliable. The base is designed to strengthen the structure, increase strength and reliability. Installation requires precise adherence to technology and significant costs. But it’s better to do it gradually once than to constantly repair it later.
Strip foundation for brick pillars.
Depth of foundation for a fence with brick pillars.
Diagram of a brick pillar on a foundation.
It is made shallow. If the soil on the site is dense and non-heaving, with a low moisture content, then the depth of laying the tape is 20-30 cm. This is the thickness of the fertile layer. This is what should be removed. If the depth of soil freezing exceeds 80 cm, then the tape should be placed no higher than 1 m in depth. The same recommendation applies to heaving soils saturated with water. For other types of soil, a depth of 40-50 cm is sufficient. This foundation for fence posts is a reliable foundation that will last for many years.
Concrete will be required to fill the shallow tape. It can be ordered from the factory, but it will be quite expensive. To prepare the solution yourself you will need:
- concrete mixer;
- cement grade M400;
- medium grain sand;
- a sieve for sifting it;
- gravel or crushed stone of medium fraction (optimally 20/40 mm);
- shovel;
- containers for filling ingredients;
- water;
- To increase the plasticity of the solution, you can add a little inexpensive washing powder to the batches.
To make formwork you will need lumber. To make the foundation for the pillars smooth and beautiful, you can use an edged board 2-2.5 cm thick or thick (from 8 mm) moisture-resistant plywood. In order not to stain these materials with concrete (since lumber is always useful in the household), they will need to be protected. For this you will need plastic film. The formwork can be assembled using metal corners or wood screws. If you decide to use nails, then you need to hammer them in from the inside and bend them on the outside. This will ensure the safety of the polyethylene and simplify the dismantling of the formwork.
Stages of work on installing a concrete strip for fence posts.
How to pour a foundation for a brick fence.
Scheme of a fence with brick pillars on the foundation.
- First of all, you should mark the line along which the fence will be built. This is done using pegs, a tape measure and a marking line.
- A trench of the required depth is formed. The width of the ditch should be 20 cm greater than the thickness of the future tape. Usually for such a foundation 40-50 cm is enough.
- The bottom of the pit is leveled using a hydraulic level and compacted.
- Waterproofing is installed, roofing felt or dense polyethylene is laid. The sheets should overlap by 10-15 cm
- Next, you will need to pour a layer of sand 5-7 cm thick. It is spilled with water from a hose and compacted.
- The next backfill is gravel or crushed stone. This layer should be 10-15 cm thick. It should also be compacted.
- The formwork is being installed. It collects inside the trench. To ensure that the foundation is level, it should be checked frequently to ensure that the tape meets the required dimensions.
- Reinforcing material is laid. Typically, thick reinforcement bars (section 8-12 mm) are used for this.
- Cement-sand mortar is poured layer by layer. It must be carefully compacted by piercing it with a metal rod. This will allow air to escape the concrete and there will be no cavities inside the tape.
- The last layer of the solution is made more liquid, since it is intended to level the foundation horizontally.
- Concrete ripening occurs within 3-4 weeks. But it is rare that the owner waits until this time. Usually the formwork is dismantled 4-5 days after pouring.
- While the solution is setting, the tape should be protected from the sun so that it does not dry out and cracks do not form. To do this, concrete is periodically watered with water from a hose. At night, the tape is covered with polyethylene in case of rain: it can wash away the top layer of concrete that has not yet set.
Columnar foundation for brick pillars.
How to pour a foundation for a brick fence.
Scheme of types of columnar foundation.
This type of fence base is good because bricklaying becomes less labor-intensive. If in the case of a tape the pillars are lined up directly on it, in the case of a columnar one they are formed around already installed supports. This is how bricks are saved. As for the depth of laying this foundation, all recommendations regarding heaving soils are relevant here. That is, the pillars should be installed at a depth below the freezing point of the soil.
There is no need to dig a trench; you will need holes at those points that are found using markings. It is best to form depressions in the soil using a TISE drill. It is capable of creating widening at the bottom of the hole. The concrete that fills them will be an excellent obstacle to pushing out the pillars by soil heaving forces. The supports themselves can be either factory-made or self-made. In the second option, you will need either wooden formwork or asbestos-cement pipes. Concrete will be poured inside them.
Columnar foundation: stages of work.
Dimensions of foundation for a brick fence.
Installation diagram of a columnar foundation.
- Marking is being done.
- Holes are dug in the right places.
- The bottom of the pits is compacted.
- The sand is poured out, moistened and compacted.
- A concrete support pad 15-20 cm high is poured.
- After the mortar has set, a pillar or formwork is installed on it for pouring concrete.
- Using spacers, the support is fixed in a vertical position, which is verified by the building level.
- Backfilling is in progress. This work is carried out slowly, with careful compaction of the soil. Gravel, crushed stone, and construction waste are added to the pit. The backfill is concreted in layers.
- Within a few days, the pillars should be firmly in place due to the setting of the concrete. Now (if required) you can pour it into the formwork, having previously placed reinforcement in it. In two weeks the foundation will be completely ready for use.
Tape-monolithic base. Construction stages
The main difference between a strip foundation for a fence and a strip foundation used for a residential building is that in the first case, significantly less depth is required and the use of reinforcing bars of a smaller diameter.
The construction of the foundation should be carried out in several stages:
- First of all, the site is marked. According to need. The “Egyptian triangle” method is quite effective for making even markings.
- A trench of the required width and depth is dug.
- The bottom is filled with sand and compacted; it is also possible to use a crushed stone cushion.
- The formwork is being installed. It is worth considering that the optimal height of the base is 10-20 centimeters.
- A layer of concrete 3-5 centimeters thick is poured onto the bottom.
- After the base has set and hardened, the reinforcement cage is installed; in this case, welding the reinforcement is not only not necessary, but also not advisable. It will be much more effective to use wire for connection.
- The final step will be pouring the solution. After this, it is worth “piercing” the unset foundation in different places to remove air bubbles.
- After the concrete has set, waterproofing is carried out using roofing material, which is glued to it using bitumen mastic.
- It will be possible to begin laying the fence no earlier than in two weeks.
Bricklaying: rules of work.
Bricks are not laid on the base of the fence just like that - they should be tied with thin reinforcement or metal wire. Masonry around already installed supports is no exception: it also requires dressing. Some people practice the construction of hollow pillars, this is quite acceptable. But it should be taken into account that the masonry in this case should be of the highest quality and it is better to entrust it to a professional. Particular attention should be paid to the supports for gates and fence gates.
If you decide to lay bricks around the pillars, then the internal space should be filled with concrete. Having built several rows on one, it is recommended to move on to the next one. While its brickwork is being done, the mortar will set at first, and it will be possible to begin pouring concrete into the cavity of the pillar. This way the fence will be built evenly and efficiently.
Upon completion of this stage of work, rainwater protection should be installed at the top of each fence post. There are various beautiful caps on sale that will decorate any fence. They make the brickwork look complete.
How to make a foundation for a fence with brick pillars.
Foundation for a fence with brick pillars.
The choice of the type of foundation for a fence with brick pillars depends on the requirements for the arrangement of fences. If they are not followed, then after some time the structure may become covered with cracks, which will cause the destruction of the entire structure. The dimensions of the thickness and height of the fence will not play any role. Therefore, when preparing to carry out work, it is necessary to keep in mind that without a foundation, you can only build an ordinary wooden fence with your own hands.
How to do it yourself?
Homeowners with time, basic construction skills and the necessary tools can build fencing themselves. It is important to follow a certain construction technology.
Rules for organizing construction
The first thing you need to do is:
- analyze the quality of the soil,
- determine the parameters of the pillars,
- step between them
- material for filling gaps.
All this is needed for calculations of material consumption and calculations of the foundation structure. You can calculate using online calculators.
Preparation
The site for the construction of the fence should be leveled, if possible, and cleared of debris, bushes and trees. After this, you need to apply markings using a level and a cord.
Step-by-step instruction
After completing the preparatory process, the construction of the foundation begins :
- According to the markings, a trench is dug under the entire fence.
- A sand and crushed stone cushion is laid at the bottom of the trench.
- Install wooden formwork in the trench.
- A frame made of reinforcement is placed in the formwork.
- At the places where brick pillars are installed, pipes or corners are installed in the formwork.
- The prepared tape is poured with concrete, leveling it with a construction vibrator.
- Allow the concrete tape to harden completely, covering it with polyethylene (7-14 days).
- Roofing material is laid in the places where the pillars are installed.
- Pillars are erected with an offset (ligation) or using the “rod” technology.
- After completing work with the pillars, the fence frame is filled with sheet material or brickwork.
- If brick is chosen for filling, it is laid according to any decorative cladding scheme. The masonry is carried out in one brick or half a brick.
- The last step is to cover the fence with a concrete cap to protect the brick pillars from precipitation.
Video instructions for building a fence with brick pillars on a strip foundation:
Preparing for the construction of a brick fence.
To build a foundation for a brick fence, you need to choose a type of foundation that will best suit the massive fence. Before installing a fence with brick pillars, you should keep in mind that inside them there must be metal posts or pipes with a diameter of 80 mm, concreted into the foundation. They can be replaced with reinforcing bars in the amount of 6 pcs.
If all the brick pillars of the foundation are secured with a core of a certain type, then it will serve as a reliable support for the structure. In any case, the brackets for mounting the logs are attached to the pipes or fittings. When erecting supports near a gate or gate, you will need to calculate the additional load, so it is important to choose the right type of core for brick posts.
When the base for the brick pillars has already been prepared, you can proceed to determining the distance between the supports. Professionals recommend installing pillars every 2.5-3.0 m. The more massive and tall the brick structure, the denser the placement of the pillars should be. The height of the brick support can be 2-3 m.
If you follow these rules, you can build a fence around the house that meets the requirements of reliability and strength, as well as optimal expenditure of financial resources. After completing the preparatory stage, you should proceed directly to pouring the foundation for the brick fence posts.
Once the total number of posts has been calculated, you will need to stretch a rope or cord to mark all the locations where posts will be installed once the foundation is complete. The support in the form of a core is installed exactly in the center of the platform with cement mortar. The foundation is poured for each support separately.
Construction of brick columns
Often, brick pillars for fences are made of 1.5 or 2 bricks, that is, the cross-section is 38x38 cm and 51x51 cm, the height can reach 3 m. The masonry is carried out offset - the seam formed at the bottom is covered with the brick of the top row.
Speaking about the order of work, it is worth noting that it begins with the fact that a double layer of roofing material is spread. This is necessary so that the brickwork does not absorb moisture from the soil, which can cause it to crack.
After this, the location of the columns is marked. According to their dimensions, a layer of mortar with a thickness of slightly more than 10 mm is applied, on which the first layer of masonry is laid - the base.
Installation diagram for a fence with brick pillars
The material is leveled on all sides using a hammer with a rubber working surface. Experts advise: before starting construction of the base, the brick must be placed in water for a couple of seconds so that the mixture dries more slowly and inaccuracies can be easily corrected.
Also, thanks to this, you can easily wipe the brick from excess mortar, which must be removed immediately.
The second row is also laid out on the mixture, but offset to cover the seam. The bricks are leveled and the dimensions are checked using a tape measure. Even minimal displacement is unacceptable. Therefore, if it is detected, then the bricks are moved closer by tapping on the end of the building material. If the sides are not coated with mortar, then it is necessary to fill the vertical seams. All further rows are laid out using the same analogy.
Drawing of the foundation for the fence
What to consider
If there is a void between the reinforcing base of the column, it is filled with masonry mortar in small sizes. If the distance is quite large, then it is more economical to fill the space with crushed stone, which is compacted and filled with a solution of sand and cement.
After all the pillars have been erected, a metal profile, wrought iron fence or wooden materials are attached between them.
Professionals also recommend placing a metal cap on the top of the post after finishing the work, which is necessary to protect the brick from excess moisture.
More details about all the stages of constructing a foundation for a fence can be seen in the video below.
Sequence of work.
Before laying brick fence posts, you will need to take care of the foundation, the type of which can be strip, columnar or grillage. The same types of foundations are used for the fence as for the house. The instructions suggest choosing the cheapest type of foundation that allows you to build reliable structures. It is important to follow the established sequence of work:
- Use a drill to make holes measuring 40x40, the depth of which should be more than 20 cm.
- Compact the bottom of each hole with a 10 cm layer of sand.
- Install a support post in the middle of each recess.
- Fill all the holes with concrete mortar, choosing the M200 cement grade.
- Leave the foundation for 2 weeks until completely hardened.
The correct foundation for a brick fence.
The given instructions will allow even a beginner to fill the base for the fence without much difficulty. For the mid-latitudes of the continent, experts recommend digging holes for fences made of brick up to 1.0-1.2 m deep. Compacting the holes with sand is necessary to maintain the stability of the brick structure and reduce groundwater fluctuations. When installing support pillars, you can use the method of strengthening the frame using reinforcement rods.
The components of the mortar for preparing the foundation for a fence made of brick pillars can be selected in the following ratio: sand and crushed stone 2.8:4.8 per package of cement. If you plan to build a massive fence, then a concrete type of base is suitable. Each base can be connected to each other using concrete plinths. To give the cement mortar additional strength, you can add broken bricks, crushed stone and construction waste to it.
What kind of foundation can there be for a fence?
No matter how many fence designs there are, they all stand on several types of foundations. The depth, diameter or cross-section of pipes, width and depth of the base may differ. These parameters depend on the climate zone and the material from which the fence spans are made. But there are not very many designs and ways to implement them:
- A little sand and crushed stone is poured into a hole made in the ground, and a pipe is inserted. The gap is filled with stones and rubble and compacted.
- Wells are drilled in exactly the same way, pipes are installed, only the filling around the pillar is concreted.
- The pipe is installed in permanent formwork, the gap between it and the formwork is filled with concrete.
- Screw piles are used instead of pipes.
- The pillars are concreted, and a grillage is made between them. To provide the tape with sufficient strength, the grillage tape is reinforced, forming an air gap under it.
- They make a shallow strip foundation on pillars.
- Strip foundation to frost depth.
Some ways to install fence posts
The designs are arranged in order of increasing cost: the least expensive is the first method, the most expensive is the fourth. The choice of foundation for the fence depends primarily on the type of soil and the level of groundwater. If the soil drains water well and the groundwater level is low - below the freezing depth - it can be installed on any structure. If the groundwater is located high, you want a “serious fence” made of brick or rubble, for example, and the soil is clay or loam - you will have to make a more serious foundation, which costs a lot.
If you don’t know how deep the water is in an area, dig a pit near the planned fence. Its depth is 50-70 cm below the freezing depth for the region. If you have dug to this level, but there is no water, then you are lucky and you can make a fence with the base of any structure.
How to prepare a concrete solution for pouring a foundation.
For different types of foundations, all components should be selected in the required proportions, since a certain type of foundation requires a different ratio of fillers (sand, lime, cement). The quality of the foundation will depend on the strength of the mortar.
The ratio of fillers is determined after choosing the brand of cement. For example, if brand M50 is used, then the ratio of lime and sand should be 1:5.8. For M75 cement it is equal to 1:4.2. The table (IMAGE 1) will help you prepare a concrete solution for the foundation.
If you add lime to the solution, the concrete mixture will become more plastic, which will greatly facilitate the process of laying bricks. The use of this filler allows you to reduce the cost of necessary materials. If the amount of lime in the concrete mixture is too high, cracks may form in the masonry. Beginning builders should always observe the proportions of all materials used.
To build a foundation for a brick fence, the following types of devices will be required:
- A metal container required for preparing the mixture.
- A bayonet shovel or other device for stirring the concrete mixture.
- A container for measuring the required amount of filler for the composition.
All components for the concrete mixture will need to be placed in a prepared container, into which water must be added. All contents should be mixed thoroughly. The cement mixture and water are taken in proportions of 1:1. The finished composition must be used within 1.5 hours, otherwise it will begin to dry out.
Construction of a strip-column foundation.
A strip-and-column brick foundation is poured with your own hands into pre-prepared formwork, for the reinforcement of which a metal mesh is used. The base for a house fence should be 50 cm deep and 40 cm wide.
The base for concrete pillars should be wider and deeper. A foundation with such parameters will be less at risk of displacement. It is suitable not only for installing brick fences, but also for installing wooden fences on stone pillars.
The process of installing a strip foundation for a brick fence with your own hands involves performing the following steps:
- digging a trench manually or using special technical means;
- compacting a sand or gravel cushion 20 cm thick;
- laying a layer of broken brick or crushed stone;
- covering the crushed stone support with reinforcing mesh;
- installation of formwork capable of holding the concrete mixture until it hardens completely.
Foundation depth for a brick fence.
Experienced craftsmen believe that digging a trench by hand allows you to complete all the work more accurately, but it takes more time. Planed boards or other materials with a flat surface can be used as formwork.
Since the foundation strip for the fence must be 30 cm above the ground surface, the formwork is installed accordingly, that is, to the entire depth of the trench. It is necessary to install metal supports for the pillars in the prepared recesses.
Installation of formwork can be carried out using special prefabricated kits that guarantee the correct geometry of the foundation of the fence around the house.
Possible mistakes
If the foundation is not strong enough, over time the pillars will sag, the tape will deform and crack, and then the entire structure will collapse.
If you do not use foundation reinforcement, it will quickly fail. If the masonry is not done professionally, the pillars may fall apart.
If you do not cover the pillars with concrete caps, they will collapse under the influence of moisture that gets inside.
The main mistakes when installing a strip foundation for a fence are in the video:
All important and useful information on the construction of a strip foundation for a fence is in this section.
Installation of a grillage type foundation.
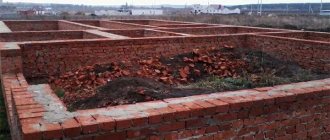
The grillage is a more reliable structure. It must be done under each pillar, so this type of foundation is more labor-intensive to construct than a strip foundation for a fence. Pre-dig holes for each support to a depth of 1.5 m. The technology for installing a grillage with your own hands requires the use of the most suitable materials. All work will need to be performed in the following sequence:
- Determine the place where the gate with a wicket will be located, under which there is no need to build a foundation.
- Drive in marking pegs and string a rope or wire as a guide for digging the trench.
- Install the first pile in a hole, the depth of which is 2.5 times greater than that of the trench, and the width is 2 times.
- Mount the piles at equal distances and equal depths.
- Place gravel in an even layer 6 cm thick at the bottom of the trench to improve soil drainage under the foundation.
- Lay out a sand cushion and a layer of geotextile.
- Make formwork from boards.
- Use horizontal bars to connect the formwork panels.
Foundation for a brick fence.
The depth of the concrete base, which must be poured between the pillars, should be 30 cm. The frame of reinforcing bars should be made as follows:
- place 4 reinforcing bars parallel to the ground at a distance of 10 cm from each other;
- weld a rod 30 cm long perpendicular to each of the ribbed reinforcement rods, taking into account a gap of 20 cm;
- weld the frame elements together at the joints of rods 15-20 cm long, if reinforcement of a suitable size is not found;
- make a frame with cells 20x10 cm, the length of which coincides with the length of the fence.
Once the preparatory work is completed, you can begin pouring the concrete solution. The mixture can be purchased or prepared with your own hands. First you need to mix the dry ingredients and then add water in small portions. To make the foundation for a brick fence strong and of high quality, you will need to take materials in the following ratio:
- Cement - 1 part.
- Sand - 2 parts.
- Gravel - 1.5 parts.
- Water - 1 part.
The entire solution must be mixed thoroughly. After preparing the concrete, you can proceed to pouring the formwork. In order for the solution to harden evenly, the entire process must be carried out within a short period of time. To eliminate air voids, you can use a vibrator or shovel handle.
Columnar-ribbon base. Construction stages
It differs in that piles are installed under the fence posts, and a regular strip foundation under the spans.
Let's take a closer look at the stages of construction:
- First of all, the site is marked in accordance with the requirements; special attention should be paid to the placement of pillars, because This will greatly affect the appearance of the fence.
- A trench is dug, in this case a great depth is not required, 15-20 centimeters will be enough.
- At the location of the pillars, holes are drilled, the depth of which should be greater than the freezing depth of the ground.
- Pipes are being installed, the height of which should be 10-15 centimeters higher than the future base.
- Next, the pits with pipes are filled with crushed stone, and care must be taken that the installation of the pipes is strictly vertical.
- The reinforcement structure is being manufactured and the base is poured with concrete.
- Work on the construction of the fence will be completed in at least two weeks.
Installing brick supports with your own hands.
For high-quality construction of a fence on a columnar, strip and grillage type of foundation, it is necessary to maintain an equal gap between the individual bricks. For this purpose, small metal tubes, bars or reinforcement rods are used. Solid brick is always used for laying the first layers of brick.
Width of the foundation for a brick fence.
When erecting pillars with your own hands, it is possible to use facing stone. All work can be done professionally using the following types of tools:
- A trowel for applying and spreading concrete mortar onto bricks.
- A shovel that looks like a scoop so that it is convenient for her to apply the mortar to the brick.
- A level that allows you to measure the vertical and horizontal positions of a brick pillar.
The first row is laid on a foundation under brick pillars according to a scheme based on the position of the support of 1.5 bricks with a slope towards the wide side of the pillar. After laying the first row on the foundation for a brick fence, you should use a level. When laying the columns, it is necessary to take into account that the end part of the second row and the length of the brick in the amount of 1 pc. should form the entire width of the support.
If you plan to install a facing brick fence around the house, you should use a special impregnation for treating finished brick surfaces. As a result, a very thin film will appear on them, protecting the structure from destruction.
A solution for concreting voids can be prepared from crushed stone, sand and cement, taken in a ratio of 3:3:1. It is better to fill voids in parts, since it is impossible to provide high-quality compaction of the support. To speed up the process, you can erect a pillar, and then move on to filling the internal space with large stones, pieces of brick, and small gravel. After this, the entire contents are filled with concrete.
After laying the pillars on the foundation under the brick fence, you should wait until the brick pillars are stable. Attaching the joists can only be done after 3 weeks, depending on the climate of the region and weather conditions. After completing all the work, you should take care of caps for the top of the posts so as not to render your fence unusable due to precipitation.
Approximate cost of work
It will not be easy to reliably determine the cost of work at the initial stage. The final amount of funds spent on the construction of the structure depends on a large number of factors. However, it is still possible to carry out some calculations.
DIY construction
The cost of constructing a capital foundation will always be high, even if most of the work is done with your own hands. On average, as practice shows, the cost of pouring a foundation for one pillar with your own hands costs about one and a half thousand rubles, taking into account all consumables, but without the involvement of a drill, which makes holes for pipes.
Accordingly, based on this figure, you can also imagine the approximate amount that the entire structure will cost. However, it is worth considering the possible appearance of unforeseen expenses in the estimate.
Construction by professional builders
Here you can quite simply calculate the average market price for services. As statistics show, the cost of a linear meter of a turnkey brick fence ranges from 7,000 to 12,000 thousand rubles, depending on the complexity of the structure.
This amount already includes the cost of the foundation and all possible unforeseen expenses. However, it is worth remembering that before contacting a particular company, it is worth considering not only the pricing policy, but also the reputation and qualifications of the specialists.
Making a foundation for a brick fence with your own hands.
Fence sections made entirely of brick are notable for their considerable weight. Such fences need a solid foundation that evenly distributes the load on the ground. The technology for pouring a concrete foundation is relatively simple and the homeowner can do this work with his own hands if desired. You just need to choose the appropriate type of base and attract a couple of assistants.
DIY foundation for a brick fence.
A brick fence is a heavy structure that requires a reliable foundation.
Choosing the type of foundation.
Nothing special has been invented for the construction of massive fences; the technologies used are the same as for the construction of buildings. There are 3 types of foundation for a brick fence:
- columnar;
- tape;
- ribbon-columnar.
- pile solutions
Strip foundation for a fence with brick pillars.
Strip-column fence foundation.
The construction of columnar foundations is practiced in dense and stable soils when constructing pillars made of brick and spans of light materials - wood, corrugated sheets, polycarbonate, and so on. The structure is a reinforced concrete monolith, enclosed in a well and resting on lower, denser layers of soil. Placed under each fence support.
Although the columnar structure is the simplest and cheapest, it cannot be made under a solid stone fence; here you will need a strip foundation. This is a concrete strip with reinforcement, immersed shallowly in the ground (up to 50 cm). Part of the base protrudes above ground level in the form of a plinth (30-40 cm), from which brick or stone masonry begins.
A concrete strip in combination with underground pillars combined into a common monolith is a strip-column foundation. It is built with your own hands on soil prone to subsidence from external loads. In exceptional cases, when the soil is susceptible to frost heaving, such foundations are made on screw piles.
Strip foundation for a brick fence.
Pile foundation for a brick fence.
Under normal soil conditions, with a relatively shallow freezing depth, monoliths in the form of a tape are the most common, and it is worth examining them in more detail.
Pouring the foundation for a brick fence.
Scheme of a strip monolithic foundation for a brick fence.
Purchase of materials.
To pour the foundation for a brick fence yourself, you need to prepare the following building materials:
- Portland cement M400 – the basis of concrete;
- sand for preparing a concrete mixture and installing a cushion at the bottom of the trench;
- crushed stone with a fraction size of up to 40 mm – concrete filler;
- periodic profile reinforcing bars (corrugated) Ø8-10 mm for tying the frame;
- soft knitting wire;
- bitumen mastic and roofing felt for waterproofing.
You also need to make panel formwork in advance from wooden boards and beams or rent it. Another option is to put together boards with your own hands from sheets of old chipboard and cover them with plastic film to prevent them from becoming soggy from moisture.
Builder tips
- It is worth paying enough attention to all the necessary materials and tools. In particular, to build a fence you will need:
- Concrete mixer. In the event that you make the solution directly at the construction site, and do not bring it.
- Everything you need for earthworks. In particular, a shovel, crowbar, sledgehammer, etc.
- Tools for laying bricks, such as a trowel, bucket, pick, etc.
- Tools for working with reinforcement, for example, a grinder and a welding machine.
- If you have not previously had experience in preparing the solution, then you should carefully study the manufacturing technology and brand of suitable concrete.
- It is worth adding a little more moisture to the mixture than usual, this is due to the fact that dry soil will absorb excess moisture.
- It is worth preparing the solution in small portions so that you have time to pour it into the trench.
- In addition to the tools, you need to prepare small crushed stone, reinforcement, plasticizer, sand and cement in advance. It is absolutely impossible to save on materials, because the service life of a brick fence directly depends on this.
- Work on pouring the foundation should be carried out in warm and hot prolonged weather. You should not fill in cold weather or in pouring rain, because... this can significantly affect the strength of the finished structure.
- Before starting masonry, it is imperative to protect the foundation with waterproofing, for example, treating it with appropriate impregnation or laying a layer of mastic and roofing felt.
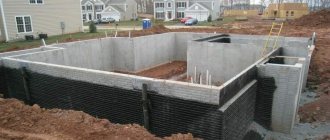
Preparing for pouring.
The structure of the foundation as a whole depends on how carefully the preparatory stage is carried out. Work begins with marking the line of reinforced concrete tape and determining its width. For example, if you plan to lay a fence made of ordinary brick 250x120x65 mm, then a base width of 20 cm is sufficient. The principle is this: the base should protrude beyond the edges of the fence wall by 3-5 cm in both directions. Further work is carried out according to the following algorithm:
- Dig a trench 45-50 cm deep and 50-100 mm wider than the size of the future foundation in each direction, so that it is convenient to install the formwork.
- Place and secure the metal supports, which are the stiffening elements of the brick pillars.
- Compact the bottom of the trench with your own hands and arrange a sand cushion 10-15 cm high.
- Tie the reinforcement cage. The distance between the outer rods is selected so that they are immersed in the concrete by 40-50 mm. The pitch of the transverse rods is 10-15 cm.
- Install formwork in the trench. To prevent the shields from moving apart, make supports on the sides and fasten them securely.
The reinforcement cage should be placed at an equal distance from the formwork panels and installed on supports so that the lower rods are inside the monolith. Otherwise, the protruding reinforcement will quickly rot in the ground. Steel fence posts must be connected to the frame, preferably by welding.