One of the most popular ways to finish a facade is to install siding panels. They allow you to give an individual look due to the wide range of colors, shapes and materials from which they are made.
Affordable technology for installing siding allows you to assemble it yourself like a designer. The variety of types of siding is great, but we will talk about how to install vinyl siding, the principles of working with this material and the stages of installation.
But first, let's talk about the components. Those details with which you can finish the facade of your house.
Important! All components must be made of the same material. With the same coefficient of thermal expansion. To prevent structural deformation.
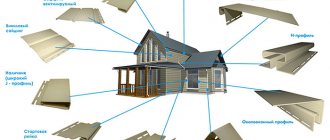
Description of components
- starting profile - a load-bearing element, the first siding panel is attached to it;
- the finishing strip is the last one in the row, hiding the top edge of the last panel;
- corner elements - they are used to form corners, the profiles have grooves in which the siding panel is placed;
- platbands for doors and windows - perform a decorative function, decorating door and window openings;
- window and door profiles - if the window or door is not located flush with the wall, but in a recess, then these profiles will help close the slopes during finishing;
- J-profile is needed for fastening panels, sometimes used instead of corner profiles;
- The J-chamfer is necessary to decorate the edge of the roof, otherwise it is called a wind board;
- ebb tides are designed to drain water from the walls;
- ceiling soffits can be perforated or solid; they cover the overhanging part of the roof from below; perforated ones provide ventilation between the siding and the wall;
- moldings connect panels located in different planes;
- H-profile is required for joining panels.
Framing doors and windows
Doors and windows can be in the same plane with the wall or be “recessed” into it.
The VINYLON assortment includes special accessories for cladding openings of any kind: near-window profiles, j-profiles and j-platbands.
There are two options for finishing openings - “at an angle” and “overlapping”. With any of these methods, horizontal elements are mounted on top of vertical ones at the top of the openings, and vertical profiles are mounted on top of horizontal ones at the bottom.
Temperature gaps: above the side profiles - 1-3 mm, below them - 3-5 mm, on both sides of the lower horizontal element - 2-3 mm.
When finishing “corner” joints, there is no need to cut off the edges of all profiles at an angle. At the lower joints, only the corners of the side profiles are cut off, and at the upper joints, the corners of the horizontal profile are cut off.
Near-window profiles, j-profiles and j-platbands are mounted in the same way.
Installation principles
Vinyl is a material that tends to change its shape and size when temperature factors change. This must be taken into account during installation. Therefore, when assembled, the structure of siding panels should not be tightly attached to the frame; parts and elements should be able to move easily relative to other components and parts.
The siding panels have technological holes for fastening, which have an oblong shape. This is not accidental; the self-tapping screw must be screwed into the center of this hole (with the exception of the upper fastener of vertical elements), so as not to interfere with the change in the shape of the material.
Do not screw the self-tapping screw tightly, leave a gap of 1 mm under its head. Do not screw the panel through the vinyl; if necessary, make a hole with a notch. The diameter of the screw must be smaller than the resulting hole.
Leave 6 mm gaps between the end of the siding panel and the profiles (J or H), in case of expansion. If installation takes place at low temperatures (-5 and below), increase the gaps to 9 mm. The gaps at the vertical panels are 3-4 mm at the top, 6-8 mm at the bottom.
Overlaps and joints do not need to be treated with sealant.
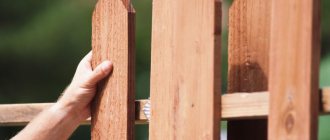
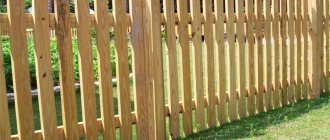
A metal profile or wooden beam is used as lathing guides. To make the façade last longer, it is preferable to install a metal frame. But, if you still decide to use wooden ones, make sure that they are well dried. Vertical guides are mounted at a distance of 40 cm.
When installing starting profiles, the gap between them should be 12 mm. When joining siding panels “overlapping”, trim its fastening parts so that there is 12 mm between them.
When installing the panel, do not overdo it, apply just enough force so that the siding lock snaps into place with the lower profile, do not overtighten or deform the structure.
Siding cutting
In the summer, VinylOn vinyl siding can be cut with a handsaw or tin snips. To cut panels and accessories at low temperatures, you will need fine-toothed tools.
It is convenient to cut siding with a circular saw with a fine-toothed disc installed in the opposite direction. Thanks to this installation of the disc, the cut is more accurate and even. Do not use the saw with the blade facing backwards to cut other materials (such as wood).
You can also use an angle grinder with a metal disc to cut siding.
When cutting siding with tin snips, do not use the blades the full length, but only three-quarters of the way. This will help make the cut more precise and neat. It is recommended to start cutting the panel with scissors from the top, from the fastening edge.
When cutting siding with a knife, you do not need to use excessive force and cut right through it. It is enough to make a shallow cut and break off the panel along it.
Important: Wear special safety glasses when cutting siding and accessories. When carrying out all work, do not violate safety rules, use proper tools and the necessary protective equipment.
Installation of guides
Installation of the frame begins with the installation of corner guides. They are attached to the wall using hangers, controlling the verticality with a building level. A cord is stretched between them and all the guides are installed in the same plane.
Attention! If you plan to insulate a house, then you need to calculate the distance from the building wall to the frame; it must be greater than the thickness of the insulation in order to provide a ventilated space. The second option is to first install a layer of insulation and then install the frame for the siding.
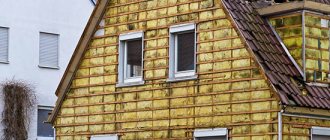
Insulation of walls before installation of siding
Cladding walls with siding provides a good opportunity to insulate the building. The siding installation technology allows it to be used with various types of thermal insulation materials.
When choosing insulation, it is recommended to pay attention to such parameters as thermal conductivity, service life, moisture absorption, resistance to various influences, and flammability. One of the best insulation options for siding is stone wool. This thermal insulation material has low thermal conductivity, is easy to use, biologically and chemically inert, vapor permeable, and does not burn.
The thickness of the insulation is selected taking into account climatic conditions, material, design and wall thickness. In many cases, preference is given to insulation with a thickness of 5 cm. It is usually more favorable in terms of price and the degree of increase in the thermal protection of the building.
To lay the insulation on the walls of the building, a sheathing of bars is attached, the thickness of which is equal to the thickness of the heat-insulating material. So, if insulation with a thickness of 5 cm is used, then bars with a cross section of 50x50 mm are optimal for installing the sheathing. They are installed horizontally at a distance from each other corresponding to the width of the heat-insulating material (for example, 60 cm). The insulation is laid between the bars close to the wall.
A windproof membrane is attached to the sheathing on top of the insulation. This material must have good protective properties and be vapor permeable so that moisture can evaporate from the insulation. An example of such a material is Tyvek vapor barrier, which you can buy from Westmet at a low price. When installing a windproof membrane, follow the manufacturer's instructions.
After this work, they begin installing the sheathing to secure the siding.
Installation of the starting profile
Using a building level, find the lowest point on the frame, screw in a self-tapping screw 5 cm above it. At the opposite end of the wall, also screw in a self-tapping screw (at the same level) and stretch a rope between them. Repeat the same operation around the entire perimeter. The line formed by the rope will be the boundary of the starting profile.
Attach corner profile. Mark the boundary of the corner profile on the sheathing slats.
Install the first profile, maintaining a distance from the corner profile of 6 mm, the gap between the starting strips is 12 mm.
You don't have to make a 6 mm gap, but in this case it is necessary to trim the corner profile fasteners.
Important! When installing the starting profile, constantly ensure that it is horizontal. Otherwise, the quality of the final result will be in question.
Installation of accessories on gables
On roof gables, fillets, j-profiles and internal corner profiles can be used as auxiliary (receiving) elements. The principles of their installation are the same as for vertical accessories.
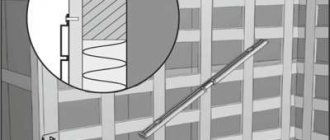
If it is necessary to connect two elements, they are mounted with an overlap of 20 mm. The lower element is cut off (see figure) and placed under the upper one.
The connection of the profiles at the ridge is carried out as follows. The elements are applied to the ridge to mark the joint. One profile is completely cut off along the joint line. On the second profile, only the fastening part is cut off, and the front strip is left and when fastening the elements, it is placed behind the first profile.
Attention! Roof gables near eaves can become very hot. To prevent this from affecting the condition of the siding installed in this area, it is recommended to retreat 20-25 mm from the junction of the wall and the roof.
Installation of external corner profile
Before installing the corner element, mark on the wall where the soffits adjoin it, or install the soffits. When installing the corner profile, make sure that the gap between it and the soffit is 3 mm, fix it with the top screws on both walls. The bottom edge should be 6mm below the starting bar.
After making sure that it is vertical, secure the profile along its entire length. If the length of one corner element is not enough, you need to overlap the second one by 25 mm, cutting it so that the distance between the mounting pads is 9 mm.
You can do without an external corner profile and use two J-profiles. In this case, we gain in time, but lose in waterproofing.
Cladding of openings with VinylOn profiles near windows
To finish doors and windows recessed into the walls, special accessories are used - window profiles. The width of their working part is 215 mm, so they are suitable for designing even significantly deep openings.
The principle of installation of near-window profiles is the same as j-profiles, the only difference is in the installation of their slope part.
Along the perimeter of the opening, finishing strips are installed on the inner edges of the slopes to fix the slope edges of the near-window profiles.
Temperature gaps when using near-window profiles:
— The sloped sides of the upper and lower profiles should be shorter than the width of the opening by the amount of expansion/compression gaps on both sides. The upper profile along the edges is cut to the required width, and cuts are made on the lower one and the resulting “tongues” are bent upward.
— The side profiles at the top are closely connected to the upper horizontal profile, and at their lower edge a gap is left for expansion/contraction of the material.
Installation of internal corner profile
Similar to the outer profile, make sure that there is a gap (3 mm) between the top edge and the soffit, and the bottom is 6 mm below the starting profile. If necessary, the internal element can also be “increased”.
The internal corner piece can be replaced with one or two J-profiles.
Installation of corner elements
Cut the corner piece 6 mm shorter than the required length (for expansion gaps).
Lower the bottom edge of the corner piece 4mm below the edge of the starting profile.
Secure the corner piece at the top with two fasteners. Install the fasteners at the top edge of the first perforation holes on top.
Place the remaining fasteners in the middle of the mounting holes every 30-40 cm.
If you need to connect two corner elements, then the joints are overlapped, with the upper element mounted on top of the lower one. This connection prevents atmospheric moisture from entering under the casing.
At the bottom of the upper corner element, the strips with mounting holes are cut off and only its outer part is left.
The lower corner element is secured first, and then the upper one is installed on top of it.
Important: the fastening strips are cut to a length sufficient to create a temperature gap, and the width of the overlap should be 2 cm greater than the width of the gap.
It is convenient to pre-mark the junction of the vertical elements on the ground or some horizontal surface (for example, on a table). After marking is applied, the fastening strips are cut to the required length, and then the elements are attached to the base.
Accessories are mounted on internal corners in the same way as on external ones.
Instead of special accessories, J-profiles can be used to finish the corners of a building. Such “stacked” corners will cost slightly less than special corner accessories.
To ensure proper quality of finishing, experts recommend decorating corners using accessories specially designed for them.
Corner pieces help make a building's skin airtight and attractive.
Installation of door and window frames
For this operation we use window and door frames. The strips are installed around the perimeter of window and door openings.
If the window and doors are “recessed” into the wall, we use platbands with a profile that covers the slopes.
Installing vinyl siding around an arch
Covering arches with siding If the openings in your house end in an arch, this is not a problem for installing plastic siding.
Finishing an arch with vinyl siding differs from finishing a regular opening only in the method of installing the J-plank.
Installing siding around an arch Flexible J-bar greatly simplifies the finishing of arched openings. To do this, notches are made on the profile and the smaller the radius, the more often the notches should be made.
Next, the profile is attached to the top of the window or doorway. The siding panel is inserted into it.
The process is clearly shown in the photo.
Installing the launch pad
Insert the first panel into the start profile. Place the ends into the grooves of the corner elements. Make sure there are end clearances. We start fixing the panel from the middle, moving towards the edges. Don't forget about the gap under the screw head.
If the panel is shorter than the length of the wall, use a connecting strip - H-profile - for extension.
You can do without a plank; in this case, we install the siding with an overlap.
Siding Installation Tools
To carry out installation work of the facing material, you will need the following equipment:
- A knife for cutting siding is used in the following way: first, a strip is drawn on the panel, along which it is bent and unbent several times, then broken. You can also cut material with a grinder, but only at low power
- Jigsaw
- Drill or hammer drill
- Screwdriver
- Level
- Roulette
- Bulgarian
- Hammer
- Marker or chalk for marking
Installation of siding panels under the eaves
Before installing the last (top) panel, a finishing profile is installed; you can use a J-profile or a corner profile. Taking into account the upper gap of 3 mm, the required part is cut out. Since the locking part is cut off, we use a punch to make hooks. We insert and snap the last profile.
Installation of finishing profiles and cornice moldings (fillets)
Finishing profiles are installed before installing the top siding panels. They are attached under cornices or soffits.
Often the last siding panels have to be cut to the required size, then special cuts are made along their edges with a punch. Using the resulting “petals,” the panel is secured inside the finishing profile.
If the eaves overhangs will be finished with VINYLON soffits, then to fix the last wall panels it is recommended to use special eaves moldings - VINYLON fillets. Unlike trim strips, fillets are attached to the eaves rather than to the walls. They can be placed at a distance convenient for securing the last wall panels.
The top wall panel is first connected with a lock to the previous panel. Then its upper edge is brought inside the final element and the panel is fixed with a short upward movement.
The fillet can be mounted on top of already fixed siding. Then you will need to make additional mounting holes on the panel connecting to it using a puncher. If necessary, a wooden strip is installed underneath to level the panel.
Fasten the panel in the usual way, and then install a fillet on it so that it covers the mounting holes.
Installation of spotlights
In addition to their decorative function (they cover the lower part of the roof), perforated soffits provide ventilation to the roof structure.
Using a level, draw a line on the wall parallel to the bottom edge of the pediment. Attach a J-profile along this line and to the edge of the gable. The planks should be located opposite each other. Measure the distance between the grooves, subtract 6mm, cut the part to the required length. Insert the soffit into the grooves and secure with a self-tapping screw.
Installation of spotlights
The soffits are installed before the last (top) wall panels are attached.
The roofs of different buildings differ in their design. One of the important principles is to ensure sufficient air circulation in the under-roof space, therefore it is recommended to make the eaves overhangs open. Old boards must be removed from closed overhangs before installing soffits.
To attach the soffits, a sheathing strip is installed in the center of the eaves overhang.
It is necessary to ensure that the receiving accessories for the spotlights are parallel to each other. To do this, first install the receiving accessories on the cornices, and then use a level to install elements parallel to them on the walls.
The length of the spotlights is calculated as the distance between the inner sides of the receiving accessories minus 6-8 mm.
One edge of the soffit is placed in a receiving accessory attached to the wall, and the second - in one attached to the cornice.
The connection of the soffits at the corners of the roof can be done at a right angle or at an angle of 45°.
Rules for siding
Installation of exterior vinyl siding is done in several stages and each one is quite important in the work.
Installation instructions for vinyl siding are as follows:
| Preparation | The rule for installing vinyl siding begins here. At this stage, we remove everything from the plane. It must be completely cleared of excess. |
| Lathing | This is quite a crucial moment. It will determine the mounting plane and allow the surface to have the correct geometric shape. |
| Insulation | Vinyl siding installation instructions include room insulation. Here you will need to make its correct fastening. |
| Facing | At this stage we will tell you how to install vinyl siding. It has its own characteristics and rules that should be followed. Everything is done with your own hands and therefore the work can be done efficiently and then the price of the structure will be much lower. |
How to solve the problem with volumetric vibrations of the material
Now let’s directly figure out how to install vinyl siding. It's no secret that panels undergo constant expansion and contraction as the temperature increases or decreases.
The rules for installing vinyl siding say that the work must be done without damaging the surfaces of the panels and it is also necessary to avoid damage due to temperature changes.
Therefore, during installation you need to adhere to some rules:
- When attaching siding, do not drive the nail in completely or screw in the screw. One to one and a half millimeters must be left between the fastener head and the surface of the panel.
- It is necessary to ensure that the fasteners are installed exactly in the center of the hole provided on the panel.
- Experts recommend leaving a gap of five to ten millimeters between the ends of the panels, as well as adjacent accessories.
- When joining panels to components and to each other, they should not be tensioned. Once they are secured, they should not experience any tension.
- If you plan to install facade, decorative and other elements on top of the siding, the holes for the bolts in the siding need to be drilled five millimeters wider than the diameter of the bolts.
Installation of H-profile
Installing an H-profile is one of the easiest and most accessible jobs; the main thing is to accurately mark the point for its placement. Otherwise, the principle of operation will be exactly the same as when arranging corners:
- two strips are attached one after another: below and above;
- to lengthen the strip, holes 0.5-0.7 cm wide are cut out in the upper part;
- profiles are attached with an overlap;
- You need to pay attention to the location of all components of the circuit. The main thing is that the starting bar is connected to the H-profile; in the reverse order, their position is unacceptable in the design.
Required tools for installation
Required Tools
Anyone who decides to undertake independent installation of vinyl siding should be armed with:
- construction hammer for installing sheathing;
- electric drill for drilling holes for fastenings;
- circular saw - will significantly save time and allow you to cut panels evenly, without the appearance of burrs;
- tape measure or folding ruler for the necessary measurements;
- screwdriver – facilitates the process of attaching vinyl panels;
- Twine - will allow you to quickly and accurately determine the vertical level;
- punch – necessary for punching “ears” on the sides of the panels during installation on the top of the wall or under the roofs;
- scissors for working on metal - it is advisable to have in stock for spot corrections of the siding shape and removing burrs if they do appear;
- screws, nails, bolts and other fastenings. The recommended width of hardware heads should be more than 8 mm.
If the casing will be installed at a height of more than 3 meters, in addition to the platform and tools, additional help will be needed. This could be one of the relatives, or a hired helper, since fixing vinyl panels at such a height alone will be quite problematic.
Installation of sheathing
Do-it-yourself installation of the lathing is carried out taking into account the method of fastening the siding: for horizontal fastening you will need a vertical frame, and vice versa.
If they plan to insulate the building at the same time as the cladding, the sheathing is made double. In this case, the first frame should be located perpendicular to the second, on which the siding will be installed. For example, if the sheathing will be mounted horizontally, then the frame under it - the second - should be vertical, and the first, installed on the wall, should be horizontally directed.
The sheathing pitch is determined based on the width of the slab insulation.
Installation of sheathing
Selection and calculation of component materials
Manufacturers of vinyl siding also produce all the necessary components for its installation:
- External and internal corners for cladding the corners of a house with a standard length of 3 m. To calculate the required quantity, the total footage around the perimeter of the building of the corners is measured and calculated, which is divided by 3. It is better not to use short trims, so as not to spoil the appearance of the building
- The starting bar is 3.8 m long and is calculated by subtracting the length of the doorways from the perimeter of the house
- The J-profile will be needed in places where extensions are attached to the building (length 3.8 m)
- The strip framing the windows (length 3 m) is calculated by summing the perimeters of the window openings
- Window sills are installed if necessary
- The finishing strip connects the roof eaves to the house
- The H-profile closes the joining gaps between the siding strips, is installed vertically, calculated by dividing the building perimeter by the length of the siding panel
- The drain strip is installed under the window openings
- The platband is mounted as a covering for any openings that are flush with the walls
To install siding with your own hands, you will also need galvanized self-tapping screws with a press washer 25-30 cm long. Their number is calculated based on the area of the walls: 20 pieces per 1 m².
Component materials for vinyl siding
Calculation of the amount of siding
Two options are used:
- The area of the walls of the house is calculated, from which the areas of all openings are subtracted. The resulting value must be divided by the area of one siding panel
- A drawing of the house is made and the required number of planks is calculated individually. This method is more economical, since you can immediately see where the cuttings will be installed
Calculation of wall area for subsequent calculation of siding
Today, the market offers a large assortment of siding from different companies. One of the popular Russian companies is Grand Line. Grand Line vinyl siding is of high quality. This material is highly resistant to impact as well as UV radiation.
Siding from the Nordside company is gaining increasing popularity. Read more about Northside siding here. The material of this company has a wide range of colors. Northside siding does not collapse, is not affected by moisture, does not rot, does not rust, and the paint does not fade.
Preparatory stage
The advantage of this type of material is that it does not require preliminary leveling of the walls. It is enough just to clean the surface from dirt or previous cladding, remove protruding elements (plinths, trim, gutters, etc.).
If cracks are found on the surface of the walls, they are sealed with cement mortar to prevent moisture accumulation in winter.
Important! Wooden walls are cleaned of mold and fungi and treated with deep penetration primer and an antiseptic.
The surface on which the facing material is installed must be absolutely dry; this requirement is set by the siding installation technology.
Installation of sheathing under siding
The lathing is made according to the principle:
- When laying siding horizontally, the wooden or aluminum profile is stacked vertically
- Wooden blocks should have a cross-section of 20-40 mm. Lathing made of galvanized profile will cost 30% more, but it will be more reliable and durable
- The distance between the profile (bars) should be 30-40 cm. They are set to the level
- First, a guide is placed on the left corner of the wall, then a horizontal load-bearing one is placed at the bottom, and the next vertical one is in the right corner. All openings are additionally tied
- When making the sheathing, the location of drains, lamps and other communications is taken into account. To do this, additional guides are mounted on the sheathing.
- The frame is attached to the wall using dowels (if the walls are made of brick, shell), self-tapping screws (wooden surfaces)
Carrying out insulation and waterproofing measures
Insulation (foam plastic, mineral wool) is placed in the sheathing. The main thing to consider is that you need to leave space for a ventilated space between the wall surface and the facing material to prevent rotting processes.
The insulation is covered on top with a water barrier, installed vertically or horizontally with an overlap of 10 cm. The waterproofing is secured to the wooden sheathing with a stapler. The joints can be sealed with tape.
After carrying out heat and waterproofing measures, a frame is made directly under the siding. The principle of the sheathing remains the same: a metal profile or wooden slats are packed in increments of 30-40 cm, and all openings are additionally framed.
Installation instructions for vinyl siding
Installation of vinyl siding involves the following sequence:
- Installation of corner strips
- Attaching the starting bar
- Installation of J-profile as finishing edges of siding
- Trim around window openings
- Cladding with siding panels
- Installing the finishing strip
The installation of the starting bar occurs along the perimeter of the structure; it is important to set it carefully. Fastening with self-tapping screws is used in increments of 25-30 cm, and perpendicular to the surface. The fastener is screwed strictly into the middle of the oval-shaped hole to prevent bending of the material. The main thing is that the self-tapping screw does not go all the way into the strip, that is, there is a gap of 1 mm between its head and the siding (for convenience, you can apply a coin). In the middle of the joining of two starting strips, a gap of 5-7 mm is required.
Window and door openings located in the same plane as the wall are sheathed with a wide J-profile (platband), into which the siding is subsequently inserted.
If there are slopes, then decoration is reduced to finishing with siding using an angular profile. Moreover, first the lower slope is lined (if there is no ebb), then the side slopes with a shift to the center of the opening to prevent the upper panel from coming out of grip in the winter, and finally the upper one.
When installed, the siding panels must fit into the starter strip and snap into place. Then only the material is fixed with hardware. Fastening of the facing material occurs under constant level checking. For convenience, you can pull the rope.
The finishing strip is attached at the top under the roof itself, further from it the value is measured to the last siding panel. The adjusted strip is bent in an arc and placed under the finishing panel.
Vinyl siding installation cost
How much does it cost to cover a house with siding? The cost of installation work on siding depends on the following factors:
- Prices for raw materials, including the manufacture of lathing, insulation, waterproofing, type of fasteners
- Number of door and window openings
- Depending on the building material (brick, wood)
- With or without insulation
Installation of gable siding
Typically, the same method is chosen for finishing the pediment as for the facades. Or you can choose to place your vinyl siding panels vertically. To do this, you need to measure the length to the nearest millimeter and carefully cut the panels at an angle and length.
When decorating gables with siding, you need to leave a temperature gap. Installation must begin from the back of the building, so that you can get to the front of the building and do the work with perfect precision.
Installation of near-window strip
To make the exterior design of a building or home look harmonious or holistic, window openings are also covered with siding. All of them can have a different type of structure, so the cladding method is selected individually. But it is important to remember the need to place rain drains. The type of window space design is selected depending on the depth of the opening in the wall. There are the following options:
- The window and the wall are a single plane. In this case, platbands are used, which have special grooves for external siding. In this scheme, the first step is to install the platbands.
- Shallow window opening up to 0.2 m. With this scheme, a J-bar is used. There is no need to install anything here in advance; installation is carried out after completion of the main cladding. Simply attach a finishing board along the window perimeter.
- If the depth of the window openings is more than 0.2 m, then you will need the same siding as for wall cladding. However, you need to cut the strips according to individual parameters, not forgetting to leave a small error for thermal expansion. For reliable fastening you will need a universal strip, a complex angle where the outer part and the plane of the wall combine. Extensions are installed in advance before installing the siding.