- October 13, 2018
- Country house
- Timoshenko Mikhail
When arranging a barn for a summer house or a personal plot, you should take care of laying a reliable floor. The coating must meet a number of requirements. The first place goes to decent strength, moisture resistance, low thermal conductivity and the safety of the materials used for animal health. What shed flooring options are worth considering? We will tell you about the best solutions in our publication.
Dirt floor
A simple option for installing a floor in a barn is to create a ground covering. The solution is to prepare a tightly compacted base, where fine gravel plays the role of the substrate. A pillow made of a thick layer of bedding is placed on top, which serves as insulation.
The main advantage of the idea of creating a dirt floor in a barn is the expenditure of a minimum amount of effort and time. The budget for the project is reduced to almost zero. However, rodents can penetrate through the dirt floor in a garden shed. Over time, the litter accumulates moisture, becomes moldy and begins to emit a repulsive odor.
To make a dirt floor in a shed, prepare the following tools and materials:
- fine gravel;
- pieces of roofing felt;
- hammer;
- nails that have a wide head;
- shovel.
Outside, around the perimeter of the shed, dig a trench about 30 centimeters deep. Place pieces of roofing felt on the walls. Nail the material. Leave the bottom of the roofing felt hanging into the ditch. Fill the trench with soil and compact it well. Ruberoid will protect the ground floor in the barn from moisture coming in from the outside. Thanks to such waterproofing, you can protect the room from flooding with storm water.
Inside the shed, thoroughly level the soil. Mix topsoil with gravel. Compact the formed pillow. Place bedding on top in the form of small sawdust or straw. Clay can be used as a replacement for gravel, which will minimize cash costs.
Concrete floor
How to cover the floors in a barn? The most reliable option is a concrete coating. Every owner who has ever mixed cement mortar and made a screed is capable of implementing the project. The advantage of the solution is the protection of the premises from rodents and simple, quick cleaning after animals.
How to make a concrete floor? Carry out the work according to the following scheme:
- Remove the top layer of soil to a depth of about 20-30 cm.
- Fill the cleared, compacted area with a mixture of gravel and crushed stone.
- Along the perimeter of the barn, make formwork from boards that fit tightly to the walls.
- Fill the floor in the barn with a solution of M400 cement and sifted sand, following a ratio of 1:3.
- Level the surface with a board.
- Leave the solution alone for 2-3 days.
- When the concrete floor in the shed is thoroughly dry, remove the wooden formwork.
DIY barn insulation technology
How to insulate a shed? The technological process is not complicated. It does not require highly qualified workers or the use of expensive equipment. To carry out the work, general construction skills are quite enough; the owner of the barn can do it with his own hands. He will be required to be careful and strictly follow technological recommendations and safety regulations.
Materials and accessories
To insulate a shed using mineral wool or penoplex you will need:
- insulation;
- wooden slats or metal profiles for guides;
- waterproofing film;
- vapor barrier membrane;
- Double-sided tape;
- polyurethane foam;
- mounting knife;
- screwdriver;
- jigsaw or circular saw;
- self-tapping screws;
- measuring tools: tape measure, ruler, square, level.
To insulate the shed, you may need a waterproofing film.
You should also equip a work place for cutting material indoors or under a canopy. It should be spacious and level and well lit.
Wall insulation
The method of insulating walls depends on the selected material. If you decide to work with bulk insulation, such as sawdust or expanded clay, you will need to build a second wall connected to the main one with wooden vertical logs at a distance of 10-15 cm from the main wall of the barn. The boards of the second wall are laid horizontally, nailing them starting from the bottom. Every half meter of height you need to stop, fill in the insulation flush with the top board and tamp it down.
If sheet material, mineral wool or penoplex is selected, proceed as follows:
- a waterproofing film is attached to the outer wall from the inside;
- then wooden planks or a metal profile of the guides are vertically fixed to the wall;
- sheets of insulation are laid between them;
- cracks and gaps are tightly clogged with scraps or blown with foam;
- A vapor barrier membrane is attached on top of the insulation along the guides.
Now you can attach the internal cladding from thin boards, plywood, OSB or moisture-resistant gypsum board.
Floor insulation
A budget method for floor insulation is as follows:
- mix chopped straw with clay;
- Apply clay to the floor in a layer of 10-15 cm, level and tamp.
The top of this floor is sprinkled with sawdust or straw, which is changed periodically. For goats and sheep, it is recommended to make beds 20-30 cm high from the floor level; the animals willingly spend the night on them and do not freeze.
Straw with clay - a way to insulate the floor in a barn
A serious method of floor insulation involves removing soil to a depth of 30-40 cm, filling it with expanded clay, and making a clay or cement screed. Wooden floors are used less frequently in animal housing buildings. They are insulated using polystyrene foam or penoplex. Mineral wool is not used because it will inevitably get wet from urine and water spilled from drinking bowls.
Ceiling insulation
Up to half of all heat loss passes through the ceiling.
To properly insulate the ceiling, you need to proceed as follows:
- A vapor barrier is spread over the rough ceiling; for this you can use polyethylene film, roofing felt or a special vapor barrier membrane.
- Insulation is laid on top of the vapor barrier on the rough ceiling: sawdust, straw with lime or expanded clay;
- it is covered with a waterproofing layer on top.
If there is no rough ceiling in the barn, sheets of foam insulation are attached directly to the roof sheathing using disc dowels and adhesive.
Spraying polyurethane foam onto the roof from the inside is very effective.
We insulate the doors
If the door is an uneven opening in the wall, somehow closed with a cracked shield made of slabs on rope loops, there is no point in insulating such a “door”.
You will need to install a normal door frame, seal the gap between it and the doorway with foam, and hang a solid wood door.
The door leaf can be upholstered with foam insulation 6-8 mm thick. This will double the door's ability to resist cold. The porch is insulated by gluing strips of foam rubber or a sealing rubber profile around the perimeter of the frame.
Windows are also insulated in the same way. To preserve heat, old windows are covered with polyethylene, pressing it against the wall with a glazing bead.
Waterproofing concrete screed
Before pouring cement, it is advisable to take care of waterproofing. For these purposes, use polymer materials or resin solution. Apply these substances to a bed of crushed stone and gravel, and then dry thoroughly. If desired, you can mix the polymer with liquid concrete and fill the floor. Experts call the method penetrating waterproofing. Such solutions will make it possible to protect the shed from the penetration of groundwater.
DIY barn
We build a garden shed with our own hands from the foundation to the roof.
Even if the entire area around the house is planted with lawn, you still need to store the lawn mower somewhere. Even the most trivial materials are suitable for building a shed, and the whole process will take at most a week, and your household equipment will be organized and reliably protected from adverse street conditions.
Choosing a place to build a shed
It is unlikely that anyone will want to display utility rooms in the most visible place. On the contrary, the most advantageous part of the site for building a shed is the utility part, that is, the part that is separated by the house from the access road.
First of all, consider the option of an attached room. This will reduce the consumption of materials, and the loss of usable space in the local area will be minimal. In addition, it is very easy to connect electricity to such a barn.
The extension should not be located closer than 1.5–2 m to the window openings, so as not to worsen the insolation of residential premises. It is optimal if the shed is not located at the very corner, so as not to complicate the route around the house.
Among the most suitable places for building a shed, you can also select naturally shaded areas where it will not be possible to place a normal flower garden or flower bed.
A good solution would be to use a shed to separate part of the local area from the direction of the prevailing wind, in order to subsequently be able to build a shed on the leeward side for outdoor storage.
If it is not possible to attach a shed to the house, a separate building should be located in the place least useful for economic activity, for example, near the fence of the site. Please note that it is very important to provide free access to the barn and to be able to lay and improve the path. Light semi-permanent buildings can be located even in close proximity to drainage pits or cellars, but not above them.
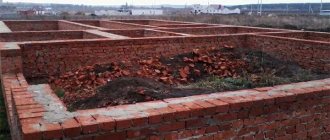
Barn base and floor
It is quite difficult to define the limit of size and quality of construction at which a barn turns into a change house or a mediocre workshop. It is believed that a building with an area of 4–5 m2 is sufficient to store gardening tools, several bicycles and all kinds of accessories. However, everyone’s appetites are different, including the degree of isolation from the street.
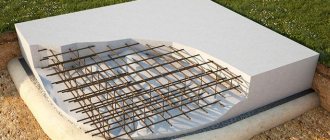
For light frame buildings it is not necessary to build a permanent foundation. MZLF on a properly constructed bed of sand and gravel will be sufficient. If you plan to lay stone walls with a load on the base of more than 300 kg/m.p., the tape should be made normally buried with correctly distributed reinforcement.
The need for a belt surrounding the perimeter of the barn is dictated by the requirement to install a dry floor inside. The tape provides insulation of the soil inside from surface water; therefore, in the shed it will be possible to store materials and tools for which high humidity is detrimental. At the same time, it becomes much easier to arrange the floor, regardless of its type: from clay with a gravel embankment to a more substantial one made of paved brick or concrete screed.
The width of the foundation should allow the walls to be placed on it at their actual thickness, so that there are protrusions of 50–70 and 100 mm, respectively, on the outer and inner sides.
They are necessary for the correct connection of the basement ebb and the possibility of installing a frame wooden floor on the ground inside.
If you plan to build on a metal frame, its rack elements are concreted first, and only after that a connecting belt is poured, raised above the ground by 150–200 mm.
Foundation diagram for a barn: 1 - shallow strip foundation with simple reinforcement; 2 - logs; 3 - gravel backfill; 4 - sand cushion
To reduce the impact of soil heaving on the base of the shed, the trench under the tape is dug a little deeper and partially filled with compacted sand and gravel mixture. It will be better if the bottom layer of the bedding is made with gravel of a fraction of 20–30 mm, and a layer of sand up to 5 cm is poured on top.
In this case, the walls of the trench must be cut in advance so that the crumbling soil does not fall under the concrete. The formwork of the underground part is the trench itself, and the above-ground part is a box of two boards on an edge, knocked together at the top with jumpers every 50–60 cm, and tied together with wire at the bottom.
Due to the small size of the tape, it is recommended to place an insulating film inside before installing the reinforcement, which will limit the release of cement laitance from the concrete.
What to build walls from
The shed can be insulated as desired, but protection from blowing is strictly required. In view of this, you can consider three options for constructing walls: masonry and on a metal or wooden frame.
The latter option is optimal for those cases when it is planned to organize additional heating in the barn.
A building made of brick or cinder block can also be heated, but usually these materials are preferred due to the ability to build massive shelves that can withstand the significant weight of stored materials.
For simple protection from wind and precipitation, a metal frame covered with corrugated sheets is ideal. Between the vertical posts you need to add two rows of jumpers, which are located 10–15 cm from the foundation and at the same distance from the top edge of the sheet. The gap between the outer crossbars is divided by additional jumpers so that their pitch does not exceed 80–100 cm.
Frame of the front and rear walls of the barn: 1 - rear wall of the barn (it is better to use double boards or timber of greater thickness to strengthen the wall, taking into account the additional load from shelves and racks); 2 - front wall of the barn; 3 - doorway
Wooden frame walls are assembled in the form of a frame of boards on edge, filled with vertical posts every 5–60 cm.
The pitch is selected in such a way that the width of the sheets for sheathing is a multiple of the center distance of the racks: for plywood it is 50 cm, for OSB it is 60 or 40 cm, for corrugated sheets it is 3–4 times the value of the wave pitch, on average 45–50 cm.
The assembled frames are raised to a vertical position, interconnected and fastened to the foundation with anchor bolts lined with waterproofing.
Windows and doors
It is very useful to provide natural light in a barn, so in addition to the doorway, it is advisable to equip one or more window openings. It is not necessary to install full glazing; small loopholes under the ceiling will be enough. It is recommended to place them on the south or east side.
In frame buildings, windows are formed by horizontal bars. It doesn’t make much sense to combine the spaces between the posts into one wide opening; for a barn it would be more correct to arrange several small windows distributed around the perimeter.
In a wooden frame, finished openings can have double glazing due to the sufficient width of the boards; in a metal frame, it is usually possible to install a frame with only one glass, fixed in a wooden frame.
And there is little point in fighting for high-quality glazing, since most metal sheds are not insulated.
General view of the frame of a shed covered with sheet material, for example, OSB
It is somewhat more difficult to make openings in stone walls. In addition to the fact that trimming of the extensions is required to form vertical edges, two more important requirements should be considered.
The top of the opening is covered with a wooden board, the thickness of which is approximately 1/20 of the width of the window, walled into the walls at 1/5 of the length from each edge.
The second requirement is to install, instead of brick extensions, at least four embedded wooden blocks for attaching the window frame.
Ceiling, roofing
Since the width of the barn rarely exceeds 5–6 m, there is no point in installing a rafter system: a pitched roof will be more than enough; its slope should be at least 15°, that is, approximately 1:5 or steeper.
Insulation of concrete floors
An important point is the insulation of the cement coating. This goal can be achieved in several ways, using wooden cladding or a thick layer of bedding. Lay boards about 3 centimeters thick on the surface of the hardened concrete. Secure the structure with wooden lintels at the walls.
A cheaper option would be to lay a thick cushion of sawdust on top of the concrete floor. Alternatively, you can use peat insulation. Be prepared for the fact that such bedding will have to be changed regularly to avoid the development of mold and mildew.
Wooden floor
Wood flooring has one undeniable advantage over concrete flooring. We are talking about much better heat retention in the room. The idea should be adopted if you plan to keep animals in a barn during the frosty winter. As a material, use oak or pine boards, which belong to the category of hardwood.
Work instructions:
- Place cross beams on the foundation columns along the entire perimeter of the room close to the walls. Secure the material in the corners of the shed with large screws or staples.
- Install a strong metal mesh onto the support beam, securing it with nails. Lay wooden logs on top at intervals of 50 centimeters. Nail such jumpers to the supporting beam.
- Place insulation on the mesh between the joists.
- Lay the top plank covering perpendicular to the joists and nail it in place. Treat the surface with a water-repellent compound. Let the boards dry thoroughly.
Waterproofing a wooden floor
Before you begin installing the plank floor, you should take care of waterproofing. Use coarse crushed stone mixed with sand as a protective cushion. Compact the layer thoroughly. Cover with plastic wrap. Re-place the sand and gravel mixture. Cover the backing with another layer of polyethylene. Connect the edges of the film with tape or other adhesive tape. Consider the groundwater level. The closer the moisture penetrates to the soil base of the future floor, the more massive the waterproofing pad should be.
How to make a floor in a barn with your own hands from boards
It just so happens that the barn is associated exclusively with the habitat of livestock - from cows and horses to chickens and turkeys. In such a room there must be a place for animals to rest, a feeding and activity area. The building must be warm, environmentally friendly and safe, so that the living creatures inside are comfortable and calm. To create a shed, a wooden plank is best suited. The building is placed on the ground without a foundation. In this case it is not necessary.
Experienced farmers advise creating sheds from wooden planks and installing them directly on the ground, without building a foundation. The advantages of such structures are as follows:
- saving time - they can be erected quickly (in just a few days);
- saving money - without a foundation, the structure will cost 2 times less;
- saving effort - it is obvious that erecting a structure without a foundation requires less effort on the part of the builder.
In addition, the barn itself turns out to be quite light and stable.
To build a shed without a foundation, choose wooden boards - they are quite light, but durable
However, such buildings also have disadvantages:
- the need for mandatory additional insulation of the floor so that the animals inside do not freeze;
- the need for external and internal waterproofing of walls and floors so that water from the soil does not destroy wooden boards;
- fragility of the structure (a barn will last about 20 years, whereas with a foundation it will last about 50);
- the need for careful preparation of the area where the shed will be installed.
If such problems do not scare you, then you can safely start building a shed from wooden planks without a foundation.
Wooden boards are a durable and reliable material and are relatively inexpensive. That is why they do not lose their popularity and relevance, despite the abundance of modern innovative materials.
A wooden shed without a foundation will last a maximum of 20 years, then it will begin to quickly collapse
When a barn is built to last, it must be installed on a foundation. If there is no need for long-term operation of the building or the structure is to be moved from one place to another, then the foundation is not poured.
There is no need for a foundation if you live in warm regions where there are no harsh winters and little rainfall throughout the year.
Residents of warm regions with low average annual precipitation can afford to build a shed without a foundation.
Cheapness is another important feature of a shed without a foundation. If funds are limited, you can build a structure without a foundation and install it directly on the ground.
Before you begin the process of constructing a shed from wooden planks, you need to decide on the design of the room, prepare all the necessary tools and materials, choose insulation and waterproofing.
A barn made of wooden planks without a foundation can only be one-story. Otherwise, the earth will not stand it and will begin to sag, the structure will gradually sink into the soil, the walls and floor will begin to collapse. This is dangerous for animals and humans.
A barn without a foundation can only be one-story: the more floors, the heavier the structure; it will quickly sink into the ground
The height of the building walls should not exceed three meters, and the total area should not be more than 20 m2. Otherwise, the structure will turn out to be very large, the earth simply will not support such weight.
In any case, the barn made of wooden boards will be frame. This means that initially they build a “skeleton” - a base, then it is lined with boards, insulation, waterproofing and finishing.
To build a shed, you need a drawing. It is better to choose the simplest design. It will be easier to build such a structure alone.
By strictly following the drawing, a barn can be built in a couple of days alone
The barn can be made square or rectangular depending on the personal preferences of the owner. But an elongated structure that is too narrow is inconvenient to use; the animals inside will be too cramped.
Using a simple drawing you can create a comfortable and cozy barn for livestock
The main material for building a shed without a foundation is wooden planks. Oak, spruce and pine trees are suitable for agricultural purposes. It is worth choosing such tree species because they:
- smell nice;
- do not absorb unpleasant odors;
- are durable;
- resistant to mold formation.
To build a frame base, choose oak wooden blocks with a square or rectangular cross-section (100×100 or 60×100 millimeters).
For construction, choose only bars with a cross-section of 100X100 mm or 60X100 mm, others will not work
To calculate how many boards and bars will be needed, you will have to take into account the following nuances:
- To create a frame, place 4 identical bars at the corners of the future structure. The length of each “stick” is 3 meters 20 centimeters (provided that the height of the barn is 3 meters, 20 centimeters will be buried in the ground to ensure the stability of the entire structure).
- Vertical bars are connected to each other by horizontal ones. And not only on the walls, but also on the floor and ceiling. The distance between parallel bars is 50 centimeters.
- The frame is sheathed with wooden boards on the outside and inside (entirely, including the floor and ceiling). The planks should fit snugly against each other without forming gaps.
Based on such features, calculations are made. To erect a building with an area of 20 square meters with three-meter walls, you will need the following number of boards and bars:
- 210 meters of timber (70 timber, 3 meters each);
- 188 square meters of wooden plank.
To calculate how much material will be required for the construction of a building, you need to know the exact dimensions of the future room. If the structure is three meters high, 5 meters long, and 4 meters wide, then counting the number of boards is easy. You need to find out the total area of all surfaces of the building (including the floor and ceiling). To do this, first multiply the length of the building by the height (5 * 3). We get the area of one wall, the same area of the parallel wall. The area of the other two walls is equal to the product of the height and the width of the barn, multiplied by two (4 * 3 * 2). The floor and ceiling have equal area. We calculate them by multiplying the length by the width (5 * 4). Now we sum up all the received numbers (5*3*2+4*3*2+5*4*2). We carry out the cladding outside and inside. This means that we multiply the resulting value (94) by 2.
Using the same formula, you can calculate the required amount of insulation and waterproofing for a shed.
The shed definitely needs to be insulated. Otherwise, the animals will not be able to stay inside in the winter. It will be damp and cold for them to sleep on the floor. In such conditions, livestock will quickly become ill and begin to die.
Suitable materials for insulation include:
- wool (mineral, stone, glass);
- ecowool;
- polyurethane foam.
Cotton wool is the cheapest insulation material, but it quickly absorbs moisture and sags. It is recommended to use it in conditions of austerity. Glass wool can be hazardous to livestock. If it gets on the skin or mucous membranes of an animal or bird, it can be fatal. It is better to choose mineral or stone.
Ecowool is more expensive than ordinary mineral or stone wool, but is considered an environmentally friendly and moisture-resistant material. Reliably retains heat indoors.
Polyurethane foam is a rather expensive insulation material. But they haven’t come up with anything better yet. It is resistant to moisture and does not sag even after long-term use. Reliably retains heat in the building.
To insulate a shed, it is better to choose polyurethane foam. It does not absorb moisture and does not deform during use
Polyurethane foam for insulation is placed in one layer, while cotton wool is placed in two or more. The choice in this case is obvious.
When building a shed from wooden planks without a foundation, special attention is paid to waterproofing. It must be carried out on all surfaces of the structure - from floor to ceiling, so that moisture does not enter inside and interfere with the comfortable stay of livestock in the barn.
Betonite mats, membranes and injections are also used as water insulation.
Coating waterproofing is bitumen - a substance with a pungent odor. It is not effective, but it is cheap. Shed wrap insulation works best. It is a rolled material that itself is attached to the surface. Paint insulation is similar to paint; sprayed insulation (in powder form) requires special equipment. The injection layer requires a lot of money. Mats or membranes are expensive and increase the thickness of the walls. But they reliably protect the structure from moisture. If there are no financial limitations, it is better to choose mats or membranes. Their service life reaches 70 years.
It is necessary to waterproof the barn, otherwise the room will be damp and the animals will get sick often
The required drawing has already been selected, the materials have been calculated. The preparation of instruments begins. To build a wooden shed without a foundation you will need:
- saw;
- drill;
- plane;
- screwdriver;
- self-tapping screws;
- nails;
- hammer;
- construction corner;
- building level;
- pencils;
- wires for carrying lighting into the room;
- marker for marking;
- construction stapler.
Additional materials and items needed to create a full-fledged shed:
- wooden door and hinges for its installation;
- a small window (in a plastic or wooden frame) so that sunlight penetrates into the room during the day, and the owner saves on electricity;
- OSB panels for creating partitions;
- lampshade and light bulb;
- switch;
- socket;
- cement mortar to fill vertical bars buried in the ground;
- sand, crushed stone;
- corrugated roofing;
- polyurethane foam.
You can build a shed not only from wooden planks. Wooden pallets and scraps are also suitable for this purpose. The main thing is to prepare them for construction work: remove all nails, level them, and process them with a plane.
Instructions for building a shed without a foundation:
- They are clearing the area for the future barn. All debris and dirt are removed from the site, holes are dug, hills and mounds are leveled.
Preparation for construction begins with cleaning and marking the area
The bars at the corners are buried in the ground and filled with cement for strength.
The ground under the shed is compacted with crushed stone and sand so that the shed stands firmly in its place
Don't forget to leave room for the door and window
When covering, it is necessary to avoid gaps between the boards
A planer will help make the wood cladding smooth and even and remove all snags.
To insulate with mineral wool, you will have to make plank sheathing with the distance between the boards 1–2 mm less than the width of the slabs, so that the slabs fit as tightly as possible
First they put waterproofing on the floor, then insulation, then again waterproofing and only in the end - wooden boards
Windows and doors can be of any shape and from any material
Waterproofing must be installed under the outer skin
Corrugated sheeting is the best material for protecting a barn roof from bad weather - it lasts a long time and is inexpensive
Building a shed from wooden planks without a foundation is quite simple. The main thing is to strictly follow the instructions and take a responsible approach to each stage of the work. Proper insulation is the key to ensuring that the animals inside will be cozy and comfortable, and the owner will not have to worry about them.
The flooring in the barn must be strong and durable, not allow moisture to pass through and protect the interior from freezing. Among the interior design of a barn or stable, a high-quality floor plays an important role, since it will determine how comfortable and practical the room will be.
In this article we will tell you how to make a floor in a barn with your own hands from scratch, using wood, concrete and other building materials for this purpose. Let us separately dwell on the insulation and waterproofing of the coating.
The most popular type of barn floors is concrete. This filling allows you to get a smooth surface that is resistant to moisture and rodents.
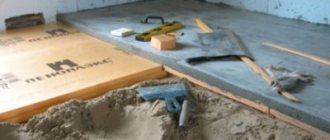
Figure 1. Technology for pouring concrete pavement
Concrete pouring begins with an assessment of the original surface (Figure 1). If it is a reinforced concrete slab, then it is enough to clean it of dust and debris, but if the surface is unpaved, it needs to be leveled. In most cases, the floor covering in such rooms is precisely ground, so let’s take a closer look at the scheme for filling it.
First of all, the ground covering must be compacted and a sand bedding 15-20 cm thick must be made on it.
Note: The sand bedding is laid in layers, compacting and moistening each layer.
For concrete pouring you will need cement (grade 400 or 500), clean sand, gravel and crushed stone. It is advisable to lay reinforcing mesh on the surface for strengthening, but this condition is not mandatory. A layer of waterproofing material (for example, roofing felt) is placed on the mesh. Wooden marks are installed along the entire perimeter, since the surfaces are filled in parts. Having prepared the concrete mixture, it is poured onto the selected area and leveled. After this, you need to wait until the mixture hardens. If pouring is carried out in the warm season, the concrete must be periodically moistened with water so that it does not become cracked.
A wooden floor in a barn also has its advantages. Unlike concrete, it retains heat, so this design is more suitable for rooms where animals will be kept.
It should be borne in mind that the installation of a wooden covering is more difficult, and the material itself easily absorbs moisture and gradually begins to rot, so some boards will have to be replaced periodically.
Figure 2. The process of laying a wooden covering in a barn
Before installation, you need to level the ground surface with a cement screed (Figure 2). After this, logs made of wooden beams are laid out over the surface area. They should be secured using corners and self-tapping screws, and installed at the same level. Boards are attached to the joists. To speed up the process, they do not need to be connected to each other, but only attached to the joists using self-tapping screws. But, if you want to get a more reliable structure and prevent the formation of gaps between the boards, it is better to fix the boards together using nails or self-tapping screws screwed into the side walls.
The video shows how to properly make a wooden floor with your own hands.
Since the wooden floor in a barn quickly absorbs moisture and can rot under the influence of physiological secretions of animals, the type of wood for covering should be carefully selected.
For this purpose, it is better to choose hard wood beards (for example, oak), but boards made from resinous trees (spruce or pine) are also suitable.
When building a barn, it is important not only to know how to make a floor in a barn, but also how to properly insulate it so that during the cold season the inside of the room does not freeze and a constant temperature is maintained in it (Figure 3).
The modern market provides a wide selection of insulating materials, so you can easily choose the right one in terms of price and quality. Let's take a closer look at the features of the most popular insulation materials.
Most often, polystyrene foam or mineral wool are used to insulate floors, and less often polyurethane foam.
Polystyrene foam is more suitable for external insulation. If you plan to insulate the floor, this material should not be used, as it is flammable and easily damaged by rodents.
Mineral wool is more suitable for this purpose. But it should be borne in mind that this material easily absorbs and accumulates moisture, therefore, when covering a wooden floor, a layer of waterproofing material must be laid between the boards and mineral wool.
Figure 3. Do-it-yourself floor insulation in a barn
The best way to insulate is to use polyurethane foam. Despite the fact that this material is expensive and requires the use of special tools for application, it retains heat well, does not absorb moisture and has a long service life.
Regardless of the material chosen, the insulation technology remains unchanged. The insulation is placed in the space between the joists and, if necessary, covered with a layer of waterproofing. This condition is only relevant for mineral wool, which absorbs moisture well and can subsequently accelerate the process of rotting of the wooden covering.
If polystyrene foam is used for insulation, it is advisable to treat it with a special solution against rodents, but even in this case there is no guarantee that mice will not damage the insulation.
When planning floor insulation, you need to select the material in advance and measure its height. The cross-section of the beams that are used as joists will depend on this, since the insulation is placed in the free space between them and covered on top with boards or other material.
If animals will be kept in a barn or stable, waterproofing is a prerequisite for the construction of the floor. This requirement is especially relevant if the covering is wooden.
There are several ways to protect your flooring from moisture. Let's take a closer look at the most popular waterproofing materials and the features of their installation.
To protect the floor from moisture, first of all it is necessary to arrange a drainage system around the building and carry out certain work on the foundation. It is also necessary to measure the level of groundwater and the degree of soil freezing in winter. The waterproofing process will depend on this.
As a rule, protecting the floor from moisture penetration involves arranging a kind of “cushion”, which consists of several layers of different materials: sand, gravel and cement.
Let's consider waterproofing technology using the example of a concrete floor on a soil base. To protect the interior from moisture, first lay a layer of sand, then a layer of fine gravel. After this, a thin layer of cement and sand is poured. After this, the screed is covered with rolled material, and its joints are sealed with a gas burner (Figure 4).
Figure 4. Floor waterproofing diagram
Next, a finishing cement screed is performed and further installation of the coating begins. A hydrobarrier can be created according to another scheme. In this case, dense polyethylene film is used as the first layer, after which a layer of sand is laid and another layer of film is laid. The joints are fixed with tape or other moisture-proof material with an adhesive base.
It should be borne in mind that waterproofing technology largely depends on the level of groundwater. The closer the groundwater is, the more reliable the first layer of waterproofing should be.
Unlike wooden floors in residential premises, such covering of barns requires more careful finishing, since wood is regularly exposed to moisture and low temperatures.
Before painting, the boards must be coated with special impregnations to protect them from fire, insects, fungus or mold. Most often, oil-based impregnations are used for this, which increase the strength and moisture resistance of wood by penetrating its fibers.
Unlike painting residential floors, you can use any paint for a shed: water-based or oil-based. In order for the coating to adhere better, you must first clean the boards from dust, dirt and debris, dry them and fill all the cracks. After this, the wood needs to be sanded smooth and wiped. The next layer is a primer, and after it dries, paint. It is advisable to paint the floor several times, waiting for each layer to dry completely.
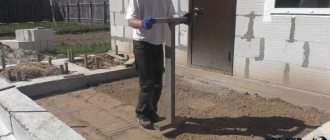
Concrete or cement screed is the base of the floor, so the evenness of the finished coating will depend on its quality. For a shed, the most suitable screed is laid in combination with a layer of hydro and thermal insulation (Figure 5).
Note: To make the screed, you can prepare the solution yourself, using a mixture of cement, sand and gravel. But it is much better to buy a ready-made mixture and dilute it to the desired consistency according to the instructions on the package.
Figure 5. Features of screeding in a barn
If the screed is laid on a ground surface, it must be compacted and, if necessary, a layer of waterproofing material and insulation must be laid. To level the surface, first pour a rough concrete screed in a layer of no more than 2 cm, after which the finished mixture is poured onto the surface and leveled as usual. The screed must be completely dry before you begin installing the floor boards. If you are working in hot weather, the concrete needs to be watered periodically to prevent its surface from cracking.
The correct technology for floor screeding is shown in the video.
Wooden floor insulation
There are many noteworthy materials on the market that will serve as good insulation for a plank floor in a barn. Experienced craftsmen advise giving preference to mineral wool and sheet foam. The first option is ideal for implementing the task. Mineral wool creates a reliable barrier between the freezing soil and the wooden covering. Polystyrene foam also insulates the floor quite well. However, the material is classified as flammable. In addition, polystyrene foam often suffers from small rodents.
The best solution is to insulate a wooden floor with polyurethane foam. The material is expensive. Despite this comparative disadvantage, the base ideally retains heat in the room, has a hydrophobic structure and can last for decades.
Regardless of the nature of the selected insulation, proceed as follows:
- Lay the material between the wooden floor joists;
- Treat the surface with compounds with water-repellent properties;
- Secure the insulation to the mesh with wire or elastic ties.
It is advisable to place anti-rodent poisons in the section under the outer plank covering where the thermal insulation material is laid. Naturally, the poison must be safe for the animals that will be kept in the barn.
Finishing the plank floor
The floor in a barn needs a high-quality finishing treatment, since the wood is regularly exposed to changing temperatures and moisture. After completing the work, apply synthetic impregnations that are harmless to animals against insects, accidental fires, fungi and mold to the surface of the boards. There are enough products in this category in hardware stores that efficiently impregnate the wood structure, penetrating deep into the fibers.
Finally, paint the floor. Pre-clean the board covering from dust and all kinds of debris. Fill any existing cracks. Sand the surface until smooth. Next, apply a primer coat. After the composition has dried, coat the boards with water- or oil-based paint.
How to paint a wooden floor in a barn
Unlike wooden floors in residential premises, such covering of barns requires more careful finishing, since wood is regularly exposed to moisture and low temperatures.
Before painting, the boards must be coated with special impregnations to protect them from fire, insects, fungus or mold. Most often, oil-based impregnations are used for this, which increase the strength and moisture resistance of wood by penetrating its fibers.
Unlike painting residential floors, you can use any paint for a shed: water-based or oil-based. In order for the coating to adhere better, you must first clean the boards from dust, dirt and debris, dry them and fill all the cracks. After this, the wood needs to be sanded smooth and wiped. The next layer is a primer, and after it dries, paint. It is advisable to paint the floor several times, waiting for each layer to dry completely.