What factors complicate the joining of tiles and laminate
Depending on the layout of the rooms and the creative idea, the junction of two flooring materials may need to be made in different places. In the case of a classic design of rooms with doors, tiles and laminate will meet exactly under the door frame, which most often needs to be covered with a decorative threshold.
It is more difficult to design a joint over a large area, as is often the case in a studio apartment. There are no partitions that clearly separate the kitchen from other rooms, so the division into zones is done conditionally along the line on the floor connecting the two coverings. The challenge is to make it harmonious with other interior elements and practical for cleaning and movement of users.
Various flooring heights
The joint between tile and laminate is more difficult to create beautifully if there are different heights of the floor coverings. For example, the tiles are 8-10 mm thick and are laid with tile adhesive, which creates a floor height of 12-14 mm. A durable laminate for flooring has a thickness of 8 mm, so even using a special underlay it is impossible to bring the level to the same value.
The difference in the joints may be inconvenient for the passage of the area and collect debris. Bringing the laminate level only at the joint will help the floor rise smoothly, but in this place it will play under load. Therefore, a more stretched screed is made under the laminate to even out the difference and create a solid base under the coating.
Hygroscopicity of laminate
Another difficulty when joining laminate to tiles is the hygroscopicity of the laminate, which affects its structure. If the laminate absorbs moisture, it will swell and become looser. To avoid this, first lay the tiles and let the glue dry. Then the joints of the laminate strips are treated with a sealant that seals the areas to absorb moisture.
Changing linear dimensions
Sometimes the problem is that the physical and mechanical properties of the laminate change in size under the influence of different temperatures and air humidity. If the fit to the tile is very tight, this can cause swelling or other deformations. To prevent this phenomenon, it is necessary to create a small gap that provides freedom for expansion.
Material cutting
A common difficulty when joining tiles and laminate flooring is line alignment. Often in these places defects are visible due to sloppy cutting. In the case of short joints under doors, this is covered with a threshold.
In a large space in a studio apartment, it is important to use an electric jigsaw for laminate flooring, a grinder with a diamond blade for tiles, and a prepared template for making the cut. This will promote evenness and identity of the lines, especially with a wavy seam configuration.
Purpose of the threshold
At first glance, it may seem that the threshold is necessary only to make the joint between the two materials look aesthetically pleasing. However, at the same time, it also copes with other important functions.
When using a floor covering consisting of two types of materials with a joint inevitably formed between them, the latter is exposed to intense exposure to dirt and dust. At the same time, removing them will require a lot of effort, and such a joint will look untidy. After installing the connecting element, the labor intensity associated with the operation of such a floor covering is significantly reduced.
To install the threshold you will not need a lot of effort, but it must be done as soon as possible - it is advisable to immediately decide on the model, color and material of manufacture
Among the positive qualities of docking thresholds, the following can be noted:
- The service life of the floor covering increases, since the joining element reliably protects the edges of the material - the most vulnerable place where chips and cracks can form.
- The threshold increases the safety of the surface when walking on it.
- Laminate and floor tiles not only have different external designs, but also thicknesses, which can result in height differences. Certain types of thresholds allow you to hide small defects.
- A wide range of products that differ in material of manufacture, appearance, method of fastening, design allows you to choose a model for a particular case. Products equipped with hidden fastenings look neat.
Important! When choosing, it is necessary to calculate the width of the product, which will allow you to effectively hide the joint between the tile and the laminate.
T-shaped sill profile
You might be interested in information on how to join laminate flooring between rooms? More details in a special article.
Forms of laminate and tile joints
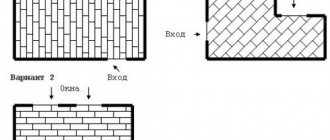
Depending on the location of the joint and the configuration of the tiles, various forms of joining the two floor materials are possible. There are three main types.
Straight line
One of the most common and simplest joints. Available with or without a threshold. It can be long, in case of dividing the room into zones, or short, located under the door. Even an inexperienced person can handle the last option by covering it with a narrow decorative overlay.
broken line
A very expressive way of joining floor coverings, which involves laying solid tiles (rectangular, diamond-shaped or triangular) without adjustment. The laminate spreads around, repeating the line. But such execution requires precise cuts and takes more time. The threshold is not used in this case, as it spoils the view. This type of joining looks most advantageous on a long section.
Curved joint
It involves connecting laminate and tiles with a wavy line, which is often implemented when moving from the kitchen area to the living room. Here you will need a professional tool for working with stone and wood materials, as well as an accurate template. The joint can be made without a threshold if you can make precise cuts. If wide gaps form, they are covered with a wavy overlay that follows the joining line.
When you can't do without a threshold
The connection of two floor coverings without a threshold looks very attractive, but in practice it is not used so often. Making a joint with a threshold is universal and often more practical. Its use is justified in the following cases:
- Masking the difference in height between two coatings. The part can be installed if the difference does not exceed 1 cm.
- Zoning of the premises. Using a threshold will emphasize the division of the room, especially if a contrasting color is used.
- Masking of joint defects. It will help hide uneven cutting of the material and other defects.
- Separating the hallway space. This is necessary so that small debris and dirt that enters the room from the street are retained by the threshold and do not enter the living rooms.
It is important to know that the threshold poses a certain danger, since it is easy to trip over it. The part makes cleaning somewhat difficult because dirt can accumulate under it. It is quite difficult to extract it. In addition, the threshold can somewhat spoil the appearance of the floor, although if you choose it correctly, this will not happen.
Methods for designing joints between laminate and tiles without a threshold
The border between two materials on a long section without a threshold can be designed in different ways. This reduces the cost of the process and also does not require a special additional tool for fastening.
Using grout
The simplest and most inexpensive method. The joint between tile and laminate without a threshold is sealed with tile grout, available at any specialty store. The color is chosen based on the shade of the tiles, laminate and other paints in the room. This could be a fusion of colors or a play on contrast. Application can be done as the line is being laid (if the line is long and this does not happen on the same day) or when both coatings have already been laid.
The process is carried out in the following way:
Step 1.
On the semi-base (concrete screed), mark the future line of connecting materials with a marker.
Step 2.
The tile is laid first so that its edges exactly fall on the intended contour.
Step 3.
The laminate is cut to size, and its edges are coated with silicone to block the access to moisture.
Step 4.
The strips are laid in place taking into account a gap of 3-5 mm.
Step 5.
The gap between the two materials is filled with silicone up to half the height.
Step 6.
When the sealant has dried, it is allowed to apply grout, pushing it deep and without gaps. The resulting seam is leveled, and the dirty areas nearby are cleaned.
Step 7
At the last stage, the seam is coated with transparent varnish, which will preserve its strength and beautiful appearance.
Installing a cork compensator
To implement this joining method, purchase a long strip of cork. This material is soft and easily takes on different shapes, so it is suitable for both straight and wavy joints. There are strips of cork from 90 to 300 cm in length, and their thickness varies from 7 to 10 mm.
This element is called a compensator because it fills the gaps and compensates for uneven cutting. Due to the soft structure of cork, it is compressible and can easily fit into tight spaces. With its help it is convenient to disguise small errors of the master. There are products with the top side treated with varnish or decorated with veneer, which increases the strength and beauty of the product. But you need to take into account that with a long joint (more than 3 m), you will have to buy two compensators and connect them to each other, and this will be visible to the naked eye.
The compensator is installed as follows:
Step 1.
The tiles are laid first. Its edge is sanded to remove protrusions from hardened glue.
Step 2.
The area should be thoroughly cleaned of dust, for which it is effective to use a compressor or vacuum cleaner.
Step 3.
Glue is applied along the edge of the tile.
Step 4.
If the expansion joint is higher, it can be trimmed so that it exactly matches the tiles. Then it is glued, pressing briefly with your fingers.
Step 5.
After this, the laminate is laid, which can be adjusted closely here. To expand it, in the event of heat or humidity, the cork will be able to move due to its soft structure.
Step 6.
You can carefully pour sealant between the compensator and the laminate, which will fix the seam.
Using cork sealant
This method is similar to grouting, only it uses a special sealant containing cork chips. The joining of laminate and tiles is carried out using a construction gun, into which a tube with sealant is inserted. This is very convenient for accurately squeezing the substance into the gap.
Cork sealant simplifies installation because it already contains protective components for the laminate that prevent moisture absorption. The seam turns out to be elastic and fills well all the unevenness caused by uneven cutting. The width of the seam does not affect the quality. The only drawback is the presence of only one color - brown, which does not suit all shades of tiles and laminate.
In what cases is such zoning applied?
Tiles and laminate are materials that are not similar in texture, composition and technical characteristics. But they can make great neighbors.
- The shoe area is tiled, which will delight you with durability and wear resistance. In addition, the tile is easy to care for and is resistant to household chemicals. But laminate will become the flooring in the rest of the hallway and rooms.
- Zoning the kitchen and dining room. In the kitchen, it is better to lay tiles on the floor that are not afraid of moisture and exposure to household chemicals and grease. And the floor of the dining room will delight you with a pleasant and warm wood-colored laminate.
- Fireplaces and stoves again became part of the interior of the Russian people. Laminate is not suitable for laying the floor next to a working fireplace, but heat-resistant tiles will do the job perfectly.
Using different floor coverings helps to utilize the advantages and strengths of each cladding.
Methods for designing joints between laminate and tiles with a threshold
Design without a threshold looks beautiful, but requires experience and precise cutting lines. Often this cannot be achieved the first time when doing home repairs with your own hands, which is why there is a need for simpler masking using an overlay on top. Such decorative elements, regardless of the material of manufacture and type, are called thresholds. They are used on both long and short sections.
When to use thresholds for a joint
The threshold is used not only to disguise the uneven cut of a novice master. Sometimes experienced repairmen resort to this design method.
This is justified in the following situations:
- there is a height difference of up to 10 mm between floor materials, which cannot be hidden in any other way;
- separating the hallway by lowering its level so that garbage and dirt from the street are not carried throughout the house, but are retained by the ledge;
- zoning of the area by visual and relief division of the room.
But when deciding on this design method, you should be prepared for the disadvantages. Among them: difficult cleaning, accumulation of debris under the threshold and the possibility of getting caught on it when passing through the area.
Types of thresholds and features of their installation
To figure out how to close the joint between the tiles and the laminate on the floor, you need to study the types of thresholds. They are available in different materials and shapes, which affects the ease of installation and the configuration of the joining line. Here are the most common solutions.
Aluminum threshold
This is a very stylish element for making a joint on the floor. Its shiny silver surface harmonizes well with gray wood and light tiles. Aluminum has increased strength compared to other materials in this industry, which contributes to a long service life. But with such an overlay you can only create straight joints, but the length does not matter: it can be a short passage under the door or a long line between the dining area and the rest room.
Aluminum thresholds are produced in various design shapes: flat, T-shaped, L-shaped.
Flat threshold.
T-shaped threshold.
L-shaped docking threshold.
L-shaped threshold spanning the edges of floor coverings.
The fastening method can be hidden (when the fasteners are first installed to the floor, and then the decorative top panel) or open (the entry points of the self-tapping screws are visible).
Hidden threshold fastening.
Open threshold fastening.
The thickness of the sides can be the same or with an internal difference (at the top the sides are at the same level, and at the bottom they are supported by shelves at different heights), which also helps to design the border beautifully and safely. Thresholds can be straight, for joining floor coverings of equal height, and curved, for joining floor coverings with differences in height. The elements are fastened with glue or screws.
Installation with self-tapping screws is carried out according to the following scheme:
Step 1.
The purchased threshold is cut strictly along the length of the joint.
Step 2.
Points are marked between the tiles and the laminate to create holes for dowels.
Step 3.
Drilling is done using a drill.
Step 4.
Dowels are laid to ensure a strong grip of the fasteners in the concrete screed.
Step 5.
The inside of the connecting element must be coated with sealant. This will prevent dust and debris from accumulating under its edges.
Step 6.
The threshold is fixed with self-tapping screws. To do this, use a screwdriver or screwdriver, but the speed of the latter should be minimal, because it is very easy to bend the aluminum profile.
Self-adhesive threshold
Such overlays are made of wood or metal. They can be flat, slightly convex, which smoothes out the joint well and makes a convenient transition for transporting a stroller, toys on wheels, a coffee table, etc. There are also multi-level models for organizing a beautiful height difference with a smooth rise.
The threshold is attached to a self-adhesive base located along the edges on the bottom side. It adheres directly to tile and laminate flooring rather than to concrete floors. Models vary in width and length, making selection easier. The color range ranges from wenge to bleached oak.
Installation of a self-adhesive threshold is carried out as follows:
Step 1.
The element is unpacked and cut to the required size.
Step 2.
To ensure that the threshold lies evenly (regardless of the quality of the cut line), you can draw precise markings and orient the edges of the overlay along it.
Step 3.
The sides of the floor covering should be wiped clean of dust, as this affects the strength of the joint.
Step 4.
The paper layer is removed gradually and the part is applied along the intended contour. You can immediately remove the protective layer, but then the threshold along its entire length will stick and it will be more difficult to maintain even fixation.
Flexible PVC threshold
This floor finishing element is made of two parts - the base and the cover, which plays a decorative function. The lower side is fixed to the concrete floor or other covering. For this purpose, self-tapping screws are used (if the base material allows their direct screwing in) or dowels (for a concrete base). The upper counter part snaps into the clamping grooves.
Due to the ability to bend in different directions, the design is well suited for wavy joints of various lengths.
It is available in large sizes and can be for a single-level floor or with a difference. The height difference is up to 10 mm. A variety of shades allows you to choose the right one for any color of tile and laminate.
Installation of a flexible threshold is carried out as follows:
Step 1.
A joint line is drawn on the concrete base.
Step 2.
The tiles are laid while maintaining the accuracy of the edges according to the markings.
Step 3.
The flexible base profile is inserted under the tile and fixed with self-tapping screws or dowels.
Step 4.
Next, the laminate is laid so that its edge is on the border of the lower part of the threshold. Its end should be coated with sealant.
Step 5.
Lastly, the lid is put on, which is also treated with sealant to prevent debris from accumulating under it. It is inserted into the grooves and snaps into place with a little effort. If clapping your hand is not enough, you can use a rubber mallet.
Flexible metal profile
These decorative elements are made in L-shape or T-shape. Due to the numerous slots in the base, the metal bends easily, so the threshold is used for straight and curved joints. It is convenient to use it to create complex lines of a combined type, which help maintain stylistic unity.
On top, the metal can be powder coated in any color or left in a natural silver shade. In the case of an L-shaped design, only the laminate is inserted into the groove, and the tiles are placed close to the metal without a gap. But to make such joints, the levels need to be the same height, otherwise the transition will not be beautiful.
Let's look at how to make a joint between laminate and tiles using a flexible profile in stages:
Step 1.
The thickness of each material is measured and, if necessary, the level is increased (substrate, screed).
Step 2.
The outline of the future joint is drawn.
Step 3.
The profile is cut and bent to the specified shape.
Step 4.
The tiles are laid and the threshold is mounted in parallel so that its lower plates go under the flooring material.
Step 5.
The laminate is laid last so that its edge goes under the edge of the threshold. This is not difficult to do due to the flexibility of the panels. The end is pre-lubricated with sealant.