The Dachny Expert portal expresses gratitude for the expert assistance in preparing this material.
Spets.Krovlya LLC is a reliable contractor for roofing work on pitched roofs of any complexity. Guaranteed quality, clear deadlines and a fixed price, which is immediately specified in the contract and will not change!
Metal tiles are roofing materials in the form of profiled steel sheets coated with a polymer coating. It is used to cover roofs with an angle greater than 14 degrees.
Outwardly, it is similar to classic ceramic tiles, but surpasses it in reliability and ease of installation. In this article we looked at what is better, soft roofing or metal tiles?
The material is resistant to temperature changes and other negative climatic influences. Its main disadvantage is low sound insulation characteristics , but this can be eliminated if the work is carried out correctly.
In this article you will learn how to make a roof from metal tiles with your own hands, step by step from A to Z. If you do not know how to choose metal tiles, then read this article.
Installation of sheathing
This stage of work should be given special attention, since it is on the sheathing that the tiles will be attached. This design also provides natural ventilation of the internal roof space.
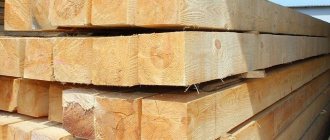
- Metal tile sheathing is made from wooden beams . The relative arrangement of the boards can be continuous or thinned out.
- Most often sparse structures , and the distance between the boards (sheathing pitch) is strictly tied to the distance between the lower depressions of the tile waves, since in these places the material has the greatest strength.
- The distance between the first two bars on the side of the slope should be approximately 70 centimeters less than the established pitch.
- The minimum thickness and width of the board for sheathing are 25 and 100 mm , respectively.
- The width of the board for the counter-lattice can be half as large. The first board from the edge of the roof should be 15-20 mm thicker than all the others.
NOTE!
The boards are pre -calibrated to one size to avoid future distortions and unevenness in the arrangement of the tiles.
Lathing step
Installation of the structure is carried out after completion of the installation of the waterproofing layer. The main lathing is attached to the counter lath, which is connected to the rafter frame with self-tapping screws. At the ridge of the roof, additional support boards are laid under the metal tiles.
Chimney pipe bypass
Scheme of bypassing a pipe with metal tiles
In order to carry out high-quality work on bypassing the pipe, it is necessary that the chimney be plastered, and waterproofing fits tightly to its sides. The sheets of metal tiles located on the sides of the pipe are cut along the stamping line, and the distance from the sheets to the pipe should not exceed 15 cm. Next, aprons are installed, first the side ones, and then the bottom and top. For side aprons, it is mandatory that they overlap at least one wave crest, so the side adjacent to the roof must be at least 20 cm.
Return to content
Calculation of metal tiles
calculated as follows (or use an online calculator):
- The area is calculated .
- The effective size of the tile sheet is calculated; for this, the area used in the overlap is subtracted from its total area.
- The number of rows of tiles on the slope is calculated. To do this, the working length of the slope must be divided by the width of the sheet.
- The number of sheets in a row is counted.
- The numbers of rows and sheets in a row are multiplied.
When calculating the number of sheets in a row, you need to keep in mind the amount of overlap , which can reach 15-20 centimeters.
To ensure that there is no shortage of material, it is better to round all values up.
Roof calculation
What kind of roof can be covered with metal tiles?
What type of roof can be covered with metal tiles?
Let us immediately make a reservation that this material is not suitable for all types of roofing. The fact is that the roof must meet certain requirements, namely:
- to be pitched;
- have a slope of more than 14°;
- have simple geometry.
If the roof has a complex structure, even if it is rectilinear, then during installation it will be necessary to make more than a dozen trimmings, which will increase the consumption of material (after all, most of it will simply go to waste). Consequently, this will greatly increase the cost of building materials and installation itself.
Metal roofing: waterproofing and vapor barrier
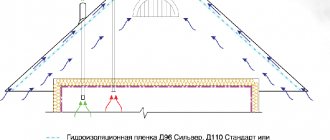
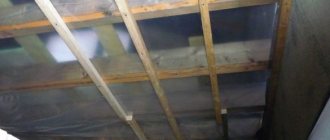
Before you begin installing metal tiles with your own hands, you should take care of insulating the roofing pie. Protection of internal spaces from liquid is provided by layers of vapor barrier and waterproofing.
The waterproofing is located between the rafters and the counter-lattice and prevents moisture from the environment from entering the interior of the roofing pie. The most common moisture-proof materials are polyethylene and reinforced films. They are stretched over the entire area of the slope with slight sagging. It is important to ensure that the waterproofing does not overlap with the thermal insulation.
Roofing pie
Vapor barrier is a protective layer that generated in the premises to pass into the interior of the roof This is the lowest layer of the roofing pie; it is located under the rafters (to which it is attached) and thermal insulation, thereby ensuring its protection from condensation.
An attic roof made of metal tiles must have a high-quality vapor barrier; in cold roofs without insulation, installing a vapor barrier is not necessary.
Tips for arranging elements
Let's consider installation on some roof elements; the technologies are universal.
Cornice strip
It is used to perform two tasks:
- protection of the under-roof space from slanting rain. Protects the rafter system and sheathing from getting wet;
- improves the appearance of the roof, hides the wooden structural elements.
Cornice strip on the diagram
Important. The thickness of the first batten of the sheathing should exceed the thickness of the others, the difference corresponds to the height of the metal tile step. The fact is that it is in this place that the first row of screws will be screwed in, and it is higher than the other fixation points. The sheet must have a stop; for this, the height of the first rail is increased.
Another nuance - the distance between the first and second lathing strips should be 28 cm, between the rest 35 cm. This is due to the characteristics of the profiles and their linear dimensions. The bracket for the cornice is attached to the first rail with self-tapping screws.
Lower (drainage) and upper valley
Quite complex elements of the roof, this is where leaks most often appear. What is the difference between lower and upper valleys? The first ensures water drainage and guarantees the tightness of the roof. The second plays only a decorative role, covering uneven cuts and additional fixation elements.
- Lower valley . The sheathing should be a continuous width of ≈ 20 cm on each side of the junction. To increase the tightness, before installing the metal valley element, flexible bituminous materials can be used for additional waterproofing. Water is drained onto the eaves strip, from which it flows directly into the gutter. The valley is fixed with flat-head screws or special metal strips.
- Upper valley. A decorative element that covers uneven sections of tiles. Screwed with self-tapping screws to the wave crests. The color of the metal element must exactly match the color of the roof covering.
Upper and lower valley
You need to work on valleys very carefully; the appearance of leaks in these places has extremely negative consequences. They are difficult to notice - the unit has a complex structure; water can remain invisible on the visible side of the roof for a long time, and during this time the wooden structures become wet and are affected by rot.
Chimney lines
In the classic design, they must have two water protections: a lower one made of flexible materials that drain water onto a long galvanized metal plate connected to a gutter, and an upper one. The second, at the same time as protection, also performs a decorative function. Metal strips are installed in chimneys in grooves; water from the strip falls onto the metal tiles.
Pipe passages
Junction strips
They are installed at the junction of the roof with vertical brick structures and in areas where slopes bend. They look like metal strips bent at an obtuse or acute angle; the material used is the same as metal tiles. The planks are fixed to the ridges of the sheets; in some cases, a rubber or foam seal can be used to seal large gaps between the slopes.
Roof abutment strip
The junction of the metal tiles to the wall, in the photo there is a junction strip
It has various geometric shapes, from a simple bent metal sheet to a convex round one. Screwed on with long self-tapping screws; the dimensions of the hardware should be 2–3 cm greater than the height of the coating wave. There are options for special universal fixation elements with a ridge bar for ventilation.
Semicircular ridge for metal tiles
Snow guards
They can be tubular, lattice and lamellar. They are used to prevent avalanche-like snow falling from the roof, during which there is a high probability of damaging the gutter or injuring people.
The strongest tubular and lattice ones are fixed to the sheathing of the rafter system.
Plate ones are screwed to the ridges of metal tiles and cannot withstand heavy loads.
The decision to install snow guards is made taking into account the angle of inclination of the roof slopes and the climatic zone of the building's location.
Required tools and equipment
Covering a roof with metal tiles begins with preparing the necessary tools . To install a metal tile roof you will need:
- Screwdriver.
- Rail.
- Tin snips or other metal cutting devices such as nibblers, circular saw, etc.
- Construction stapler.
- Tape measure and marker.
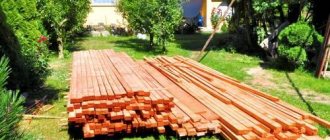
- Components of the roof and roofing pie: tile sheets, self-tapping screws, hydro-, steam- and heat-insulating materials, timber for sheathing and rafters.
NOTE!
When working with tiles, you should not use a grinder or other abrasive cutting tools, as this disrupts the structure of the sheet.
What and how to attach it to
The metal tiles are secured with special self-tapping screws and rubber washers. Just like the main material, they are made of galvanized steel, and the top is painted to match its coating. When installing, the self-tapping screw must be screwed in strictly perpendicular to the roof surface; tilting it is not allowed.
How to properly screw self-tapping screws into metal tiles
When fastening metal tiles, you need to monitor how tightly the fasteners adhere to the surface. You cannot tighten it too much, bending the metal, but you also cannot allow a loose fit - the connection will not be airtight.
Installation of metal tiles - step-by-step instructions
How to properly cover a roof with metal tiles with your own hands? The first step is to arrange the rafter system.
It is on it that all other roofing elements will be fixed. The system is constructed from wooden beams, and their size exceeds the dimensions of the sheathing bars .
The most important elements of the rafters are:
- Mauerlat . This is the fulcrum of the structure.
- Rafter legs . They hold the sheathing on themselves and rest on the mauerlat.
- Racks . Strengthen the support of the rafter legs.
The rafters are fastened to the wall using so-called shanks . These are strips of metal that connect two structures with nails or screws.
Next, the main insulating layers : insulation, vapor and waterproofing. A waterproofing film or membrane is applied to the rafter system and fastened to it with a stapler. Thermal insulation is placed in cells formed by the intersections of the rafter beams, and is fixed using cords drawn crosswise in the lower plane of the rafters.
Installation of rafters
After completing the installation of protective structures, you can begin installing the sheathing, on which we will subsequently lay the roofing. It is applied over the rafters and waterproofing layer and attached to these structures with self-tapping screws.
NOTE!
Before installing the sheathing, you need to coat all wooden roofing materials with antiseptic preparations and allow them to dry. Don't forget to choose the angle of the roof.
Installing metal tiles with your own hands:
- A cornice strip is attached to the frontal board, providing protection for the roof from the effects of wind.
- When performing work, the need to ensure good natural ventilation of the space is always taken into account. To do this, you need to leave gaps between all layers of the roofing cake. The basis of natural ventilation is the possibility of free air circulation under the roof ridge.
- The last step is the installation of metal tiles . It must be taken into account that the sheets must protrude 5 centimeters beyond the edges of the sheathing and be aligned horizontally along the eaves line.
- The ridge strip is attached to two additional boards , which are installed at the joints of two slopes when installing the sheathing. Such measures are necessary to ensure additional resistance of an important structural element to negative influences.
metal tile laying diagram
Laying metal tiles around a chimney requires extra care. Firstly, it must first be plastered . Secondly, you need to install boards around it that are attached to the sheathing. Thirdly, the tiles are cut to 15 centimeters on all sides facing the chimney.
Chimney bypass
Construction of the rafter system
We found out that the rafter system works in tandem with the roofing pie. The layout of the rafter frame is directly related to the number of “cake” layers. Let's analyze the most complex insulated design option and find out which components we do not need to build a cold roof.
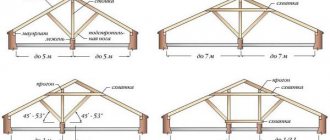
The rafter structure of a gable roof is a series of alternately installed pairs of rafter legs, the design features of which depend on the architectural data of the box being equipped. The manufacture and installation of a gable roof truss system is carried out in accordance with the rules regulated by:
- Rafter technology , which requires two specific supports for the top and bottom of each rafter leg. It is used if the building has an internal load-bearing wall or rather powerful columns are installed instead. The use of the layered method is allowed if the ridge girder racks can be installed on floor beams with high load-bearing capacity or if the floor is made of reinforced concrete slabs.
- Hanging technology , which requires support only for the bottom of the rafter legs. The top of the elements of the hanging rafter system rests against each other in pairs. It is used if the box does not have an internal load-bearing wall and the ability to install supports under the ridge girder.
The step for installing the legs of the rafter system recommended by metal tile manufacturers is from 60 to 90 cm.
Option #1 - rafter frame for a warm roof
The use of insulation forces one to resort to technological tricks, thanks to which the layer important for the structure can retain its insulating qualities. And they will inevitably shrink when wet, because... The water that appears in the body of the material will facilitate the passage of heat waves.
Water appears in thermal insulation in three situations:
- Penetration of household fumes attacking thermal insulation from inside the structure being used.
- Formation of condensation due to the difference in temperature outside the building and in the attic.
- Leaks observed during snowmelt and heavy precipitation, resulting from non-compliance with technology and operational errors.
A properly laid roofing pie, correctly distributed and securely fixed by the rafter system, is simply required to eliminate the listed misfortunes. In addition, the responsibilities of the rafter structure include the formation of ventilation channels through which air flows wash the thermal insulation and the inner surface of the metal tiles.
Ventilation channels created by installing lathing and counter-lattice create conditions for regular ventilation and removal of condensation from the space under the roof, thereby extending the life cycle of the roof itself and the wooden parts of the rafter system.
If we imagine a conventional cut of a warm roofing pie with a rafter system from the inside of an already finished structure, then the sequence of layers and ventilation ducts will be as follows:
- Clapboard, plasterboard panels, or similar material used for the interior of an attic space.
- Internal lathing designed to secure the vapor barrier layer to the rafters.
- Vapor barrier that prevents household fumes from penetrating into the insulation.
- Rafters between which insulation is laid. The width of the rafter leg should be 3-4 cm greater than the thickness of the thermal insulation. In other words, the specified gap for ventilation must remain between the upper plane formed by adjacent rafters and the outer surface of the insulation. If the thickness of the insulation is equal to the width of the rafters, i.e. The thermal insulation lies flush with the conventional plane of the slope; a lathing made of timber with a side of 30 or 40 mm is nailed to the rafter legs. This will create the required gap.
- Waterproofing, which is laid either on the rafters, if there was no need to install a counter-lattice, or on a counter-lattice. Classic polyethylene waterproofing film is prohibited from contacting the insulation so that moisture does not appear in its body. Waterproofing materials of the class of polymer diffuse membranes are allowed to lie directly on the insulation, because they are able to let excess moisture out without letting it in. Therefore, when using polymer membranes, there is no need to create a ventilation channel between the hydro- and thermal insulation.
- External sheathing that simultaneously performs three significant functions. It is used for fastening waterproofing, to form another air gap between the waterproofing and the metal covering and serves as the basis for installing sheets of metal tiles.
- Finish coating.
Bitumen varieties of rolled materials cannot be used as waterproofing of roofing systems under metal tiles and corrugated sheets. When heated, the insulation and roofing will release substances that destroy each other's structure.
Let's summarize. A standard roofing pie for an insulated roof has three layers and two ventilation circuits, if classic waterproofing was used in construction. There are three layers and one ventilation channel in a cake with polymer diffuse waterproofing. All components are attached to the rafter system, which must withstand the weight of the materials and the snow load. For the domestic middle zone, the total load is approximately 200 kg/m².
Most often, rafter legs for metal roofs are made from boards with a cross-section of 50×100 or 50×150 mm, if the rafter installation step recommended by the material manufacturer has been followed. If the distances between the rafter legs are greater than the recommended value, the cross-section of the outer sheathing should be increased.
Option #2 - rafter structure for a cold roof
The diagram of a roof structure without insulation clearly confirms that it does not contain a heat-insulating layer. This means that there is also no need to install all types of insulation protection from getting wet. However, waterproofing is still needed to protect the wooden rafter system in case of leaks. And ventilation between the water-repellent material and the metal coating should also be built.
A cross-section of a cold roofing cake for metal tiles looks like this:
- Rafter legs, the cross-section of which is calculated without taking into account the weight of the insulation and related components.
- A waterproofing layer laid over the rafters.
- Lathing designed to provide a ventilation gap, fix waterproofing and fasten sheets of metal tiles.
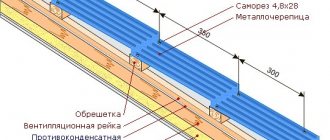
The sheathing for both types of rafter systems is laid in a special way. The step of its installation is determined by the distance between adjacent transverse steps of the metal tile sheet. The distance depends on the brand of roofing, on average it is 300, 350 and 400mm.
The dimensions of the starting lath should be different from the subsequent ordinary bars. For example, if all ordinary laths are made of a block with a cross-section of 30x50mm, then to make the very first element from the eaves line you need to take a block of 50x50mm. The distance between the starting block and the cornice line is always less than the step between the row laths. So it is necessary that the first transverse step of the sheet lies exactly on the base.
Additional elements
In addition to the above eaves and ridge strips, when installing a metal roof, you may need the following products (full list here):
- Snow guards. They loosen the snow masses falling from the roof, making their fall relatively safe for building structures and for humans.
- Junction strips . These products frame the joints between tiles and all important structures, such as chimneys and ventilation pipes.
- Corners and valleys . They protect all corner roof structures.
- Low tides . Used to redirect flows of rain and melt water.
- Horse.
Additional elements
Features of waterproofing installation
The first row of waterproofing film is rolled out horizontally, starting from the eaves. The overlap must be at least 15 cm. The border is indicated by the manufacturers in the form of a strip along the roll.
To isolate overlapping areas, it is recommended to use adhesive tape, and a construction stapler is suitable for fastening the strips.
The overlaps are located not in spaces, but immediately on the wooden parts of the structure: sheathing, spacer bars, counter-rails, rafters.
The material should not be turned over, since with this arrangement the film cannot protect against moisture. When laying the film, you need to leave a margin: the membrane should sag by about 20 mm between the rafters.
This is necessary to prevent its breakage or tension under the influence of adverse weather conditions or shifting of the rafters.
When using a classic or anti-condensation film, the protrusion of the rafters beyond the level of thermal insulation should be 3-5 cm.
When the heat-insulating layer is at the same level with the rafters along the beam, it is necessary to fill a special spacer bar with a cross-section of 30x50 mm. This is done to provide a ventilation channel between the insulation and the waterproofing layer.
The superdiffuse membrane is rolled directly along the rafters. When the rafter protrudes above the layer of thermal insulation material, the membrane is rolled out in such a way as to wrap around it.
At the eaves and overhang of the roof, the layer of waterproofing material should protrude at least 20 cm beyond the wall line. At the eaves, the waterproofing is carried out along the rafters and secured with special tape.
If you have not yet decided what kind of roof to make, then the article DIY gable roof can help you.
When building a gable roof, you can build an attic in it. You can read about how to do this here.
When using a membrane, damage to the roof can be determined by the amount of incoming water.
The overlap of the film panels at the joints of the slopes is 15–20 cm.
It is better to insulate stove and ventilation pipes using a double layer: the first with an overlap of approximately 5 cm, and the second above it.
Even when planning a cold attic, the use of a waterproofing agent is necessary.
Since metal tiles “sweat” due to the contrast between internal and external temperatures, the film under the tile sheets is laid with at least a 5-centimeter gap.
Thanks to this technique, the temperature conditions outside and inside the profile become the same.
For this type of attic, anti-condensation materials are most suitable.
Advice from the experts
- The distance between the beams of the rafter frame should be no more than 60-90 centimeters , otherwise the roof structure may sag.
- When performing work, you need to wear soft-soled and walk on the tiles, stepping into their lower deflections. This will prevent the material from being pressed through.
- The absence of contact between the protective layers is important not only to ensure ventilation, but to prevent their mechanical damage due to friction.
- To provide additional ventilation, you can install dormer windows in the attic.
- To install all elongated additional elements evenly, you need to stretch the thread and secure it between two already installed structures.
This is what the technology for laying metal tiles on a roof looks like. This material has an approximate service life of about 50 years , but without the need for repair work, operation will only take place if the installation is carried out correctly.
It is important to correctly calculate the material consumption; for this you need to know the dimensions of the coating, as well as all dimensions and proportions. Even minor deviations from the required indicators can lead to a reduction in operational life by an order of magnitude.
Installation of cornice strips
This roofing element is necessary to protect the wooden sheathing from atmospheric influences and precipitation. Installation of cornice strips is very simple: the strips are nailed to the sheathing in a checkerboard pattern with a pitch of approximately 30 cm.
Wind (end) strips that protect the roof from precipitation under the metal tiles are mounted on top with a bend on the eaves in increments of about 35 cm. The mounting diagram is shown in the figure below.
End plank installation diagram
Note that perforated soffits are used along the eaves to provide ventilation under the roof.
Hemming of eaves overhangs
Return to content
Skate attachment
For the necessary ventilation of the attic space, it is necessary that the profile sheets do not meet under the ridge strip. The ridge is attached to the roofing using self-tapping screws at the top of every second wave. In this case, the overlap of the planks is at least 10 cm in length. Installation of a semicircular ridge on a hip roof is done using Y-shaped overlays and hip caps.
Technology for installing ridge strips and seals
The universal seal is fixed before the actual installation of the ridge strip. To install it, you need to remove the protective film and stick it at a distance of 25 mm from the edge of the ridge towards the middle. The ridge is attached to the roofing sheet at every third longitudinal wave using self-tapping screws, with a minimum allowable overlap of 100 mm.
Selection and installation of self-tapping screws
Using galvanized self-tapping screws, the profile is attached to the sheathing. Therefore, the quality of self-tapping screws must be taken seriously, because the service life of high-quality fasteners is comparable to the service life of metal tiles (30-50 years). To do this, choose special, branded self-tapping screws with a head of the required color and with a gasket made of EPDM (Ethylene Propylene Diene Monomer) - rubber.
They are fastened using a screwdriver or an electric drill with reverse and speed switch. If, during installation, accidental damage to a layer of material occurs, then it is necessary to apply a masking aerosol can to the damaged area.
The screws should be tightened tightly enough, but not so tightly as to push through the sealing gasket.