Selection of materials
Before covering a wooden house with siding, it is worth studying basic information about the types of material. The following brief description can be given:
- plastic siding is the cheapest, most practical, but is afraid of mechanical stress;
- metal - strong and durable, but needs protection from rust (does not apply to aluminum);
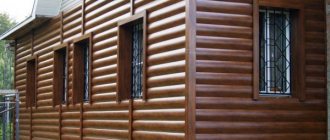
- wooden - fits perfectly into the properties of a wooden house and will be the best option, but buyers may be put off by the price;
- fiber cement - not so popular, not flammable, durable, but difficult to install and has a large mass.
Next, you need to select the sheathing material. It can be made of wood or light metal profile. Installing metal sheathing is easier on uneven ground. Such a frame will be strong and reliable.
But covering a wooden house with siding on a wooden frame yourself will cost less. You also don’t have to worry about protecting the wall and sheathing at the points of contact with the element, since they are made of material with similar properties. When purchasing and selecting wood for sheathing, it is important to ensure that the wood is:
- without delaminations;
- without deformation;
- without bluish spots or signs of rot.
Before starting work, the wooden sheathing is impregnated with fire retardants and antiseptics. The former increase resistance to fire, and the latter to mold and mildew.
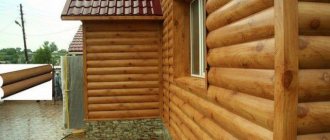
Before you start finishing the house siding
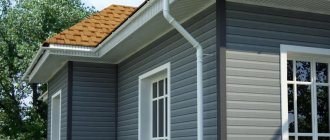
This is what a house covered with vinyl siding looks like.
When planning to decorate a wooden house with siding, you should take into account some features of such buildings:
- If a house is built from logs or solid timber that have not been processed in drying chambers, it will shrink over a long period of time. This means that the geometry of the structure will change in some way. To the naked eye, the shrinkage will be invisible, but if the finishing is fixed to the walls, it will probably be deformed and in some places may even collapse. Shrinkage is also taken into account when constructing the roof: the rafters are not fixed rigidly, but according to a sliding pattern.
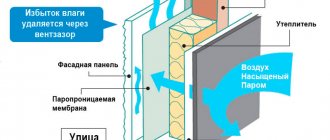
- Depending on the design, wooden walls can have a vapor permeability from 0.06 (across the fibers) to 0.32 mg/m*h*Pa (along the fibers). Siding, whether vinyl or metal, has zero vapor permeability. If we screw the facing panels close to the wall, then the steam that has penetrated into it from the inside, having no outlet, will turn into condensation on the outer surface (under the siding).
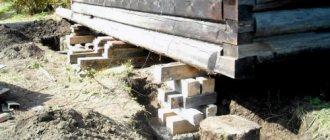
Moisture is dangerous for any building material, as it increases the thermal conductivity of the structure and, when freezing, creates gradually increasing cracks in it. And in the case of wood, it also leads to rotting. Therefore, a house covered with siding will serve you for many years.
This is what an unprotected tree turns into over time
Therefore, it is very important to ensure effective steam removal: the siding is mounted so that there is a ventilated gap (builders say ventilated) between it and the wooden wall.
There is no need to install a ventilated gap only if the inside of the wall is covered with a vapor barrier film or trimmed with some absolutely vapor-proof material, for example, covered with vinyl wallpaper. But this solution has a drawback: to remove excess humidity, it is necessary to increase the ventilation performance, which leads to an increase in heat loss and, accordingly, heating costs.
Houses made of laminated veneer lumber, as well as those built using frame technology, are not characterized by shrinkage: all wooden elements from which they are built are thoroughly dried before starting construction work.
Frame installation
Finishing a wooden house begins with the installation of guides. The vast majority of siding requires the sheathing to be mounted vertically. Its pitch is selected depending on the insulation. The clear distance between the guides should be a couple of centimeters less than the width of the mineral wool. For polystyrene, the distance is selected exactly to match the width.
To make wooden sheathing, bars measuring 40x40 mm or 50x80 mm are most often taken. When using the metal version, you will need a set of special profiles of different sections.
The frame slats are installed in increments of 40 cm, incl. around openings. There should not be any slats at the very bottom
Nails or self-tapping screws are used to attach the frame to a wooden wall. The former must have an anti-corrosion coating made of zinc or aluminum. Before fastening the sheathing with a construction stele, a vapor barrier is installed. To do this, you can use regular plastic film, but it is better to buy a special vapor barrier membrane. The choice of materials in a wooden house should be taken extremely responsibly. It is not recommended to use those that will block the movement of air through the walls. For this reason, membrane is better than film.
When finishing a wooden house with siding, the vapor barrier is attached with an overlap of 10 cm. Before starting work, it is recommended to read the manufacturer’s instructions. Next, the guides are attached at the required increments, starting installation from the corners. Levelness is checked using a building level.
Insulation is placed between the sheathing guides. It is better if it is mineral wool - due to its good air permeability. A layer of waterproofing and wind protection needs to be fixed on top of the wool. The best option would be modern vapor diffusion (not to be confused with vapor barrier) windproof membranes.
Step-by-step instructions for installing siding panels
The façade is ready, the sheathing is secured, thermal insulation and wind protection are installed, and you can begin attaching the siding panels. The sequence of actions does not depend on the type of panels and is always the same:
Step 1. The starting slats and ebb tides are mounted according to the level. Experienced builders always leave a small gap so that the mobility of the base material or panels does not lead to deformation.
The low tide and starting rail are mounted strictly according to the level
Step 2. Corner guide profiles are installed at the corners of the building.
It is convenient to use anchor plates for mounting guide strips
Step 3. The siding panels are secured to the sheathing beams through special oblong holes using self-tapping screws with a wide round head.
The panels are secured with self-tapping screws
Prices for popular models of screwdrivers
Screwdrivers
Step 4. After the panels are secured, the finishing strip is fixed.
The finishing strip secures but does not pinch the siding panels
Remember! The design of entrance and window openings is made from a whole panel. That is, you first mount the panel, and then cut a hole in it for a door or window.
Video - Example of installing vinyl panels on a wooden facade
Securing the starting J-profile
Cladding a house with siding with your own hands at the next stage involves the following procedure:
- Finding the lowest point on the sheathing using a level. It is necessary to measure 50 cm upward from this point and mark this point (for example, with a loosely screwed screw).
- Sequential marking of lines with self-tapping screws along the perimeter of the building.
- Pull the cord at a distance of 50 cm from the bottom along the screws.
- Marking the location of corner profiles on slats. The profile is laid to the corner, its edges are marked.
- Fixing the first starting profile along a rope with a gap of 6 mm from the future border of the corner profile.
- Fastening the remaining starting strips with a gap between adjacent ones equal to 10-12 mm for thermal expansion.
- Checking the level of the starting bars.
Installation of the starting profile
The profile must be mounted perfectly level. If there are deviations at this stage, the entire siding of the wooden house will be distorted.
Required Tools
The work of covering a house with siding is simple and does not require special knowledge , but it is still necessary to become familiar with the sequence of work, as well as their features, especially if a person has not encountered this type of work. Before covering a wooden house with siding, it is necessary to purchase material, check the availability of everything necessary and carry out preparatory work.
Tools that will be needed to complete the work:
- perforator;
- grinder or passing hacksaw;
- a screwdriver or drill with an attachment for tightening screws;
- metal scissors;
- punch;
- pattern;
- dismantling hook;
- coated cord;
- hammer;
- metric tape;
- level;
- plumb line;
- corner;
- knife;
- tall stepladder or scaffolding.
Return to content
Corner profiles
Before you attach the siding, you will need to install the corner strips. They can be for external and internal corners. The first ones are mounted in this order:
- Marking the location of the edges of the spotlights.
- Attaching the guide to the corner of the building. There should be a gap of 3 mm between the profile and the soffit (roof). The lower border of the profile is located 6 mm below the border of the starting profile. The plank is secured with self-tapping screws in the upper part.
- Check verticality using a building level or plumb line. Adjust the location if necessary. Fastening the bottom and middle with self-tapping screws. Fasteners do not need to be provided too often.
Installation of a corner profile
If it is necessary to join the profile in height, the joining place is located at the same level in all corners of the building. The joining is done with an overlap. The part with holes for fastening the top panel is cut so that there is a gap of 9 mm between it and the same part of the bottom panel. Instead of a corner profile, when installing siding on a wooden house, you are allowed to use two starter ones.
Step-by-step instructions for installing profiles for internal corners look almost the same. But in this case, other strips are used.
Options for interior corner solutions
Installation of external corner strips
Installation of external corner strips is carried out in the same way as internal ones; it is necessary to ensure the same clearances and tolerances.
If the height of the wall exceeds the length of the corner strip, they should be connected with an overlap of 25 mm , for which the nail strips of the upper profile should be cut to the required height, taking into account the temperature gap. The connection is made in the direction of water flow - the upper profile on the lower one.
Opening frames
When securing the siding with your own hands with insulation, you may encounter difficulties at this stage of the work. The fastening in this case depends on how the opening is located relative to the plane of the outer wall: flush or recessed.
Waterproofing is required around windows
In case of flush openings, the façade should be finished in the following order:
- Performing waterproofing of openings.
- Fastening trims or J-type profiles. For each opening you need to use 4 platbands: 2 horizontal and 2 vertical.
- The profiles are connected to each other. A bridge cut is made on each side of the upper profile. They are bent down to divert precipitation into the lower profile. Areas of material on the vertical strips that prevent connection with the upper ones should be removed. The side and top profiles are connected so that the bridges are inside.
- The operations are repeated with the lower casing. But in this case the bridges are cut in the side elements.
Installing profiles around windows
To work with recessed openings, you need to follow the same recommendations as in the previous case. The differences lie in the use of profiles of different shapes.
How to go around windows and doorways with siding
The order of design of window and door openings depends on the depth of their installation relative to the plane of the wall (on the width of the external slopes).
In the absence of slopes, i.e. when a window or door block is installed flush with the plane of the wall, ordinary platbands are used to form the opening around the perimeter (for doors - on three sides) .
If the installation depth does not exceed 20 cm, a J-profile is used, and for slopes greater than 20 cm, a set of cut pieces of the main panel is made, repeating the wall cladding along the slopes.
In such cases, an external corner strip is installed along the outer perimeter, and a finishing strip is installed along the window (door) frame . This type of cladding resembles finishing a narrow section of a wall.
Installing the first panel
Work should begin on the side of the building that is least noticeable. In this case, there is an opportunity to practice and get better. The first panel is first inserted into the corner profile and into the locking connection of the starting one, snapped into place. A 6 mm gap must be left between the bottom of the lock and the first siding element to compensate for thermal expansion.
Correct fastening of slats
The next step is to fix the first cladding strip to the sheathing. Self-tapping screws are used for this. The siding has elongated holes for fasteners; the self-tapping screw must be placed in the middle of this hole. All fasteners are placed strictly perpendicular to the wall surface. The screws do not tighten too much; this is necessary to prevent deformation and damage due to thermal expansion.
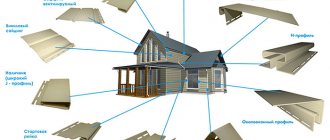
Types of siding
The manufacture of siding began about half a century ago with wooden cladding panels similar to horizontal lining. Since then, the range has expanded significantly.
Today there are the following types of material:
- Wood.
- Metal.
- Plastic.
- Fiber cement.
At the same time, each type of material has its own varieties, composition and other manufacturing options.
In addition, siding has different design options.
Popular profile types:
- Ship's
- Under the beam.
- Under a log.
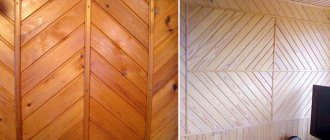
- "Herringbone."
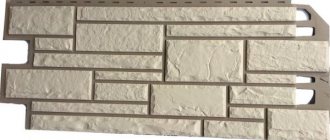
- Under the brick.
- Under a stone.
A wide selection of profiles and colors creates ample opportunities for finishing houses in different styles and color combinations , while essentially doing the same job.
Installation of remaining panels
Finishing with siding with insulation (or without it) is then performed in two ways:
- overlap extension;
- extension using H-profile.
With the first method, you will need to first shorten the panel locks and fastening frames so that the overlap length is 2.5 cm. Installation of the H-profile is carried out according to the same principle as the corner elements. It is necessary to remember about the gaps of 0.6 cm from the starting strip and 0.3 cm from the soffit.
Every 2-3 rows it is worth checking the horizontal position of the siding using a building level. When passing through openings, a piece of trim falling into a window or door is simply cut off.
Completion of finishing
How to properly sheathe a building under a roof? You need to follow this algorithm:
- Measure the distance between the bottom of the finish strip lock and the penultimate siding panel. From this distance, subtract 1-2 mm per indent and obtain the required width of the last panel. The element is marked and the upper part, in which the locking connection is provided, is cut off.
- At the top of the last plank, hooks are made, which are located in increments of 20 cm. To do this, make cuts and bend them outward.
- The prepared strip is inserted into the penultimate panel and snapped into the finishing profile.
To sheathe the pediment, use profiles for internal corners or starting ones. The installation technology is similar to cladding the main part of the wall. In the same way, you need to trim the panels and remember the gaps of 6 and 9 mm. The last, uppermost section of the gable can be secured with a self-tapping screw directly through the panel material. This can only be done here; in other cases, drilling holes is not allowed.