How to make sure that the floor is reliable, beautiful, easy to install and at the same time inexpensive? These seemingly incompatible qualities are combined in a laminate. That’s why this flooring is being used more and more often. However, in order for the floor to serve for a long time, you simply need to know the intricacies of the technology. For example, before laying laminate flooring, you need to check how level the base is. The maximum permissible deviation is no more than 1-2 mm per meter of surface. Only under this condition will it lie tightly and will not sag or creak. If the differences are greater, the lock may even break or the board may crack.
If the base has irregularities that exceed the permissible dimensions, it must be leveled. For cement floors everything is simple - a leveling screed is poured. Laying the laminate begins after the solution has gained at least 50% strength.
Laying laminate flooring is only possible on a level surface
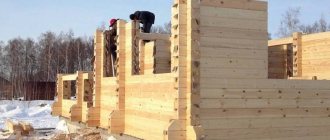
If an old wooden floor serves as the base, it must be removed according to technology, then a full-fledged cement floor must be made, with all the necessary layers (backfill, hydro- and thermal insulation, reinforcing belt and screed). You can install a heating system into this floor, and then lay the flooring on the warm floor. Only in this case it is necessary to use special types of laminate that can withstand heat well. The cost of such a floor is high, and its installation requires a lot of time. That's why they don't always do this. If the joists and boards are not damaged, you can level the wooden floor with plywood, and then lay the laminate on it.
When leveling a wooden floor, all strongly protruding fragments are trimmed off with a plane or using a scraper, and the cracks are sealed with putty. Sheets of plywood are laid on the prepared old wooden floor (it is used more often, although any sheet material with a flat surface can be laid). They are fastened with self-tapping screws to the floor: along the perimeter every 15 cm, in the middle in a checkerboard pattern.
The joints of the sheets are shifted - they should not coincide (look at the photo below). This way the load is transferred more evenly. One more thing - leave some gaps between the sheets - they should not be fitted closely to each other. Wood changes dimensions depending on humidity and temperature. And these gaps will provide the necessary freedom so that there are no “humps” or distortions.
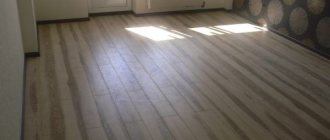
Laying plywood on a wooden floor under laminate is a common way to prepare the base during renovations. If the wood has not been damaged, and the plywood is laid evenly, does not “play” or sag, such a base will serve for years
This is what an old wooden floor looks like, prepared for laying laminate.
.
Laying schemes
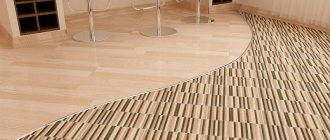
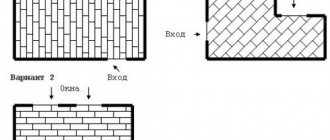
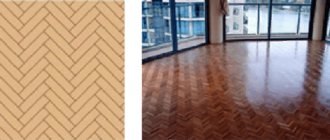
In which direction should I lay the laminate with my own hands? There are no strict rules, but there are recommendations. To make the joints along the boards less visible, the direction of the light should go along the board. It turns out beautifully if you lay the coating at an angle. But this method is more complicated and produces more waste. You can also lay it across the light - this is also practiced, and does not threaten anything other than more visible seams.
Laying laminate relative to the window: arrangement of elements
The basic rule that must be observed when laying laminate flooring is the offset of the seams. The minimum transverse seam should be at a distance of 40 cm from the other. This way the strength of the floor covering will be greater: the boards will not come apart under load.
The minimum distance between seams in adjacent rows is 40 cm
The laying scheme of the laminate should be developed taking into account this rule. The easiest one to do on your own is shifting by half the board. Then each odd row begins with a whole, and each even row begins with a half (or vice versa).
If the length of one element exceeds 1.2 m, then the second row can be shifted by 1/3, the third by 2/3 of the length (as in the photo above). It turns out to be a kind of “ladder”. In some types of laminate (expensive), the minimum offset of the rows is much less - maybe 15 cm. This is indicated on the packaging or in the accompanying instructions.
You can lay the laminate with a “ladder”, but you need to observe the minimum permissible seam displacement. On the right is a laying diagram for a long board length and small displacement
You may be interested in reading about the technical features of decorating the inside of a wooden house or about the design of rooms in wooden houses.
Substrate
The process of laying laminate flooring begins with choosing a substrate. It is needed to reduce the deformation of boards, reduce the influence of moisture on the wooden surface, and prevent the growth of mold and fungi under the floor. Using the correct underlay will significantly extend the life of your laminate flooring.
Kinds
Depending on the material, the substrate can be of different types.
- Polyethylene. This is the most comfortable and waterproof material. It is easy to install and secure, and provides partial sound insulation. But polyethylene substrates are short-lived, easily torn and wrinkled.
- Polystyrene. This material is easy to use and more durable than polyethylene. It can smooth out minor unevenness in the floor, provide hydro- and sound insulation, and prevent the development of fungi under the boards. The disadvantages include the price, a more complex installation process and not the longest service life.
- Cork backing. This is the most expensive and most durable option. The cork backing retains heat, quickly restores its shape, and provides sound insulation. The disadvantages include the high price, low hydrophobicity and the fact that it can only be laid on a perfectly flat surface.
When choosing a substrate, it is worth considering the appropriateness of using the material. In rarely used rooms or rooms with a large area, polyethylene can be used. Cork backing should be laid in rooms with low humidity - in the nursery, bedroom, living room.
Features of choice
When choosing a substrate, you also need to consider its thickness. It shouldn't be too thick. This does not compensate for uneven floors, but creates an additional difference in height during the trampling process. In addition, gaps form between the sheets of the substrate, and the thicker the substrate, the larger their size. Due to the cracks, deformation of the shape of the boards may occur. Therefore, the optimal thickness of the substrate should be 2-3 mm. If it is thinner, it will not cope with its function; if it is thicker, it will create additional problems.
Comparative table of properties of different substrates
How to lay laminate flooring with your own hands: step-by-step instructions
The installation technology is the same: there are only some features when connecting elements depending on the locks. The procedure will be as follows:
- The substrate is laid on the leveled base, and its joints are taped.
- Wedges or pieces of plywood 10-15 mm thick are installed around the perimeter of the room. The laminate boards will rest against them. In this way, a compensation gap is created around the entire perimeter of the room. It is needed to prevent the coating from swelling in the heat or high humidity.
- Along one of the walls - usually opposite from the entrance - the laying of the first row begins. The first row is placed with a spike against the wall (it can be cut off). The entire row rests on wedges that measure the gap. The outermost one also rests on the wedge with a side lock (it can also be cut off).
Laminate laying technology in a graphic image
- All elements in a row fit together.
- The last board often needs to be cut: it does not fit in length. There should also be a wedge on this side, so the size is 10-15 mm smaller than the distance to the wall. We mark it for cutting as follows: turn the board “face down” so that the desired side tenon is on the right. We join this edge to the wedge and use a square to draw a line that continues the edge of the installed board. We cut off the required piece along the marked line and install it.
- If the first row started with a whole board, then the second row starts with a half, a third, etc. This is how all the rows are assembled. In this case, the developed installation scheme serves as a guide.
- The last row often needs to be cut to width. Nothing complicated, the main thing is not to confuse which side we cut from: leave the part with the thorn on it.
If the geometry of the room is correct, there are no difficulties. If there are distortions, you will have to trim. Questions may arise when finishing the threshold: the board near the jambs is not cut straight, but along an arc, maintaining a gap of 10-15 mm. Why in an arc? This way there won’t be a hole under any door trim of any shape.
Required tools and materials
The technology for laying laminate flooring is quite simple. A substrate for the laminate is installed on the rough base, on top of which the laminated panels are laid. You should also carefully prepare the material for a concrete or wooden floor. Often the finishing coating is mounted on linoleum.
Internal and external structure of laminate boards
Before you begin, it is important to prepare all the necessary materials that you may need at each stage. The list compiled by professional builders is as follows:
- primer mixture;
- polyethylene film;
- foamed polyethylene layer;
- laminated panels;
- wedges for making gaps for technological purposes;
- special glue;
- plinth and functional fastenings for it.
Step-by-step instructions for installing the material on a concrete or wooden floor involve the use of the following tools and devices:
- pencil for marking;
- construction knife;
- jigsaw or hacksaw;
- tape measure 1.5-2 meters, construction corner;
- hammer;
- solid wood block.
Comparison of basic flooring installation schemes
Methods for laying laminate flooring: two locks - two methods (video instructions)
The technology for laying laminate depends on which of the locks is on your flooring. They are made in two types - “click” and “lock”. You won’t get confused, because the system is written on the packaging of each pack, and many have pictograms explaining the principle of installation.
The method of laying the laminate depends on the locking system of the laminate.
Method without a hammer - click lock
When using click locks, it is more convenient to assemble the boards one by one. The system is named so because of the characteristic click that is heard when the tenon enters the groove. With this system, the side locks are connected first, then the longitudinal ones. It happens like this:
- the element to be installed is brought from the side to the mounted one at an angle of 45°,
- With light pressure, the tenon is inserted into the groove, tapping with the back of the hand;
- lower the board to the floor, it turns out to be connected to the side surface located to the left;
- This is how the entire first row is assembled;
- in the second row, the first board is installed in the same way, only with a longitudinal groove: we bring it at an angle of 45°, insert it into the groove and, slightly pushing it until it clicks, lower it down;
- We first connect the next boards in the second row with a side lock;
- the edges of boards joined together by the sidewalls are raised a couple of centimeters;
- insert a longitudinal tenon into the groove of the previous ones;
- snap into place with a slight effort; if necessary, knock them in only with the palm of your hand.
Graphic representation of the process of laying laminate flooring with a click lock
Watch the video to see how to lay laminate flooring with a click lock.
How to lay with a Lock lock
Here the lock must be inserted from the side and the assembly method is different. You will need a piece of laminate with a tenon and a light hammer (rubber mallet). The boards are laid out on the floor and adjusted so that they lie exactly one relative to the other. Move it so that the tenon is close to the groove, insert a piece of laminate on the other side and tap it with a hammer to achieve a connection.
How to lay laminate flooring with the “lock” system
The method is also simple, but requires caution: you can hit the lock too hard with a hammer and break the lock. Then you will have to use another element.
With this method, it is more convenient to lay laminate flooring by first assembling individual rows and then connecting them. This is shown schematically in the photo below.
It’s more convenient to lay laminate flooring with your own hands using the “lock” system
For more information about this method, watch the video. There is no audio, but everything is clear.
The methods of laying laminate flooring described above can be made almost airtight; in any case, the amount of water that can get into the joint space can be significantly reduced. For this, special glue is used. They coat the tenons of the boards being laid with it. The composition retains its elasticity for 10 minutes, so glue is applied immediately before installation.
The disadvantage of this technology is that the coating becomes almost monolithic. If you need to replace one or more boards, this will not be possible.
Tips for laying flooring
In order for the created coating to fit perfectly on the floor and serve for a long time, it is necessary to properly prepare the base. An insufficiently dry screed layer or an uneven concrete floor will be the first reason why the created coating will quickly lose its original appearance.
General flooring installation diagram
Moisture from the screed will lead to deformation of even the highest quality and most expensive finishing coating. The rough base must also be perfectly level. To do this, experts recommend laying linoleum, fiberboard or chipboard sheets, or a plank floor on it.
Laying laminate flooring on a wooden floor is carried out without using a sublayer under the laminate. Most often, apartment residents use a special leveling compound.
The technology for laying laminate flooring is somewhat reminiscent of assembling a construction set, so it will take a small amount of time. The exception is laying laminate diagonally, which has some technological features. Each subsequent element is attached to the previous one if it is not fixed at the level of the floor base.
Example of a straight laying scheme
The substrate under the laminate is a mandatory layer of the structure. The sublayer under the laminate made of polypropylene foam or polystyrene foam has not only sound and heat insulation properties, but also performs the function of additional leveling of the rough base.
Laying laminate flooring on a wooden floor is carried out without the use of a backing.
But such a lining under the laminate can only mask irregularities up to 5 mm in size. If linoleum is used as a sublayer, then it is advisable to level the base. Linoleum will not be able to smooth out defects or differences in the level of the base.
The technology for laying laminate flooring should assume the presence of a technological gap to the walls. Its size is 10 mm. Why is this gap needed? The formed floor must be able to “move”.
Technology for laying laminate flooring on a concrete floor
When heated and cooled, any material changes shape (expands or contracts). To prevent laminated panels from deforming when the heating system is turned on, you need to give them the opportunity to expand. Therefore, the technological gap is a mandatory requirement, which includes step-by-step instructions.
A few days before starting work, it is recommended to open the package with laminated elements and leave them indoors. This is necessary so that the material “gets used” to the humidity and temperature of the room.
How to cut laminate evenly
You can cut laminate boards:
- jigsaw (most convenient);
- hacksaw;
- hand-held circular saw.
To prevent burrs from forming on the front surface when cutting, it should lie “face” up. To ensure that the cut is even, guides are used - rulers (bars) made of metal or wood. When using a hacksaw, the ruler should not allow you to “climb” onto the desired half.
The square can not only be used for drawing lines, but also used as a guide when cutting
When cutting crosswise, it is more convenient to use squares. It is pressed against the long side, the second serves as a guide.
Types of laminate joints
Perhaps the most popular fastening system for laminate panels is click. This name is rather common and is used to define fastening, based on a system of grooves and protrusions that firmly fasten the laminate panels together.
Before the advent of the click lock system, tongue and groove locks were used. However, even a short period of operation revealed significant shortcomings. Floors made of laminated panels with this type of fastening often developed cracks.
This is due to the fact that inevitable changes in temperature and humidity in the room change the size, albeit slightly on the scale of the entire canvas, of the laminate strips, which entails the release of the fastening locks.
In this regard, almost all manufacturers began an active search for a solution to the problem. It was necessary to create a fastening that could provide reliable adhesion of laminate planks, while maintaining the price category of the laminate.
This is how the click click mount appeared. It has a margin of safety and ensures reliable fastening of the panels throughout the entire life of the laminate.