The desire to stand out when decorating the interior of an apartment often leads to the use of non-standard solutions: building materials are used for other purposes. For example, wall decoration with laminate. Usually one wall in the room or a fragment of it is sheathed (in some design options, this is the lower part of the wall surface). The slats are suitable for almost all styles: classic, loft, country, retro, English, etc. The panels can be mounted horizontally, vertically or diagonally. They can be from the same collection or multi-colored.
Pros and cons of finishing walls with laminate
Every year the number of people who want to decorate the walls of their home with pressed lamellas is growing steadily. And there is a logical explanation for this - laminate has many advantages:
- high strength - on the floor it can withstand significant mechanical loads, which are not present on the wall in principle;
- durability - manufacturers of lamellas guarantee them 15-25 years of service as a floor covering. On walls, laminate is not subject to abrasion, the most destructive type of impact. Consequently, when covering walls with lamellas, the service life of the decorative coating increases significantly;
- a huge selection of colors, textures, sizes, which makes it possible to satisfy any design desires. In this case, the material can visually change the dimensions of the room in height, length or width;
- cladding technology that is easy to understand for beginners in the construction business - the owner of the premises can do all the work with his own hands;
- high resistance to UV rays, which guarantees the absence of sun-bleached areas on the wall;
- no special care is required - just wipe with a paper napkin or a strongly wrung-out wet cloth;
- affordable price, and in the case of walls, when you can buy the thinnest lamellas, at the same time of the lower classes without loss of quality, the cost factor disappears altogether - this type of finishing is slightly more expensive than painting and wallpapering;
- Convenient transportation: compact shape and light weight.
At the same time, there are several disadvantages that manufacturers and sellers are reluctant to talk about and rarely write about on construction sites:
- resonates and amplifies sounds when attached to the lathing. Therefore, additional noise insulation work is required;
- Despite manufacturers' assurances about the environmental friendliness of their products, in reality they are not so harmless. The presence of 20% phenol-formaldehyde resins in the material leads to the release of small amounts of harmful formaldehyde (HCHO) into the environment. There will be no harm to health in the short term. But when the material is heated, even under the sun, the process of formaldehyde release is activated, which immediately affects well-being. You can avoid the consequences by constantly ventilating the room in hot weather;
- afraid of sudden changes in temperature and high humidity, which limits its use on the balcony and dacha;
- the protective film accumulates static voltage from operating electrical appliances, as a result of which dust, soot and volatile fats are attracted to the wall;
- traces of children's creativity (greasy stains from plasticine, oil paint and ballpoint pen paste) are difficult to remove, and therefore many experts do not recommend covering the walls with laminate in a child's room.
Types of laminate that are suitable for finishing indoor walls
The material differs in the type of outer surface, it can be:
- glossy;
- matte;
- with imitation tiles, can be glossy or matte;
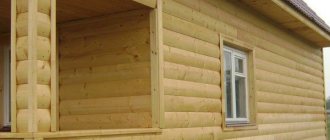
- with a decorative layer of natural wood;
- with a textured surface.
Laminate also differs in strength classes:
- class 33 is the most durable and is more suitable for flooring in public spaces with a large number of visitors;
- class 32 and 31 are also durable and do not deform during prolonged contact with water;
- class 23, 22, suitable for residential premises;
- class 21 is only suitable for wall cladding: living room, bedroom, corridor.
The manufacturer usually indicates the material class on the packaging, and you can also check it with your sales consultant.
Laminate is produced in thicknesses from 6 to 12 mm, it differs in the type of connections:
- tongue and groove lock - consists of a groove on one side and a special tenon on the other side;
- Click lock is a simpler type of connection. Here the tenon is shaped like a hook; it is inserted into the groove at an angle and then straightened, causing a click to occur. This connection allows you to make the laminate collapsible.
Which laminate is better for finishing walls?
A very difficult task faces the consumer when choosing a laminate. Here it is necessary to solve several problems simultaneously:
- choose the texture and color of the finishing material to match the style of the interior;
- ensure that the laminate regulates the space and geometry of the room;
- at the same time, it performed its main function - finishing;
- The cost was affordable for the family budget.
When choosing a material for finishing a room, first of all you need to take into account financial capabilities. However, in the case of laminate for walls, everything is much simpler: there are many options to choose from, but they are all identical in quality and durability - this material does not experience any stress on the walls.
Therefore, class 21 slats with a thickness of 6 mm (produced specifically for walls) will last as long as class 33 products with a thickness of 12 mm. Therefore, there is no need to overpay for a higher quality finishing material if the end result is the same.
Attention: lamellas of class 21-23 do not have locks and are attached only with glue.
The next thing you need to pay attention to is how to attach the slats to the wall. If it is flat or sheathed with sheets of OSB or plasterboard, then the best option is adhesive, without a tongue-and-groove system. This is the simplest installation technology: the slats are attached to the wall with “liquid nails” or special types of glue.
Attention: laminate thicker than 6 mm cannot be glued to glued plasterboard - the entire system may collapse under the weight of the finish. The problem is solved by additionally fastening the gypsum board to the wall with self-tapping screws (with self-tapping dowels if the base of the wall is concrete).
The issue with uneven walls is resolved differently. They can be plastered, but it is expensive, messy and time consuming. But you can make everything much simpler: install a wooden frame made of slats (plywood), on which the finishing will be attached. In this case, two types of fastening are suitable: tongue-and-groove and click.
The tongue-and-groove method of fastening lamellas is based on special devices: clamps, which are attached to the slats and hold the laminate by the ridges, without interfering with closing the connecting lock between adjacent panels.
The click method of fastening the slats to each other (when the lock is clicked, a characteristic sound is heard - that’s why it’s clicky) is based on more modern locks. The assembled wall panel is attached to the wall surface with self-tapping screws (along the perimeter), decorative nails (evenly along the entire wall), or glue. The nail heads are sealed with special pencils, and the heads of the hardware are hidden by the plinth and side profiles.
After solving technical issues, aesthetic ones are resolved. For each room in the apartment, designers have their own recommendations.
Living room
The living room, or, in the old way, the hall, is the place where the owners demonstrate their status. Therefore, finishing all the walls with laminate will look ridiculous. Partial wall covering with lamellas is encouraged here. The combination of aged laminate with stone, decorative plaster or fabrics looks rich.
Light, cool shades are selected for the living room on the south side of the apartment and warm ones on the north side. The slats look impressive near the fireplace and in the area where the TV is located, especially if it hangs on the wall (in this case, the laminate finish has another function: decorative - all the wires going to the TV are hidden). The living room is the type of room where there are no restrictions on the imagination of the designer or owners.
Bedroom
The most acceptable solution for the bedroom is to decorate the wall at the head of the bed with laminate. The lamellas imitating natural wood look very rich and respectable. Textiles of the same shades look harmonious with this type of decoration. Sconces or paintings attached to a wall finished with laminate will add charm to the room.
Hallway
According to the tradition that arose in the early 60s of the last century, the hallway in Khrushchev-era buildings was upholstered with clapboard, which is practical and beautiful. Therefore, “God himself ordered” to decorate this part of the room with laminate, as people say.
In the corridor, with the help of finishing material, you can highlight different zones using the texture and colors of the lamellas. They cover either one wall or the lower part of all walls, and try gluing wallpaper or putting decorative plaster on the upper part. Both options look very impressive.
Kitchen
Laying laminate flooring on the wall in the kitchen has more practical than aesthetic value. Here the work area and eating area get very dirty, but the slats are easy to clean. Moreover, they are much cheaper than tiles. At the same time, laminate can imitate various finishing materials: cork, stone, wood, tile.
The only thing you need to remember is that moisture-resistant laminate of class 31-33 is purchased for the kitchen.
Bathroom
In the bathroom, all finishing materials are subject to extreme exposure: temperature changes and humidity fluctuations. Under these conditions, most experts will advise abandoning the idea of laminate walls in this room.
But even for such conditions there is a laminate - waterproof lamellas of class 31-32 with a thickness of at least 8 mm (attention: waterproof, not moisture resistant). Practice shows that it can withstand the existing extreme conditions. How long this will continue is still unknown, there are no statistics.
Loggia and bankon
Finishing the walls with laminate in the loggia allows you to get an additional seating area. Attempts to lay laminate flooring on the walls on the balcony often lead to negative results even after insulating this part of the apartment - in winter the slats become unusable.
How to make and fix tongue-and-groove laminate on the wall yourself: installation technology
Tongue and groove laminate has a special locking connection. You do not need to use glue to install it.
List of tools
- mallet;
- glue;
- level;
- construction corner;
- hacksaw;
- hammer drill
How to make a frame for covering
For lathing, slats with a width of 20 to 40 mm are used. Their placement must be marked on the wall using a pencil and level. The pitch of the slats is approximately equal to half the width of the lamella. It is necessary to make a frame of slats around the perimeter.
How to attach the sheathing: fasteners
The slats are attached using self-tapping screws in increments of about 30 cm. The slats must be smooth and dry. The rail can be installed by drilling through it and into the wall. It can also be secured using a steel angle with holes for self-tapping screws. First, the corner is attached to the wall, and then the rail on the side is screwed to the corner.
How to lay soundproofing sheathing
Sound insulation is installed between the beams of the sheathing. It should fit snugly against the beams; mineral wool is usually used.
How to lay laminate: how to install
It can be attached to surfaces in several ways:
- gluing each lamella separately;
- using clamps;
- small nails that are nailed onto the plank; this option is reminiscent of installing lining.
First, the lamellas are covered with glue, then inserted into the lock and pressed to the surface. After this, gently tap with a mallet.
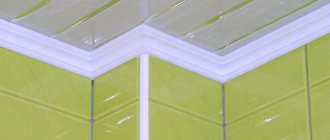
How to set interior corners
When forming an internal corner, you need to remember that laminate swells with high humidity, so you need to step back at least 1 cm from each wall. You can decorate the resulting space using a special corner.
How to decorate the edge: how to close it
The outer corner can be decorated using a plastic corner, which can be purchased at a hardware store. It can be made of MDF to match the color of the laminate.
How to lay corners
The corner must cover the joining seam and have a hidden fastening method. It consists of a strip and a decorative outer element. In the center of the seam, fastenings for the strip are made. Drill holes and install screws. Then the outer part is installed on top.
How to finish the surface
You can hide the sides using a decorative strip or edge tape. Tongue and groove laminate can be installed horizontally, vertically, or at an angle. In the latter option there will be a lot of waste, this must be taken into account when purchasing material.
What glue to choose for fastening
When laying laminate panels horizontally, their fastening to each other is ensured mainly by the locking connection of the lamellas. However, when the boards are placed vertically, the locks do not always secure the panels together tightly enough. In this case, other methods of attaching laminate to the wall are used:
- glue. The most popular option. Not very expensive. Technological. Traces of fastening are hidden;
- liquid Nails. Quite expensive. The panels do not always hold in place when the laminate expands - low resistance to deformation of the materials being held;
- self-tapping screws They are screwed into the wall through a lamella, subsequently masking the heads of the hardware with special wax pencils. The option is simple and very cheap, but traces of fasteners will still be visible;
- staples. The fastening method is not very complicated - you just need a construction stapler, but after attaching the staples it is quite difficult to snap the lock between the slats;
- clamps - used on walls where you can drive a nail or screw in a self-tapping screw.
Many professional builders and authors of materials on this topic on construction sites combine glue and liquid nails - they have a similar principle of operation. We will look at them separately.
Liquid Nails. Of the brands of liquid nails offered by the trade for attaching lamellas to the wall, the products of the Henkel concern with a spray can painted green on the bottom are most suitable. The adhesive mass has good viscosity, long service life, low consumption - 20-30 g/m2.
Glue. In practice, glue brands such as Thomsit, Kiesel, and Kleo laminate have performed well. However, there is one nuance here that for some reason is constantly ignored: among the listed brands there are regular types of glue and contact ones. The methods of using them are completely different.
The fact that the overwhelming majority of the population does not know how to work correctly with contact adhesives is evidenced by the experience of using Moment glue. He is contactable. But for some reason it is glued mainly using this technology: the parts to be glued are lubricated, and then they are pressed tightly against each other for a while. The result is easy to foresee: very low adhesion inside the glued seam. Therefore, we will briefly outline the rules for using both types of glue.
Ordinary. The glue familiar to the average person is applied to the lamella, after which it is pressed against the wall or sheathing and held there for several minutes until the glue sets and fixes the panel. However, this composition of the adhesive can hold no more than 3 rows of lamellas without complete crystallization. Therefore, you will have to take significant breaks in work while waiting for the glue to dry.
Contact. The lamella is smeared and pressed against the wall for a few seconds so that a mirror trace of the glue remains on it (it is problematic to make matching strips of adhesive on the materials being joined using another method). After fixing part of the glue to the wall, the laminate panel is removed and set aside for 5-10 minutes.
During this time, the glue surface hardens both on the wall and on the lamellas, as a result of which the adhesion force becomes maximum (this is a feature of contact types of glue). The process is completed by firmly pressing the laminate board against the wall surface - strong adhesion occurs instantly.
Which laminate to use
To create a decorative wall covering, a laminate with the lowest physical and mechanical characteristics (class 21 - 22) is usually used, because it will not have to experience any loads on the wall.
Laminate decor
Note! This does not mean that you cannot, for example, use a 32-grade board to cover a wall. It’s possible, it’s just more expensive, and it’s not practical. However, you will even be forced to use such a laminate if the finishing is done on the floor too.
What do the images on laminate packaging mean?
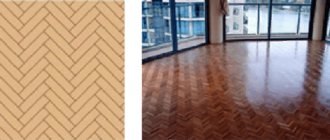
Board formats may vary. In the standard version, this is a strip 1288 mm long and 186 mm wide. But depending on the desired design, you can also use narrow short planks that look like parquet . They look very interesting when laid in a herringbone pattern or diagonally.
Laminate board dimensions
Before you begin transforming the interior, you must first resolve the issue of purchasing basic and consumable materials. And for this you need to accurately determine the technology, since you can attach the board to the wall using either glue or lathing. Let's consider both methods.
How to put laminate on a wall
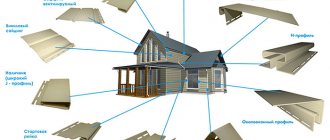
Materials and tools
Installing laminate flooring on a wall will require purchasing the following materials and tools (the latter can be asked from neighbors or friends or rented):
- several packs of lamellas;
- ceiling and floor plinths;
- gel for lubricating locks;
- a set of spacer wedges or slats;
- fastening material depending on the chosen fastening method (glue, screws, profile, clamps);
- stepladders or construction platform (gantry);
- jigsaw for cutting lamellas (you can use a hand saw for wood);
- screwdriver for working with self-tapping screws;
- wooden or rubber mallet;
- bars for padding panels;
- construction square;
- level;
- pencil or marker;
- metal ruler 1 m long;
- spatula.
Flow calculation
Before visiting a hardware store, you need to calculate the required amount of materials - laminate and fasteners. You can do this yourself using the following algorithm:
- is the area of the wall. If it has windows or doors, then their area is minus from the result obtained;
- the final result increases by 10-15% when laying horizontally or vertically and by 20% when laying diagonally;
- the adjusted figure is divided by 2 - this is the average amount of laminate per package per m2. The number of packages is always rounded up to the nearest whole number.
Which method is better to choose
When deciding how to attach the laminate to the wall, you should pay attention to several criteria.
The first one is the evenness of the wall. If the level shows that its curvature is almost zero, and you just need to fill up a few potholes, then you can safely lay the trim with glue. Is the surface not perfectly flat? In this case, you will have to plaster it (putty) or level it using sheet material, such as drywall. The main thing is to attach it not with liquid nails, but with self-tapping screws. And only after this can the panels be mounted on silicone. All other options involve building a frame.
The second criterion is the material from which the dies are made. It is advisable to install vinyl cladding only with adhesive compounds: if you use nails or screws, the finishing surface will be noticeably damaged. The same applies to products made from valuable species. If you place them on screws, the coating will deteriorate. A more suitable technology is glue or clamps.
The third important point is the availability of free time and construction skills. If you want to do everything quickly and with your own hands, but have little experience, choose a ready-made wall mounting system. Even a novice master can cope with it.
Preparing the walls
Before laying laminate on the wall, it must be prepared. Attaching lamellas using the adhesive method requires a hard and uniform surface, with a height difference of up to 3 mm per 1 m (the difference is compensated by the glue). To eliminate surface defects (depressions, cracks and significant differences in height), it is primed and then plastered, in case of significant defects, or putty, in case of small differences. How to properly level a wall can be found in the material “Plastering walls on lighthouses with your own hands”, where detailed instructions are given for performing the work.
If the wall is initially flat, then first remove the old finish, then prime it with a deep penetration primer, and then putty.
In case of large defects, it is cheaper and easier not to level the walls, but to install a sheathing made of wooden slats or metal profiles 2-4 cm wide.
Wooden sheathing.
Metal sheathing.
There are 2 ways to attach the grille strips to the wall:
- perpendicular to the laid laminate panels at a distance of approximately 40 cm from each other;
- parallel to the slats so that the locking connection falls exactly in the middle of the slats.
When working, it is necessary to constantly check the vertical and horizontal of the surface being formed with a level.
Selecting a cladding option, depending on the wall and room dimensions
Vertical installation of lamellas is much easier. This option is suitable for low rooms and can visually increase the height of the room. Narrow panels are suitable for a small room. For a wide wall, it is better to choose slats of large width.
How to attach laminate flooring to a plasterboard wall
Laminate is usually attached to such a surface using glue. Drywall must first be primed. For this option, the thinnest laminate is used. Since if there is a lot of weight, the wall surface may collapse.
How to cover uneven walls with laminate
You can also use laminate on uneven walls, but to do this you need to use wood lathing.
The sheathing must be installed strictly horizontally and vertically; if gaps form between the timber and the wall, then special spacers made of thin wood must be installed.
Instructions for attaching laminate flooring
Step-by-step instructions on how to attach laminate to a wall, regardless of the method of attaching the slats, provide several general points:
- A day before the start of work, the laminate is brought into the room where finishing work will be carried out and unpacked - during this time the panels will acquire a geometry corresponding to the humidity and temperature of the room.
- The lamellas actively expand when temperature and humidity change. Therefore, along the entire perimeter of the wall there should be a gap of 1-1.5 cm between the mounted finish and the ceiling, floor, and adjacent walls.
- The technological gap from the floor is provided with the help of a lath, on the sides with wedges (a lath is also suitable), and a gap is simply left on top.
- The technological gap on the sides is closed with special strips, which can always be matched to the color of the installed laminate, below and above - with a plinth.
- The side of the laminate on the outer corner of the wall is masked with a special profile made of MDF or aluminum.
- The internal corner, if the cladding is mounted on adjacent walls, is also hidden with a special profile.
There are several ways to install a decorative screen on a laminate wall. Let's look at each of them in detail.
Glue method
Laminates of different classes can be applied to glue, but the technologies will be completely different. Lamels of class 21-23 are produced without a lock. Therefore, they should only be glued to a flat wall surface.
If there is a locking connection, the trim can also be attached to the sheathing with glue.
Why can't you stick laminate wall coverings onto slats? In this case, the lamellas do not fit tightly to each other everywhere, as a result of which the connecting seams are very noticeable.
The step-by-step algorithm for attaching class 21-23 laminate to the wall is as follows:
- the wall surface is degreased;
- a 10-15 mm thick strip is laid on the floor under the first horizontal row of lamellas to ensure a technological gap. The same operation is carried out at the ends of the future finishing;
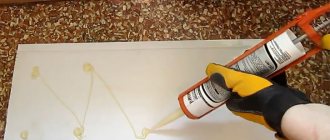
- The adhesive is applied in a zigzag stripe to the reverse side of the lamella. If the glue is ordinary, then the panel is pressed against the wall and held in this position for several minutes until setting occurs. When using contact types of glue, the lamella is pressed forcefully against the wall for a few seconds so that part of the adhesive mass remains there, and then removed for 5-10 minutes. During this time, the process of adhesion of the glue to the wall and to the panel occurs, and the dried surface will ensure instant and strong adhesion of the lamella to the wall. But this will only happen if the adhesive surfaces on the wall and the laminate match. If there is a slight shift, nothing good will come of it - the panel will stick, but very soon it will fall out of the wall;
Applying glue with a snake.
- the second row begins not with a whole panel, but with a cut panel - the seams should look like brickwork. It is better to cut with a jigsaw or grinder with a cutting wheel;
- After installing 3 rows using regular glue, you need to take a break for a couple of hours - the glue should dry. If this is not done, the structure may collapse. When working with contact types of glue, it is not necessary to take a break;
- after completion of the work, a plinth is attached at the bottom and top, and special linings (profiles) on the sides - in this way the technological seams are closed.
Overlay (profile) covering the lateral technological gap.
There is a lot of advice on the forums to glue laminate flooring with polyurethane foam. The method has the right to life, but with reservations: it is applicable to lamellas with a lock, spacers are needed (in the photo polypropylene pipes are used as spacers), it is suitable for small areas - otherwise it is very difficult to obtain a flat surface.
The process of installing lamellas on polyurethane foam.
Intermediate result of repair with polyurethane foam.
You can also use glue for the click method of attaching laminate flooring - it replaces nails and screws. But here is a combined fastening method.
tongue and groove method
For flooring, lamellas with tongue and groove connections at the sides and ends are not available. This mounting option can only be found on laminate walls.
Tongue and groove method of fastening lamellas.
For information: a tongue and groove lamella is a board that has a groove on one side and the same tenon on the other. The same goes for the ends. The groove on the bottom side of the lamella has a larger protrusion, which allows you to drive nails into it when attaching it to the wall (see photo).
A tongue and groove connection using an example of a board.
Fastening technology includes the following operations:
- Wedges (rail) are placed on the floor to create a gap - needed to compensate for the expansion of the laminate;
- a similar operation is carried out on the sides of the future panel;
- The first row of lamellas is nailed to the slats, after which the operation is repeated. In this case, it is necessary to ensure that the end seam is shifted by 1/3 or ½ in relation to the first row;
- Upon completion of the work, the technological seams are closed.
Click method
How to attach laminate to a wall using the click method, or rather, the process of assembling lamellas with a click lock into a single panel, can be seen in the work “How to lay laminate on a concrete floor?”. But you can attach the slats to the sheathing (you can’t drive decorative nails into concrete walls) in several ways:
- glue;
- decorative brass nails with small heads (those who don’t know what these are can look at them on the door frames);
- clamps;
- self-tapping screws.
The simplest method is decorative nails . However, the caps, although small, are still visible at close range, even if they are treated with special wax pencils.
The use of clamps allows you to hide the fastening of the laminate to the wall. The clamps themselves are special galvanized brackets, which in one part are fastened with self-tapping screws to the sheathing, and in the other they hold the lamella by the lower protrusion of the lock (see photo) - space is left for them in the lock connection (see photo). But here you need to remember that the last row will have to be glued.
Free space is provided for clamps in the lock connection.
Fastening with clamps.
Installation of lamellas on metal sheathing using clamps.
Self-tapping screws are used around the perimeter of the panel (at the bottom of the first row of panels and along the ends) - they will then be hidden by the baseboard and trim.
Laying laminate on the wall - learning technologies
Forums are full of advice from craftsmen who have laid kilometers of laminate flooring on their own, and numerous articles on the pages of online publications encourage experimentation. We are against this approach! Engineers and technologists of the famous plants Pergo, QuickStep, Armstrong and others have many years of experience, excellent knowledge of the material, process physics and, of course, laboratories with the most modern equipment. The instructions they developed will help you avoid many mistakes and create a beautiful, certainly durable cladding on the wall.
Fixation with glue
This is perhaps the easiest and fastest installation method. To work, you will need laminate, decorative moldings and an adhesive compound. The latter would be:
- Adhesive sealants or adhesive foam. Silicone-based compounds are elastic and work well with mineral and wood materials.
- Liquid Nails. These are polymer compounds with a wide range of applications; they form a strong but ductile connection between dissimilar materials.
- Structural adhesives. This option is the most reliable, since the compositions have a high initial setting force, which will ensure excellent fixation and the absence of sliding elements.
ADVICE! You can replace adhesive mixtures with elastic parquet adhesive (applied with a notched trowel). But it is more difficult to work with, since the composition has a small initial shear adhesion force. That is, the slats can simply slide off. As another analogue, American manufacturers offer special double-sided adhesive tape for floors (similar to domestic mirror tape). However, this product is not available in Russian stores.
We'll tell you how to properly glue laminate flooring to a wall step by step.
Stage 1. Surface preparation.
The instructions for absolutely all adhesives indicate that the surface must be clean, smooth and dry. Therefore, before work you need to:
- Check the wall for smoothness and remove any unevenness.
- Remove dust and, preferably, treat with a binder primer and dry well.
Stage 2. Applying markings.
Since the installation will be carried out horizontally, it is necessary to apply a certain number of reference points to the wall:
- Using a tape measure, measure the height of the initial plank, taking into account the indentation and the size of the lock tenon.
- Use a marking cord to mark a line strictly parallel to the floor, along which the first row will be fixed.
If you plan to sheathe the wall in a vertical direction, then mark the line of the starting strip on the surface at an angle of 90º to the floor. Compliance with clearances is mandatory.
Stage 3. Gluing the planks.
It is recommended to work from right to left. Spacer wedges or a long strip should be placed on the floor near the wall. Apply the adhesive composition in a “snake” pattern to the planks, then install the first board along the markings, press and tap with your fist or mallet. After this, check the horizontal level again with a level and, if necessary, correct immediately. The next plank is also installed with the end locks secured. Don't forget about side clearances!
Manufacturers recommend starting the second row with a shortened slab, cut using a miter saw or hacksaw. Apply glue to the board, insert the ridge of the locking part into the groove of the lamella of the previous row at an angle of 30º, snap it and press it against the wall to fix the glue. Continue until the end of the strip. A steel laminate bracket will help mount the end strip tightly to the rest of the panel. It is advisable not to remove the spacers from below until the work is completed.
If necessary, the slabs of the top row are cut and fixed in the same way as all other strips.
Vertical installation is carried out similarly with a difference in direction - not sideways, but from bottom to top. Shifting rows is desirable.
If installation is carried out on adjacent walls or wall-to-ceiling, then to decorate the joints you can use:
- Plastic W-shaped profiles for panels.
- Metal layouts for ceramics, designed for internal or external corners.
Stage 4. Finishing touches.
To complete the work, it is necessary to refine the finishing around the perimeter. Skirting boards are installed along the floor, and decorative metalized or laminated corners are installed on the walls. At this stage, you can install sockets, switches, lighting fixtures and other furnishings.
Installation using hardware and lathing
Covering walls with this method is easy and relatively cheap. The technology is not suitable for small spaces, as it “eats” much-needed square centimeters of the total area. Although, in defense of the sheathing, we note that lighting can be mounted around the perimeter, and directly under the cladding - a layer of sound-absorbing, noise-dissipating and heat-saving insulating materials.
Laying the laminate on the wall using a frame of 40x70 slats is carried out in several steps.
Stage 1. Surface preparation.
The base wall should be as flat as possible, always dry, clean and durable. Holes and cracks should be filled with repair compounds, bumps should be cut off, and dust should be removed.
IMPORTANT! There is a misconception that any walls are suitable for lathing. This is a gross mistake, because the slats must “hold” tightly to the base at least in 5 points. Therefore, leveling the surface is a mandatory step.
Stage 2. Marking.
The slats are fixed to the wall at intervals of 50-65 cm. This step is suitable for boards with an average length of 120 cm. When working with shortened slats less than 100 cm, it is recommended to reduce the distance between the moldings - 35-40 cm.
Before attaching the slats, you need to apply markings to install dowels under the nails. To do this, holes for hardware should be drilled in a wood product in increments of 30 cm. Then the batten is applied to the middle of the wall, leveled strictly at 90º and the drilling points for installing dowels are marked on the surface with a pencil. It is necessary to take into account the distance from the floor - 1 cm from the plane or 10 mm from the baseboard.
Marking for the remaining slats is carried out from the central one in both directions at the distance indicated above.
Stage 3. Fixation of the frame.
Slats are applied to the prepared wall and nails are screwed into the holes for dowels. The cap should not protrude on the surface.
Stage 4. Installation of laminate.
The first strip is applied to the sheathing, aligned with a level and fixed along the lower edge with self-tapping screws to the slats. Pins with a diameter of no more than 2.5 mm are also driven into the groove of the locking part at an angle of 45º.
The next plank must first be secured with an end lock to the first plank, checked with a level and secured along the lower and upper edges with hardware. So until the end of the row.
The second strip begins with a board shortened using a circular saw or jigsaw to create an offset on the finished blade. The initial strip is inserted with a tenon into the groove of the first row and snaps into place. Thin nails or pins are also driven into the groove part. If the work is done with an assistant, then you can connect all the elements of the strip with end locks, attach them to the wall, snap them into place, and then secure the structure with hardware. Repeat steps until desired height.
Stage 5. Decoration.
Moldings are installed along the perimeter of the finished finish, and baseboards are installed along the floor.
Fastening the trim using a combination of glue + hardware
Integrated cladding technology can be called the most reliable. The reason is that the glued planks will only lock each other in one direction, leaving the side connections without additional fastening. Hardware elements will help relieve mechanical stress on the narrow sides of the planks and create a monolithic cladding on the wall.
Most manufacturers recommend laying laminate on the wall as follows.
Stage 1. Preparing the wall for installation.
Since glue will be used during the work, it is necessary to carefully level the wall, remove wallpaper, enamel paint, ceramic tiles and dirt. Then dry and remove dust. It is advisable to reinforce crumbling surfaces with fiberglass or special non-woven fabrics for fragile bases.
Stage 2. Applying reference marks.
The wall is marked in two directions:
- Horizontally - the height of the starting row is marked at several points with a pencil, taking into account the gap from the floor, then the line of the first row is drawn with a marking cord.
- Vertically - using a level or slats, lines are drawn from floor to ceiling every 30-50 cm, which will indicate to the master the points for driving in nails.
Stage 3. Fixing the slats.
Spacer wedges or a support rail are installed on the floor near the wall. The adhesive compound is applied to the plank in an S-shape, then the board is placed along the horizontal markings, taking into account the side gap, its evenness is checked with a level, and tapped with a fist or mallet. After this, the lamella is fixed in at least 2 places with pins in the area of the locking part using a nail gun (nailer). If necessary, the nail heads are “recessed” into the slab with a hammer. The following slats are installed in the same way. Along the bottom edge, it is recommended to additionally secure the first row with wood screws (they will be hidden under the baseboard).
The second strip starts with the strip trimmed to create the offset. A sealant or adhesive is applied to the board, the ridge of the locking part is inserted into the groove of the previous row at an angle of 30º, snaps into place, pressed tightly against the wall and “targeted” in the area of the lock using a nail gun. If necessary, the board can be tapped or moved tightly using laminate tamping tools: a block and a staple. All other planks are mounted identically to the very top.
Stage 4. Completion of work.
Skirting boards are fixed along the floor, and suitable corners and other decorative moldings are installed along the perimeter of the walls. After this, you need to wipe the surface with a clean, slightly damp microfiber cleaning cloth to remove dust and small shavings.
Wall covering using special fastening systems
Some craftsmen recommend decorating walls with laminate using clamps for wall panels and lining. However, these products are not suitable for laminate flooring. Their shape and thickness will not allow the lock to form a reliable connection. Of course, you can cut off the tenon of the locking part and drive the sharp protrusions of the clamps into the bar, but then you won’t be able to tightly connect the two lamellas.
Many well-known manufacturers have long developed entire wall mounting systems. We will look at the method offered by one of the oldest manufacturers of wood cladding - Haro (Hamberger Flooring GmbH & Co. KG).
For work you will need: laminate, profiled metal rails, dowel-nails, clips-retainers and specially shaped clamps, moldings for decoration.
Before laying laminated parquet, carefully read the instructions to avoid possible problems during the installation process.
Stage 1. Surface preparation.
The wall surface must be smooth, dry, clean and durable. Decorative and finishing coatings must be removed (with the exception of water-dispersion paints), unevenness and cracks must be eliminated.
Stage 2. Installation of rack profiles.
The rails are attached to the base at intervals of 50 cm. The first one is installed in the middle of the wall, and the rest are already fixed from it on both sides.
You should attach the first strip to the wall surface, level it strictly vertically using a level, mark the drilling points for installing the dowel. The pitch between fasteners is 50-60 cm.
After all the dowels are in their proper places, the rails are fixed to the wall with nails.
Stage 3. Installation of laminate.
You need to start from the left corner. Spacer wedges are installed under the starting row. The first strip is applied to the roof rails; the points where the clips are screwed are marked on it. Then the board is placed against the wall and attached to the profiles with a little effort. In this case, a characteristic click will be clearly heard. The lamella is fixed along the upper edge of the lock using rotary clamps. Subsequent strips of the first strip are attached in the same way as the initial one.
The second row starts with a shortened board, but the starting clips are no longer needed. The locks of the laminated boards are joined at an angle and snapped into place, and clamps are installed in the upper part. And so on to the very top.
The slats of the last row are first applied to the wall to mark the locations of the rails. Then clips are screwed to the slats (along the lower edge of the slab, not the lock). The prepared boards are secured with a locking connection and using clamps. For the outer strip, clamps are not used.
Stage 4. Completion of work.
Finishing moldings are installed along the perimeter of the finished canvas, and baseboards are installed along the floor.
The nuances of attaching laminate to the wall
Like any type of work, attaching laminate to a wall has its own nuances.
Where to start?
Installing lamellas for right-handed people should start from the left - this way it is more convenient to tamp the lamella for snapping the end lock. For those who have a left hand, the opposite is true.
How to lay the last row?
In all methods of attaching lamellas to the wall, the last row, after cutting the lamellas to width, is glued to the wall or sheathing with liquid nails or silicone.
How to bypass the battery?
Modern batteries hide the space behind them. Therefore, it is enough to insert the slats from all sides to the mounting brackets. To do this, simply cut out part of the panel.
How to cover the end if the laminate panel does not cover the entire wall
To seal the end, you can use laminated aluminum corners - they are available in various colors and shades, which allows you to choose the desired profile. Attached with glue.
Aluminum profile for the end.
How to glue adhesive laminate with your own hands: step-by-step instructions
Glue the laminate in the following sequence:
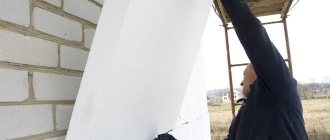
- level the wall with plaster or plywood;
- glue the lamellas from bottom to top in several rows, depending on the glue;
- After installation and drying of the glue, install the baseboard and decorative strips.
Surface preparation
It is necessary to apply a primer to the wall to ensure adhesion of the surface to the adhesive. After drying, begin installing the slats. You can also install a sheathing of beams and screw a sheet of plywood.
Preparing wood sheathing
After purchasing the slats, they should not be immediately attached to the wall; they should lie in the room. During this time, the wood may dry out a little, this will help avoid deformation when attaching the laminate.
How to secure without lathing
Without lathing, the slats can be glued to a leveled wall. The second option: a sheet of plywood is attached to the sheathing, and lamellas are glued onto it.
Sticking
Glue is applied to the first panel in wavy lines and pressed against the wall, aligning along the intended line. Then they tap it with a special wooden hammer.
How to mount horizontally: how to stick
A small gap should be provided between the floor covering and the wall laminate. To do this, you need to draw a horizontal line on the surface of the wall at a distance of no more than 2 cm from the floor. After gluing the lamellas, the gap is covered with a plinth.
How to lay it out vertically
For vertical installation, you must first draw a vertical line on the wall, and lay the lamellas along it from bottom to top. After installing the first vertical row, install the next one, leveling each element using a level.
Facing: how to do it
They start tiling from the floor, usually from the left corner. After installing the first row, proceed to the next ones. After installing two horizontal layers, the work must be left, as the glue must set.
Preparation for installation
When carrying out installation work, you will need to use a variety of materials based on the fastening of the panels. When working with the adhesive option, you do not need to use special tools. With other options, you need to tap the panels with something, for example, a mallet. A simple hammer will not work, as it can damage the panels and cause cracks between them. The mallet distributes the impact force well, while keeping the panel completely intact.
Kiyanka
In addition, when carrying out work, you will need to use a hook so that you can easily pull up the panels when installing them in the corners. Spacer wedges are necessary in order to make the necessary indentation throughout the room.
Claymer for lining
The product is afraid of moisture, so it makes sense to make a space of about 2 cm from the corners and the floor. You need to put a slats on the floor, and wedges can only be used on the sides, since the material is not too light. When working with the adhesive option, it makes sense to wrap the lath in polyethylene so that the laminate does not stick to it. In addition, you will definitely need a pencil or pen, a jigsaw for cutting into pieces and a tape measure, you can also take a square and a hammer.
Return to content
Product Features
Laminate flooring began to be sold on the Russian market quite recently, and quickly received positive recommendations. It is quite easy to maintain; it does not leave marks from furniture, as is often the case with linoleum. Some time after the appearance of this material, the idea arose to also lay it on the walls. This assumption received a design embodiment after a short period of time. Nowadays, many people have begun to install laminate flooring on their walls.
More recently, panels made from MDF have become very popular, but they are quite expensive. Laminate also looks respectable and stylish, but at the same time costs much less.
The advantages of the material are as follows:
- Environmental friendliness of the product;
- Serves for more than ten years;
- Does not collect dust and does not absorb surrounding odors;
- After installing it, you can forget about repairs for many years;
- A large number of colors and textures will make the interior of the room unique;
- Laying laminate on walls is quite simple, sometimes even easier than gluing wallpaper.
The disadvantages include moisture intolerance; if the material gets wet, it can swell and crack. Therefore, you should not use it in the bathroom or kitchen. It also reacts poorly to temperature changes; in the heat it can swell and burn out, and in cold temperatures cracks can appear on it. As a result, you should not install this material on the balcony.
Another disadvantage of the material is its high cost in comparison with wallpaper, plaster, paint, but if its price is compared with MDF, it will not seem very high.
As a disadvantage, it is also worth noting the content of melamine resin, which, according to some experts, negatively affects human health. When purchasing, you should also make sure that the laminate you choose meets modern requirements for formaldehyde emissions - class Super E.
Return to content
Decoration and decoration of walls
You can do the design and decoration of walls with laminate yourself, or you can entrust these actions to professionals. What to do - choose for yourself, we will only offer some interesting ideas for implementation.
Decorative vinyl laminate
Vinyl (PVC) is an excellent decorative material that can be laid on the surface in absolutely any room. It is moisture resistant and has a self-adhesive layer.
Panel
To add variety to your design, you can make a wall panel from laminate. You can play around with colors to your heart's content. The panels can be laid both lengthwise and crosswise.
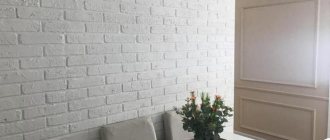
Behind the sofa
The wall behind the sofa can be highlighted using laminate. It will become an accent and will be the object of everyone's attention.
That's all. It's time to wrap things up. We sincerely hope that the 150 photos of interiors with laminate on the walls collected in this article helped you finally decide on the future design of yours. All that remains is to implement our plans. Great luck!
If the article was useful to you, share it with your friends by clicking on the buttons: Below, leave your comments, suggestions, ask questions, express your opinion - this is very important to us!
Design Features
The choice of material and installation of laminate on the wall is subject to the basic idea of the interior. Design finishes vary significantly in different rooms. Some specific nuances can be noted:
- Living room. Here it is important to ensure a combination of laminate flooring and furniture upholstery. The panels can be placed on the wall either horizontally or vertically. Horizontal placement is suitable for rooms with high ceilings, while vertical placement, on the contrary, can visually raise low ceilings. The finishing option is shown in the photo.
- Laminate in the kitchen. The most attractive options are a contrasting wall that accentuates attention and finishing the apron of the work area. This lining protects well from splashes and is easy to clean. The dining area can be highlighted with dark-colored panels.
- Decoration in the bedroom. In a large bedroom, a wall lined with light-colored laminate looks good. Hanging accessories clearly stand out on it. A laminate insert on the wall at the headboard creates a cozy feel. It is better to make it match the color of the bed.
- Arrangement in the hallway. In this room, the design in the form of a tiled lower part of the wall is popular. Here it is better to use laminate, which contrasts with the floor covering. Another tempting option is suitable for hallways of sufficient area. Laminate on the wall in the interior (the photo clearly demonstrates this) perfectly sets off the working wall with hangers and shelves, creating the illusion of natural wood. In small corridors, the panels should be placed vertically, which will visually enlarge the room.
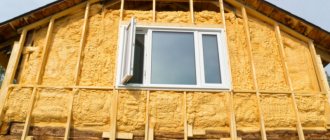
- Balcony or loggia. In these rooms, laminate is most widely used for wall decoration. It is usually mounted on a lathing, in the cells of which insulation is placed (mineral wool, polystyrene foam, expanded polystyrene, etc.). With this finishing you can zone the office on the loggia.
The right combination of colors plays an important role in design. Laminate is available in different shades - from almost white to dark brown. You can choose green, blue, red, brown, yellow colors of different saturations.
Multi-colored (sometimes variegated) panels look great in a modern interior. Sharp contrasts are often preferred. So, when one wall is covered with a dark laminate, the other walls are covered with light wallpaper. The illusion of endless space is provided by mirror inserts in the laminate cladding.
Laminate flooring can create an attractive look and comfort in your home. It is important to choose the right material and carry out all work carefully, taking into account the recommendations of specialists. Such wall cladding will not be cheap, but it retains its original appearance for a long time without requiring repairs. You can reduce costs by doing all the work yourself.
Features of using laminate
Laminate is a finishing panel based on pressed wood-fiber boards covered with protective and decorative films. Its main purpose is flooring, but covering walls with it turns out to be an even simpler task. It is able to effectively imitate various natural materials, and a wide selection of color shades, patterns and surface quality makes it possible to decorate a room in a different style.
Finishing walls with laminate has a number of advantages:
- high wear resistance and increased mechanical strength, which ensures the durability of the coating;
- environmental cleanliness associated with the absence of harmful components in the composition of the material;
- the possibility of using cheaper models for wall decoration (minimum thickness and low strength class);
- no special care required during operation, can be cleaned using ordinary detergents;
- antistatic abilities and lack of tendency to attract dust;
- the ability to hide wall defects under the cladding;
- wide range of models of different colors;
- ease of installation and the ability to do it yourself.
Certain disadvantages should also be noted:
- low resistance to heat, which creates problems in areas adjacent to heating radiators or stoves;
- the need for careful preparation of the wall surface when using adhesive fastening of panels;
- reduced moisture resistance, limiting use in bathrooms;
- increased cost of laminate with a decorative surface.
In general, the positive properties outweigh the disadvantages, which makes it possible to use laminate on the wall in the interior. Moreover, panels of a strength class in the range of 21-30 are quite suitable for wall decoration, which reduces costs. The main selection criterion is appearance. Color, pattern, surface type are selected taking into account the overall design style. The laminate should be in harmony with the flooring and walls finished with other materials.
Another selection option is the profile of the panel edge for joining them together. The type of lock largely determines how the laminate is attached to the wall surface. Panels of class 21-23 have only a “groove-tenon” profile (Lock-lock). Such a connection may diverge, so panels are generally mounted with glue. A click lock (Click system) is considered more reliable, which allows you to firmly fix the joint.