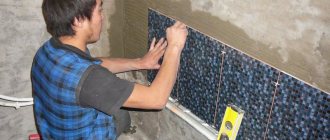
Recently, laminate flooring has become increasingly popular. It is beautiful, inexpensive, quick and easy to install. How to lay laminate flooring correctly with your own hands and how to do it beautifully will be discussed.
How to install laminate flooring yourself? Laminate is good because it can be installed quickly, and the material is ready for installation, and the process itself does not require expensive materials or tools.
This makes it possible to lay the final floor covering yourself. But for the result to be truly pleasing, you need to know how to lay the material correctly. There are controversial circumstances that can greatly influence the final result.
What will you need for installation?
It takes 3-4 hours to lay laminate flooring in a room with an area of 15–25 m2 on a finished base. This type of coating refers to “floating floors”, which are not rigidly fixed to the base from below, but simply lie on it without fastening. Therefore, you just need to lay out individual laminate lamellas on a screed or flooring made of wood boards, connecting them firmly to each other.
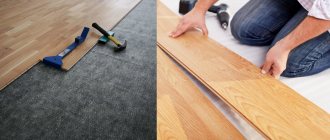
To lay laminate flooring you will need the following tools:
Nothing particularly specialized is needed to install the coating in question. No special skills are required for this. Most home craftsmen can handle this tool without any problems and correctly. Installing interior doors with your own hands can still cause difficulties. With a laminated finish flooring, everything is much simpler.
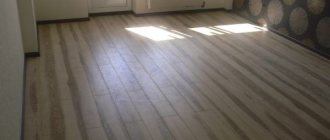
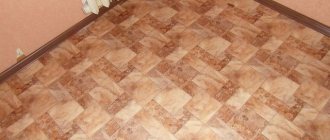
Laminate in the interior
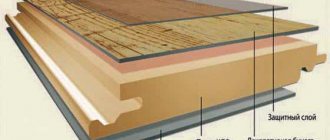
In addition to the lamellas of the laminate itself, in order to lay it on the floor, you will also need a plastic film for waterproofing. Plus, you will need a backing made of cork, foamed polyethylene or other similar material. The purpose of this lining is to increase sound insulation and distribute the load from individual laminate flooring strips to the base.
It is not recommended to neglect laying the substrate. It is provided with all step-by-step instructions from laminate manufacturers. If you don’t put it in, you can immediately forget about the coverage warranty.
Flooring options
The final row of laminate
Having determined where to start laying, the master sees the planned place of completion of the work. The final row usually does not fit entirely, so the panels are cut lengthwise. A marking diagram is present on each package of material, facilitating independent installation. If it is impossible to install a piece of the last row in place (presence of interference, for example, heating radiators), the surfaces of the locks are removed with a plane. After this, the lamella can be inserted from the side and pushed into place along the seam. In this case, the effectiveness of fastening decreases, so the lock is placed on glue.
High-class specialists with an ideal eye can begin styling from the center. When decorating the floor yourself, you should start from the wall, from the corner. The technology allows you to get by with a minimum of hand tools, although when using a jigsaw, the pace of laminate installation increases sharply.
Floor preparation
In order for the laminate to last a long time, the base underneath must be perfectly level. Differences in height are permissible only within a couple of millimeters per meter of coverage. If the unevenness on the subfloor is greater, the lamellas will move apart at the joints due to uneven distribution of the load.
The laminate is laid on bases made of:
- floor boards and parquet strips;
- wood boards;
- tiles;
- linoleum;
- concrete (screeds or floor slabs).
Styling tools
The main condition is that the base must be level and stable under the feet of a person walking on it. Sagging boards or recesses (bulges) on the concrete surface are unacceptable here. If there are such defects on the rough base, they should be eliminated before starting to lay the laminate.
If the ceiling or floor covering meets the requirements for levelness and resistance to loads, then it can be left. Otherwise, you will have to dismantle this foundation and build a new one.
Laminate in the house
Leveling the floor
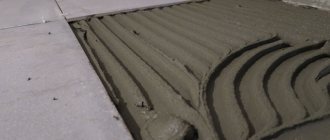
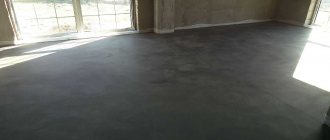
To level the rough base, most often they use a wet or semi-dry floor screed made from DSP. This is the most reliable and durable option. Concrete can withstand heavy loads and is resistant to moisture. However, it will take up to three weeks to set and harden. If you decide to lay laminate flooring on a concrete screed, then repairs to the house may last more than a month.
The subfloor is also made from gypsum fiber boards, chipboard, fiberboard or plywood. This option eliminates wet processes and is faster, since there is no need to wait for the cement mortar to set. However, if pipes break, such a base usually has to be completely or partially replaced along with the laminate. Contact with water for wood and gypsum fiber sheets is contraindicated. But in its finished form, such a prefabricated screed weighs much less than a concrete screed.
Substrate
Almost all manufacturers prohibit laying laminate flooring without a backing. This underlying layer is needed to redistribute the load on the floor, reduce noise and additionally insulate the laminated slats from moisture from below on the base side.
Most often, a film of foamed polyethylene with a thickness of 2–3 mm is laid as a substrate under the laminate. It is not afraid of moisture and is cheap. But you can also use analogues made from cork, pine needles and polystyrene foam. Cork and coniferous options are natural, eco-friendly materials, but they become unusable when exposed to water. Expanded polystyrene boards have increased noise and heat insulation, but are flammable.
Laying the substrate
Laying laminate on difficult floor areas
Heating appliances and communications are present in every room, regardless of functionality. Therefore, you have to lay the laminate near the pipes, under the radiators. Doorways and architectural structures in the room significantly complicate the task. To tile the floor near the pipe, we begin to perform the following actions:
Figure 4. A jigsaw with a saw that has a reverse tooth is suitable for creating cuts of complex shapes in lamellas.
- a mark of the center of the hole is applied to the laminate (the locking connection and the gap near the wall are taken into account);
- a hole is drilled (the diameter should exceed the pipeline by 3-5 mm);
- the panel is cut along the axis of the hole;
- The pieces are laid on both sides of the pipe, the connection is fixed with glue.
To increase the aesthetic value, the gap between the laminate and pipe is masked by installing special sockets that are commercially available. Laying at the entrance usually completes the complex of facing works. If there is no bottom strip of the door frame, the panels extend to the middle of the opening or to the cladding of the adjacent room. The expansion joint is mandatory; later it is closed with a special strip attached to the base, and not to the panels.
Laying the laminate on podiums is done in the same way as the floor planes; the riser is covered with one panel if it is sufficiently wide or made in typesetting (for high podiums). In this case, double-sided plastic corners are used, with the help of which the side cladding is fixed to the surface. If there are no door blocks at the time of cladding, it is necessary to leave a gap from the intended installation site. It is prohibited to mount the entrance box on laminate flooring, as this will disrupt the mobility of the carpet. Heavy furniture significantly affects the service life of the coating, since it also disrupts the mobility of the slats.
Related article: Burgundy wallpaper in the interior
Manufacturers produce decorative squares, the side size of which coincides with the width of the lamellas. This allows you to assemble mosaics and use inserts in any order. The front surface of the products can imitate the texture of stone, which allows you to lay out laminate in the form of imitation tiles or porcelain stoneware. To create cuts of complex shapes in lamellas, a jigsaw with a saw with a reverse tooth is optimal (Fig. 4).
Methods for laying laminate
Before you go to the store for the coating in question, you need to carefully figure out how to calculate the laminate for a room of a specific size in pieces. Nobody needs extra material, and if there is a shortage of it, it is not always possible to purchase even a couple of planks exactly the same as those taken earlier. And here the method of laying out the slats on the floor plays an important role.
Laminate planks are laid in two ways:
- straight (deck);
- diagonal.
The first one is easier to install and requires less material. In the second case, much more scraps are obtained due to the need to cut the planks at an angle near the walls. But the lamellas laid diagonally in the assembly look more impressive. In both options, the boards are laid with an offset of 10–35 cm to the adjacent row.
Laminate assembly
The connection of laminate planks is made with or without glue. The use of the adhesive method is recommended when it is necessary to increase the moisture resistance of the entire coating. Water then cannot penetrate into the joints between the lamellas and does not harm the substrate and the bottom layer of the laminate.
In this case, the second option is often more preferable. After laying the laminated finish without glue, it can be disassembled if necessary to replace one or more lamellas. It is impossible to separate glued boards without damage.
The laminate is connected using end locks:
- “Lock” (groove-ridge).
- "Click" (simple latch).
- "UniClick" (complex latch).
The first of the locks is the weakest to break, and the third is the most durable and reliable. However, if the laying of the laminate is done professionally, then all of them guarantee a strong connection of the lamellas into a single laminated coating.
The principle of laying laminate
Laying subsequent rows
To lay the laminate in the second row, you will have to remember the dressing of the brickwork. This scheme provides maximum rigidity and ideal geometry. The slightest discrepancy in the locking connection instantly becomes visible, which makes work easier. Professionals divide the lamella in half and fasten the piece with a longitudinal lock to the solid panel of the first row. The remaining piece will be useful for starting the fourth row. When working with lock locks, the following element is inserted into two locks simultaneously:
- end of the first piece of a new row;
- longitudinal of the first two panels of the previous row.
Figure 3. To prevent spontaneous separation of locks during operation, it is necessary to lay laminate only when the pieces are at least 40 cm long.
This way the long sides of the material align with each other. All that remains is to check the absence of gaps in the locking joints and the presence of installed wedges near the walls (they tend to fall). Laminate flooring can only be laid if the pieces are at least 40 cm long, otherwise the locks hold weakly and spontaneous separation is possible during operation (Fig. 3).
Laying laminate with click locks will not work this way: for a high-quality connection, each lamella is inserted into the previous one at an angle, so the end locks are secured after the longitudinal ones. Each workpiece that ends a row is inserted into the end lock and tapped with a special tool - a Z-shaped bracket made of hard material. One edge is placed on the end of the lamella, the second is lightly tapped with a mallet until a characteristic click is heard. Professionals easily click these locks with their feet if they are wearing shoes with light-colored non-slip soles.
How to cut laminate correctly?
You can cut the laminate into the necessary parts with your own hands:
- electric jigsaw;
- small hacksaw for metal;
- a durable construction knife.
When cutting, you must ensure that no cuts or scratches appear on the top decorative layer. Then, on the surface under the sun's rays, they will all be visible to the naked eye. That is why it is not recommended to use a hacksaw on wood with large and medium teeth. It is almost impossible to make a cut without creating unsightly grooves.
Laying laminate flooring near the threshold
To get an even cross-section, it is best to use some kind of metal guide or square. And you should cut out the holes for the pipes slowly with a knife.
Using the tools listed above almost always produces a burr-free cut. If they do form, then such rags can be cut off with a knife or ground off with a flat rasp on wood.
Laying floors around pipes
Recommendations
Laminate flooring should be laid in compliance with the following simple rules:
- Before installation, the lamellas must lie in the room in a horizontal position for at least a day to cool down or warm up to room temperature.
- Laying laminate flooring is only permitted on dry substrates. If a concrete screed was originally made, then laying the coating is permissible only after it has completely dried.
- Before starting work, the rough foundation must be thoroughly swept so that there are no pebbles or other debris left on it. If you leave them under the laminate, sooner or later the substrate will tear first, and then the coating itself will be damaged.
- To identify differences in the subfloor, you should use a long rule or level - the slightest deflections will be visible in the gaps that appear.
- It is best to lay the planks away from the window so that the seams along the locks are less visible in daylight.
- Compensation gaps 8–10 mm wide should remain between the walls and the laminate. Without them, the laminated coating, during thermal expansion, will rest against the wall surface and rise like a mound in the middle of the room.
- To prevent the slats from moving during installation and closing the gaps along the walls, spacer wedges should be placed. Then they clean up.
- Compensation gaps must also be made in the middle of the room if the coating is more than 10 meters long. Afterwards, these seams must be closed with decorative thresholds made of plastic or metal.
- The substrate and waterproofing should be glued with tape at the junction of their individual strips. At the same time, you cannot nail this sublayer to the rough base with nails or screw it with self-tapping screws. Gaps are not allowed here.
- The first row is laid against the wall with a tenon, for which it is pre-cut so as not to interfere.
If the walls are uneven, then special attention should be paid to placing spacer wedges and laying the first row. The smoother the first slats are laid out, the more reliable the connection of all the remaining slats will be.
If you strictly follow the given step-by-step instructions and recommendations, the laid laminated coating will last for many years. There is nothing particularly difficult about its installation. In order to figure out how to choose the entrance door to an apartment and then install it, you will have to use your head completely. With the floor finish in question, things are not so scary.
Step-by-step instruction
Details
Process Features
To install laminate flooring correctly, you need to bring the packaging into the room, unpack it and inspect it. Sometimes in packages it is not noticeable that the material is swollen and wet. This happens during transportation, and if it is immediately noticeable, then you should immediately replace it. The unpacked laminate should sit in the room for a couple of days. It needs to be laid in even stacks on a perfectly level base, and within a couple of days it will reach operational condition.
It turns out that the material warms up to room temperature and acquires room humidity. It is definitely important to remember that when laying the laminate, it is not laid close to the walls, but a gap of 1 cm is left. This is important in order to compensate for thermal expansion, and there must be a gap, otherwise the laminate will swell. To make it easier to maintain the gap, spacers of the required thickness must be installed between the boards and the wall during the temporary installation of the laminate. We are also talking about laminate trims, and material with a thickness of 0.8 cm is suitable for the house. Please note that there should be a gap of 1 cm around columns, protrusions or pipes. After laying the last row, remove all spacers. Laminate flooring will shrink or increase in size as humidity changes, and this gap will give it room for such changes. Afterwards, the gap will be covered with a plinth, which is important to attach to the wall.
Process
Laying scheme
There are several simple laminate installation schemes, and they can generally be divided into 2 groups - diagonal and straight. If you have not dealt with such a coating and are just figuring out how to lay laminate flooring, it is better to choose one of the direct methods. There will be less pruning, which means less waste.
Productive deck-type installation is an almost waste-free installation scheme, since what remains when cutting the last board in a row will become the beginning of a new row. Only sections less than 0.3 meters in length will be rejected. The disadvantage of this method is that this coating does not always look beautiful.- ½ shift - this laminate laying scheme is recognized as the most reliable in the sense that the joints in adjacent rows are always spaced at a good distance. This will make the floor stable, and it will be much less likely that cross-type joints will come apart. The amount of waste will depend on the floor geometry, but “straight schemes” usually produce much more waste.
- Shift by 1/3 - this laying method can be used if the length is at least 1.2 meters. With this method there is not much waste and the 3 rows start with different lengths of material. Every 3rd is whole, and the others are cut to 2/3 and 1/3 of the length. As a result, the joints of adjacent rows are spaced 0.4 meters apart. In this case, the coating will be reliable.
An additional variety is displacement with a adjusted step. Choose an exact offset size, which can be arbitrary, but definitely less than 30% of the length. The shortest plank cannot be less than 0.3 meters, otherwise there is an increased risk that it will pop out or that it will need to be glued to those placed nearby. The design is calculated because it depends on the dimensions of the laminate board. Whatever laying scheme you choose, remember that it is better not to lay short pieces less than 0.3 meters. Usually they are the ones who pop up. It is difficult to install them in place without disassembling them, and the locks can also be damaged. In short, don't skimp on the little things.
Please note that in more expensive collections with complex locking structures, a shorter length with a short piece is allowed. But this is all indicated in the documents, and there is no need to install laminate with a shorter length.
Procedure
Before installing laminate flooring yourself, you need to remove everything from the room. The floor must be completely clean and dry. It is prohibited to lay laminate on a damp screed, even if it is moisture resistant. Before starting work, you need to thoroughly clean everything with a vacuum cleaner. The following materials and tools are required for the work:
- Ruler, square, tape measure, knife and pencil.
- A hammer, a Z-shaped plate or a piece of laminate, but the plate is much easier to work with.
- A wood hacksaw or angle grinder with a suitable disc.
You can cut laminate with a grinder, hacksaw, or jigsaw, but the perfect cut is obtained using a miter saw. There are also special machines for cutting laminate, but not everyone has it and trimming; each of the mentioned devices will do. If it is difficult to make an even cut, take an inexpensive miter box, but with such a width that you can lay the board. The miter box can be made with your own hands from three boards, which are knocked down in the shape of the letter P.
Rules and algorithm of actions
You will learn further where to start laying laminate flooring correctly. The order itself will depend on the type of locking connection and the chosen method, but in general the work proceeds step by step.
Spread the film on a flat and dry base, place it slightly on the walls, and then attach it with masking tape. At the end of installation, it is cut and folded into the gap, but this is not necessary.- A substrate is definitely required; it must be laid along the wall from which it is important to start laying. If the substrate is made of several pieces, the joints are glued using tape. You shouldn't cover it too much, because you can't walk on it.
- Start laying the laminate, with the short side facing the window. This way the joints will be less noticeable; do not forget about the gap between the wall and the edge of the board. Place special gaskets.
- Lay the board, placing it against the pads (along the long side and at the end). The tenon will face the wall, and the groove will face the side of the room.
- The method of fastening the board depends on the locking shape, there is lock and click. The first castles are less common.
- Lay out the first row and the last board is usually cut. Don’t forget that here, too, there should be a gap of 0.3 cm to the walls, and in order to fit such a piece tightly, you need Z-straps.
- The next row needs to start with a board of a different length, and this will depend on the pattern, but the order of execution is similar. All you need to do is join along the long part, and insert the end lock first, positioning it so that the lock is close to the edge. When the long side is connected, the side lock will “ride on rails.”
- Next, do everything by analogy.
- The last row usually needs to be cut to length. Unfold the plank with its tenon away from the walls, rest it against the spacers, and then mark where it needs to be cut. Due to the fact that the geometry of our rooms is almost never ideal, it is better to try it on on the spot, and then put marks at both the beginning and the end.
This is all the instructions, and now you know how to lay laminate flooring yourself.