Many technical solutions, having undergone changes, come to the modern world from ancient times, dramatically changing our understanding of the idea. For example, sliding interior doors are not a new product in the modern building materials industry, but a deeply redesigned system of internal doors for the inhabitants of the Japanese islands, which is gaining popularity every year. After all, installing sliding doors in an apartment allows you to change the aesthetic perception of the room - unusual and very beautiful, as well as save space.
In Russia, the transition to sliding interior doors is still being held back for two reasons:
- the high cost of such a system - the price of only one mechanism is approximately the same as the cost of simple doors;
- the prevailing opinion about the complexity of installation, which is almost impossible to do on your own, and specialized companies charge decent money for their work.
Let's try to destroy the last myth and show that all operations can be performed by a simple person with basic skills in working with various tools.
Classification of sliding door systems
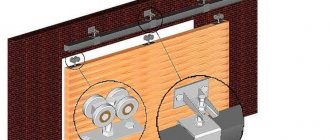
Sliding systems differ from swing doors by the presence of a sliding mechanism instead of a traditional hinge. The door leaf is moved along a special rail (sometimes called a guide profile or slide) using rollers attached to the door leaf. The door moves parallel to the wall, opening or closing the passage.
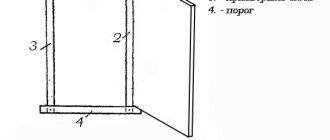
Sectional view of the recoil mechanism.
Such systems are classified according to the type of movement of the door leaf (method of opening), the principle of operation of the structure and the type of material from which the door is made.
By opening method
Despite the variety of models of sliding doors, according to the method of opening they are divided into only two structural and functional systems: sliding and folding.
Folding systems (also called sliding-folding models) include:
Accordion doors. They consist of several sections connected to each other by loops. Moving in the doorway along the rail, the individual door leaf leaves fold like an accordion. The main function of such doors is to divide space into several zones.
Accordion door.
The principle of the device is original, but most models are not practical.
Book doors. One of the best options for replacing swing doors due to their compact size. Therefore, they perform their function perfectly in the wardrobe, bathroom, kitchen and narrow corridors. They are practical, have a low price, operate silently, and are easy to install.
Door-book.
At the same time, book doors have low sound insulation and a high probability of the doors jamming.
Fastening the wings to the book door.
Both versions of folding doors have many common characteristics. The only thing that distinguishes them is the thickness of the door leaf and the folding method. The accordion leaves are thinner and when folded they resemble blinds.
Sliding (parallel sliding) doors have one or more leaves that move parallel to the wall - hence the name. They have many design solutions. Among them:
Sliding doors. The most popular option. Can be attached to both the wall and the ceiling. Have two guide profiles (the classic version, when the door on rollers slides along the upper and lower rails) or one (hung doors - they move only on the upper slide). Consist of one or two leaves.
Sliding doors.
Among the advantages are:
- reliable and durable design;
- long service life without repair (about 6 years);
- convenient use - open without much effort;
- stylish design and aesthetics.
Unfortunately, there are also disadvantages: poor sealing, which is why sounds, odors and cold or hot air easily penetrate through them.
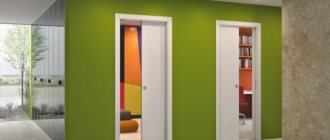
Cassette (panel). The sliding mechanism is the same as that of compartment doors - the rollers slide along a guide. Everything else is different. Firstly, all the door parts are hidden in a rigid cassette, inside which the door leaf moves. Secondly, the part of the cassette where the doors slide is hidden inside the wall.
Choosing a narrow and long opening will not work. Therefore, the wall is either completely disassembled, or approximately 2/3 of the wall thickness is knocked out to fit the dimensions of the part of the cassette that will be hidden. The lower part of the cassette, the tray, is hidden in a groove cut into the floor. After installing the sliding door, the wall is restored using drywall. Sometimes the cassette is placed next to the wall, and then a false wall is installed to cover part of the structure.
Cassette single and double doors.
This system has many advantages:
- unlike sliding doors, they do not protrude beyond the doorway;
- fit tightly to the end of the wall in the closed position, as a result of which they have the same sound insulation as swing doors;
Diagram of the operation of a cassette door.
- with the advent of double doors on the market, they can close doorways of any width;
- movement inside the cassette is easily automated.
The negative aspects include a very, very high price and unusual, but very labor-intensive, installation.
Cascade. They consist of two or more canvases that have their own slides mounted on the ceiling or the top of the wall. The peculiarity is that the canvases are moved sequentially, one after another, thanks to a special mechanism and a flexible cable that connects the sashes into a single whole.
Sliding can be in one direction or in opposite directions. The downside is that part of the opening will always be closed by at least the width of one panel. This problem can be avoided in one case: by analogy with cassette doors, hide the doors inside the wall. Naturally, the width of the internal parking should accommodate several panels.
Cascade doors.
The doors move silently and smoothly thanks to bearings and rollers with a special outer coating made of a soft but wear-resistant material (often silicone).
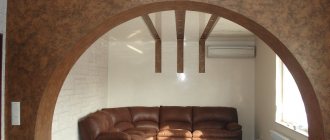
Radial. This version of doors is used when decorating interiors in Art Deco and Art Nouveau styles. Their peculiarity is that the sliding panels do not move along the walls, but along a semicircle of the mounted profile. They can only be placed in spacious rooms, as they “eat up” a lot of space. Therefore, it is unlikely that you will be able to see them in standard apartments. Their place of application is cottages or public buildings.
Radius door.
Intra-opening. The structure is mounted inside the opening, without extending beyond it either parallel to the wall or inside the wall. It consists of two doors that move on their own rails towards each other. In the open position, only half of the opening can be used for passage.
According to the design of the recoil mechanism
To move doors, two types of sliding mechanisms are used:
With two guides: one profile is attached at the top, the second on the floor. This design allows the door leaf to be rigidly fixed vertically, while providing good heat and sound insulation.
Two guides.
There is only one drawback: the bottom rail quickly becomes clogged with dirt and requires constant cleaning.
One rail - the door moves along one rail fixed above the door. To avoid accidental release of the rollers from the slide, stoppers are installed inside the profile at its ends, and flag rollers are mounted on the floor to prevent the doors from oscillating in the transverse direction.
One guide.
This system has silent and safe movement and a long service life.
According to the material of the canvas
Based on the type of material from which the door leaf is made, there are 4 main types and several subtypes of sliding doors:
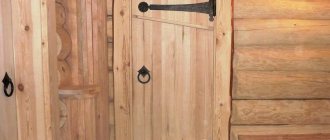
Wooden. They are made from various types of wood, including valuable ones. They fit perfectly into any interior, classic or ultra-modern, as they have a variety of textures and patterns. The material is environmentally friendly, so there are no restrictions on use.
There is only one drawback: those made from valuable wood species cost a lot of money. Even a simpler material: pine, is more expensive than alternative options.
Aluminum. They are characterized by light weight and long service life. They are not afraid of humidity. They do not require special decoration - painted or anodized, they look great, especially in combination with other materials. They have high resistance to aggressive chemicals stored in the apartment, do not burn, and protect well from noise and heat loss.
Disadvantages include high price and susceptibility to corrosion in damp rooms when in contact with other metals, especially iron.
Glass. They are made of tempered glass, which makes them absolutely safe. They look original and very beautiful - glass allows you to get a stunning effect when creating the interior of a house or apartment. Ideal for high-tech style. They make the room cozier and brighter.
Glass door.
The disadvantages of glass doors include their sound permeability - a working TV will be heard in all rooms of the apartment.
Veneered. Here, the door leaves are first made of MDF, and then covered with veneer of different types of wood. They look solid. They can be milled, which allows you to obtain a voluminous surface. Such doors are very similar to wooden ones, but the quality is much worse, which is reflected in the price.
Laminated. A door leaf made of MDF or chipboard is covered with a special protective film that can imitate various natural materials.
Combined. The frame of the canvas is made of wood, steel, aluminum or modified plastic, and the inserts are made of other materials: wood, glass, rattan, hardboard. They are quite expensive, but the price is justified by the very beautiful appearance.
How to make sliding doors with your own hands?
To make glass partitions, you need skills to work with this material. If they are missing, you should contact a professional. To work with glass you need special tools that are expensive.
It is necessary to consider how to assemble a sliding door made of wood. This material is easy to process, stronger and more reliable, has better sound insulation, frame products weigh less than solid wood, and panels can be made if desired.
Design Features
Before starting work, you should draw up a diagram or drawing of the structure and indicate all the parameters. The design of sliding doors can have one or more leaves depending on the size of the opening. You can make a solid canvas or with panels of various materials. Depending on the weight of the structure, the door can be suspended or on roller mechanisms.
Sometimes a product is installed that slides deep into the wall. To do this, dismantle part of the partition and make a niche from plasterboard.
Preparatory work
Before making a sliding door with your own hands, you should prepare the material. Boards or bars must be processed with a plane and sanded with sandpaper or a sander. You should also prepare a shield if you plan to have a hollow door inside. It is worth deciding in advance on the method of attaching the boards. Common connections are:
- half a tree;
- tongue and groove
Measurements and markings
When making a door on rollers with your own hands, you must take into account that the door leaf should be several centimeters larger than the opening on each side. If the passage does not exceed 80 cm in width, then a single-leaf door is made. When the opening width exceeds 1 m, 2 panels are made. All dimensions are transferred to beams or boards.
Manufacturing
To make frame sliding doors with your own hands, you need to make a frame. Pre-prepared beams are cut according to the drawing. If the structure includes panels, recesses are made in the inner part of the frame and lintels using a milling machine into which the inserts will be mounted.
The joints of boards or beams are coated with wood glue or PVA. Wood should be treated with an antiseptic to protect the material from rotting and the harmful effects of insects. Additionally, the structure is coated with fire retardants, which prevent the wood from quickly igniting.
To make a sliding door mechanism with your own hands, you will need:
- upper and lower guides along which the canvas will move;
- a wooden beam to which the top rail is attached;
- rollers and fastenings corresponding to the weight of the structure;
- clamps that prevent the web from coming out of the rails.
Paneled
First, a frame is made from solid boards or laminated veneer lumber. The cross members and the mullion are made from this material. On the inside, the timber is processed with a milling cutter, making a groove for the panels. If you make a shaped cut, you don’t have to use glazing beads. When it is planned to install the latter, the surface near the groove is made smooth.
Vertical and horizontal elements are connected to each other using a tongue and groove. The tenon is cut out in the transverse parts. It should fit into the groove up to half the width of the beam. The recess is adjusted to the dimensions of the tenon so that the parts fit tightly into each other.
The panels can be:
- glass;
- plywood;
- chipboard;
- thin boards, etc.
Inserts can be smooth or have a textured surface. In the second case, plywood or boards are used, which are processed with a milling machine. The edges of the product should be 1-2 mm smaller than the groove in the frame. This will allow the panels to move freely. When all the elements are ready, they are treated with antiseptics.
Assemble the entire structure on the table to avoid distortions. The joints are coated with glue. First, all the crossbars and panels are inserted into one longitudinal beam, then the second vertical beam is glued. The beads are installed after assembling the entire structure and are fixed with glue.
Panel
This structure can be solid, small-hollow or hollow. The first type consists of a frame and boards that are laid between the vertical elements. Hollow and shallow-hollow contain transverse elements that give rigidity to the entire structure.
First, a frame is made according to the size of the canvas. To do this, cut a beam with a section of 30x120 mm according to the drawing. The elements are connected to each other by fastening in half a tree or in a paw. The surfaces are coated with glue and clamped with clamps. It is necessary to ensure that the internal angles are 90°.
After the glue has dried, the joints are additionally secured with dowels. To do this, make holes of 7-9 mm and insert dowels pre-treated with glue into them. Then one side of the frame should be covered. The material chosen is plywood or fiberboard, which is cut to the size of the frame. The facing material is fixed with glue.
If the structure is solid, then the frame is filled with timber, pieces of MDF or other low-quality wood. All parts are glued together and additionally glued to the facing sheet. In the frame of hollow or hollow-core doors, cross members are installed, which are fixed with glue to the sidewalls and facing material. The second sheet is installed only after the glue has completely dried.
Advantages and disadvantages
When talking about the strengths and weaknesses of sliding doors, you need to be very careful. The appearance on the market of more advanced models, on the one hand, adds advantages to their characteristics, on the other, levels out or completely removes some of the disadvantages.
As of the beginning of 2021, the sliding door system has the following advantages over swing doors:
- The usable area of the room is saved by eliminating the area required to open classic doors;
- longer service life due to the absence of diagonal load - the swing door constantly strives to take the shape of a diamond;
- original, fashionable, stylish - such characteristics enable creative people to realize the most unusual design ideas;
- fit harmoniously into any interior style;
- high safety: they cannot open spontaneously when there is a draft - the design of the doors completely eliminates this possibility; fingers cannot be pinched, which is especially important for families with small children; there is no danger of breaking your forehead on a half-open door at night, or for children while playing and running around;
- open easily and silently;
- allow you to delimit the room into several zones, which is interesting for studio apartments;
- amenable to automation;
- there are no so-called “dead zones” where, with swing doors, nothing can be placed or placed;
- You can close an opening of any width.
There are also disadvantages :
- high price of the kit - fittings, mechanism, door leaf itself are much more expensive than swing doors;
- smells and sounds spread freely throughout the apartment;
- high installation cost - the problem can be solved by installing the system yourself;
- difficulty of repair - several years after installation, you may not find similar wheels on sale. Therefore, when ordering doors, it is better to immediately order an additional set of rollers;
- cannot be installed instead of entrance doors.
Preparatory work
To make compartment doors with your own hands, you need to do the following:
- Take preliminary measurements. All data must be accurate, since the design requires an exact fit, otherwise the mechanism may jam during movement.
- Prepare tools and materials.
- Make canvas and loot.
- Prepare the opening into which the structure will be installed.
- Assemble the door and install it.
- Adjust the design.
Preliminary measurements
Making compartment doors at home involves taking preliminary measurements. To determine the dimensions of the opening yourself, you need to take into account the dimensions of the wall, ceiling, and floor; Electrical appliances are not used in this case, only a tape measure. The design stipulates that the partition should exceed the opening by 5-7 cm in width. If there are 2 panels, each should be 2-3 cm wider than the opening.
Standard dimensions for the width and height of the opening are 0.6-1.8 m and 1.9-2.2 m, respectively. The opening is measured in 3 places: top, bottom and middle. This is due to the unevenness of the walls. Changes in size are taken into account if you plan:
- flooring;
- decorative wall covering, etc.
In order for the design of compartment doors to be correct, it is necessary to subtract the size of the covering from the obtained data or add it if the opening increases. Then the thickness of the walls is measured. If the walls are wider than 10 cm, install an additional element. This is a wooden plank that makes the loot wider.
If you use the cassette method of installation deep into the wall, you should dismantle part of the partition and erect a plasterboard box.
Tools and materials
Do-it-yourself installation of interior compartment doors is done using the following tools:
- roulette;
- pencil;
- hacksaw for metal;
- screwdriver;
- screws for fastening.
Tools needed to make the box and the canvas itself:
- jigsaw;
- a circular saw;
- hammer, chisels, plane, screwdrivers;
- electric drill;
- screwdriver;
- construction plumb line;
- sandpaper or sander.
The following materials and spare parts will be needed:
- Canvas. The material determines the weight of the structure, which affects the choice of fasteners and accessories. It is made from laminated chipboard with a thickness of at least 16 mm. Depending on the features, the canvas should be higher or lower than the opening. If you plan to install it on 2 rails, the door is chosen so that when open it is slightly larger than the opening, and when closed it is just as much smaller.
- Metal rail.
- Wooden beam 50x50 mm. Its length should be equal to the prepared rail.
- Rollers and fasteners for them. The mechanism must support the weight of the canvas.
- Platbands.
- Closers.
- Pens.
- Anchor.
- Self-tapping screws and decorative nails.
Required materials and tools
Installing sliding interior doors with your own hands requires the availability of the necessary materials and a set of tools. You will need:
- railing (crossbar) made of well-dried timber - for attaching the guide profile (rails);
- a sliding mechanism consisting of: a guide profile (other names: rail, runners); rollers (2 rollers for a door weighing less than 27 kg, 4 for a heavier leaf); limiters; flag roller;
- mortise lock;
- special handles for opening (closing) the door;
- sash made of aluminum, plastic, glass, wood or MDF;
- platbands;
- extras;
- wood screws;
- self-tapping dowel;
- hammer drill with a set of drills for concrete or brick;
- screwdriver - for drilling holes in wood and tightening screws. Can replace a drill or Phillips screwdriver;
- jigsaw or hand saw for wood with fine teeth;
- grinder or hacksaw;
- chisel;
- roulette;
- pencil;
- laser level or construction level.
Types of sliding systems
With all the variety of doors, the mechanism they use is the same, and the doors themselves can differ only in appearance.
There are several popular designs:
- Sliding doors;
- Cascade models;
- Harmonic;
- Multi-leaf systems;
- Radius systems.
Accessories
The unusual design requires such unusual fittings. If you are going to make sliding doors with your own hands, you need special locks, handles and other parts. The handles and locks for these structures look unusual - the handles are recessed into the canvas. This is done so that nothing interferes with the canvas when closing.
When purchasing or making a sliding door with your own hands, the door leaf can be equipped with all the necessary fittings, or everything will have to be purchased separately. In the second case, it becomes necessary to perform independent installation. When choosing, you need to carefully examine the accessories.
How the mechanism works
These doors are so called due to a different, not typical for city apartments, method of opening and closing. The systems operate via rollers that move along special guide profiles. When planning to make a sliding door with your own hands, you need to take time to choose a mechanism that will fit the door. The choice also depends on the number of leaves and the type of door.
The fact is that the systems differ significantly in weight. Therefore, different weight means different load on the entire system.
Telescopic (cascade) sliding doors.
When installing some types of doors, it is necessary to take into account the number of rollers in order to then select the correct guides for them. For example, if you plan to make cascading sliding doors with your own hands, then you will need to prepare two mechanisms for each leaf. The guide profile must have 2 grooves. It is also very important that cascade structures require one groove in the guide profile for each blade.
Here's how to make your own sliding doors. In the video you can see what mechanisms and fittings are used.
Installation instructions
The installation of sliding interior doors of various models has a single principle for assembling the sliding mechanism and nuances when attaching it to a load-bearing wall or ceiling. Therefore, we will consider the technology of constructing such systems using the example of instructions for installing sliding doors with your own hands.
For a more convenient understanding of the technological process, we will break it down into separate steps. Step by step it looks like this:
- a beam is attached to the wall;
- a guide profile is mounted to the beam;
- the recoil mechanism is assembled;
- fittings are installed;
- the door is hung;
- the opening is decorated.
Fastening the timber
Experts have two approaches to fastening the beam: some first attach it to the wall and then screw a guide profile to it, others, on the contrary, first hang rails on the beam and then fasten it to the wall. Our experience shows that the truth is somewhere in the middle. In practice, it is most convenient to work according to this scheme:
- a dry timber with a cross-section of approximately 50x70 mm is taken and cut to fit a sliding door (the length is equal to twice the width of the door leaf + 5 cm for attaching stops inside the profile);
- at least 4 holes are drilled in the side face with a screwdriver or drill (the diameter of the drill should be 1 mm less than the diameter of the self-tapping dowel);
- the extreme sliding points of the doors are marked on the wall, after which 2.5 cm is added on each side to install stops;
Important: the sliding door structure is attached to the wall only if it is made of brick or concrete. When the interior partition is made of plasterboard or plasterboard blocks, the entire system is attached to the ceiling or cassette doors are installed instead of compartment doors.
- the height for attaching the bar is determined. To do this, add up the dimensions of the rail, rollers (it is necessary to take into account that the wheels themselves are inside the profile) and the door leaf. 10 mm is added to the result obtained - the distance between the bottom of the door and the floor. Otherwise, the door leaf will constantly cling to the floor, making unpleasant sounds and interfering with the easy movement of the leaf;
- at the required height, the beam is applied to the wall, and then, using a level, it is brought to a strictly horizontal position (an error of a few mm leads to spontaneous closing or opening of the doors);
- Through drilled holes in the timber, marks are left on the wall for self-tapping dowels. This can be done using a screwdriver with a thin drill or a large nail, which must be hit with force with a hammer;
The holes for fastening are transferred to the wall.
- Holes for dowels are drilled in the wall using a hammer drill;
- dowels are driven into the holes.
Stop there. Now it is best to move on to the second stage, and then complete the first.
Installation of the guide profile
The complexity of the work on installing rails depends on the number of guides. If the sliding mechanism consists of two rails, then the scope of work is double. In this case, the whole process is divided into two parts: fastening the upper guide and installing the rail on the floor.
Attaching the guide to the beam. The step-by-step work algorithm is as follows:
- the guide is cut along the length of the beam;
Fastening the rail to the beam.
- holes are drilled in the profile for self-tapping screws, at least three (more is possible, less is not possible). Along the edges, the fastening elements are located 10 cm from the end, between them the remaining hardware should be at an equal distance from each other;
- Using a screwdriver at low speed, the profile is attached to the beam with self-tapping screws 8 cm or more in length;
- Rollers are inserted inside the profile and their progress is checked. If everything is done correctly and they slide easily, the beam is attached to the wall - the first stage of work is completed.
Installing the lower slide. The lower guide profile can be installed in two ways:
- into a groove in the floor - it is grooved along the entire length of the rail, where the profile is then attached using self-tapping dowels;
Important: the length of the bottom rail is always 5 cm shorter than the top - limit stops are not placed below.
- the guide profile is attached on top of the floor covering, i.e. without a groove. To avoid clinging to the rail when crossing the door threshold, it is covered on both sides with a metal threshold.
If there is no bottom rail, a flag roller is installed on the floor - it should direct the movement of the door below (to prevent the door leaf from oscillating in the transverse plane). It is attached to the floor with small (15-20 mm) self-tapping screws, for which holes are drilled. A groove is cut out at the bottom end of the door for the flag roller, 18-20 mm wide than its diameter.
The flag roller is installed.
Assembling the recoil mechanism
The mechanism is assembled according to the manufacturer's instructions. For example, some recommend installing rollers immediately along the edges, others, retreating from the edge by 1/6 of the width of the doors. However, there are general installation rules, which we will present here.
1. Place the roller platform on top of the end of the door leaf as recommended by the manufacturer and center it, while simultaneously checking that the distance from the end is the same on both rollers.
2. Use a pencil or marker to mark the locations for the hardware, then drill holes for the screws (the drill should be 1 mm thinner than the screw).
3. We set up the platforms and screw in the fasteners. The length of the screws is at least 7 cm. They must enter the door leaf strictly vertically. Therefore, you need to tighten the screwdriver at low speeds.
4. Threaded supports for rollers are inserted under the fixed plates, which are secured with a special cover located on the side of the platform.
5. Rollers are screwed onto the supports.
Lock and handles installed
Installation of fittings is also carried out according to the manufacturer's instructions. The process is simplified if the door leaf was purchased - all the grooves and recesses for the lock and handle are made in the factory. All that remains is to do a simple job - tighten the screws.
Installation of accessories.
When making a door leaf on your own, you will have to tinker a little: mark the location of all the fittings. Using a chisel and drill, hollow out recesses (grooves) under the lock and handles, and then take it all with self-tapping screws.
After installing the doors on the guides, mark the location of the lock and handle tongue at the end of the opening, drill small recesses under them, and secure the bar.
Hanging the door
After assembling the movement mechanism and fittings on the canvas, the door is carefully inserted into the rail from the end. If there is not enough space to perform such a procedure, do this - remove the beam with the guide profile from the wall, insert rollers inside the rail, and attach the entire structure to the wall. The occurrence of such a situation can be anticipated and not fastened to the wall until the entire system is fully assembled.
The process of installing a sliding door is completed by installing limiters at the ends of the guide profile to prevent the rollers from leaving the internal space of the rail.
One of the types of retainer (stopper).
Installation of limiters.
Final work
The process of installing sliding doors is completed by decorating the doorway and adjusting the sliding mechanism. An extension is attached to the doorway and trims are nailed.
The doorway is decorated.
After this, the door moves several times in different directions until it stops. If any problems arise: stiff movement, noise, etc., the rollers are adjusted using the nuts on the bracket. You can see how to quickly perform such work in the materials on our website: “Installing extensions on interior doors with your own hands” and “Installing trim on doors,” where a step-by-step analysis of the technologies is provided.
To help, you can watch a video with a lesson on installing sliding doors.
Mounting options
Regardless of the sliding door system, installation methods can be:
- Sliding doors. Guides are fixed on the wall along which the canvas rolls.
Sliding doors. The guide is mounted on the wall above the correct opening
- Cassette. A special niche is made in the wall into which the door leaf is hidden. They are also sometimes called “retractable.” Cassette sliding interior door: the door is hidden in a wall niche
- Cascade. They consist of one fixed blade and several movable ones. The movable ones, if necessary, move and hide behind the fixed part.
Cascading sliding doors: one leaf pulls the other
The simplest installation option is sliding doors. They can be installed independently, not only at the repair stage, but also after it. It is only important that the opening is smooth and the wall has normal load-bearing capacity. The disadvantage of such a system is that you cannot place anything close to the wall in the place where the door rolls back. There is one more thing: very low sound insulation. This is easy to explain: if you look from the end, there is a gap of several millimeters on the sides. It is necessary so that the canvas does not “shuffle” along the wall. And all sounds penetrate perfectly through it, becoming only a little quieter.
Cassette doors are good because when open, the door leaf is located in a niche in the wall and does not interfere. The second advantage is that seals can be installed around the perimeter of the opening, which provide much higher sound insulation performance. The disadvantage of installing a sliding door in a niche is that it can only be done at the renovation stage. The second drawback: to make a pencil case for sliding doors, they usually install a false wall, and this means stolen centimeters of space.
Cascade doors are one of the types of sliding doors. It simply has a larger number of guides: according to the number of movable door leaves. Installation is perhaps the most difficult: there are many parts and high installation accuracy is required. The systems belong to the elite category, and they rarely save on installation: repairs will cost more.
Care and operation
There are no mechanisms in nature that would serve for a long time and without problems without care. The same situation applies to sliding doors. Here are a few simple rules that will significantly extend the service life of sliding doors.
- Water should not be allowed to come into contact with a wooden canvas - it may lead to damage. We'll have to change it.
- Clean the guides regularly - debris accumulating there prevents the doors from sliding easily.
- Do not use excessive force to move the door leaf. There can be two troubles here: accelerated wear of the roller coating - the ease of sliding will disappear and unnecessary noise will appear; the stopper will fall out and the door will “pop out” of the profile.
- Check the condition of the rollers at least once a year. If they jam, you will have to change the entire structure.
Materials for making sliding doors
The reliability of the structure will also depend on the quality of the materials from which it is made, so special attention should be paid to this point.
The sliding system is a mechanism that consists of guides, rails and rollers. It can be made from various materials:
- Steel. It is these durable mechanisms that are best suited for installing heavy interior doors. They securely fix the canvas and do not deform under load. The only drawback is the noticeable noise when the doors move.
- Aluminum. Guides made of this metal should be chosen only if you plan to install a weightless canvas. One of the advantages of such a mechanism is the silent movement of the canvases.
- Plastic. A mechanism made from this material is used only for simple hinged doors.
It is recommended to use only durable, steel guides
Note! An equally important point is the choice of material for the canvas itself. In this case, the purpose of the structure will be of great importance.
Prices for different types of sliding door guides
Guides for sliding doors
Table No. 3. The most popular materials for making door leaves.
| Material | Description |
| Wood | Sliding doors are usually made from natural solid wood, which are best suited to a classic interior. It should be taken into account that the canvas will have a large mass, therefore the fastenings must be as strong as possible. In addition, if you make your own door from natural wood, you need to take care to protect the structure from fungus using special treatment. |
| MDF or chipboard | Such materials are often used to make doors, because they are much cheaper than natural wood, but at the same time have good resistance to temperature changes and humidity. However, it should be noted that MDF is much easier to saw - it is from this material that a structure of any shape can be cut. In addition, it is environmentally friendly compared to chipboard. Most often, craftsmen prefer to choose laminated panels, because such a door does not need to be primed or painted. It is strictly not recommended to use chipboard for sliding doors in a children's room, because this material contains toxic synthetic resins. |
| Plexiglas | In this case, we are not talking about standard glass, but a special organic material that is resistant to mechanical damage. Such doors have an unusual appearance - they can be matte, glossy, with or without various patterns. Of course, such a canvas serves as a decoration rather than as protection from noise or prying eyes. An excellent replacement for glass construction are polycarbonate sheets. This material also has an unusual appearance, but it is quite durable. Another obvious advantage of polycarbonate is the huge variety of colors. |
Glass doors are often used by designers to create respectable interiors.
If you have the desire and opportunity, you can combine the listed materials. Some craftsmen prefer to install glass or mirrors in wooden doors.
Important point! It is important to use only high-quality material in your work, otherwise the door leaf may become deformed. This especially often happens when natural wood is poorly processed and dried.
Prices for different types of MDF panels
MDF panels
Little tricks
Some advice from professionals will help improve the quality of assembly of a sliding interior door.
- The sliding leaf should be higher than the previously standing doors.
- When installing a pencil case, sockets and switches are removed from its area.
- To improve sound insulation, seals are attached to the canvas.
- Manufacturers produce pencil cases for different types of walls. Don't lose sight of this moment.
- Polyurethane foam is not used to fill the technological gaps of the foam structure due to its high expansion coefficient.
- A plumb line shows the vertical more accurately than all other tools, including a laser level.
- Before inserting the rollers into the profile, the latter is thoroughly purged - small chips left inside after the drill, debris and scale will hinder the movement of the doors.
- No matter how smoothly the doors slide, microvibration affects the fasteners, causing them to weaken. Glue or sealant applied to the threads will help prevent unauthorized unscrewing of screws and nuts.
Instructions for installing sliding interior doors video
The installation method discussed above has many advantages, but most importantly, it is extremely simple. We looked at each stage step by step, but an inexperienced person who has never done anything like this may have a lot of questions.
In this case, we have prepared for you a useful video instruction that will help you pay attention to the most important details:
- preparation of the opening and walls;
- assembly of interior sliding doors;
- correct fastening of the bars;
- filling cracks with polyurethane foam;
- processing of joints and so on.
After watching this video instruction, you will have a complete understanding of each step. Moreover, you can complete the installation yourself. The roller helps determine the type of tools that may be needed during the work, as well as the amount of materials and fasteners. You get a lot of useful information that will certainly come in handy during installation.
Choosing the look and design
Buying interior doors is a responsible matter; the market offers a huge selection of sliding structures that can fit favorably into any interior.
According to the shape and method of fastening the guides, they are divided into the following types:
- Straight and semicircular, which are used for both cabinets and rooms. They can be quite original in design.
- Compartment interior doors mounted in the upper part of the opening, on the ceiling, floor or wall. Such a variety of fastenings allows them to be used in almost any room.
Semicircular doors with lighting Simple sliding doors Wooden sliding doors for a room Radius sliding doors Original version of radius doors Linear sliding doors for furniture
You can buy any of the listed options. Installation can be done with your own hands without any problems, and the price will depend on the finishing materials and the complexity of the mobile mechanisms.
Attention: The use of compartment doors with lower guides is fraught with a violation of the aesthetics of the room and the occurrence of some inconveniences associated with the accumulation of dust and dirt in the slats. Because of this, some time after the start of operation, the structure takes on an untidy appearance, to which is added the difficult movement of the rollers.
The use of compartment doors for the arrangement of small apartments or studios, which require separation of zones, is difficult due to the violation of the integrity of the interior. In order to hide this drawback, it is recommended to mount the guide system flush with the floor.
To do this, you must first prepare a recess in it into which the lower slats will be inserted.
Example of zoning for a living room and bedroom
To give the structure strength and stability, it is recommended to install a series of upper rails along with the lower guides. This requirement is mandatory if the owner decides to use not light chipboard sheets, but heavy doors made of wood and glass (see Installation of glass doors in residential and public buildings). The main load in this design is borne by the bottom row.
For installation of such heavy models, stronger and more durable rollers are provided. Often, compartment doors with rollers only on the top panel are used to arrange the space.
Depending on the location of attachment, these partitions are divided into 2 categories:
- Mounted , which are mounted along the ceiling or wall;
- Hanging models , the panels of which are attached to the top of the doorway.
Hinged rollers in compartment doors
The first type of partition is similar to curtains. The movement system of hinged compartment doors is hidden in decorative panels. Their drawback is that the doors do not fit tightly to the wall, which eliminates sound insulation of the room.
This system of fastening partitions also does not allow furniture doors to be placed along the movement area, which reduces the possibilities for arranging the interior.
Hanging models of compartment doors are more practical. Their use allows not only to divide the space into zones, but also to make a certain contribution to the decor of the room. Suspended structures fit more tightly to the wall, and therefore have greater sound insulation.
A special type of compartment doors are sliding models. A distinctive feature of such structures is that they do not move along the walls, but slide into them.
This occurs due to the installation of a special cassette inside the wall. Sliding models compare favorably with their analogues due to the possibility of the best organization of space. Their disadvantage is the high labor intensity and cost of the installation process.
The video of interior sliding doors will also help you choose the desired design option. Pay special attention to the mounting base and the wall, because the choice of the mechanism itself will depend on this.