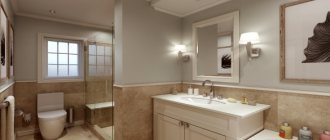
Advantages and disadvantages of a shower stall
Users willingly share positive impressions received during the operation of the purchased hydrobox:
The system is not strictly tied to the bathroom and can be installed in any suitable place - as long as there is access to utilities.
Hydroboxing is an ideal solution for apartments with large unoccupied niches, into one of which you can squeeze a modern shower.
The market offers many options for booths (straight, triangular, semicircular), among which you can always choose the one suitable for specific installation conditions.
Saves space, taking up much less space than a bathtub. Allows you to save water.
Design
When thinking through the question of how to make a shower stall at home with your own hands, you first need to decide on its location:
- The most convenient are corner booths, located in a free corner of the room between two walls. In shape, these structures are triangular, square and rectangular, as well as semicircular;
- booths, consisting of two side walls and a door, are installed with the rear open part to any wall;
- There are minimalist designs of one front side, which overlaps a suitable niche, forming a closed volume.
The base of the cabin can be arranged differently: low and high pallets on the floor or podium.
Plan
To properly make a shower stall with your own hands, you need to draw a plan of the bathroom. And then model possible options for placing a niche depending on the location of the rest of the plumbing and furniture, the availability of free space and the features of the cabin.
First, the requirements for the size and design of the cabin are formulated.
If you plan to use a shower tray, then everything is simple with the dimensions - you need to add to one of its dimensions the width of the plasterboard partition of the niche, if it is in the corner of the room (or two widths, if the niche is not in the corner).
Then, on a scale, they cut out a projection of the shower stall from paper and see how it “fits” into the geometry of the room on the plan. Based on this, choose the type of door:
- Swing. It is necessary that the free space in front of the cabin is larger than the width of the canvas
- Sliding. Suitable for a rectangular niche, the minimum size of the facade of which must be at least 140 cm. Another option is a radius door model for a corner cabin
- Folding: accordion or book. Apart from the number of sections, these doors have no other differences: the book has two, the accordion has three. This is the best option in limited space. But the mechanism has the lowest service life compared to the others.
The minimum door width should be about 80 cm. Although there are factory models less than 70 cm, it is difficult to call such a narrow cabin comfortable. The optimal size of the width inside the niche is 90-100 cm. And the specific choice depends on the anthropometric characteristics of family members.
But even in this case, there are two options: choose a factory door or order an original product from a company specializing in the manufacture of glass partitions and doors. There you can not only make a canvas and select fittings and mechanisms for it, but also select glass processing from the photo in the catalog - matting, tinting, drawing, etc.
If the cabin is square, then the depth of the niche should be slightly greater than the width of the swing door. And for a folding door, you also need to add at least half the width of the section.
For a rectangular cabin, the optimal depth of the niche, as well as the width, is 90-100 cm.
When calculating the thickness of the partition, the following conditions are used:
- Guide profile width – 50-75 mm
- On each side of the partition it is better to use not one, but two sheets of gypsum board with a thickness of 12.5 mm.
- It is necessary to add the total thickness of the coating waterproofing, adhesive mortar and tiles on each side of the partition.
Thus, the width of the partition lies in the range of 120-150 mm.
After choosing the location and design of the niche, the preparatory stage begins.
Location
The problem of choosing a suitable location for a shower stall in spacious apartments and cottages is irrelevant.
Everything here is based on considerations of harmonious arrangement of living space, as well as the availability of utilities. The situation is more complicated with small apartments, where every centimeter counts.
For example, we make a shower without a tray with our own hands in a cramped bathroom. We need to remove the large bathtub, install a shower stall, and as a result we get additional space for a flat-top washing machine, although previously there was no room for it.
Shower doors
If the cabin is rectangular, everything is solved more or less simply: the rectangle can be cut out of glass in the workshop. There are many canopies for glass doors, you can choose the one that is more convenient for your case. Just order doors with canopies: you will have to drill holes for them, and it is best to try them on.
It is advisable to take tempered glass. Even if it breaks, it will be into small fragments with blunt edges that are difficult to injure. But, most likely, the fragments will remain hanging on the film. The downside of this glass is that it is expensive. To save money, you can order a regular thick one - 5-6 mm, and at home cover it on both sides with a translucent polymer film. You will have to tinker, but the effect will be almost the same as with tempered glass: the fragments will be on the film.
The simplest, but most expensive option is to install glass doors in a homemade shower stall
One point: the glass is washed before applying the film, then degreased. The film is glued to wet glass. This makes it easier to expel air bubbles, and you can also move the film for a while.
If you don’t want glass doors, but need translucent ones, you can make them from polycarbonate, but not cellular, but sheet. You will have to find a suitable furniture profile, make a frame out of it, and put polycarbonate into the frame with sealant. For reliability, you can also attach it through with screws and washers.
Another option is to buy ready-made doors. There are also glass ones specifically for cabins, or you can use plastic folding “accordion” ones, as in the video.
Remember your neighbors
By the way, you need to know that building codes prohibit installing shower stalls with fences outside the bathroom, since then, due to high humidity, problems in neighboring apartments are possible.
How to make a ceiling with your own hands - 135 photos and video descriptions of how to make various types of ceilings- Combined bathroom - stylish design methods and examples of competent interior selection (125 photos)
How to install an interior door frame with your own hands - 130 photos and step-by-step installation video
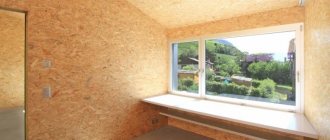
Wall covering
When the main points have been completed, everything necessary has been purchased, the exact plan for how to make a shower stall with your own hands is known, you still need to decide what material the walls should be made of, exposed to the powerful effects of water and hot steam.
In principle, the walls can have any coating, but everything there must be treated with a water-repellent composition and an antiseptic, otherwise within a month black mold will appear in the booth, which will then have to be dealt with separately.
Do not forget that while taking a shower, splashes of soap or shampoo will fly in all directions. The walls must be even and smooth, so that to wash the surfaces it is enough to splash water on them.
How to choose the right place
The main limitation of any shower stall is the size of the bathroom and the availability of communications for draining wastewater into the sewer system. Before proceeding to the design of this structure, it is necessary to perform a number of preparatory works, namely:
- Thoroughly inspect the water supply and sewerage systems for leaks, corrosion, and the quality of sealing and connecting elements. If problems are detected, it is necessary to replace areas and elements in unsatisfactory condition.
- Assess the condition of the building envelope: walls, ceiling, floor. The floor in the intended installation location of the shower cabin should be given special attention: adjust the level, and, if necessary, carry out work on arranging additional waterproofing.
Important! Unlike a hydrobox, a shower stall is a fairly open structure, which can cause direct contact of water with the enclosing structures of the room (walls or partitions), as well as exposure to moisture on the power supply system. Before installing a shower cabin, you need to take care of replacing electrical appliances with devices with increased moisture protection
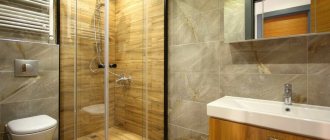
Do you need a pallet?
Shower stalls without a tray are usually installed in public baths, swimming pools or water parks. It’s very convenient to go there because you don’t have to cross a barrier.
However, this is also the cause of frequent cases of injury, since a person does not see the boundary between a dry floor and a wet one, which is why he can slip and fall.
- How to make a heated floor with your own hands - 160 photos and video description of how to make a heated floor
Laying tiles in the bathroom with your own hands: 150 photos of how to lay large areas with tiles quickly and easily
Do-it-yourself slopes are the cheapest and most durable slopes. Instructions and advice from experts (video + 125 photos)
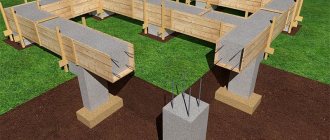
Preparation
A plasterboard shower stall is made during a major bathroom renovation. At this stage, the following general work is carried out:
- Cleaning walls, ceilings and ceilings of old coatings
- Distribution of water and sewer pipes to connection points for plumbing fixtures (including shower stalls)
- Leveling the walls (plaster or covering with moisture-resistant gypsum board)
- Preparation of the subfloor (correction of floor defects, waterproofing using coating and roll materials, pouring screed)
When the screed is “ripe”, you can start making a niche.
Optimal height
No less dangerous are “symbolic” pallets that people cling to with their feet. The optimal height of the side is up to 15 cm.
If you miss the bathtub, it is better to choose a tray up to half a meter high. You can get hot water there and soak yourself, at least while sitting.
Is it possible without a pallet?
Don’t risk installing a shower in a city apartment without a shower tray. Mistakes with waterproofing have dire consequences - destruction of structures, flooding of lower neighbors.
In addition, connecting the drain to the sewer can only be done using a siphon, which will cause certain difficulties in the absence of a pan. A shower without a tray is better suited for a country cottage.
Algorithm of actions
Experienced craftsmen, when asked how to make a shower room with their own hands in an apartment, answer: separately buy everything necessary for the implementation of the project - building materials, tray, door and walls, fittings, mixer, and then, without involving specialists, bring your idea to life by connecting the hydrobox to utilities, and carrying out final finishing.
Installation of a shower drain
First, you need to make a “trough” from coating bitumen-polymer waterproofing, in which the screed for the shower drain and threshold will be poured. If this is not done, then when the screed matures, the moisture from the solution will saturate the lower part of the gypsum board sheathing.
Then, using a cement-sand mortar, the drain body with a water seal is set and fixed at the required height and connected to the sewer pipe.
The location for installing the ladder is chosen depending on its shape. If it has a round or square grille, it is usually mounted in the middle of the floor. A linear shower drain is often located next to the wall on which the shower set is installed.
Install the formwork for the threshold from two parallel boards. A couple of metal rods are placed inside. The height of the formwork must be higher than the level of the ladder.
Fill the threshold with cement mortar. After two or three days, the formwork is removed.
The slope of the floor from the walls and the threshold of the shower stall to the drain is formed from wooden slats - at least 1% (per 1 m - 1 cm).
Fill the screed. The level is formed by beacons using a rule. The next day, the beacons are removed, a solution is placed in their place and the surface of the screed is smoothed.
After the screed and threshold have matured, a hydrophobic primer is applied to their surface and the walls of the shower cabin, and then a coating polymer-cement waterproofing is applied.
The last stage is laying the tiles and grouting the joints.
DIY shower photo
Tell your friends