- Peculiarities
- How to install a compartment door with your own hands: sequence
- Selection of materials
- Measurements
- How to calculate the door leaf parameters?
- What else should you consider?
- Connecting bracket PU09
- Height adjustment
- Adjusting the Bottom Guide
- What other points does the installation instruction for interior compartment doors include?
- How is the opening made?
- Instead of a conclusion
Having decided to renovate your house, you have probably encountered such a problem as choosing interior compartment doors. They will not only help solve the problem of lack of free space in the room, but will also allow you to quickly combine two rooms into one.
Having understood the principle of the design and the features of its assembly, you can quickly install interior compartment doors with your own hands.
This will not only save money, but also be 100% confident in the quality of the existing mechanism.
After reading this article, you will easily understand the nuances relating to the topic under consideration and will be able to quickly install an interior compartment door, the step-by-step installation of which is described here.
Peculiarities
Installation of products will help solve the problem of lack of free space in the house. The mechanism opens easily and does not slam shut due to drafts. If everything is configured correctly, unnecessary noise is eliminated, the system operates in its calm rhythm, without unnecessary haste, the room has reliable sealing when the air conditioner is running. Materials such as MDF and wood, laminated chipboard and tempered glass, as well as a combination of your favorite ones are used in production options. Depending on this choice, the weight will change, which will certainly affect the design of the sliding mechanism and the required number of carriages with rollers. For example, a blade weighing 45 kg is provided with 2 carriages.
Installation of sliding doors
There are different models of sliding sliding doors. They may differ slightly in design, but the general assembly and installation rules are the same.
The following requirements must first be met:
- Align the walls of the entrance opening so that you do not have to purchase a large door leaf that can hide all the flaws;
- The entrance walls must have increased load-bearing capacity;
- The entrance opening must be completely finished: plastered, painted or covered with other finishing materials.
Assembly of the canvas
After preparing the opening, you can begin assembling the interior door block. It is first necessary to install rollers on the ends of the door leaf. Each manufacturer offers step-by-step assembly and installation instructions for its model. Therefore, the rollers can be fixed from the corner of the blade at the distance of the mounting plate or at 1/6 of the length of the end part of the blade.
Installation of rollers
The rollers must be centered, i.e. they should be located at equal distances. To do this, using a plate on the end of the canvas, the places where the rollers are fixed are marked and holes are made. In this case, take a drill with a diameter 1 mm smaller than the diameter of the screws.
Next, the plates are secured with self-tapping screws, the length of which is selected depending on the weight of the door leaf. Fastening elements should not be shorter than 7 cm. To avoid unnecessary stress, it is recommended to tighten the screws strictly perpendicular to the base.
Support elements for the rollers are inserted into the fixed plates. They are fixed on the side surface using a lid. Next, you need to fix the platforms for the rollers on pins, the ends of which have threads for this purpose.
Fastening the fittings
Before installing the door leaf into the opening, it is recommended to install the lock and handles. In this case, special mortise-type fittings are used. If the delivery package of the door block includes handles and locking mechanisms, then installation sites for them have already been prepared.
If the canvas and accessories were purchased separately, then all the necessary recesses and holes must be made independently using a chisel and an electric drill. In this case, it is necessary to pre-mark the areas for fixing the fittings elements.
Installing the guide
When the rollers are already installed and secured to the door leaf, it is much easier to determine the location of the fastening of the guide elements of the door structure. In such a situation, it is clearly clear at what height to place the lower edge of the guide rail for the rollers.
The most convenient option for fixing the rails is on a wooden rectangular beam, the minimum cross-section of which should be 5x7 cm, and the length is equal to the width of the door leaf multiplied by 2, plus an additional 5 cm. The guide rails should have a similar length.
The guide is attached to the beam with at least 3 screws: 2 at the edges, with an indentation of 10 cm, 1 in the center (there may be more fixation points, but not less than three). In this case, it is necessary to use only self-tapping screws, the length of which is at least 8 cm.
Next, the beam with the rail is rolled onto the rollers of the canvas, the doors are placed against the opening, and markings are made on the wall to secure the guide structure. It is imperative to add about 1 cm so that the lower part of the canvas does not come into contact with the floor base. And if additional installation of flooring is planned, then its thickness must also be taken into account. There must be at least 4 fasteners.
After drawing a line on the wall to install the guide, holes are first drilled in the wooden beam. Then it is applied back to the wall along the marked line and through the holes made, using a nail, the places for drilling holes in the wall are marked. If the wall allows, it is recommended to use anchor bolts or self-tapping screws 12 cm long to fasten the guide bars.
After securing the beam with the rail above the entrance opening, you can hang the door leaf. To do this, the rollers are inserted into the rail, after which its edges are blocked with clamping screws. And a flag roller is mounted on the floor base to prevent the door from tilting vertically. At this stage, the installation of the sliding structure can be considered complete.
How to install a compartment door with your own hands: sequence
You will need wooden wedges, a drill and a screwdriver, screws and a tape measure, foam for installation, a building level, and a plumb line.
The system operates simply. It is based on a guide rail and rollers. They are attached to the edge of the future product, and on the sides they fix elements that limit movement. This ensures easy movement of the structure above the floor.
Before installing an interior compartment door with your own hands, you should prepare materials such as guides, false panels and trims, as well as purchase stoppers, wooden beams and fittings.
Keep in mind that some space is left between the trim and the door partition; they should not touch each other.
Installation instructions for sliding doors
Only a true professional can install a multi-leaf structure, mirrored doors or large-weight products. A novice master, having taken on such responsibility, is capable of making many reckless actions, which will later prove costly.
Therefore, if this is your first time encountering sliding structures, start with the simplest option - assembling compartment doors. If you purchase a ready-made kit, you will save a lot of time and effort. The kit contains all the components for installing the sliding system, including fittings.
When starting work, you should be extremely careful and careful. The whole process begins with preparing the opening. The quality of installation depends on how accurately its measurements are made.
The height of the opening is determined in several places: the right, middle and left sides are measured. Its width is measured in the same way . Then check how perpendicular and straight all sides are. When installing platbands, measure the thickness of the vertical surface in several places and in the corners of the opening.
The height of the opening is measured in several places
To avoid mistakes when installing sliding doors with your own hands, carefully follow these instructions. Break the whole process into blocks and gradually move from one to another.
Removing the old door
Empty the box from cashing, remove the old door leaf and door hinges, and then dismantle the box itself. However, you can leave it alone if it holds well and does not interfere with the doors moving freely on the rails.
At the first stage, the old door frame is dismantled
Preparing the opening
If necessary, eliminate the curvature of the walls, seal the gaps and cracks with putty.
The contours of the opening should be smooth, so make sure that there are no bricks or drywall sticking out anywhere.
Check how parallel and horizontal the part of the opening is from the top to the floor covering. The maximum maximum deviation is allowed up to 5 mm. This is also mandatory for the sides of the opening. Here the tolerance is a maximum of 0.5 cm per 2 m .
After dismantling the old box, a new one is installed. It is leveled with small wedges. Adjust the angle of the structure relative to the floor covering and vertical surface by moving or pressing the wedges.
Wooden wedges are used to level the door frame
Secure the box with screws. When working with a screwdriver, you must be extremely careful so as not to damage the product.
Installation of the upper guides
After placing the box, place the door against the opening and mark its top border. Repeat this action again, placing the product in the opening. This is only necessary if the floor is not very level.
Installing the Top Rail
If the straight line turns out to be horizontal, measure 0.7 cm from it and draw another line. A wooden beam will be installed on it in the future. To fasten the beam, take enough screws so that it fits tightly to the vertical surface.
The rail is fixed to the lower end of the beam. First, it is slightly screwed on one side. To accurately determine the location of the self-tapping screw, the thickness of the leaf is divided by two and added from 0.3 to 0.5 cm, which are necessary for the smooth movement of the sashes. Follow the same principle on the other side.
Before fixing the guide, make sure it is straight.
Before the rail is finally fixed, make sure that the gap between the canvas and the wall is sufficient. Also pay attention to the straightness of the guide. No kinks or curvatures should be allowed, otherwise the structure will not work properly.
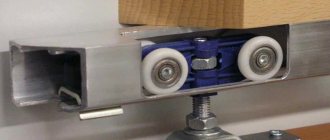
Assembling carriages and installing limiters
Moving on to installing the sliding door rollers, insert the bolts into the carriages so that they protrude slightly from the hole. Run the carriages into the rails prepared for them and make sure that they move smoothly.
The next step is to install the carriages
Stoppers should be installed at both ends of the guides to prevent the canvas from leaving the rails. In this case, make sure that the rubber shock absorbers are directed inward.
Making a groove at the bottom of the door leaf
To make a recess in the lower end of the sash, step back 1.5 cm from its edge on both sides and drill one hole with a radius of 3.5 mm and a depth of 2 cm. Between them, in the center, select a groove for the guide.
A groove for the guide is selected in the center of the sash
The depth of the recess should be 1.8 cm, and the width should be 0.3 cm greater than the width of the guide, which is a flag or a knife. Taking into account that it is not easy to make a completely even groove, it is recommended to mount two slats or a profile in the shape of the letter “P”.
Fastening to carriages
Moving two millimeters away from the side borders of the sash, fix the fasteners to the carriages exactly in the middle. An important point: the cutouts on the brackets in the shape of a semicircle must be directed towards the wall .
Hanging the door leaf
You won't be able to install the door alone, so call someone to help. Once you find an assistant, start doing the following:
- Place the product against the rail and connect the carriage bolt on the right with the cutout on the bracket, while lifting the blade.
- Place the end of the bolt into the hole of the adjusting nut and washer.
- Lightly tighten the brackets onto the carriage bolts.
- We proceed to installing the bottom rail into the recess. To do this, move the lower part from the vertical surface, install the canvas horizontally and move it to the open state.
- Measure the maximum opening length and mark it with a simple pencil.
- Establish a gap between the sashes and the vertical surface. To do this, move the lower part of the blade and put a mark at the location of the knife. The distance should be no more than 0.5 cm.
- Remove the canvas and tighten the guide from below to the floor covering with two self-tapping screws.
- Align the notch in the end of the canvas with the rail and hang the products without screwing the nuts all the way.
- Set the gap between the floor covering and the product by tightening or loosening the adjustment bolts on the carriages.
- Secure the nuts without allowing the bolts to turn.
Decorative design
To hide the rails at the top of the opening, platbands are used for decorative purposes. The lock and handle are installed at the end.
Selection of materials
The reliability of the product will depend on the type of materials used. Aluminum, steel and plastic guides are the most famous in the furniture market.
In the first case, parts made of such metal will be useful if a weightless door leaf is being installed.
Steel and aluminum do not deform under load. This is a suitable option for arranging heavy structures.
Plastic is suitable for simple products.
The choice of door leaf material is also very important. The appointment will play a big role here.
Usually the cost of glass filling is quite high. The weight is significant, therefore, the installation of additional carriages will be required. To avoid distortions, you need a competent drawing. Such products are not the easiest to install. The same applies to solid wood.
If we consider panel materials such as chipboard, MDF and OSV, it turns out that these options are easier to install and their price is lower. Two carriages will be enough for each sash; weight is not a hindrance. If you need to restore a door leaf, you don’t have to contact a professional technician. It is quite possible to cope with this task on your own.
Homemade sliding doors
Any door leaf can be installed on rollers and will work as a sliding door. The guide and all other components - rollers (carrying and flag), stoppers, stops - can be purchased. Hang on them at least a piece of plywood or a door assembled from several boards. This will be the simplest and cheapest option. But making the mechanism yourself is a more difficult task. One of the options for a sliding door mechanism made from scrap materials (from round pipes of different diameters) is in the video. The system was intended to be installed in a closet, but judging by the design, it can easily withstand even a solid oak door.
Measurements
When installing, it is important that measurements are taken accurately. If installation is carried out in a new building, it is worth considering how the finished floor will be located. This is taken into account in the calculations.
If you are making repairs in a residential building, not only the frame, but also the platbands are first removed. After the existing section of the wall has been cleaned, you have decided that you do not plan to strengthen or expand the walls, the next stage begins - choosing an installation method.
This will help not only to take correct measurements, but also to understand how to position the structure.
The threshold-free system has gained great popularity. Its advantages are undeniable compared to systems with a lower support.
What mounting options are there?
Depending on the type of structure, the following installation methods are distinguished:
- With two guides. They are fixed on the ceiling to a wooden beam (which is previously installed there) and from below. Thus, the canvas is securely fixed, allowing it to move smoothly and without obstacles. The only disadvantage that can be highlighted is that for the lower profile in the floor you will have to make a recess in advance using the gating method. If it is not embedded into the floor, the structure will look unsightly and the profile itself will quickly become unusable. In addition, contaminants often accumulate in it.
Doors with two tracks
- With one guide. For canvases of this type, special fasteners are provided. They are installed in the opening and move along the profile, which is located on top. An additional rail is not installed at the bottom, because usually such doors have a small mass.
What else should you consider?
In order to be able to grasp the partition with your hand at the moment of closing, you should ensure that the handle protrudes from the mounted opening by an amount equal to 41 mm.
For glass filling with a thickness of 4 or 8 mm, a silicone seal is used. We put it on the edge of the glass. On one side of the filling we install the upper and lower horizontal profiles KR07 and KR08, for this we use a rubber mallet. Then the handle profile KR 300N is attached on both sides. As filling you can also use laminated chipboard, MDF, mirror and other types of materials whose thickness is 4, 8 and 10 mm.
Design features and advantages of the sliding system
There are no standard door sizes for sliding wardrobes: they can be made to the required length and width. But there are dimensions that are most convenient.
The restrictions are:
- Width: within 50-110 cm (optimally 60-90 cm). Narrower doors may warp and pop out of their tracks. Wider ones will be more difficult to move due to the heavy weight, and the shelves will be inconvenient to use (you will have to move the door far to access).
- Number of doors: selected based on the width of the cabinet and the width of 1 door. The most important thing is that the doors should not interfere with the use of the contents. This is relevant if there are large, wide compartments inside.
Doors for sliding wardrobes can be sliding or folding. Sliding structures are most often used.
Their advantages:
- Sliding doors, compared to folding ones, are simpler, more difficult to break and easier to repair.
- Since the door moves along one plane parallel to the wall, there is no need to leave free space in front of the cabinet. This is true for small or narrow rooms (for example, corridors).
Connecting bracket PU09
We fasten the PU09 bracket into the groove of the KR300N handle with a standard self-tapping screw in the upper part until final fixation. This must be done in such a way that the groove for the wheel screw head on the top shelf of the PU09 bracket faces the inner surface of the door. We perform a similar action on the opposite side.
We secure the installed parts to the other two corner joints with M6X30 self-tapping screws, using shock absorbers.
How to install the structure yourself?
The instructions for installing a sliding door are not complicated. If the owner has conceived a design in which the open door will be disguised, it is worth installing a plasterboard structure. Using this technique, the room is visually enlarged. But this is completely optional - moving on rollers simply along the guides, the product will also be functional.
According to the instructions for installing a sliding door, a place for the handle is initially prepared on the door leaf itself. A hole is cut out with a chisel, rough edges are smoothed out, and the door handle is installed and fixed. Next, a groove is cut out in the upper part of the existing doorway into which the U-guide is inserted. After fixing it, the lower part is mounted. After installing all the parts and checking their strength, the rollers are installed. The interior sliding door is installed with the help of an assistant, since it is very difficult to hold it strictly vertically on your own and carry out all the manipulations. The product is installed in grooves near the roller bases.
[vimeoyoutubepopup_video displaytype=”image” videoplayer=”youtube” videoid=”gETxrrCHT4A” text=”Design and features of a sliding door” autoplay=”true”]
All that remains is to mark the location of the upper door guide. The area for the location of the rail, which should guarantee trouble-free movement of the rollers, is indicated with a simple pencil. After the markings are made, the accuracy of the measurements taken is once again clarified. If no errors are found, the rail is carefully and firmly fixed with pre-purchased anchors or self-tapping screws.
Important: You can check the strictly horizontal position of the product using a level. If an error is found, it must be corrected. Without paying due attention to the correctness of the process, interior sliding doors will provide owners with a lot of trouble, opening spontaneously.
To connect both parts of the mechanism, the door is slightly tilted with its upper edge and placed on the rails. The work is considered perfectly completed if the structure is well fixed, the door moves without difficulty, and no extraneous sounds appear during its movement.
Guide mechanisms ensuring easy sliding of the structure
Height adjustment
To attach a single-leaf system partition to the ceiling, two upper PU10 wheels must be installed in the upper running profile PU01. We fasten the profile to the ceiling with M 3.5x 51 self-tapping screws. After this, the assembled system is hung on the tetrahedral head of the PU-10 wheel screw.
In this position, the system is secured with a fixation nut to the bracket. Manipulation is carried out by tightening it to the surface of the bracket.
Debugging is performed by rotating the height adjustment bushing of the partition. Afterwards, the wheel is secured with a nut to the bracket, while the partition bushing is held in height.
How to assemble and install doors for a sliding wardrobe: step-by-step instructions
Structurally, the door consists of:
- doors (thickness from 4 to 10 mm, can be made of wood, glass, plastic, mirror);
- rollers on top and bottom (so that the door can move along the guides);
- top profile;
- lower profile;
- intermediate profiles (if the door is composite);
- profile handles.
We will consider installation for the most common design - with the sash supported on the lower profile.
Assembly diagram of a sliding door supported on the bottom guide
Calculation
The first stage is calculating the doors. You need to calculate the following parameters:
- Opening dimensions. It is necessary to choose the place where the cabinet will be located, accurately measure its height and width.
- Width of 1 leaf. To calculate, you need to divide the total width of the opening (in cm) by the desired sash width (60-90 cm is the optimal figure). When calculating, the overlap of the sashes on each other is taken into account - it leaves about 25-50 mm. If there are 3 or more sashes, an overlap is added on 2 sides for sashes that are not on the edge (they will have an overlap on 2 sides).
Let's give an example of calculations.
You need to make a cabinet in the opening, 300 cm wide. The cabinet will have 3 sections 100 cm wide. The width of 1 door is selected according to the width of 1 section.
Divide 300 by 100 - we get 3: that’s how many doors there should be. The width of 2 side sashes will be equal to 100 cm, the width of 1 central sashes will be 100 + 5 + 5 (2 overlaps of 5 cm each) = 110 cm.
Allowable error
When calculating and installing, an error of up to ±5 mm can be allowed. Remember that even 1-2 “wrong” mm can lead to play in the sash. This is not critical, but it is unpleasant.
Installing the Top Rail
The guide profile on top is mounted flush with the side walls. There should be no gap between the side wall and the ends of the profile: its length should be equal to the internal width of the cabinet.
For fixation the following can be used:
- Self-tapping screws with press washer.
- Countersunk head screws.
Since the sash will rest on the lower profile, and there will be no upper loads, the pitch between the screws is selected in the range of 25-35 cm. It is recommended to embed them in different channels (the first screw in the right, the second in the left, the third in the right, and so on, alternating).
Installing the Bottom Rail
Before installation, you need to “try on” the bottom guide:
- Mount the top profile.
- Place the lower profile on the bottom without screwing it in place. The guide should be offset from the front edge by approximately 20-22 mm.
- Install 1 leaf.
After this, you can understand how many mm and in which direction the lower guide will need to be shifted. This should be done by level, checking the evenness along the entire length. When the profile takes the ideal place, it is marked with a line along its entire length.
Then the sash is removed, and the guide is screwed to the bottom of the cabinet with self-tapping screws.
Assembling the frame for filling
If the doors are delivered unassembled, or if you are building the cabinet from scratch yourself, the next step is to assemble the frame into which the infill is installed.
To do this you will need:
- 2 vertical profiles along the height of the opening. There can be 2 types: C (asymmetric) or H (symmetric). Their use is approximately the same, the differences are minor.
- 2 horizontal frames the width of 1 sash.
- 2 upper and 2 lower rollers.
- Fasteners.
- Drill with drill bit for fasteners.
- Adjustment screws.
If the filling consists of several parts, then additional frames or profiles will be needed.
Assembly step by step:
- “Try on” the elements to each other: lay out the profiles on the floor in the shape of the future frame. This is necessary so as not to make a mistake when drilling holes.
- “Try on” the lower and upper rollers.
- Subtract the height of the rollers from the height of the vertical profiles and trim them. An important nuance: the cuts must be made at right angles so that the profile stands level in the opening.
- Holes are drilled in the vertical profiles for connection with the horizontal ones. Each hole must be drilled perfectly accurately, without minimal deviations, otherwise either the frame will assemble crookedly or the filling will not fit in smoothly.
- A rectangular frame is assembled.
- The lower and upper rollers are installed.
- Adjusting screws are installed.
The assembled frame can be “tried on” to the rails in the closet.
Fill setting
The following materials can be used to fill the sash:
- MDF (6-12 mm thick). They can be plain, patterned or patterned. Pros: low cost, relatively light weight of the slab (250×90×1 cm - about 15-18 kg), ease of processing.
- Mirror (4 mm thick), with anti-fragmentation protection on the reverse side. It is useful to use as a filler if the cabinet is placed in the hallway or small bedroom. It can occupy the entire area of the sash, be divided into several parts, or occupy part of the area.
- Glass (4 mm thick). May have a pattern, different colors.
- Rattan. This option is rare and costs more than others. Plus - it looks “expensive”.
The infill is usually ordered according to the calculated sash size.
In addition to the filling itself, you will need a silicone sealing profile for installation.
To install the filling, the frame fasteners are loosened or completely unscrewed (the frame is disassembled). The profile is carefully placed on a sheet (MDF, mirrors, glass - it doesn’t matter) and assembled into a frame.
Buffer tape sticker
Buffer tape is needed for:
- protecting the contents of the cabinet (things) from dust from the outside;
- softening the impact of the sashes on the side walls.
It looks like a thin strip of dense elastic base with a pile (can be of different lengths) on one side and a sticky surface on the other.
The tape is glued to the back side of the vertical frame profile.
Inserting the sash into the guides
The assembled sash remains to be installed in the guides. This is done always starting from the far profile (that is, first the sash that stands further is placed, then the one that stands closer).
Step by step description:
- The door is moved to the opening.
- The door is raised to the position in which it will be installed in the cabinet.
- The top part tilts and moves towards the top guide.
- The rollers are adjusted into the groove of the upper profile.
- The sash is lifted and the lower rollers are directed into the groove of the lower guide.
- When the sash is installed, check the smoothness of its movement. The doors are adjustable if necessary.
- The second leaf is installed (and the next ones, if any).
- Check the smooth movement of the second leaf. Adjust as necessary.
Adjusting the Bottom Guide
The installation procedure for interior compartment doors involves the equally important stage of installing and adjusting the lower guide wheel PU04.
The lower guide roller PU04 is attached to the floor using 3.5x15 self-tapping screws. It should be placed clearly under the top profile. To determine the correct position of the lower wheel, move the partition from the open position to the closed position. Now it automatically takes the right place.
Using a double-leaf design, in the closed position both door leaves will close. The installation of wheels is similar separately for each of the existing products.
Having decided on the location of the lower roller, we secure it with M3.5×15 self-tapping screws. We reinstall the partition in its plane.
Design features of sliding interior doors
Before you install a sliding door in a wall opening with your own hands, you need to understand the design of such products.
Today, there are two options for sliding door blocks, which differ in the system of opening the leaves: rail and hanging. The canvas can be made of one or two leaves. There are also accordion models, the canvas of which is made up of several separate elements - wooden or plastic slats.
Suspended structures
The hanging system for sliding doors is a load-bearing beam - a guide rail along which the door leaf moves with the help of rollers. The guide is fixed above the doorway; the doors are held suspended by rollers, which is why they are called suspended.
When installing such models in interior openings, the floor base under the door leaf remains smooth. The only element that is mounted on the floor in the opening is the lower roller, designed to hold the canvas strictly in a vertical position. This is the simplest sliding structure, the installation of which, if desired, can be easily done with your own hands, without calling a specialist.
Door block installation procedure:
- Installation of the top guide - rails above the wall opening;
- Attaching rollers to the upper end of the door leaf;
- Inserting the roller mechanism with the web into the guide;
- Blocking the ends of the rails with special locking parts (this is necessary so that the sash does not fall out when moving);
- Inserting the roller into the groove on the lower end of the canvas, fixing it to the floor base;
- Sliding doors on rollers are installed.
The process of installing sliding door structures does not require a lot of free time. But, it is necessary to understand that such systems are simply designed to block the entrance to the room, and they do not provide high-quality sound insulation.
Sliding rail systems
The design of such models of door structures includes 2 rails, one of which is fixed above the doorway, the other on the floor base. Accordingly, the door leaf is equipped with rollers on the bottom and top. Such sliding doors are more stable when compared to suspended structures.
The only drawback of this system is associated with the guide rail, which is built into the floor. It is difficult to remove dust and debris that gets inside this element of the door block. But, if small children live in the apartment, then it is better to install just such doors, as they are much safer.
What other points does the installation instruction for interior compartment doors include?
Now you need to make adjustments by eliminating the gap between the lower roller and the partition. There is play between these elements. To make adjustments, you need to place the tip of a flat-head screwdriver into the end of the wheel plate, directly opposite the elliptical groove.
Now, using a hammer, rotate the roller body relative to the central hole. Lightly tapping with the tool removes the gap. Remove the partition again.
We tighten the screws until they stop to firmly fix the lower wheel.
We put the structure in place. A double-leaf partition is installed in the same way.
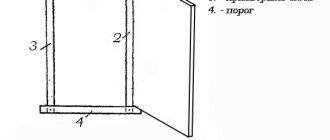
How is the opening made?
We decide what the edge trim will look like. It is worth installing platbands or extensions. The choice depends only on your preferences. It is better if the guides are closed. At this stage, you should not have any problems, since there is a wide selection of decorative strips on the construction market. When purchasing accessories, there is always the best option for any room interior. Now you know what the instructions for installing interior sliding doors are.
Question details
Installation options
Installing sliding doors with your own hands is not difficult, it is only important to decide on the type of installation:
- Sliding door - guides are attached to the wall along which the canvas will roll.
- Cassette - a special niche should be made in the wall in which the door leaf will be hidden. Sometimes they are called retractable.
- Cascading - made of one stationary canvas and several moving ones. Movable ones, if necessary, can be moved and hidden behind the fixed part.
The easiest way to install is a sliding door. You can install it yourself, and not only at the repair stage, but even after it is completed. The only important thing is that the opening is smooth and the walls have good load-bearing capacity. The disadvantage of the system is that nothing can be placed close to the wall. There is another drawback - the extremely low level of sound insulation. This can be explained simply - if you look from the end, there will be a gap of several millimeters on the sides. It is required so that the canvas does not “shuffle” along the surface of the wall. In addition, all sounds will penetrate perfectly through it and will become only a little quieter.
The beauty of cassette doors is that when open, the door leaf will be in a niche and will not disturb anyone. The second advantage is that you can install seals around the entire perimeter of the opening, which will provide much higher sound insulation rates. The disadvantage of installing a door in a niche is that this can only be done during renovation, and also that to make a pencil case, a false wall is usually placed under sliding doors, and this is the best way to steal precious centimeters of space. The cascade type of doors is a type of compartment doors. Installation is the most difficult - you will need many elements, and there will also be high accuracy of installation. The systems can be classified as elite, and they rarely skimp on installation - repairs will be much more expensive.
Features and installation procedure
You can install such doors even without experience, and it will be possible to do without installers. It will take a little time, and there will also be installation instructions. We tried to provide you with a detailed description of the process with photos and videos.
Installation of sliding doors between rooms (as in a wardrobe)
The systems may differ slightly from each other, but the general requirements will remain the same.
There are several requirements that must be met before installation:
- The opening must be level, since otherwise it will be necessary to take a canvas that will cover all deviations with a margin.
- The load-bearing capacity of the sides of the doorway must be as high as the wall above it.
- The opening should be finished with plaster and paint, or covered with wallpaper/decorative panels.
Next, you should start assembling. First, attach the rollers, and all manufacturers have their own recommendations. Some advise retreating 1/5 of the width of the door leaf opening from the edge, while in other systems they will be attached immediately from the edge, and the indentation is provided by mounting plates. Install such a system - in it, roller-type platforms will be installed immediately from the corner. DIY sliding door installation depends on how you center the rollers and how smoothly everything is installed. Having positioned the plate, use a pencil or marker to mark the places for fastenings. Drill holes at the marked points, and the diameter of the drill should be 0.1 cm less than the diameter of the screw.
Align the plates and screw in all the screws. The length of the fasteners will depend on the mass of the canvas, but definitely not less than 7 cm. They should be screwed perpendicularly, as otherwise unnecessary stress may appear. The supports for the rollers should be inserted into the installed plates and secured with a lid on the side. Next, you should screw the roller platforms onto the threaded pins. In addition, before hanging it is convenient to immediately install locks and handles; it is best to take mortise ones. If you bought a ready-made kit, then you already have holes, and if you chose a regular door leaf, you will need to trace the outline yourself with a pencil and remove the excess with a chisel. After the lock or handle fits into the recess, you should mark the fastening points and drill holes for them, and then install all the fittings.
Next, let's start installing the guide. With mounted rollers, this is much easier - you will know exactly at what height the lower part of the rail should be. It will be most convenient to hang sliding doors on dry wood beams. Its cross-section should be at least 5*7 cm, and the length should be twice the width of the canvas +5 cm. Cut the guide to a similar length. Now you need to align the guide along the beam, attach it to the beam using self-tapping screws with a length of at least 8 cm. The number of fasteners should be at least three with 10 cm indentations from the edges and in the middle (more often, but not less often). Now measure at what height the timber will be placed. On doors with installed rollers, you should place a guide with a beam, and you can also mark how tall the door will be. Drill at least 4 holes in the side of the beam for mounting to the wall.
0.7-1 cm should be added to this mark - the doors should hang and not shuffle. 0.7 cm is the minimum gap, which will be sufficient if there is no floor covering in the opening. If you plan to lay carpet, laminate or linoleum, then this should also be taken into account, as well as the thickness of the coatings. To prevent the canvas from “walking” during installation, it should be wedged using small wooden wedges, and make sure that there are at least two stops near the rollers. Now attach the beam to the wall and adjust its position using a building level, and its position should be marked with a pencil. If the wall allows, then you can attach everything right through to the wall, but this requires self-tapping screws of at least 12 cm in length, and it is better to use anchor bolts.
If the walls are concrete, then you will need to install dowels. To do this, transfer the marks for the fastening to the wall surface, and this can be done using a long and thin drill, and its diameter should be slightly smaller than the drilled hole. Another simple option would be a long, thin nail. It should be inserted into the hole and with two strokes a mark should be applied to the surface of the wall. Then everything is simple - drill holes for the dowel plugs, insert the plugs and hammer everything in if necessary, and then install the doors. Stoppers should be attached to the edges of the guides, and they are driven from the blocks, and the required location is established experimentally (so that the canvas can cover the opening when closed, and at the same time rolls back sufficiently when opening).
In this case, fixation should be performed using clamping screws. Next, we open the doors and install a flag roller on the floor, which will go into the groin, sawn in the lower plane of the canvas. This is required so that the doors do not deviate vertically. To begin with, it should be inserted into the groove, the holes for fastening should be marked, drilled, and then secured using small 1.5-2 cm screws. At this point, the installation of the doors can be considered completed, and they are already fully functional. All that remains is to complete the finishing - the mounting beam should be covered with a decorative trim with a guide, and it should match the tone of the door leaf. It can be nailed to the timber with finishing nails. When inserting, make sure that the wheels are closed - this is much more beautiful.
Installation of cassette-type sliding doors
The installation process for the guide itself and hanging the door leaf almost exactly repeats all the steps described above. Only finishing is not needed, but the remaining stages are extremely important. Do-it-yourself installation of sliding interior doors (in the case of cassette type) does not use a decorative strip, and a false wall must be installed at a distance of no less than 10 cm from the wall. It is usually made from a plasterboard profile, which should be covered with wall plasterboard. But this is not important - you can use both plywood and gypsum fiber board. Why do you need a distance of 10 cm? the thickness of the door leaf and the gaps on both sides are already 5 cm, and to them it is worth adding at least the same amount to install the profile, and now 10 cm have already been used.
Due to the fact that the main load will be on the wall, the frame made of profiles does not need to be reinforced, but if you do not think that the wall is reliable, then you can put wooden blocks inside, which are screwed onto self-tapping screws, which will help make the structure very rigid. The basic principles of calculation for a pencil case, as well as the specific markings and principles of preparing a door opening for installation, can be seen in the video.