Home » Doors » Do-it-yourself front door installation
April 29, 2021 No comments
Is it easy to install an entrance door with your own hands in compliance with technological requirements: all the features of this work.
How reliable the entrance doors will be depends on the design features of any system and on compliance with technological requirements during its installation. Installation can be done correctly if you read the recommendations given in advance and carry out the work step by step.
Then installing a door with your own hands is unlikely to cause any difficulty, despite the fact that for many years such a door will delight the owner with both its reliability and appearance.
In what order is this work performed?
Replacing a door frame (installing it in a new building) is a multi-stage job.
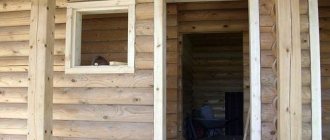
Entrance door installation
Stage one. Measurements are being taken.
Stage two. The opening is being prepared. The old door is being dismantled.
Stage three. A new door structure is being installed.
Stage four. All cracks are sealed.
Stage five. Finishing is being done.
You need to work slowly and efficiently, only proven materials should be used, you need to have all the tools and compounds at hand. And yet, it is advisable to enlist someone’s help.
The door frame can be secured using different techniques. So you will need to decide on the most optimal one.
It needs to be taken into account. The manufacturer provides a guarantee. But it loses its meaning if the owner decides to install the door himself. So any damage to the new door will subsequently have to be repaired only at your own expense.
Measuring and ordering a door
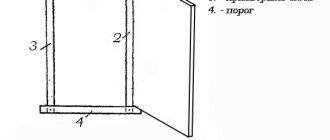
The speed and quality of work on installing the front door depend on the accuracy of the measurements taken. In terms of height, they must be carried out in two places; the width is measured at the bottom, in the middle and at the top. To calculate the dimensions of the door frame, the smallest vertical and horizontal values are taken, after which 40-50 mm are subtracted from them - for technological gaps.
Scheme of doorway dimensions measurements.
Before going to the store, you need to decide on the location of the hinges, i.e. decide which way the doors will open. The standard option is to the wall of the corridor. If the corridor is through, then in the opposite direction from the entrance - it’s easier to bring in furniture.
The openings of old houses are mostly non-standard. Therefore, you need to choose: expand the opening or order doors according to existing sizes. Experience shows that the second option loses a little financially, but is otherwise preferable (the customer avoids the noisy, dirty and labor-intensive process of adjusting the opening to the size of the door block), especially since the order in almost all companies is completed the next day.
Another important point when ordering is that the insulation must be not only in the door leaf, but also inside the door frame.
How to buy doors
New iron door in packaging
Firstly, while still in the store, you should remove the protective film with extreme care.
Secondly, we carefully check:
- frame;
- door leaf.
Thirdly, after checking, the polyethylene is again glued with tape.
Only after completion of installation and finishing work can the protective film be removed. Then the surface will remain intact and clean.
Required Tools
Often, before installing a new entrance door, you need to dismantle the old one. Depending on the material of construction, different tools will be needed. For metal, you will need a hammer drill, grinder, screwdriver and nail puller. To dismantle a wooden box, you additionally need to take a hacksaw and an ax.
To install a safe door you will need the following tools:
- hammer drill;
- Boer;
- hammer;
- roulette;
- Bulgarian;
- sledgehammer;
- pencil;
- construction level;
- open-end and socket wrench;
- crosshead screwdriver.
In case of fastening with anchor bolts, a welding machine and fittings will be required. Additionally, you need to prepare all fasteners, a cement-sand mixture, and a block for cutting wedges.
What exactly should be measured?
When taking measurements, you need to clearly define the limits of the box (loot). Often the box is immersed in a layer of plaster, along the entire perimeter (except for the bottom). Then it is difficult to make accurate measurements.
Entrance door measurements
Better initially:
- remove the platbands from the tray;
- clean off the protruding solution;
- dismantle the threshold.
But the new box may be wider than the previous one, then the length of the support beam under the opening is measured. Its width should be approximately 4-5 cm larger than the door frame, otherwise the fastening will be too unreliable.
Metal door size chart
Prices for entrance doors
Installation in a wooden house
Installation of the door structure is carried out according to the following scheme:
- A casing is made along the opening - this is a powerful wooden box made of beams.
- The door frame is inserted into it.
- The box is fastened to the casing using long self-tapping screws or self-tapping screws. It is important here that the fasteners do not pass through the casing.
More details about this process can be found in the article “Installing an entrance door in a wooden house.”
Accuracy in taking dimensions, a strictly step-by-step order of operations, correct alignment of the door in all planes and reliable fastening of the door are the basic rules for its installation and a guarantee of the quality of the final result.
How to prepare the opening (dismantling the opening)
If the building was constructed of brick and has already served for many decades, then dismantling work should be carried out without fanaticism, carefully. Old masonry should not be damaged. The same rule applies to walls in new buildings constructed from vulnerable foam concrete.
Removing the old door frame
First, the door leaf is removed from the hinges. After this, using a hacksaw or grinder, you will need to cut the loot - on each side in several places. And finally, the cut box is pryed with a crowbar and removed from the opening section by section.
How to clean the opening
When the loot is removed, pieces of the old frozen solution will remain around the perimeter. Also, all voids and cracks will open in the masonry of the wall.
Cleaning the entrance door opening
The destruction often turns out to be especially severe under the threshold, at the bottom. This is due to the fact that the old beams rot, and the brickwork becomes loose and crumbles.
On a note. All unsafe areas should be cleaned. You can level the entire area where the opening is located using a hammer drill.
How to fill voids and cracks
All small cracks are rubbed with cement mortar. But first, pieces of brick are placed in deep crevices, after which they should also be covered with mortar.
Sometimes the floor needs to be raised, in this case:
- a new substrate is laid out of brick;
- you can make a screed.
At this stage, it is too early to level the walls of the opening, because when installing a new box, the treated surface may be slightly damaged.
Important! There should be no voids left inside. They become channels through which cold enters the room.
Preparing the opening
When dismantling an old door, you should not be particularly careful; it is only important not to damage the walls, especially if they are made of foam concrete or it is an old brick building. The door leaf is removed from the hinges or the hinges are unscrewed from the hinges. Using a grinder or saw, several cuts are made around the perimeter of the door frame and, using a crowbar, it is removed from the opening.
Using a hammer drill, the opening is cleared of excess mortar and plaster around the entire perimeter. Particular attention should be paid to the bottom of the opening. As a result, the door must be mounted flush with the floors in the hallway or corridor, and this parameter depends on whether the screed will still form or not. Moreover, in the vacated opening under the old door there may be a wooden beam or brickwork that has become unusable over time. All this must be cleaned and removed, and instead, if necessary, form a base of bricks or the same wooden beam of the required height.
Installation of entrance doors
The owner of the house will definitely need a helper. It is very difficult and inconvenient to lift a heavy structure and insert it into a niche on your own. Of course, the canvas and the box are mounted separately, but you will still need an assistant.
Metal door installation diagram
The work is simplified if there is on the frame:
- mounting ears;
- factory pre-prepared holes for wiring.
Features of box installation
First, remove the fabric from the loops; it needs to be set aside for now.
The box should be installed in the opening so that the panel opens outward. The structure must be leveled, otherwise the door will not close tightly, swing open spontaneously, or jam.
Checking the correct installation of the door frame using a level
The horizontal and vertical elements of the new sump must be checked on all planes. Some protrusions in the opening may interfere with correct measurement; then they are removed with a hammer drill or knocked down with a hammer.
The mounted structure must not be allowed to move. Its position should be fixed using wooden pegs. These auxiliary parts must be made in the form of wedges and have an even shape. With their help, you can adjust the level without much effort.
For your information. Nails should not be used to secure the box: the box may move, and then it will have to be leveled again.
Features of safe doors
Steel armored safe doors have a multi-level degree of protection. Their popularity is increasing every day. In addition to high reliability, they are suitable for any interior of an apartment or private house. Safe structures are made of high quality materials. Their production is strictly regulated by state standards.
The following doors are manufactured in production:
- profile;
- bent-welded.
For the manufacture of profile type, electric arc welding and standard rolled metal are used. This design is done by hand. Often it has a thermal break, which allows installation outdoors.
A feature of the production of bent-welded profiles is minimal deformation of the material. Using bending equipment, the metal sheet is bent before spot welding. A cast box and stiffeners are cut from a single sheet. Bent-stamped metal is not thermally treated, which ensures a long service life and improved quality. Security doors are often installed in offices, storage facilities or government facilities.
Design Features:
- The presence of armored linings on the pocket lock.
- Powder spray painting. It provides protection against burnout.
- The filler is mineral wool. Safe doors have excellent sound insulation and protect the room from drafts.
- The box is equipped with flashings that ensure a tight fit with the opening. It is almost impossible to knock out such a door frame.
- Each safe sheet has a rebate, which increases its protective properties.
- The hinges contain bearings. They are able to withstand large masses and ensure free movement of the blade.
All structural elements are necessary to increase burglary resistance. The components are carefully thought out. Doors require proper installation for them to function. If a mistake is made during installation, the protection will be reduced to a minimum.
Structure mounting options
Various methods have been developed for securing the frame in the opening. It all depends on the material and design features of the doors.
The number of fixation points around the perimeter of the frame is at least 10. At a minimum:
- 3 on each side;
- 2 on top and bottom.
Option one. The loot is fixed by the eyes and anchors are used. This technique is considered suitable for any design. In the factory, lugs are made on metal doors when the frame is constructed.
Installation of doors with lugs
But if the door is plastic or wooden, in this case the parts are screwed on with self-tapping screws.
A hammer drill is threaded through the eyelet, after which a recess is made in the wall (no more than 15 cm). You can insert an anchor into it in order to further tighten this fastener with a socket wrench.
If there is no anchor, it is permissible to use a steel pin made from ordinary reinforcement (section 1 cm). One edge should be flattened with a hammer (hat), the other should be pointed. This pin is driven all the way into the prepared hole, after which it is welded to the eye.
Option two. Fasteners are installed through the canvas. Then holes are made in the end of the frame. But the bolts (pins) go deep into the wall in the same way as shown earlier. But they are attached directly to the box.
Fastening the door through the frame
In wooden (plastic) material, you need to drill neat recesses to install the bolt heads flush-mounted.
Option three. Fixing the door frame with metal clamps. If the walls of the building are monolithic (reinforced concrete structure), then this method will be considered the most acceptable. There is no need to drill any holes. From the outside, the door frame is held in place using a special edging. It is attached from the inside with metal hooks that are welded to the inside of the steel frame.
First, secure the side where the loops are located. The top point is attached first, then the rest to the bottom. The first bolt is tightened. The correct position of the box is checked with a level to prevent distortion. The vertical is controlled in the same way after installing each subsequent bolt.
After fixing this side, the door leaf is hung. You need to check the tension of the box. The door should open without any extra effort. Make sure there are no gaps or deformation. Only then is it permissible to begin attaching the second side.
The canvas is removed once again. Bolts fix:
- vertical frame support;
- lintel (top beam);
- threshold.
At the same time, the level controls the position of the tray after installing each next fastener. Then you need to hang the canvas again to understand how easily it moves and whether the tension is normal.
You should know. The tension may be too strong, then the fasteners will need to be loosened slightly.
Installation of metal doors
Steel (metal) doors are most often used as entrance doors. The door frame, door frame and outer surface of the door leaf are made of metal. To ensure the required degree of heat and sound insulation, the canvas is laid with soundproofing material. On the side of the room, the entrance doors can also be covered with metal, or with sheet material (a budget option).
Metal door structure
Rubber insulation is laid on the frame along the perimeter of the vestibule (sometimes on the door leaf). It performs two functions: it serves to seal and reduces the strength of the sound that occurs when the door slams. The result is a reliable, warm and “quiet” entrance door.
Preparing the door
Since it is problematic to embed a lock into a metal door, doors are ordered immediately with a lock. You receive a kit that includes a pre-installed lock. Handles come separately. Here they need to be installed in place, screwed with self-tapping screws. Before installation, you need to check the operation of locks and latches. Everything should work smoothly, without effort or problems. If everything is fine, you can begin installing the metal entrance door.
Preparing a steel door for installation: checking the operation of the lock, insulating the frame with mineral wool
If the doors are installed with access directly to the street (in a private house, for example), the outside of the door frame is lined with insulation. You can use rock wool cut into strips. It is inserted into the frame and held in place by elastic force. It has a significant disadvantage: it is hygroscopic, which is why the doors can rust from the inside (if they stand as an exit to the street and are not tightly sealed). In multi-storey buildings this is not critical: here there is no precipitation in the entrance. Another solution is to install polystyrene foam or fill the frame with foam. They are not afraid of moisture, and the thermal insulation is normal.
To ensure that the paintwork of the box is not damaged during installation and subsequent finishing work, it is covered with masking tape around its perimeter. It is removed after the door slopes have been made. If there are any wires coming through the door frame, it’s time to install the inserts - a piece of plastic pipe or corrugated hose through which these wires will get inside.
Installation in brick and concrete walls
It is more convenient to install doors in which the panel can be removed. Before installation, it is removed from its hinges. The door frame is inserted into the prepared opening. At the bottom it is placed on mounting pads 20 mm high. She should stand in the opening freely.
We place the door frame on mounting pads
By changing the thickness of the pads, we ensure that the lower frame is strictly level. This is checked using a building level. Having set it horizontally, we set it vertically: so that the racks do not deviate either forward or backward, but stand strictly vertically. This is also checked using a level, only the device with a bubble is located on the short part of the tool. Another option is to check with a plumb line.
Checking whether the door frame is aligned vertically
After the box is level, it is wedged using prepared wedges. They can be cut from wood, or you can buy plastic ones. The wedges are inserted on long posts, three in number, two at the top. They should be placed close to the fastening points, but without blocking them.
Example of wedge installation
After installing the wedges, check once again whether it is positioned correctly: in the horizontal and vertical planes. There should be no deviations.
Next, the installation of the metal door frame in the opening begins. There are two types of mounting holes: steel eyes welded to the box and a through mounting hole (there are actually two of them: in the outer plate with a slightly larger diameter and in the inner plate with a smaller diameter).
Two types of mounting holes
There is no difference in the installation method. Simply frames with holes in the body of the box can be installed on thinner walls. This may be important if the entrance door is installed in a panel house: it is not always possible to install doors with lugs in them.
Through-hole mounting
Iron entrance doors are secured to anchors or to pieces of steel reinforcement with a diameter of 10-12 mm. The diameter of the fastener is selected to match the existing holes. If anchors are used, their head should fit into the outer hole and “get stuck” in the inner one. The diameter of the fittings must match the diameter of the holes. In any case, holes are pre-drilled for them.
We take a hammer drill, a drill and an anchor. The drill is of the same diameter as the fastener. Its length should be at least 30 cm. To more accurately determine the depth to which you need to drill, masking tape is attached to the drill. It marks a distance that is slightly greater than the required depth.
Mark the drill according to the length of the anchor
The installation of fasteners begins on the hinge side. When drilling, it is important not to move the installed box. First they drill from the top.
Drill holes at the top, on the hinge side
Install the anchor, finishing it off with a hammer. To recess it to the inner edge of the box, insert a screwdriver into the slots and tap the handle of the screwdriver with a hammer. Then, when the anchor is driven in, it is tightened a few more turns with a screwdriver. We check whether the box has been moved during work - take a level and check everything.
Driving the anchor deeper
We install the fasteners below in the same way. We also check verticals and horizontals. If the door leaf is not heavy, you can already check at this stage how correctly the frame is positioned. To do this, hang the doors and check how smoothly they “sit”, whether there are any distortions, cracks and other troubles, how well the locks and latches match and work properly.
If the canvas is made of thick sheet steel and weighs about a hundred kilograms, two fasteners are clearly not enough. Then install all the fasteners on the hinge side, as well as one on the lock side. After installing each fastener, the verticality and horizontality of the box is checked. Then they carefully hang the canvas and check how it “moves”. If everything is fine, continue installing the fasteners. No - you will have to remove the already installed fasteners and re-position the frame.
We place the anchor in the door frame of the front door from below, checking the verticality of the post
After checking, the canvas is removed again, and the already installed anchors are finally tightened. Then they put everything that is needed on the hinge side, then on the lock side. When everything is finally installed, the door leaf is hung in place again.
Now you need to fill the installation gaps with foam. To install an entrance door with your own hands, it is better to take one with a low expansion coefficient: it is easier to work with. In order for the polymerization of the foam to proceed normally, the cavities that will be filled are moistened with water from a spray bottle (ordinary household). Then everything is slowly filled with foam.
You need to blow it across the entire width of the door frame: then there will be no blowing and the sound insulation will be better. When installing a door with iron, you don’t have to worry about the frame breaking apart: the rigidity of the metal is such that the expansion force of the foam is far from insufficient. Therefore, you can foam generously.
We fill the installation gaps with foam
Only if foam gets on the canvas should it be removed immediately with a damp cloth. After 5 minutes, you just won’t be able to wipe it off. While wet, it can be removed without leaving a trace. Then you will have to scrape, but this is not painless: traces will remain. Polymerization of the foam will end after 24 hours. Then we can consider that installing the front door with our own hands is completed. All that remains is to make the slopes on the door.
Installation of a box with lugs
If there are welded plates on the box - lugs - the box is placed in the same way: on pads. Then it is leveled and wedged. Then there are two options:
- The lugs have mounting holes. Then holes are drilled for them. Cut a piece of reinforcement, insert it into the hole and hammer it in.
Installation using fittings
- There are no holes in the lugs, but they are made of thick metal - 3 mm thick or more. Then two pieces of reinforcement are driven in near the plate (after drilling holes), and the plate is welded to them.
Weld to two pieces of reinforcement driven into the wall
When installing using this method, you need to control the position of the box even more carefully: it is easy to move it from its place. If not corrected, the doors will not work well.
Installation in openings made of gas, foam and expanded clay concrete
Expanded clay block private house or buildings made of gas or foam blocks belong to the category of buildings with fragile load-bearing structures. Therefore, in order to install an entrance door in them, it is necessary to take into account two important requirements specified in SNiP and GOST:
- Increase the number of fasteners on the vertical sides of the box within 4-6 per side. At the same time, their depth should not be less than 20 cm. To fasten metal doors in a foam concrete wall, you cannot use standard metal anchors, which in soft blocks will quickly become loose due to intensive opening and closing of the door. In such houses, according to the standard, it is better to use chemical anchors, for example Hilti.
- Install a crimping structure consisting of two frames made of steel angles with a flange width of 40 or 50 mm. In fact, it’s the same edging, only on both sides of the wall. Both structures are fastened together by crossbars made of metal plates 3-4 mm thick.
Trimming the opening from metal corners
Installation in a wooden house
Installation of the door structure is carried out according to the following scheme:
- A casing is made along the opening - this is a powerful wooden box made of beams.
- The door frame is inserted into it.
- The box is fastened to the casing using long self-tapping screws or self-tapping screws. It is important here that the fasteners do not pass through the casing.
Accuracy in taking dimensions, a strictly step-by-step order of operations, correct alignment of the door in all planes and reliable fastening of the door are the basic rules for its installation and a guarantee of the quality of the final result.
The last stages of installation work
You will have to remove the canvas again. This will need to be done to keep the surface clean and unscratched. The heads of the anchor bolts are hidden using special plugs. They are selected in accordance with the color of the door.
The loot is covered with masking tape. All technological indents, cracks, and gaps are filled with polyurethane foam. You can also use cement mortar by adding alabaster to it. Then the reliability of the design increases many times over.
The solution is made so that it is in a loose state and not liquid. By the way, alabaster speeds up its hardening. This compound is used to fill all the gaps around the perimeter between the frame and the wall.
Filling Metal Door Gaps
Completion of installation
- The hinges are lubricated.
- All fittings are attached, including the installation of locks.
- Sealing tape is glued around the perimeter.
- When the solution has completely hardened, the opening should be puttied and plastered.
- Remove the tape from the loot.
- The canvas is hung.
Hanging the front door leaf
- You should check:
- does the lock work correctly (the bolt should close and open without rubbing);
- Do the handles turn normally?
- Does the door leaf move easily?
Checking the operation of the front door locks
Installing platbands on the outside will give the doorway a neat appearance. If the logs are made of wood, self-tapping screws are used to fasten them, the heads of which go deep into the wood. These places are then covered with putty. And if the frame is metal, then the platbands will have to be secured with rivets or bolts.
How to restore doors with your own hands, see here.
The inside of the opening is decorated with neat slopes. This door takes on an aesthetic appearance.
Video: Installing a metal entrance door with your own hands:
(No Ratings Yet)
Final stage
At the final stage, the finishing work of the technological process of installing the door is carried out, as well as the finishing of the slopes and the economy class door leaf.
After installing the frame, you need to foam the gap between the wall and the door block. Foam performs several functions at once:
- is an additional fastening of the door frame;
- serves as insulation;
- protects the apartment from corridor noise.
Before filling the gap, the box on the apartment side is sealed with masking tape to prevent foam from getting in, and the wall is moistened with water to remove dust. The foaming process is carried out in two stages. First, a thin layer of foam is applied from the inside to the outer casing through a technological gap.
The technological gap is foaming.
This operating procedure will not allow the foam, when expanding, to escape between the wall and the metal trim in the corridor. After 15 minutes, when the expansion process is complete, you can fill the remaining part of the gap with foam. After it dries, the excess is cut off with a knife. Remove the masking tape from the box.
Instead of foam, you can close the gap between the block and the wall with cement mortar or putty. But this is more expensive financially and more difficult to implement. The installation process is completed by removing the protective film from the door leaf and installing decorative plugs on the holes with anchors.
Useful tips
When purchasing a product, not everyone pays attention to the warranty terms. The nuance is that some manufacturers completely cancel it if the installation of metal doors was carried out independently and not by a licensed specialist. Consequently, repairs (if necessary) during this period are possible only at your own expense.
When inspecting models in a furniture showroom, you need to pay attention to the following points:
- number of locks. If there is only one, then the reliability of the steel entrance door is very doubtful;
- type of insulation. Optimally - polystyrene foam or mineral wool. Bookmarks made of cardboard, chipboards and the like will not only not provide high-quality thermal insulation, but will also not muffle street noise. It's very easy to check; tap on the canvas. A booming sound clearly indicates its poor insulation;
- metal thickness. 1.5 mm is the acceptable minimum. First of all, this applies to entrance doors;
- loop type. Awnings must have support hinges. In the absence of such, the distortion of the canvas, given its massiveness, is guaranteed very soon;
- metal door kit. High-quality products are always supplied with platbands. The reliability of the installed structure and the safety of the house largely depend on them, since these planks perform not only a decorative function. Without platbands, direct access to the hinges is easier - it’s easy to cut them off and pull out the fabric; or the entire frame of the front door, doing the same with the elements of its fastening in the wall;
- manufacturer. In the middle price range, domestic, Polish and Belarusian models are considered one of the best. Products “made in China” play more of a decorative role; in terms of durability and reliability, they do not meet the requirements for doors installed at the entrance to a building. In addition, the metal is thin and easily susceptible to impacts; as a result, dents.
Knowing the rules for installing entrance doors and following all recommendations will not only allow you to perform technological operations quickly and efficiently, but also save significant money. Installation of a metal structure costs about ¼ of its cost, and this money is not so small.