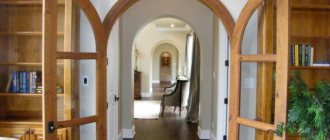
Features and Benefits
The main difference between sliding systems is the operating mechanism. Traditional hinges are replaced with rollers. The web moves along the rail. Rollers can be attached only to the top of the sash or simultaneously to the top and bottom. In the second case, the load is evenly distributed over two rails. The service life of the mechanism increases, but there is one drawback. The lower element often becomes clogged with dirt. If you don't clean it, the sash will jam.
It is not difficult to install interior compartment doors yourself. The main work consists of correct measurements, installation of the roller mechanism, guides, and hanging the door leaf. The door is suitable from solid wood, paneled, veneered, or any other material.
There are two types of sliding structures:
- the door goes behind the wall;
- the canvas goes inside the wall.
The second option is more convenient, but difficult to manufacture. The system involves the assembly of a pencil case installed instead of a partition.
The popularity of sliding structures is due to a large number of advantages:
- saving useful space due to the absence of a dead zone;
- creating a beautiful modern style;
- simple installation;
- single-leaf or double-leaf design allows you to close an opening of any width;
- increasing the service life of the door block due to uniform distribution of the load along the rail.
The disadvantage is considered to be a decrease in the level of sound insulation and tightness.
A gap of about 5 mm is formed at the top and bottom of the door structure, through which extraneous sounds and odors penetrate into the room.
Advantages and disadvantages
When talking about the strengths and weaknesses of sliding doors, you need to be very careful. The appearance on the market of more advanced models, on the one hand, adds advantages to their characteristics, on the other, levels out or completely removes some of the disadvantages.
As of the beginning of 2021, the sliding door system has the following advantages over swing doors:
- The usable area of the room is saved by eliminating the area required to open classic doors;
- longer service life due to the absence of diagonal load - the swing door constantly strives to take the shape of a diamond;
- original, fashionable, stylish - such characteristics enable creative people to realize the most unusual design ideas;
- fit harmoniously into any interior style;
- high safety: they cannot open spontaneously when there is a draft - the design of the doors completely eliminates this possibility; fingers cannot be pinched, which is especially important for families with small children; there is no danger of breaking your forehead on a half-open door at night, or for children while playing and running around;
- open easily and silently;
- allow you to delimit the room into several zones, which is interesting for studio apartments;
- amenable to automation;
- there are no so-called “dead zones” where, with swing doors, nothing can be placed or placed;
- You can close an opening of any width.
There are also disadvantages :
- high price of the kit - fittings, mechanism, door leaf itself are much more expensive than swing doors;
- smells and sounds spread freely throughout the apartment;
- high installation cost - the problem can be solved by installing the system yourself;
- difficulty of repair - several years after installation, you may not find similar wheels on sale. Therefore, when ordering doors, it is better to immediately order an additional set of rollers;
- cannot be installed instead of entrance doors.
What is needed for installation?
Having decided to install compartment doors with your own hands, you need to know what materials you will need:
- Railing. It is a beam secured with anchors to the wall surface. Usually a wooden beam with a cross section of 50x50 mm is used. A rail is fixed to it.
- Mechanism. The set includes rollers, stops, guide blade, and rails.
- Accessories. For sliding systems, special mortise handles and locks are produced.
- Sash, platbands, extensions.
The tools you will need are a drill, a screwdriver, a screwdriver, a jigsaw, a level, a tape measure and a pencil.
Required materials and tools
Installing sliding interior doors with your own hands requires the availability of the necessary materials and a set of tools. You will need:
- railing (crossbar) made of well-dried timber - for attaching the guide profile (rails);
- a sliding mechanism consisting of: a guide profile (other names: rail, runners); rollers (2 rollers for a door weighing less than 27 kg, 4 for a heavier leaf); limiters; flag roller;
- mortise lock;
- special handles for opening (closing) the door;
- sash made of aluminum, plastic, glass, wood or MDF;
- platbands;
- extras;
- wood screws;
- self-tapping dowel;
- hammer drill with a set of drills for concrete or brick;
- screwdriver - for drilling holes in wood and tightening screws. Can replace a drill or Phillips screwdriver;
- jigsaw or hand saw for wood with fine teeth;
- grinder or hacksaw;
- chisel;
- roulette;
- pencil;
- laser level or construction level.
How to install sliding interior doors with your own hands?
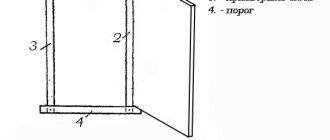
The installation of sliding interior doors begins after the walls are leveled. The room must have a clean floor and the verticality of the doorway must be checked. If there is no floor covering, then its thickness is taken into account when taking measurements.
The main problem with how to install compartment doors is the difficulty of installing the top beam and rail. The railing must be perfectly aligned in level and height, fit tightly to the wall, and securely fixed with anchors.
Before installation work begins, it is determined in which direction the sash will roll. If there are two products, then provide free space on both sides of the opening.
The instructions for installing a sliding door consist of the following points:
- timber installation;
- rail fastening;
- assembling the mechanism and hanging the canvas;
- installation of accessories;
- decorative finishing of the opening.
Installation of timber
The beginning of the installation of compartment doors involves applying markings on the wall for the upper beam. The sash is leaned tightly against the opening. Taking into account the width of the rail and a gap of 5 mm, mark the boundary of the beam location on the wall. The canvas is set aside. A horizontal line is drawn along the mark.
For a right-opening sash, the beam is positioned so that its middle is above the right side of the frame. The level is set to horizontal. Holes are drilled in the timber and the wall and the upper beam is securely fastened with anchors.
Guide installation
When installing sliding doors, the top rail is screwed with self-tapping screws to the bottom plane of the beam. For convenience, it can be secured to the beam in advance. After fixation, rollers are inserted into the rail and driven to check for unhindered sliding.
If the installation of an interior compartment door involves bottom fastening , then the installation of the guide is carried out in three ways:
- A groove is cut into the floor covering. The bottom rail for the rollers is immersed inside.
- The guide is fixed from above to the floor covering without cutting a groove. They close with a threshold on both sides.
- The guide is installed on the end of the lower part of the sash inside a pre-cut groove.
The third method is suitable if, instead of lower rollers, a guide knife is used, which simply holds the opening blade. The element is fixed to the floor covering.
How to assemble sliding doors?
Begin assembling the sliding door by installing the rollers. The location is chosen based on the manufacturer's instructions. The rollers can be installed at a distance from the edge of 1/6 of the sash width or directly on the edge. In the second option, the indentation is formed by mounting plates.
At the end, mark with a pencil the place for the rollers. You can pre-drill holes for free entry of hardware. The mounting plates are screwed with self-tapping screws no less than 70 mm long. Threaded supports and side covers are inserted into them. The roller platform is screwed onto the threads of the pins.
If sliding doors on rollers have a guide knife installed at the bottom, then a groove is made at the end of the leaf 2 mm wider than its thickness. The rail itself doesn't even need to be installed. The depth is usually between 10 and 18 mm. The groove is not selected for the entire width of the end of the blade, but a section without a slot of about 10 mm is left at the edges. These will be the limiters.
After assembling the mechanism, they begin to install the sliding door with their own hands on the prepared guides. The product is rolled along the rail to check its progress.
Installation of fittings
The final step in installing a sliding door with your own hands is the installation of fittings. It is more convenient to attach all elements before hanging the canvas. First you need to install a door limiter - a rubber shock absorber - into the runners. The sash is checked again for free movement, the places for the handles and the lock are marked, and the leaf is removed from the guide.
Grooves are cut for fittings. Wood cutting is usually done with a chisel. Drilling helps partly. After installing the handles and lock, the sash is hung back on the guide.
Finishing the opening
Once the installation of the hinged doors is complete, they begin decorating the opening with trims and trim. The elements give the structure a complete look. In order to hide the mechanism, an additional board is attached to the beam.
Sliding door systems
There are two types of mechanisms: suspended and rail. Neither is perfect. Briefly about their advantages and disadvantages below.
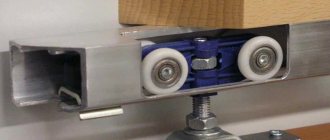
Top rail suspension system
The suspension mechanism is a supporting beam to which is attached a guide in the shape of the letter “P” with “legs” bent inward. The rollers to which the door leaf is attached move along this guide. In technical terms, it is a hanging door on a top rail.
Basic design of sliding interior doors on the top rail
When installing such a door, the floor under the door remains smooth, only the lower roller is installed on the right and/or left in the doorway. It slides along a groove made in the lower end of the blade. It is necessary so that when moving it does not deviate vertically. This design is the easiest to install. Installation is very simple and consists of several steps:
- secure the top rail;
- screw the roller mechanism to the upper end of the canvas,
- roll the canvas into the guide;
- install stoppers at the top (so that the doors do not fall out);
- Having opened the doors, insert the lower roller into the groove and secure it to the floor.
Single-leaf interior sliding doors
That's all. Doors on rollers are installed. But this system, in the form shown in the photo, has very low noise insulation characteristics. They are practically zero: the passage is simply blocked.
Rail sliding doors
This type of door has two rails: top and bottom. Rollers are also installed at the top and bottom. Thanks to this design, the system has a high degree of rigidity: it can be shaken without causing much damage.
Rail sliding doors
The disadvantage of having rails in the floor is known: they are difficult to clean. Debris and dust constantly get into the grooves, so you have to keep them clean. This type of door is most often used in cabinets and dressing rooms. They are used as interior doors if there are active children in the family. Then safety is more important than difficulties with cleaning.
Care and operation
When using a sliding structure, it may be necessary to adjust the canvas if sagging is noticed. To eliminate the defect, remove the top panel. An adjusting screw is located on the roller. It must be scrolled while simultaneously checking that the sagging of the canvas is eliminated.
Caring for the sliding system involves cleaning the guides from debris. The rollers are lubricated and replaced when worn. The door closes smoothly. With sudden movements, the rollers may fly out of the guide.
Preparatory activities
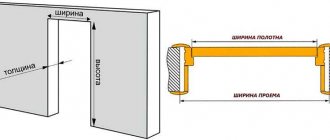
Taking measurements
This is easy to do if you have a tape measure on hand. For those who are settling into a “new building,” it is much easier. If the house is being renovated, then it should be taken into account that the installation of compartment doors will be much more complicated if the measurements are made inaccurately. And this is quite possible, since the openings must be trimmed.
First you need to dismantle not only the platbands, but also the box. After cleaning this section of the wall, its condition and the need for reinforcement are determined. At this stage, solutions may vary. For example, widen the opening, install a partition made of gypsum plasterboard (multi-layer plywood) instead of the dismantled part of the old one. This will help not only to take the correct measurements, but also to understand how to install the compartment door.
Most recommendations do not take into account that several installation options are possible, so the owner has a choice:
- two small sliding doors;
- one is fixed, the other is mobile;
- how the canvases will be joined - simply close together or overlap each other;
- a wide canvas that slides into the septum cavity. For example, from the same drywall.
Perhaps this is the whole difference in the methods of self-installation of sliding compartment doors. The principle of their functioning is identical - movement along the guides in one direction or another.
After measuring the width of the opening, it is necessary to increase the corresponding parameter of each sash by at least 50 mm. For what? If the panels are calculated exactly according to the passage pattern, then in the “closed” position of the door, gaps may form between their cuts and the ends of the wall; extraneous sounds and drafts are guaranteed.
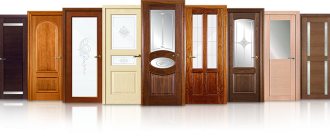
Material selection
Everyone has their own preferences in terms of aesthetics, design, and so on, but a number of installation features are worth noting.
- Glass (high strength) or solid wood. What they have in common, in addition to high cost, is significant weight. This means that you will have to install a larger number of carriages and carefully develop the drawing to avoid distortions and snags. Consequently, the installation of doors will be greatly complicated.
- Board materials (MDF, OSV, chipboard). The option is cheaper and easier to install. For each sash (taking into account the low weight), two carriages are enough. In addition, if necessary, you can restore the canvas and eliminate its minor defects without the help of a professional.
Adviсe:
- Cloths that are too cheap wear out quickly. When choosing slab materials, you need to pay attention to the density of the products. And it is desirable that they be laminated.
- The top rail is mounted on the ceiling or wall (when the height of the sash is chosen less than the opening). In the latter case, if a wooden block is being prepared, you need to take into account that its side should be approximately twice as thick as the canvas.
- All necessary components (rollers, guides, locks, fittings, fasteners) are supplied with the doors. But if you decide to purchase them at retail, for canvases made independently, you should take with you a developed installation diagram with the dimensions of the opening. The manager will tell you what exactly may be needed and in what quantity (for example, how many carriages should be installed).
How to remove a compartment door?
Methods for removing the sash depend on the type of sliding system. If there are rollers with one wheel on top and a guide knife on the bottom, then the blade is slightly raised so that the knife comes out of the groove. The bottom is pulled towards you. The canvas is lowered to the floor at an angle. At this time, the rollers should come out of the guide.
If there are double rollers at the top and bottom of the sash, then first unscrew the stops. The door leaf is simply rolled out of the guide. Premium sliding systems are equipped with a closer. The mechanism fastening is unscrewed only from the canvas. The closer remains hanging on the door frame.
The sliding system is convenient to use and easy to install. If you follow the operating rules, high-quality rollers will last for many years.
Why is it better to buy a mechanism than to make it yourself?
In order to install a sliding door with your own hands, you need to purchase a set of rollers that suit your size and a guide (rails), it is better to take it with a reserve length, well, just in case, and then adjust it to the desired size.
Of course, you can make a guide with your own hands, and from any material, but doing this is very inconvenient and difficult, besides, the quality of the mechanism may then become worse. You want your sliding door to last a long time, and at the same time it would be is it convenient to use? Then it would be better to buy a ready-made guide. In addition, in any case, you will have to buy the rollers in the store, and the guide is not very expensive, and plus, if you used the tips described above, you also managed to save on the door leaf, so feel free to buy the guide!
Interior door installation options
Door-compartment. A guide of the required length is attached to the wall, along which the canvas moves.
Cassette doors. More difficult to install. A special niche is installed in the wall into which the door leaf fits.
Cascade. In this design, one leaf is fixed, and the rest are movable, which, if necessary, are hidden behind a fixed sash.
Among the listed options, the easiest to install is the sliding coupe-type system. It is very easy to install it yourself and the big advantage is that the system can be installed not only at the repair stage, but also after it. The only disadvantage of this installation is that nothing can be placed along the wall where the door leaf moves, and the sound insulation in the room will be quite poor. This is because if you look at the structure from the end side, you can see a small gap that is left so that the door does not rub against the wall. It is because of this gap that the audibility in the next room will be quite high.
As for the cassette version, everything is much better here. When opened, the canvas hides in a niche in the wall, without getting in the way, and additional seals can be installed around the perimeter, which create excellent sound insulation after the door is closed. Among the disadvantages, it is worth highlighting that the cassette structure can only be installed at the repair stage. Also, to install a niche, you will need to install a false wall.
The cascade design is the most difficult to install and its installation will require high precision. The design belongs to the elite category and they do not skimp on its installation.
Installation of sliding door structures
You can handle the installation of sliding doors in the interior opening of an apartment or country cottage on your own without calling an experienced technician. To do this, you just need to prepare all the tools, consumables, fasteners, the door structure itself and step-by-step instructions for performing installation work.
The easiest way to install sliding doors with one leaf is to install them yourself. But the assembly and installation of all models in this category is practically no different.
What you need to consider when installing such door blocks yourself:
- The width of the sliding panel should be at least 5-7 cm larger than the interior opening, so that there are no gaps between them;
- If sliding interior doors will open along a wall or partition, then their width must be sufficient to accommodate the entire width of the door;
- Sliding door structures, the leaf of which will move only along the upper guides along the partition or wall of the room, are installed after laying the floor covering.
It is important to accurately measure the interior passage, especially in the areas where the guide rails are fixed, and also check the verticality and horizontality of the wall surfaces using a mounting level and plumb lines. The walls and floor base where the guides are installed must be perfectly level. Otherwise, this will affect the poor functioning of the sliding door block system.
A pseudo-box is inserted into the interior opening to line it. Using a building level and a plumb line, the vertical and horizontal placement of the structure is checked. To prevent the box from moving after alignment, wedges pre-cut from wood are inserted between it and the wall of the opening along the entire perimeter. All cracks are filled with polyurethane foam, and its excess is cut off after drying. Then these areas are covered with decorative trim.
To fix the guide, markings are made on the wall above the entrance opening - a straight horizontal line is drawn with a simple pencil at a distance from the floor base equal to the height of the door plus an additional 7 mm. Along the marked line, a wooden beam with a square section of 5x5 cm is screwed to the wall with fastening bolts.
Be sure to check the horizontal position of the level.
The beginning of the beam coincides with the beginning of the doorway, i.e. where the door leaf will be located when closed. The guide itself is attached to the bottom of the wooden beam in increments of 20 cm. There should be a gap of 6-7 mm between this structural element and the wall.
Next, the mobile mechanism is assembled - the carriages are connected to the rollers and inserted into the guide rail. The ease of movement is checked. And to prevent the rollers from falling out of the guide, special locking plugs are installed at its ends.
The brackets are screwed to the upper end part of the canvas with self-tapping screws into pre-prepared holes. Interior sliding doors are being installed on rollers. The smoothness and evenness of opening/closing is checked. When moving, the door leaf should not touch the wall surface.
The bottom guide for the door leaf, as a rule, is a flag, under which a groove is selected in the floor base. To cut it you need a cutter. Not every home has such a tool, so when installing sliding door blocks yourself, they often use a special threshold, which is included in the fittings. To determine the installation location of this element, you must open the door completely and make a mark on the floor.
The sliding interior doors are installed, all that remains is to check their vertical position with a level (plumb bob), if necessary, adjust the carriage adjusting screws and decorate the door structure with your own hands. For this purpose, decorative trims, strips to hide the guide beam, and plugs to cover fastening areas are used.
What other points does the installation instruction for interior compartment doors include?
Now you need to make adjustments by eliminating the gap between the lower roller and the partition. There is play between these elements. To make adjustments, you need to place the tip of a flat-head screwdriver into the end of the wheel plate, directly opposite the elliptical groove.
Now, using a hammer, rotate the roller body relative to the central hole. Lightly tapping with the tool removes the gap. Remove the partition again.
We tighten the screws until they stop to firmly fix the lower wheel.
We put the structure in place. A double-leaf partition is installed in the same way.
Preparation for installation
The sliding system comes with everything you need, but at the request of the owners, all elements or some of them can be replaced with others. Since, for example, the purchased fittings are selected based on the wishes of the home owner.
In order for the door to be installed correctly and securely, it is worth carefully preparing for this process and taking into account all the nuances down to the smallest detail.
It is necessary to decide on which side to install the sliding structure so that it is convenient to open and close the door. From an aesthetic point of view, it would be better to install it from the entrance to the room, because the movement of the canvas occurs along the wall and placing any other furniture there is prohibited, so installing the structure from the corridor side is the best option.
To avoid wasting time searching for the necessary tools during installation, you should prepare everything in advance. So, for installation you will need:
- Railing. This is a beam in the form of a wooden beam, which is attached to the wall using anchors. A rail is attached to it;
- Mechanism. It includes rails, rollers, stops and a guide knife;
- Accessories. Locks, handles.
The tools you should prepare are a screwdriver, a jigsaw, a tape measure, a level, a pencil, a screwdriver and a drill.